Seat Back Recliner Replacement YC5 and YC6
Removal Procedure
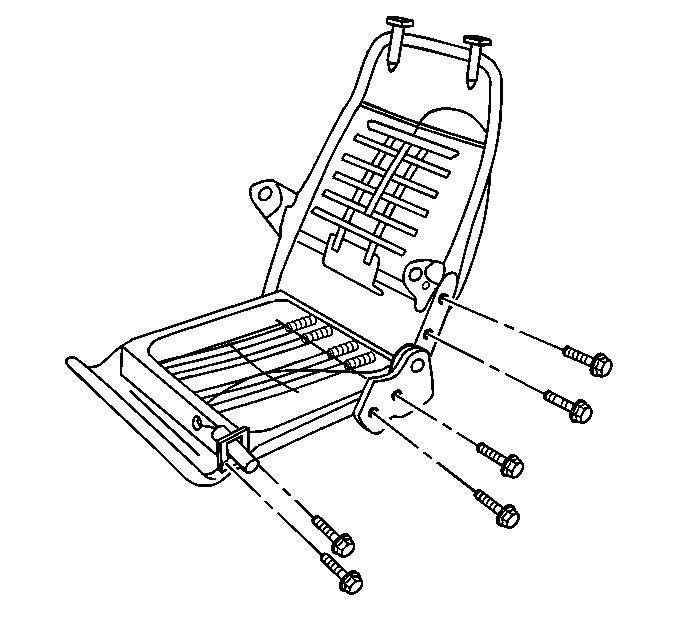
- Remove the bucket seat from the riser. Refer to Bucket Seat Replacement .
- Remove the screw that retain the recliner handle to the recliner. Refer to Seat Back Recliner Handle Replacement .
- Remove the following seat cover J-hooks from the seat cushion frame:
- Remove the bolts that retain the recliner to the seat cushion frame.
- Remove the armrests, if equipped. Refer to Armrest Replacement .
- Lift the seat back cover and pad above the bolts that retain the recliner to the seat back frame.
- Remove the bolts that retain the recliner.
- Remove the recliner from the seat back frame.
| • | The J-hook at the rear of the seat. |
| • | The J-hook on the recliner side of the seat. |
| • | The J-hook on the recliner side of the seat that retains the seat back cover and to the carpet to the seat back. |

Important: When removing the recliner retaining bolts, note the position and length of the bolts. This will assist with reassembly.
Important: When removing the bolts, note the position and length of the bolts. This will assist with reassembly.
Important: Handle the seat carefully when just one side of the seat back is attached to the seat cushion. Improper handling may damage the seat back hinge or the lumbar support cable.
Installation Procedure
- Install the recliner to the seat back frame.
- Install the bolts that retain the recliner to the seat back frame. Install the bolts in the locations noted during removal.
- Refit the seat back cover and pad over the bolts that retain the recliner to the seat back frame.
- Install the armrests, if equipped. Refer to Armrest Replacement
- Install the bolts that retain the recliner to the seat cushion frame. Install the bolts in the positions from which they were removed, as noted during disassembly.
- Install the seat cover J-hooks to the seat cushion frame as follows:
- Install the screw that retains the recliner handle to the recliner. Refer to Seat Back Recliner Handle Replacement .
- Install the bucket seat to the riser. Refer to Bucket Seat Replacement .
Notice: Use the correct fastener in the correct location. Replacement fasteners must be the correct part number for that application. Fasteners requiring replacement or fasteners requiring the use of thread locking compound or sealant are identified in the service procedure. Do not use paints, lubricants, or corrosion inhibitors on fasteners or fastener joint surfaces unless specified. These coatings affect fastener torque and joint clamping force and may damage the fastener. Use the correct tightening sequence and specifications when installing fasteners in order to avoid damage to parts and systems.
Tighten
Tighten the bolts that retain the recliner to the seat back frame to
30 N·m (22 lb ft).
Tighten
Tighten the bolts that retain the recliner to the seat cushion frame
to 30 N·m (22 lb ft).
| 6.1. | Install the J-hook that retain the seat cover to the carpet on the back of the recliner side of the seat. |
| 6.2. | Install the J-hook to the seat frame on the recliner side of the seat. |
| 6.3. | Install the J-hook at the rear of the seat. |
Tighten
Tighten the screw that retains the recliner handle to the recliner to
2 N·m (18 lb in).
Seat Back Recliner Replacement YC7
Removal Procedure
- Remove the bucket seat from the riser. Refer to Bucket Seat Replacement .
- Remove the armrest from the recliner side of the seat. Refer to Armrest Replacement .
- Remove the J-hooks that retain the carpet on the back of the seat cushion to the corners of the seat cushion trim cover.
- Remove the screw that retains the seat back recliner handle to the recliner. Refer to Seat Back Recliner Handle Replacement .
- Remove the bolts that retain the recliner to the seat back and seat cushion frames.
- Remove the seat back recliner from the seat frame.
Important: When removing the bolts that retain the seat back recliner, note the position and length of the bolts. This will assist with reassembly.
Important: Handle the seat carefully when just one side of the seat back is attached to the seat cushion. Improper handling may damage the seat back hinge or the lumbar support cable.
Installation Procedure
- Install the seat back recliner to the seat frame.
- Install the seat back bolts that retain the recliner to the seat back and the seat cushion frame.
- Install the seat back bolts in the locations noted during disassembly.
- Install the screw that retains the seat back recliner handle to the seat back recliner. Refer to Seat Back Recliner Handle Replacement
- Install the J-hooks that retain the carpet to the seat back and to seat cushion frame and to the corners of the seat cushion cover.
- Install the armrest to the seat back recliner side of the seat. Refer to Armrest Replacement .
- Install the bucket seat to the riser. Refer to Bucket Seat Replacement .
Notice: Use the correct fastener in the correct location. Replacement fasteners must be the correct part number for that application. Fasteners requiring replacement or fasteners requiring the use of thread locking compound or sealant are identified in the service procedure. Do not use paints, lubricants, or corrosion inhibitors on fasteners or fastener joint surfaces unless specified. These coatings affect fastener torque and joint clamping force and may damage the fastener. Use the correct tightening sequence and specifications when installing fasteners in order to avoid damage to parts and systems.
Tighten
Tighten the seat back bolts that retain the recliner to the seat back
and the seat cushion frames to 30 N·m (22 lb ft).
Tighten
Tighten the screw that retains the seat back recliner handle to the
seat back recliner to 2 N·m (18 lb in).
