| • |
Use a charger, with an
end voltage of 16 V, equipped with a voltmeter that is accurate to
within 1 percent. |
| • | The ambient temperature should be 15-38°C (60-100°F).
A battery that is extremely cold will not accept measurable current for several
hours after starting the charger. |
| • | The charging area should be well ventilated. |
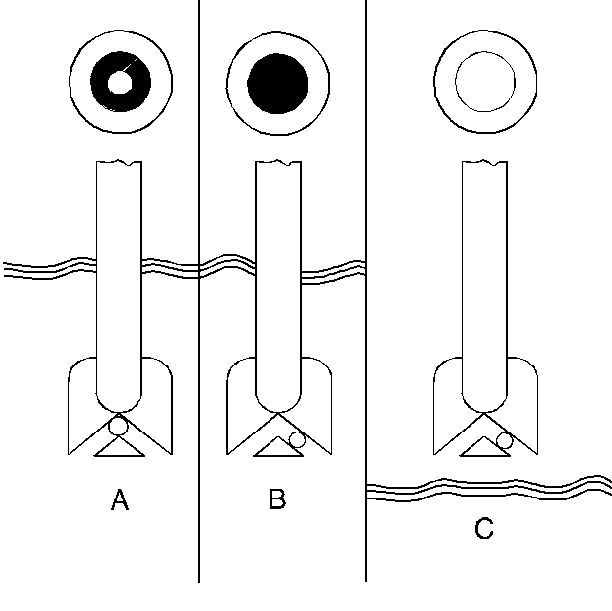
| • | Do not charge the battery when the built in hydrometer is clear
or yellow (C). Replace the battery if there is a cranking problem. |
| • | Do not charge a battery that appears to be frozen, replace it.
Refer to
Battery Replacement
. |
| • | Batteries showing a green dot in the hydrometer (A) do not need
to be charged unless they have just been discharged (such as cranking the
engine). |
Charging Time Required
The time required to charge a battery will vary depending upon the following
factors:
- The size of the battery -- A completely discharged, heavy-duty
battery requires more than twice the recharging time as a completely discharged,
light duty battery.
- The temperature -- The colder the battery, the more time
it takes to recharge. When a fast charger is connected to a cold battery,
the current accepted by the battery is very low at first. Then, as the
battery warms, the battery accepts a higher rate of current.
- The charging capacity -- The higher the charger amperage,
the less time it will take to charge the battery.
- The state-of-charge -- A completely discharged battery requires
more than twice as much charge time as a half charged battery. Because
the electrolyte is nearly pure water and a poor conductor in a completely
discharged battery, the battery accepts very low current at first. Later,
as the charging current causes the electrolyte acid content to increase,
the charging current also increases.
Charging Procedure
Tools Required
GM P/N 12303040
Notice: Turn OFF the ignition when connecting or disconnecting the battery cables,
the battery charger or the jumper cables. Failure to do so may
damage the PCM or other electronic components.
- Do not charge a battery with a green hydrometer dot unless it
has just been discharged, such as in cranking.
- When charging side-terminal batteries while on-vehicle, use the
following procedure:
| 2.1. | Turn OFF the charger. |
| 2.2. | Connect the charger positive lead to the positive cable terminal
located in the engine compartment on the right side. |
| 2.3. | Connect the negative charger lead to a solid engine ground, such
as the generator mounting bracket. |

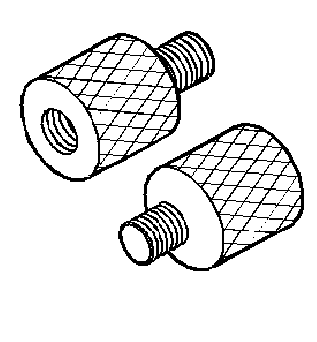
- When charging side-terminal
batteries out of vehicle, install battery side terminal adapters.
Tighten
Tighten the battery side terminal adapters to 15 N·m (11 lb ft).
- Make sure all battery terminals are clean and tight.
- Best results occur when charging a battery that is at room temperature.
A battery that is extremely cold may not accept current for several hours.
- Charge the battery until the hydrometer has a green dot.
- Inspect the battery every half hour after starting the battery
charger.
- Tap the hydrometer lightly to dislodge any air bubbles. The bubbles
may cause a false indication.
- After charging, load test the battery. Refer to
Battery Load Test
.
Charging a Very Low or Completely Discharged Battery
Tools Required
J 39200 Digital Mulitmeter
The following procedure should be used to recharge a very low or completely
discharged battery. Unless the procedure is properly followed, a perfectly
good battery may be needlessly replaced.
The required battery charge time varies according to the voltage capabilities
of the battery charger. A charger of less than 14 volts could take up to
16 hours before the battery appears to be accepting current.
- Measure the battery voltage at the battery terminals using the J 39200
Digital Multimeter.
| • | A reading of less than 11 V indicates that the initial
charging will be very low. |
| • | It could take some time before the battery accepts current in
excess of a few milliamperes. |
- Set the battery charger on the highest setting.
- If necessary, disable the polarity protection circuitry:
| • | This circuitry, available on most chargers, prevents charging
unless the charger leads are properly connected to the battery terminals. |
| • | A completely discharged battery may not have enough voltage to
activate this circuitry, even though the leads are properly connected, implying
that the battery will not accept a charge. |
| • | Most chargers have an override or a bypass function so that the
charger will turn ON and charge a low voltage battery. |
- To determine the amount of hours the battery may need to be charged,
the following calculation can be made:
| • | The reserve capacity rating on the battery label is the number
of ampere-hours of charge required in order to produce the green hydrometer
dot. |
| • | After the meter on the charger starts to show current flow, note
the number of amps being accepted. |
| • | Determine the reserve capacity of the battery. Refer to
Battery Usage
. |
| • | Divide the reserve capacity by the number of amps shown on the
meter to determine how many hours of charging is needed. |
- When the green dot appears in the hydrometer, discontinue charging.
- If the green hydrometer dot is not visible after an ampere-hour
charge equal to twice the reserve capacity rating, replace the battery. Refer
to
Battery Replacement
.
- After charging, load test the battery. Refer to
Battery Load Test
.
