CORSICA XT OPTION SERVICE MANUAL ADDENDUM

Model and Year: 1988 CORSICA WITH XT OPTION
TO: ALL CHEVROLET DEALERS
Information contained in this bulletin is an addendum to the 1988 Corsica/Bere'tta Service Manual Section 10.
When servicing items related to the 1988 Corsica XT option, the following procedures should be used as reference.
BUMPERS AND FRONT END
FRONT BUMPER LOWER DEFLECTOR Figure 1 Remove or Disconnect
1. Eleven screws (12) and J-clips (9) 2. Lower deflector (11)
Install or Connect
1. Position J-clips (9) on fascia 2. Position lower deflector and install screws (12)
FRONT BUMPER FASCIA
Figure 1
Remove or Disconnect
1. Lower deflector 2. Bolts (15) retaining splash guard (16) 3. Unplug marker light (13) 4. Bolts (2) retaining fascia (3) to wheelhouse panel radiator baffle to grille 5. Screws (1) and push in pins (7) 6. Grille (8) from vehicle 7. Three screws (17) on front underside of fascia (3) 8. Fascia (3) from vehicle 9. Screw (14) that holds marker light (13) 10. Screws (10). Lower grille (6) to fascia 11. "U" nuts (4) and J-clips (9) from fascia (3) 12. Rub strip (5) from fascia (3). Strip is adhesively retained to fascia. Use heat gun to release adhesive.
Install or Connect
1. Clean the fascia (3) in the cavity where the rub strip (5) is attached 2. Peel off the paper backing on the rub strip (5) and install on fascia(3) 3. Ten "U" nuts (4) and J-clips (9) on fascia (3) 4. Lower grille (6), four screws (10) to "U" nuts (4) on fascia 5. Marker light (13) to fascia, one screw (14) and J-Clip (9) 6. Lower deflector (11) with eleven screws (12) 7. Slide fascia (3) over impact bar 8. Position grille and engage push in retainers (7) into the top center of front fascia (3) 9. Grille (8) and radiator baffle to headlight housing with screw (1) and push in fasteners 10. Align fascia (3) to fender sides and fasten with two bolts (2) on each side 11. Connect marker light (13) 12. Splash guard (16) to fascia (3) with two outer bolts (15) and two lower bolts (15) 13. Three screws (17) front fascia to underbody
REAR BUMPER VALANCE
Figure 2
Remove or Disconnect
1. Seven push pin retainers (7) from rear valance (4), rear fascia (6) and impact bar
2. Three screws (5) and "U" nuts (3) from rear fascia (6)
Install or Connect
1. Position rear valance (4) to fascia (6) and secure rear valance to impact bar using seven push pin retainers (7)
2. Six clips, valance to fascia, three each side
3. Secure rear valance (4) to LH wheelhouse by running one screw (2) thru wheelhouse and rear valance bracket (1)
4. Secure rear valance (4) to RH wheelhouse using one screw (2)
Important
When removing or installing rocker panels care should be exercised. Adjacent finishes should be protected to prevent damage to finish. Proper care should be used to guard against rocker panel damage.
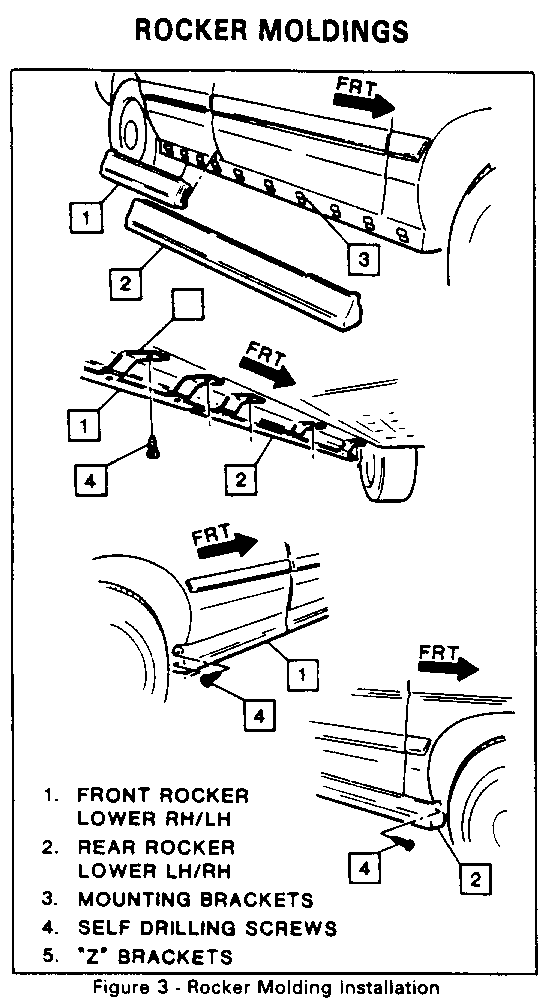
LOWER ROCKER MOLDINGS FRONT AND REAR
Figure 3
Remove or Disconnect
1. Screw from front wheelhouse
2. Two screws from rear wheelhouse
3. Screws from "Z" brackets
4. Front and rear rocker moldings
BRACKET INSTALLATION
The front and rear rocker panel moldings are attached to the body panels with ten mounting brackets and five "Z" brackets as shown in Figures 4 and 5. The rocker panel mounting brackets are attached with rivets as shown in Figure 5. The "Z" brackets are attached with self-drilling screws as shown in Figure 4.
Install or Connect
1. Rocker lower front and rear over flanges. 2. Screws in "Z" brackets. 3. Two screws in rear wheelhouse 4. Screw in front wheelhouse
DOOR OUTSIDE MIRRORS
The door outside mirrors are stud mounted to the door filler. The mirror face can be replaced without removing the entire mirror assembly. Left side flat and right side convex miffor faces must be replaced with the same type mirror face when serviced. (See Service Manual Section 10-5.)
Remove or Disconnect
1. Door trim panel (See Service Manual Section 10-5.) 2. Upper trim panel 3. Sound absorber 4. Three mirror attaching nuts 5. Remote control cable from upper trim panel 6. Mirror and filler
Install or Connect
1. Filler over studs on mirror 2. Control cable through filler and connect to upper trim panel 3. Mirror attaching nuts
Tighten
Nuts to 6.5 N.m (58 LB-IN)
4. Sound absorber 5. Upper trim panel 6. Trim panel
UPPER TRIM PANELS FRONT AND REAR
Figure 6
Remove or Disconnect
1. Trim panel 2. Nuts (14) retaining inner trim panel 3. Trim panel
Install or Connect
1. Press inner trim panel (1) into position on door panel (2), leaving marks on the panel. 2. Drill 1/8' diameter holes thru the marks on the door panel (2) 3. Fasten with nuts (14) 4. Reassemble door panel components
MANUAL SHIFT BOOT
Figure 7
Remove or Disconnect
1. Rubber insert from tray (1) 2. Screws from tray (2) 3. Tray (3) 4. Set screw (5) 5. Screws (7) 6. Boot assembly (8) 7. Screws (9) 8. Cover (10) 9. Retainer (11) 10. Boot (12) from cover
Install or Connect
Inspect
Boot for any defects
1. Boot to cover (12) 2. Retainer (11) 3. Screws (9) 4. Boot assembly over shift lever (8) 5. Cover to console (10) 6. Screws (7) 7. Set screw (5) 8. Tray (3) 9. Screws (2) 10. Rubber insert (1)
AUTOMATIC SHIFT KNOB
Figure 8
Remove or Disconnect
1. Cover cap (1) by pulling up from shift knob 2. Snap ring (2) 3. Shift knob (3)
Install or Connect
1. Shift knob (3) by sliding onto shift arm 2. Snap ring (2) 3. Cover cap (1) into shift knob (3)
BRAKE HANDLE
Figure 8
Remove or Disconnect
1. Set screw 2. Handle (5) by sliding off arm
Install or Connect
1. Brake handle (5) by sliding onto brake arm 2. Set screw (4)
REAR DECK LID SPOILER
CENTER REAR DECK LID SPOILER
Figure 9
Remove or Disconnect
1. Decklid lamp 2. Plugs 3. Nuts 4. Spacer 5. Center rear compartment lid spoiler 6. Mastic washer
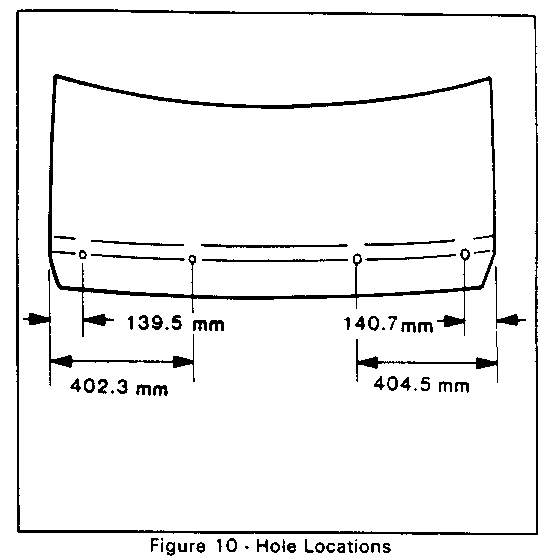
CENTER DECKLID SPOILER INSTALLATION-REPLACEMENT LID
Figure 10
Support rear compartment to lid in open position and cover rear compartment trim.
1. Center punch and drill four 7.9 mm (5/16") diameter in locations shown in Figure 10.
Important
Drill the two outermost holes thru the inner panel of the lid.
2. Use a long center punch to make an outding on the lid inner panel thru the right side innermost hole.
3. With lid open, drill three 19.0 mm (3/4") holes in the inner rear compartment lid panel using the two outer 7.9 mm holes and the outding as guides.
Important
Drill these holes thru the lid inner panel only. They are for access to the spoiler mounting studs.
4. Prime three inner holes and four outer holes with zinc chromate primer.
Clean
Remove all metal shavings from lid and rear compartment.
Install or Connect
1. Mastic washer 2. Center rear compartment lid spoiler 3. Spacer 4. Nuts
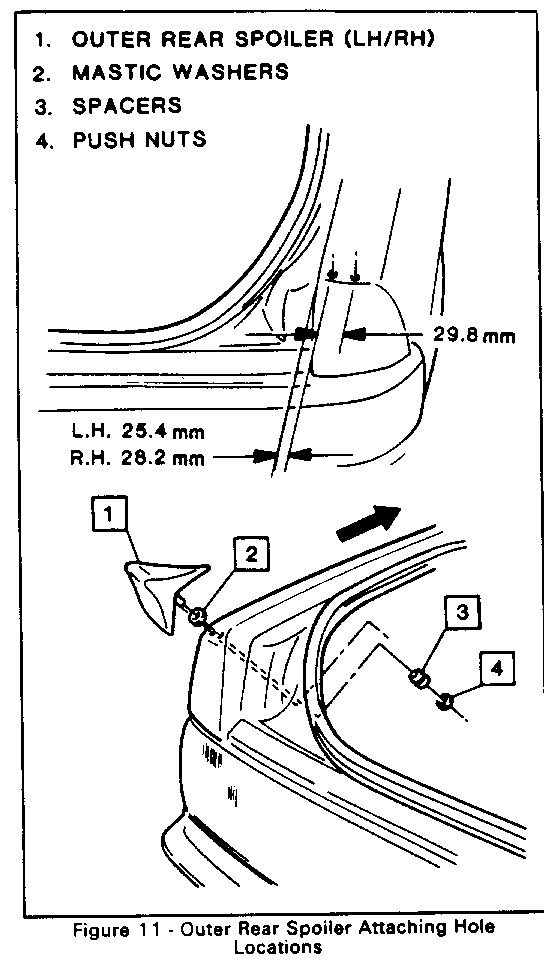
OUTER REAR SPOILER-RIGHT AND LEFT
Figure 11
Remove or Disconnect
1. Push nuts 2. Spacers 3. Outer rear spoiler 4. Mastic washers
Install or Connect
1. Mastic washers 2. Outer rear spoiler 3. Spacers 4. Push nuts
Inspect
To make sure outer rear spoilers are properly aligned.
To install outer spoilers on replacement rear quarters, refer to Figure 10 to locate attaching hole position. Center punch and drill two 7.9 mm (5/16") diameter.
CORSICA XT DECKLID EMBLEM
Figure 12
Remove or Disconnect
Apply heat using a hot air gun making certain gun is moved in a circular motion and held a minimum of 152 mm (6") from emblem.
Install or Connect
Wash area with detergent and water and wipe dry. Wipe area with oil free naphtha or alchohol. Peel paper backing from emblem and press in place as shown in Figure 12. Apply constant pressure to emblem for thirty seconds. Emblem cannot be repositioned after contact with car.


General Motors bulletins are intended for use by professional technicians, not a "do-it-yourselfer". They are written to inform those technicians of conditions that may occur on some vehicles, or to provide information that could assist in the proper service of a vehicle. Properly trained technicians have the equipment, tools, safety instructions and know-how to do a job properly and safely. If a condition is described, do not assume that the bulletin applies to your vehicle, or that your vehicle will have that condition. See a General Motors dealer servicing your brand of General Motors vehicle for information on whether your vehicle may benefit from the information.
