CAMPAIGN: FUEL SENDER SEAL DISPLACEMENT, INSPECT/REPAIR

SUBJECT: FUEL SENDER SEAL DISPLACEMENT
Models: 1991 'S/T' 4-Door Jimmy/Blazer (Moraine Assembly Only)
TO: ALL GENERAL MOTORS DEALERS
General Motors of Canada has determined that certain 1991 'S/T' 4-Door Jimmy/Blazer vehicles fail to conform to the requirements of Canada Motor Vehicle Safety Standard (CMVSS) 301, "Fuel System Integrity." Some of these vehicles may have been shipped with the fuel tank sender seal out of position. In the event of a rollover accident an out of position seal could allow fuel spillage in excess of the amount prescribed by CMVSS 301. If an ignition source was present, fuel leakage resulting from this mispositioned seal could result in a fire.
To correct this condition and to comply with CMVSS 301, dealers will inspect the involved vehicles and determine if the fuel tank sender seal has become displaced and replace those seals that are displaced.
VEHICLES INVOLVED:
Involved are certain 1991 S/T 4-Door Jimmy/Blazer built at Moraine Assembly within the following VIN breakpoints:
Model Year Carline From Through ----------- ---------------- ----- -------- 1991 Chevrolet Blazer SOP M2546510 1991 GMC Jimmy SOP M2266356
All affected vehicles have been identified by the VIN listing provided to involved dealers with this bulletin. Any dealer not receiving a listing was not shipped any of the affected vehicles.
DEALER CAMPAIGN RESPONSIBILITY:
Dealers are to perform this campaign on all involved vehicles at no charge to owners, regardless of kilometres traveled, age of vehicle, or ownership, from this time forward.
Whenever a vehicle subject to this campaign is taken into your new or used vehicle inventory, or it is in your dealership for service, you are to ensure the campaign correction has been made before selling or releasing the vehicle.
Owners of vehicles recently sold from your new vehicle inventory are to be contacted by the dealer, and arrangements made to make the required modification according to instructions contained in this bulletin.
CAMPAIGN PROCEDURE
Refer to Section 4 of the Service Policies and Procedures Manual for the detailed procedure on handling Product Campaigns. Dealers are requested to complete the campaign on all transfers as soon as possible.
OWNER NOTIFICATION:
All owners of record at the time of campaign release are shown on the attached computer listing and have been notified by first class mail from General Motors. The listings provided are for campaign activity only and should not be used for any other purpose.
PARTS INFORMATION:
Parts required to complete this campaign should be ordered through regular channels, as follows:
Part Number Description Quantity/Vehicle ----------- ------------- -------------------- 3893116 Seal Ring 1 Seal Ring per Truck (Package of 10) (As Required)
NOTICE: IT IS EXPECTED THAT LESS THAN 1% OF THE VEHICLES INVOLVED IN THIS CAMPAIGN WILL EXPERIENCE THE CONDITION DESCRIBED.
PARTS AND LABOUR CLAIM INFORMATION:
Credit for the campaign work performed will be paid upon receipt of a properly completed campaign claim card or DCS transmission in accordance with the following:
Repair Code Description Time Allowance ----------- ------------------------------ --------------- 1A Inspect - Seal Seated Properly .3
2A Pressurize Fuel System 1.2 - Pressure Loss - Remove Fuel Tank and Install Fuel Sender Seal Ring
Time allowance includes 0.1 hour for dealer administrative detail associated with this campaign. Parts credit will be based on dealer net plus 30% to cover parts handling.
SERVICE PROCEDURE:
Tool Required:
J-24460-01 - Radiator Pressure Test Pump
A. INSPECTION
CAUTION:
GASOLINE OR GASOLINE VAPOURS ARE HIGHLY FLAMMABLE. IF AN IGNITION SOURCE IS PRESENT A FIRE COULD OCCUR. HAVE A DRY CHEMICAL (CLASS B) FIRE EXTINGUISHER NEARBY.
1. Disconnect the negative battery cable. 2. Remove fuel tank filler cap to relieve any fuel vapour pressure. 3. Reinstall fuel tank filler cap and tighten until an audible "click" is heard. 4. Remove fuel vapour canister purge line from canister fitting marked "TANK." 5. Disconnect radiator pressure test cap from Radiator Pressure Test Pump - Kent Moore J-24460-01 or equivalent. 6. Insert threaded end of Radiator Pressure Tester Hose into fuel tank vapour purge line. 7. Pressurize fuel tank and emissions system with 30 strokes of Radiator Pressure Tester Hand Pump. Pressure gauge on pump will indicate a low amount of pressure. Note location of needle in relationship to gauge and monitor for one minute. If emissions system, fuel tank filler cap and sender seal are correctly installed there should be no loss of pressure.
NOTICE: DO NOT, UNDER ANY CIRCUMSTANCE, USE SHOP AIR HOSE IN PLACE OF RADIATOR PRESSURE TESTER HAND PUMP. OVER PRESSURIZING OF FUEL TANK OR EMISSIONS SYSTEM COULD LEAD TO SYSTEM LEAKAGE OR DAMAGE. IF AN IGNITION SOURCE IS PRESENT A FIRE COULD OCCUR.
8. After one minute, slowly remove fuel tank cap while listening for pressure being released past the fuel tank threads.
- If release of pressure is evident the seal ring has not been displaced. Go to Step 9. Stop at Step 12.
- If no pressure is detected when fuel tank filler cap is removed, it will be necessary to remove fuel tank to replace fuel tank sender seal ring. Proceed to Step B - Replacement of fuel sender seal ring.
9. Disconnect Radiator Pressure Tester Hand Pump from fuel tank vapour purge line. 10. Reconnect fuel tank purge vapour line to fuel vapour canister. 11. Reconnect negative battery cable. 12. Install Campaign Identification Label.
B. REPLACEMENT OF FUEL SENDER SEAL RING
CAUTION:
GASOLINE OR GASOLINE VAPOURS ARE HIGHLY FLAMMABLE. IF AN IGNITION SOURCE IS PRESENT A FIRE COULD OCCUR. HAVE A DRY CHEMICAL (CLASS B) FIRE EXTINGUISHER NEARBY.
1. Drain fuel from tank.
CAUTION:
NEVER DRAIN OR STORE GASOLINE IN AN OPEN CONTAINER, DUE TO THE POSSIBILITY OF FIRE OR EXPLOSION.
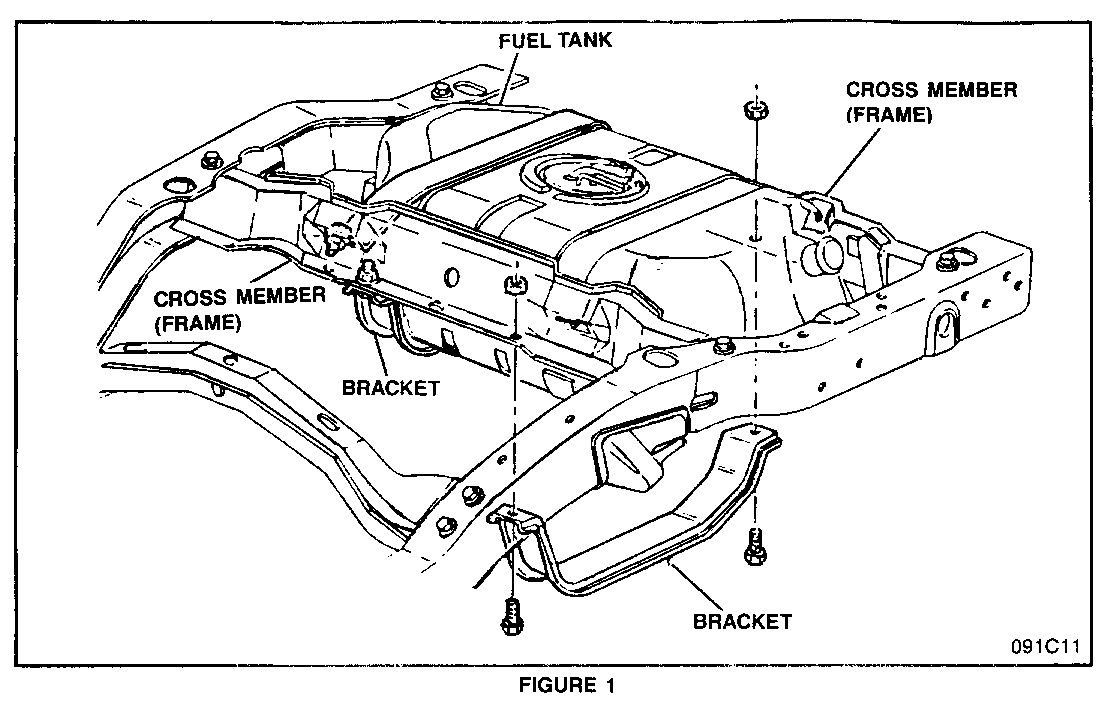
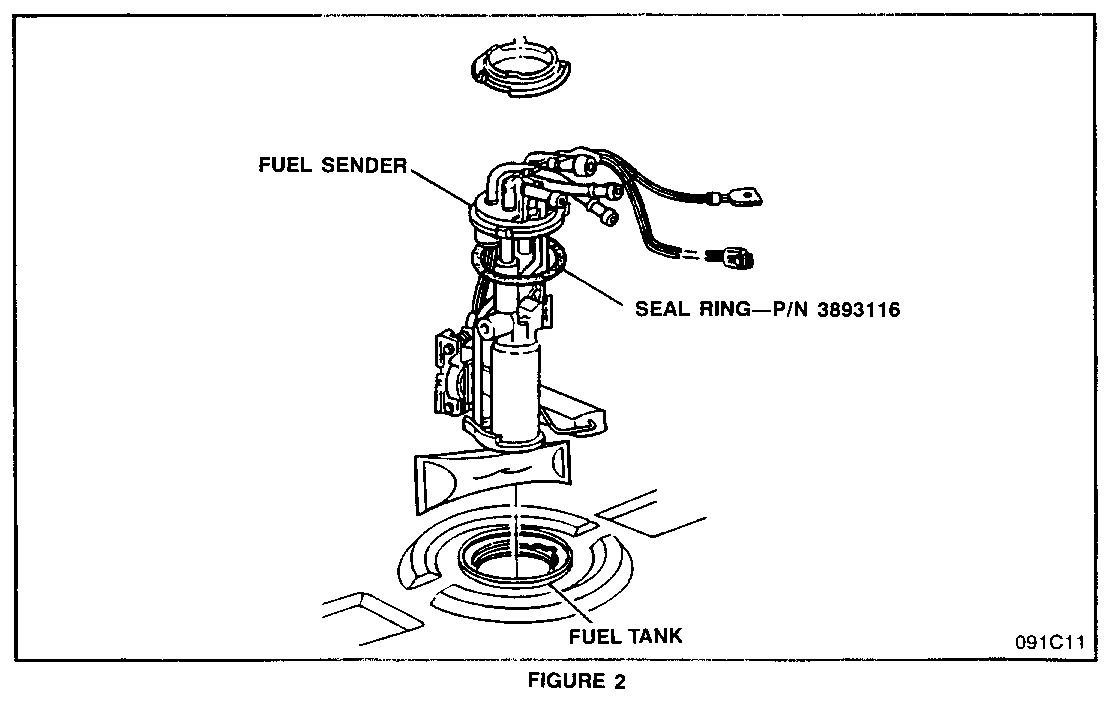
2. Raise vehicle on hoist. 3. Remove fuel tank plastic shield. 4. Support fuel tank and remove brackets. (Figure 1) 5. Disconnect fuel tank filler neck. 6. Disconnect fuel lines at filler neck. 7. Lower tank and disconnect fuel lines and electrical connections at sender. 8. Remove fuel sender seal and seal ring using tool J-36608 or J-24187. (Figure 2) 9. Replace seal P/N 3893116 and reinstall sender using tool J-36608 or J-24187. 10. Raise tank and reconnect fuel lines and electrical connections at sender. 11. Reconnect fuel lines at filler neck. 12. Reconnect fuel tank filler neck. 13. Reinstall fuel tank brackets and tighten bracket bolts to 45 N.m (33 lb. ft.). 14. Install fuel tank plastic shield. 15. Pour fuel removed in Step 1 back into tank. 16. Reinstall fuel tank filler cap. 17. Remove tester from purge line. 18. Reinstall fuel vapour purge line to vapour canister. 19. Reinstall negative battery cable. 20. Install Campaign Identification Label.
INSTALLATION OF CAMPAIGN IDENTIFICATION LABEL
Clean surface of radiator upper mounting panel and apply a Campaign Identification Label. Make sure the correct campaign number is inserted on the label. This will indicate that the campaign has been completed.


General Motors bulletins are intended for use by professional technicians, not a "do-it-yourselfer". They are written to inform those technicians of conditions that may occur on some vehicles, or to provide information that could assist in the proper service of a vehicle. Properly trained technicians have the equipment, tools, safety instructions and know-how to do a job properly and safely. If a condition is described, do not assume that the bulletin applies to your vehicle, or that your vehicle will have that condition. See a General Motors dealer servicing your brand of General Motors vehicle for information on whether your vehicle may benefit from the information.
