Exhaust Boom/Groan Noise in Passenger Compartment (Install Exhaust Bracket and Dampers to Exhaust System)

| Subject: | Exhaust Boom/Groan Noise In Passenger Compartment (Install Exhaust Bracket and Dampers To Exhaust System) |
| Models: | 1997-2002 Chevrolet and GMC T Pickup and Utility Models (S-10, S-15, Blazer, Jimmy, Envoy) (Old Style) |
| 1997-2001 Oldsmobile Bravada |
| with 4.3L V6 Engine (VIN W -- RPO L35) and 4L60-E Automatic Transmission (RPO M30) or Active Transfer Case (RPO NP4) or Automatic 4WD (RPO NP8) |
Condition
Some customers may comment on a low frequency noise heard in the passenger compartment with the vehicle in "Drive" and at or near idle. The noise is often described as pressure in the ears.
Cause
The noise may be due to the exhaust system "exciting" and causing the disturbing frequency.
Correction
Follow the service procedure below to correct this condition.
Raise the vehicle. Refer to Lifting and Jacking the Vehicle in the Service Manual (SI Document ID #6771).
Bracket Installation Procedure for 1997-1999 Vehicles
- Remove the two bolts and two nuts from the transmission mount.
- Support the transmission with a suitable adjustable jack stand.
- Raise the rear of the transmission with the adjustable jack stand.
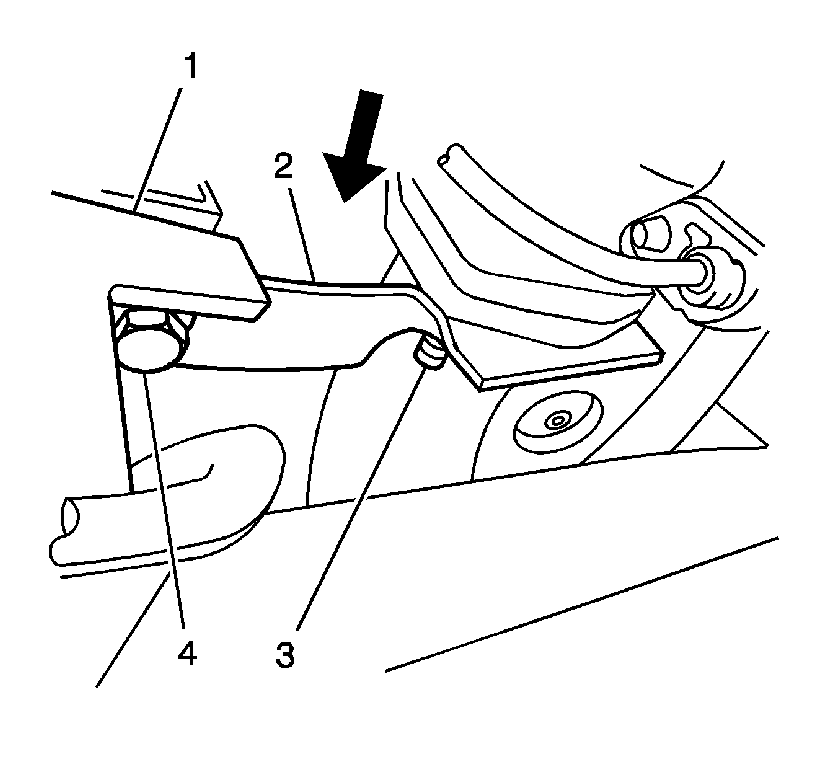
- Remove the two lower exhaust flange nuts (3) located on the flange in front of the converter.
- Remove the two bolts (4) securing the transmission mount (1) to the extension housing.
- Remove the two nuts securing the transmission mount (1) to the crossmember.
- Reposition the transmission mount (1) in order to allow access for the installation of the bracket (P/N 15172526) (2) inside of the transmission mount (1) and onto the two lower exhaust flange studs (3).
- Position the transmission mount (3) into the correct location. Lower and remove the adjustable jack stand from under the vehicle.
- Reinstall the two lower nuts and two upper bolts (4) onto the transmission mount (1).
- Reinstall the two lower exhaust flange nuts (3).
- Tighten the two transmission mount bolts to 50 N·m (37 lb ft).
- Tighten the two transmission mount nuts to 57 N·m (42 lb ft).
- Tighten the two exhaust flange nuts to 35 N·m (26 lb ft).

Tighten
Bracket Installation Procedure for 2000-2002 Vehicles
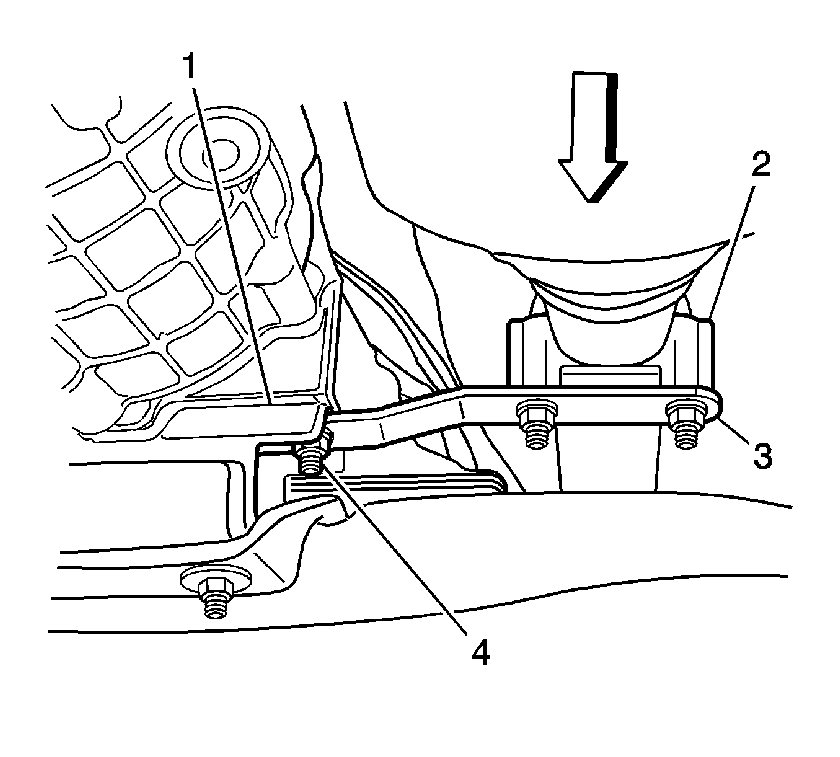
- Remove the two bolts (4) securing the transmission mount (1) to the extension housing.
- Install the bracket (P/N 15172527) (3) by sliding the bracket into the transmission mount (1).
- Reinstall the two transmission mount bolts (4) and hand tighten at this time.
- Install the exhaust clamp (P/N 15595206) (2) onto the exhaust pipe.

Tighten
| • | Tighten the two transmission mounting bolts to 25 N·m (18 lb ft). |
| • | Tighten the two clamp nuts to 30 N·m (22 lb ft). |
Damper Installation Procedure (All Vehicles)
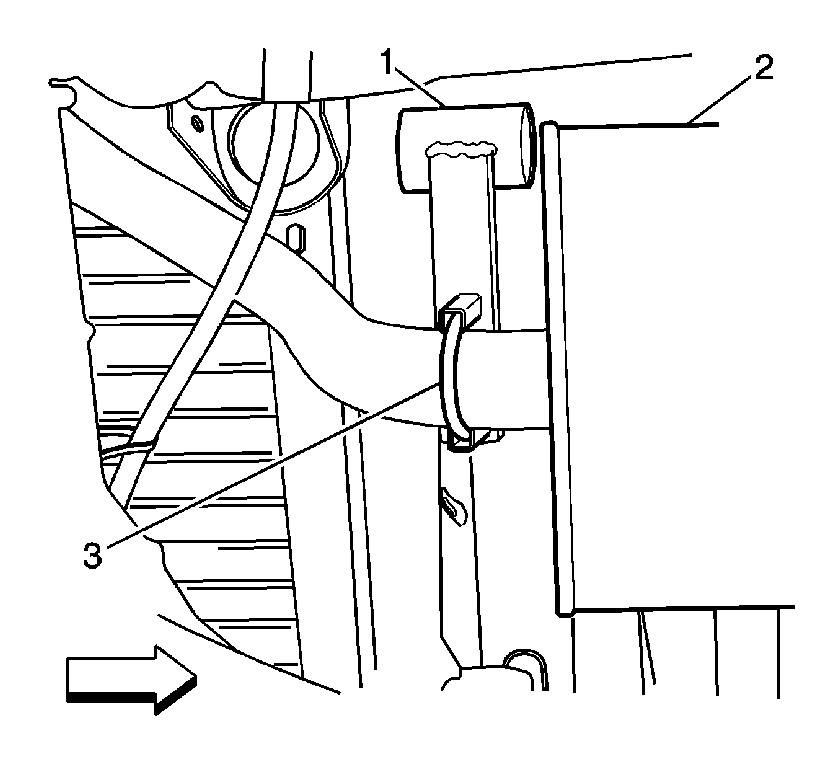
- Install the damper (P/N 10281828) (1) using clamp (P/N 15595206) (3) 60 mm (2.4 in) rearward of the muffler (2) and as parallel to the ground as possible.
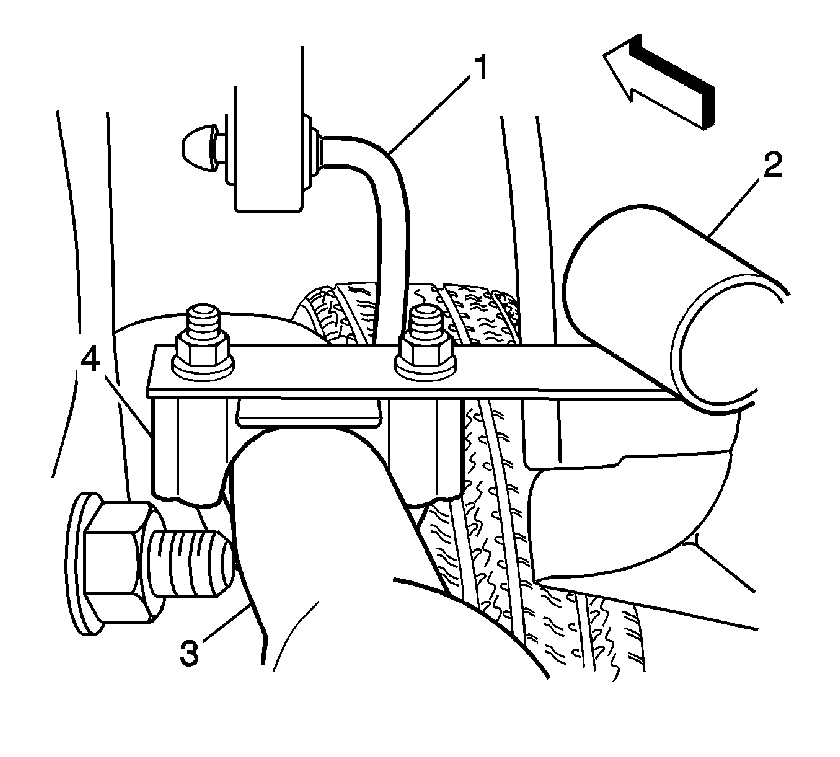
- Locate the far most exhaust hanger (1) on the tail pipe (3).
- Install the second exhaust damper (P/N 10281828) (2) using clamp (P/N 15595206) (3) 60 mm (2.4 in) rearward of the exhaust hanger (1) and 315 mm (12.4 in) in front of the tail pipe end (3) and as parallel to the ground as possible.
- Lower the vehicle.

Important: When installing the exhaust dampers, it is critical to maintain at least 25.4 mm (1 in) clearance from all other components.
Tighten
Tighten the two clamp nuts to 30 N·m (22 lb ft).

Important: When installing the exhaust dampers, it is critical to maintain at least 25.4 mm (1 in) clearance from all other components.
Tighten
Tighten the two clamp nuts to 30 N·m (22 lb ft).
Parts Information
Part Number | Model Year | Description | Qty |
|---|---|---|---|
15172526 | 1997-1999 | Bracket | 1 |
15172527 | 2000-2002 | Bracket | 1 |
15595206 | 1997-1999 | Clamp Asm. | 2 |
2000-2002 | Clamp Asm. | 3 | |
10281828 | All | Damper Asm. | 2 |
Parts are expected to be available 5-1-2002 from GMSPO.
Warranty Information
For vehicles repaired under warranty, use:
Labor Operation | Description | Labor Time |
|---|---|---|
L2009 | Damper, Exhaust (BOTH) - Install | 0.5 hr |
Add | Bracket Installation (1997-1999 models) | 0.3 hr |
Add | Bracket Installation (2000-2002 Models) | 0.2 hr |
