MOULDINGS-WINDOW GLASS REVEAL REPAIR AND REUSE PROCEDURE

The 1982 Fisher Body Service Manual recommends installing a new plastic reveal molding when a windshield, back window or hatch lid glass is replaced, or when a reveal molding has been improperly installed and is not flush to the glass and body. However, reveal moldings do not always need to be replaced. The following two (2) procedures describe how a quality installation can be achieved when a reveal molding is reused.
Procedure I describes the method for reuse of a reveal molding after a windshield, back window or hatch glass has been replaced. Procedure II describes the method to use when a reveal molding has been improperly installed and is not flush to the glass and body.
PROCEDURE I
Reusing a reveal molding after a windshield, back window or hatch glass has been replaced.
1. Grasp the end of reveal molding by hand and carefully remove from cavity.
2. Remove windshield, back window or hatch glass as de- tailed in the Fisher Body Section of Service Manual.
3. Prefit new glass to body as detailed in Fisher Body Section of Service Manual.
4. Start at an upper corner, prefit reveal molding into cavity and determine section(s) of molding that does not fit flush to the glass and body.
5. With a grease pencil reference mark the section(s) of reveal molding that does not fit flush.
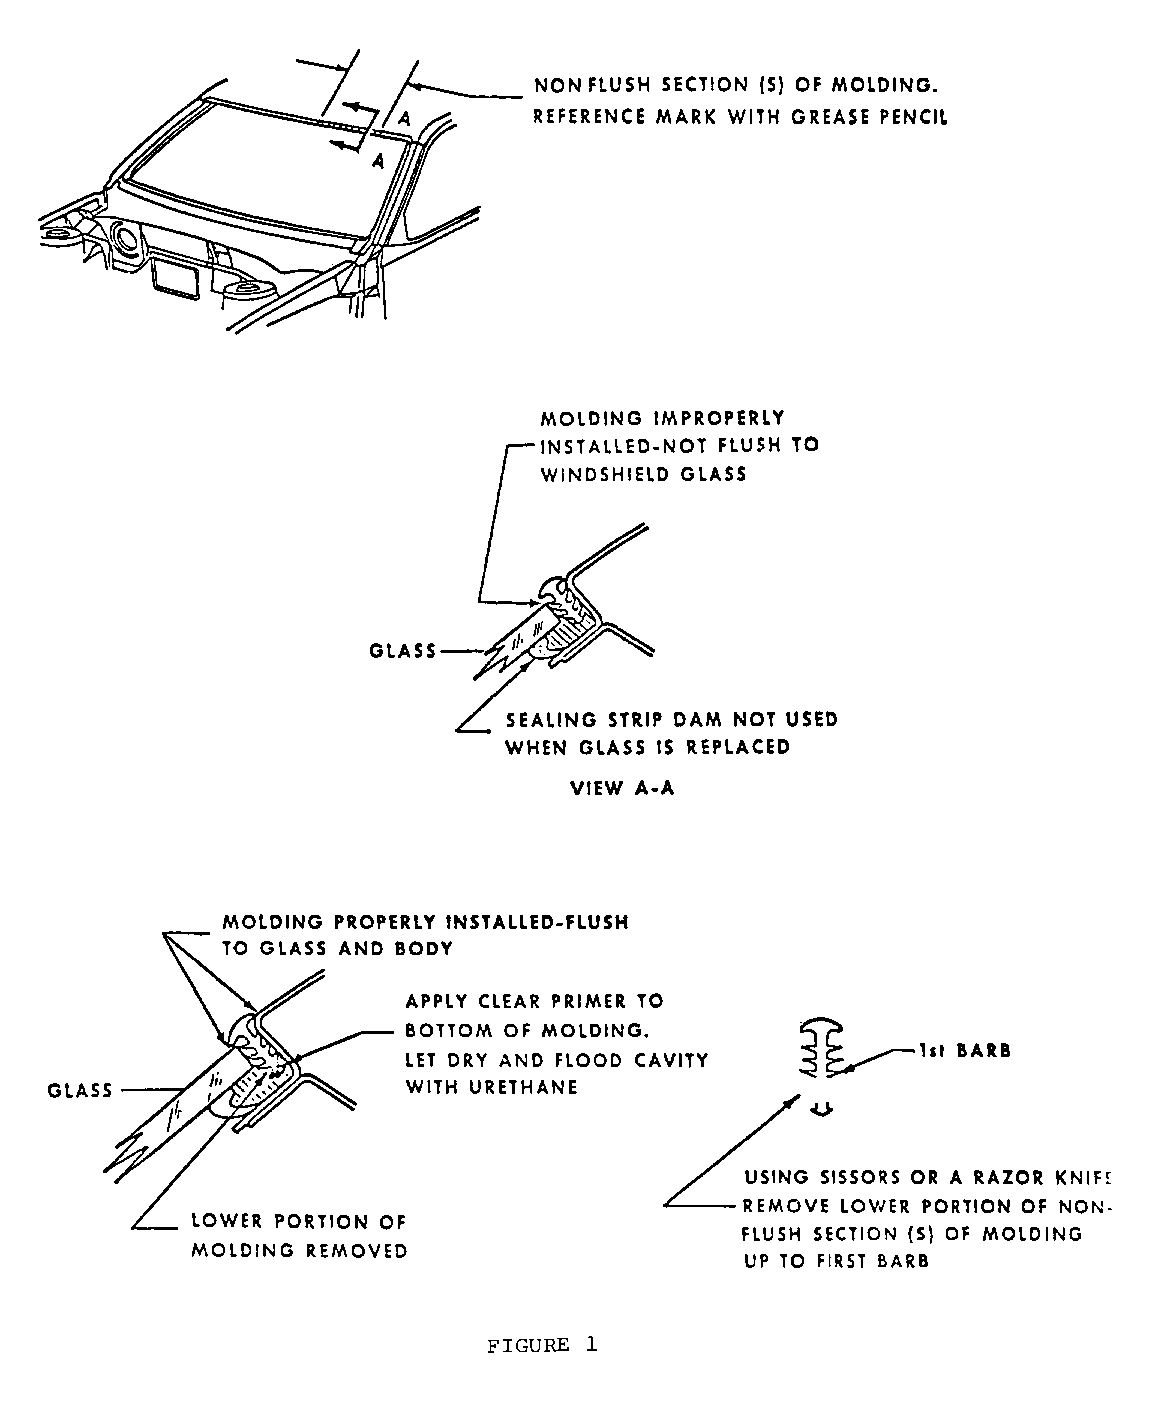
6. Using scissors or a razor knife, carefully remove the lower portion of the molding up to the first barb within the reference mark (Figure 1).
7. Refit molding into cavity and check flushness.
8. Remove molding.
9. Install glass according to the procedure specified in the 1982 Fisher Body Service Manual.
10. Clean bottom of molding section with an alcohol dampened cloth and let dry.
11. Apply primer from urethane adhesive kit, P/N 9636067, to bottom of molding.
12. Allow primer to dry and apply enough urethane into cavity to retain molding.
13. Flood the urethane filled cavity with lukewarm water. This will speedup the curing process of the urethane.
14. Starting at an upper corner, install molding using hand pressure.
15. Apply tape over molding to keep molding in place while urethane cures.
PROCEDURE II
Repairing an improperly installed reveal molding.
1. Use a grease pencil and reference mark the section(s) of reveal molding that does not fit flush to the glass and body (see Figure 1).
2. Carefully loosen the molding to a point just beyond the previously marked nonflush section(s).
3. Using scissors or a razor knife, carefully remove the lower portion of the molding up to the first barb within reference marks (see Figure 1).
4. Refit molding into cavity.
5. If the molding fit is still not completely flush to the windshield, back window or hatch glass and body, remove a portion of the urethane adhesive from the glass cavity.
6. Refit molding and repeat Step 6, if necessary.
7. Secure loose portion of molding away from cavity with marking tape.
8. Clean bottom of loose molding section with an alcohol dampened cloth and let dry.
9. Apply clear primer from urethane kit, P/N 9636067.
10. Allow primer to dry and apply enough urethane adhesive into cavity to retain molding.
11. Flood the urethane filled cavity with lukewarm water. This will speedup the curing process of the urethane.
12. Press loose section of molding into place using hand pressure.
13. Apply pieces of tape over molding to keep molding in place while urethane is curing.

General Motors bulletins are intended for use by professional technicians, not a "do-it-yourselfer". They are written to inform those technicians of conditions that may occur on some vehicles, or to provide information that could assist in the proper service of a vehicle. Properly trained technicians have the equipment, tools, safety instructions and know-how to do a job properly and safely. If a condition is described, do not assume that the bulletin applies to your vehicle, or that your vehicle will have that condition. See a General Motors dealer servicing your brand of General Motors vehicle for information on whether your vehicle may benefit from the information.
