SPOILER ATTACHING BRACKET INSTALLATION/NEW PARTS & PROC.

Model and Year: 1989 AND EARLY 1990 F CAR CONVERTIBLE
DATED NOVEMBER 1989. THE 1990 MODEL YEAR HAS BEEN ADDED, AND CHANGES IN THE THIS BULLETIN CANCELS AND SUPERSEDES DEALER SERVICE BULLETIN NO. 89-273-10, PROCEDURE HAVE BEEN MADE. ALL COPIES OF 89-273-10 SHOULD BE DISCARDED.
Condition:
Some rear deck lid spoilers on 1989 and early 1990 Chevrolet Camaro convertibles may loosen from the deck lid.
Cause:
This condition is due to excessive torquing of the mounting stud fasteners combined with the thermal expansion of the spoiler.
Correction:
In order to address customer concerns, the following procedure is recommended.
Parts Required:
Spoiler Repair Kit, P/N 12505119 (includes templates) 3M Rigid Body Repair Material #05898 or equivalent 3M General Purpose Adhesive Remover or equivalent Oil-Free Naphtha or Alcohol Zinc Chromate
Parts are currently available from GMSPO.
Tools Required:
1/8 inch drill bit and motor Rivet Gun 10mm Socket and Ratchet driver Torque Wrench #80 Grit Sandpaper
Procedure:
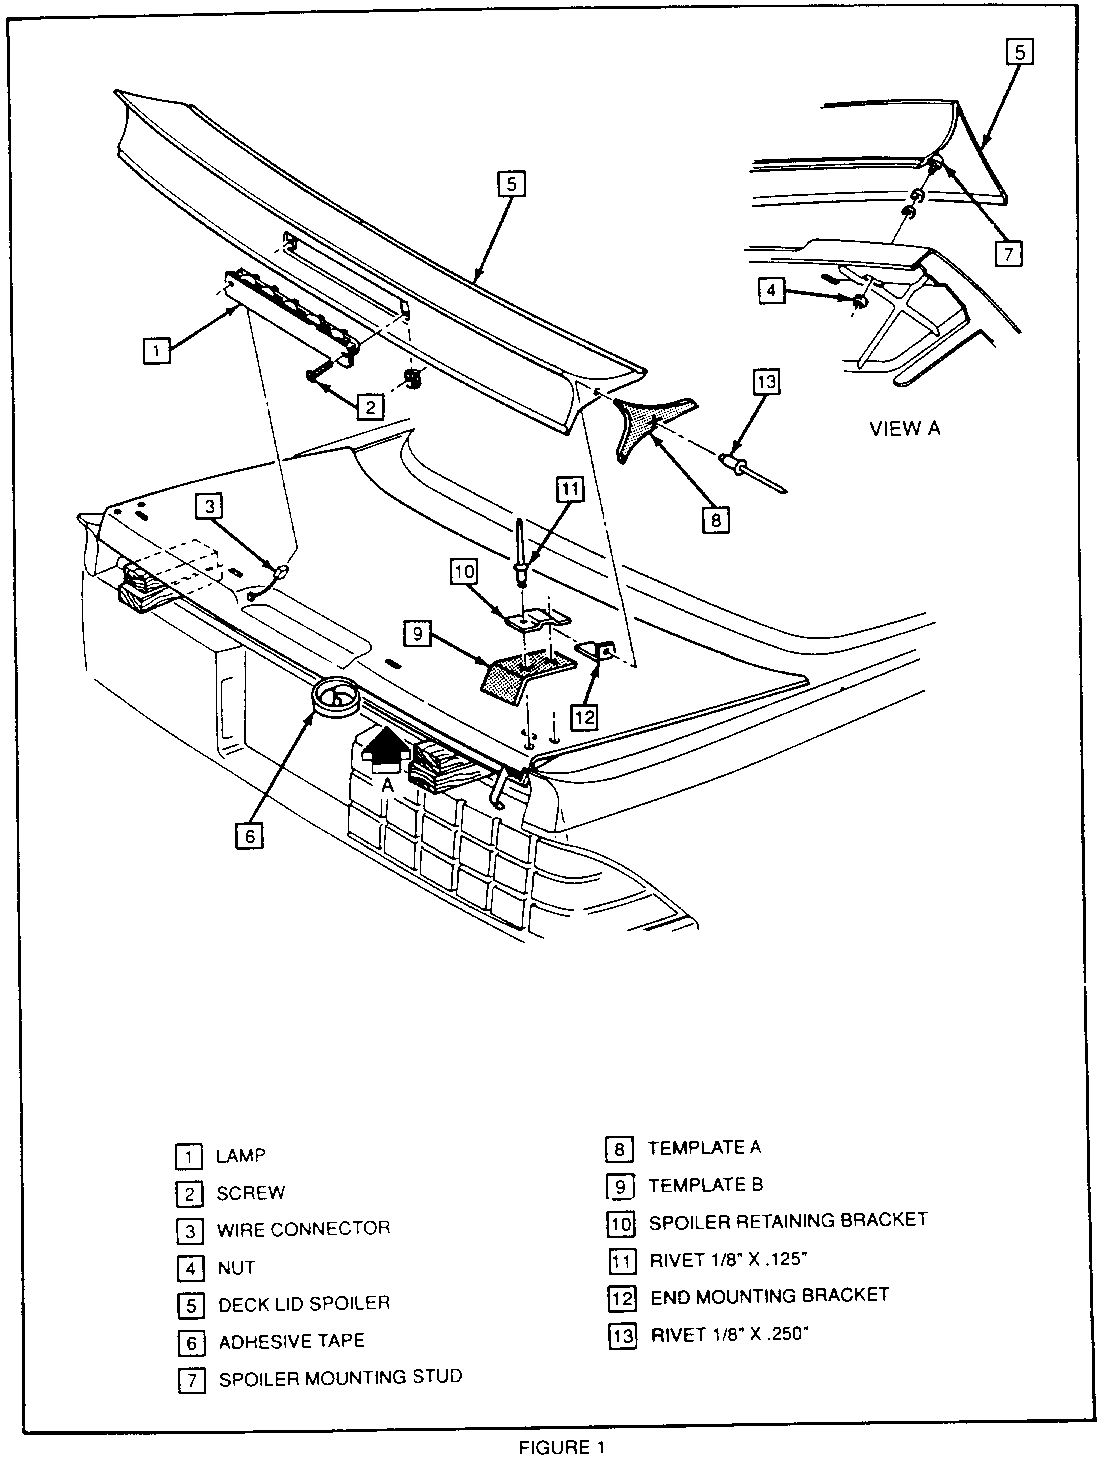
1. Remove the Center High Mounted Stop Lamp (CHMSL) mounting screws and remove the CHMSL unit from the cavity.
2. Disconnect the CHMSL wiring harness.
3. Open the deck lid and remove the access plugs and spoiler retaining nuts.
4. Carefully remove the spoiler from the deck lid.
IMPORTANT: Some spoilers may be adhered to the deck lid with two-sided adhesive tape. To remove the spoiler, apply heat to the lower edge of the spoiler using a hot air gun held approximately 300 mm (12 in.) from the surface.
5. Wash the deck lid with soap and water and wipe dry.
6. Wipe the deck lid and adhesive side of the spoiler with a clean rag and oil-free naphtha or alcohol to remove all adhesive tape from the deck lid and spoiler.
7. If the spoiler was originally equipped with a metal stiffener in area below the CHMSL, and the stiffener is no longer attached to the spoiler, clean both sides of the stiffener to remove the adhesive tape from it. Reattach the stiffener to the spoiler using an appropriate length of two-sided tape from the spoiler repair kit.
8. Inspect the spoiler mounting studs to insure that they are secure to the spoiler. If they are secure, proceed to step 16.
9. Clean the adhesive end of the stud and the area on the spoiler where the stud attaches using 3M General Purpose Adhesive Remover #08984 or equivalent.
10. Sand the surfaces to be rebonded using #80 grit sandpaper.
11. Lightly wipe surfaces with lacquer thinner and allow to dry.
12. Thoroughly mix equal parts of 3M Rigid Parts Repair Material #05898 or equivalent on a clean, dry, non porous surface.
IMPORTANT: The 3M product allows only 15 minutes of working time. Be sure to consult the manufacturers instructions for information regarding working time.
13. Apply a thin coat of adhesive to each bonding surface.
14. Position parts and press together firmly.
15. Let cure for at least two hours.
NOTICE: The necessary parts and templates are included in the bracket kit, P/N 12505119.
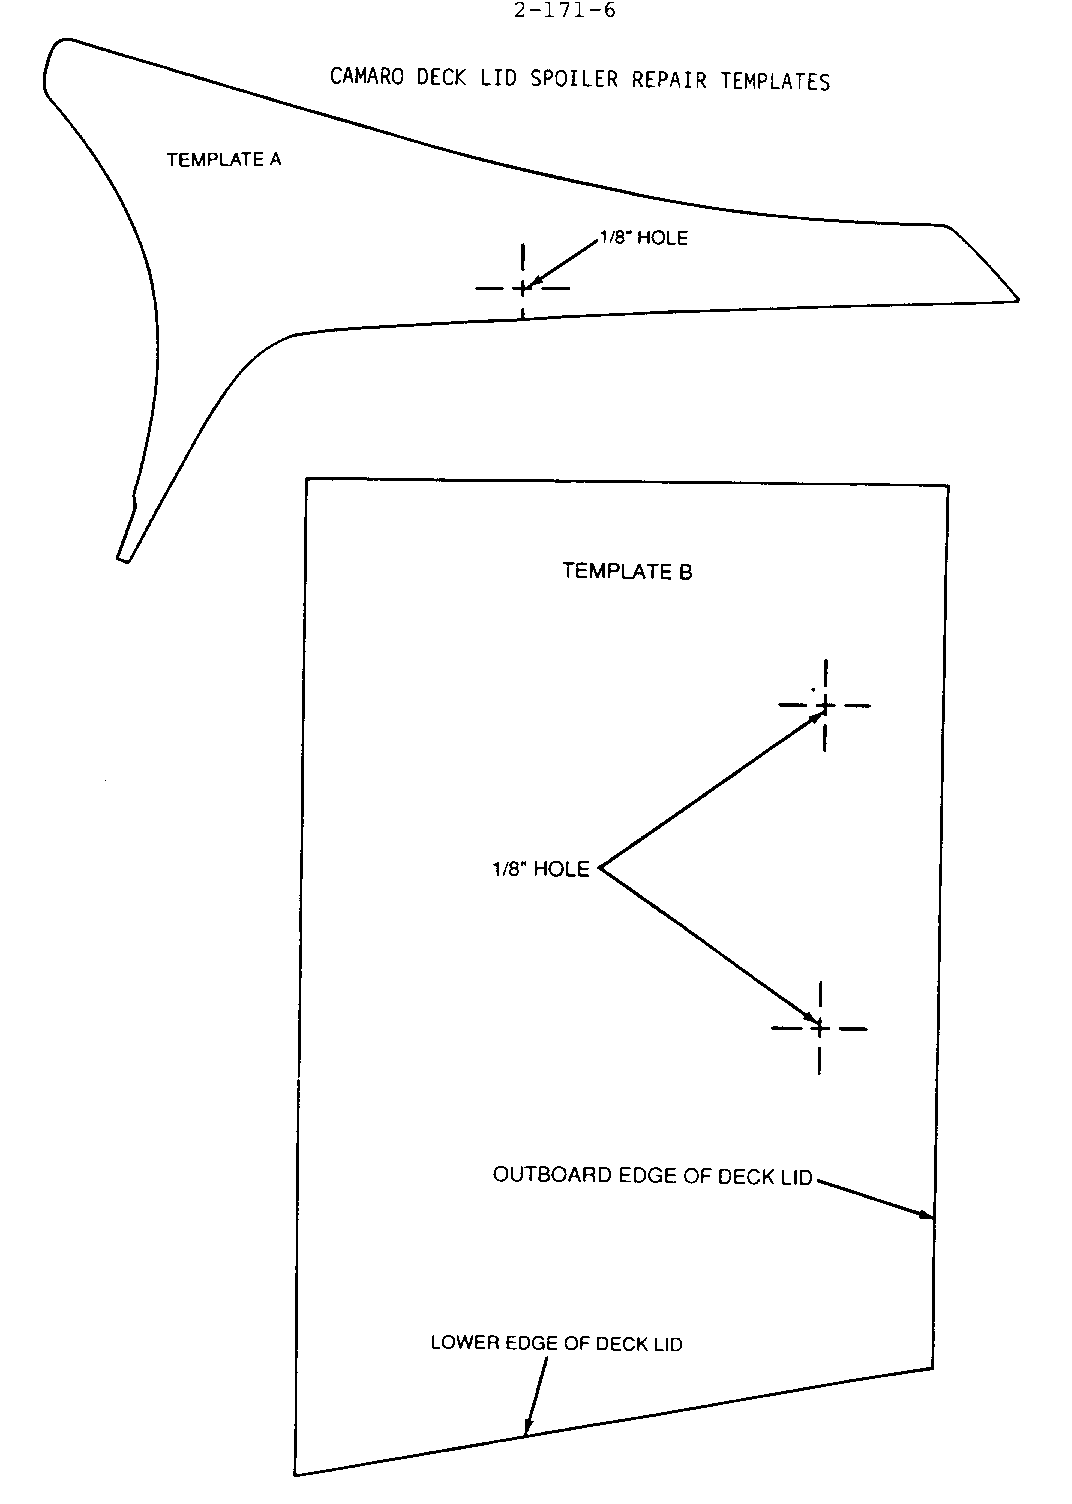
16. Mark location of bracket holes on ends of spoiler using template A.
17. Mark location of spoiler retaining bracket holes on both left and right sides of the deck lid using template B.
18. Drill holes at marked locations using a 3.1 mm (1/8 inch) drill bit. (Total of 6 holes)
19. Coat holes on deck lid with zinc chromate.
20. Insert 1/8 in. X 0.125 in. rivets through spoiler retaining brackets and deck lid and secure. Repeat for other side of deck lid.
21. Insert end mounting brackets into spoiler retaining brackets.
22. Apply double sided adhesive tape to lower edge of deck lid and peel back about 3 inches of the release paper. The remainder of the release paper will be removed after the spoiler is aligned.
23. Position spoiler to deck lid.
24. Push spoiler to one side, and drill hole in end mounting bracket while holding spoiler tight to deck lid. Use hole in spoiler end for location.
25. Insert 1/8 in. X .250 in. rivet through spoiler and bracket and secure.
26. Repeat steps 24 and 25 for opposite side.
27. Tighten spoiler retaining nuts hand tight.
28. Adjust position of spoiler so that is is aligned both fore-aft, and side to side with the quarter cap moldings.
29. Tighten retaining nuts to 2 Nm. (approximately 12 in. lbs.)
IMPORTANT: Use a torque wrench to insure that these nuts are not over-torqued. Over torquing will damage the spoiler.
30. Pull remainder of the release paper from the double sided adhesive tape, and press spoiler lower edge firmly in place.
31. Attach CHMSL wiring harness to CHMSL and lamp assembly to spoiler.
32. Reinstall access plugs in underside of deck lid.
Labor Operation Number: T1577
Labor Time: 0.7 Hours


General Motors bulletins are intended for use by professional technicians, not a "do-it-yourselfer". They are written to inform those technicians of conditions that may occur on some vehicles, or to provide information that could assist in the proper service of a vehicle. Properly trained technicians have the equipment, tools, safety instructions and know-how to do a job properly and safely. If a condition is described, do not assume that the bulletin applies to your vehicle, or that your vehicle will have that condition. See a General Motors dealer servicing your brand of General Motors vehicle for information on whether your vehicle may benefit from the information.
