DIAGNOSIS FOR THEFT DETERRENT SYSTEM PASS KEY

Model and Year 1989 F CARS
The diagnostic text for the Theft Deterrent System: Pass Key has been revised on the following pages in the 1989 Chevrolet F-car Service Manual. Please update your manual. Pages 8A-133-0 through 8A-133-6
Diagnostic Aid
An analysis of field service activities has shown that the Pass Key Decoder Module is usually not the cause of customer concerns relative to Pass Key system performance. Should a comment be made, components more likely to be responsible for the condition are (listed in descending order): lock cylinder and steering column wiring, ignition keys, wiring and the starter enable relay.
TROUBLESHOOTING HINTS
Try the following checks before doing the System Check.
1. Check the key pellet sensing contacts in the Ignition Lock Cylinder by looking into the key opening. If the contacts are damaged, replace the Lock Cylinder.
2. Check the VATS Fuse by visual inspection.
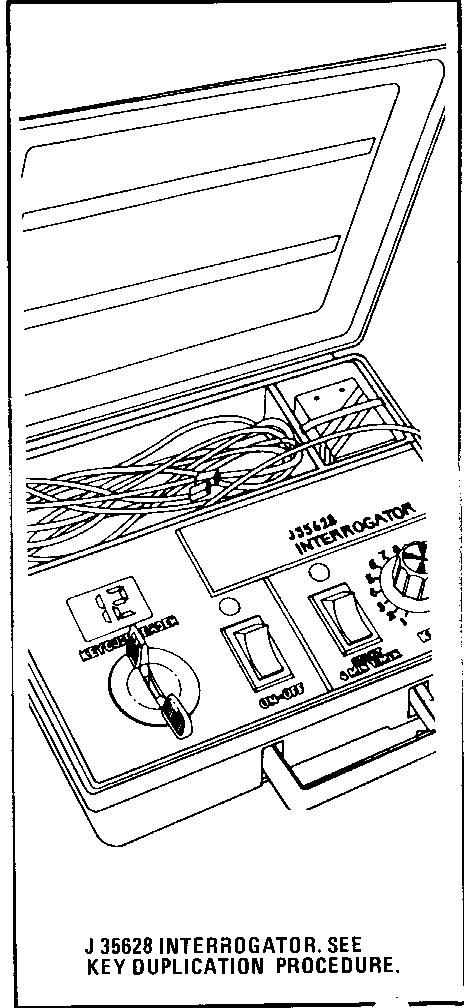
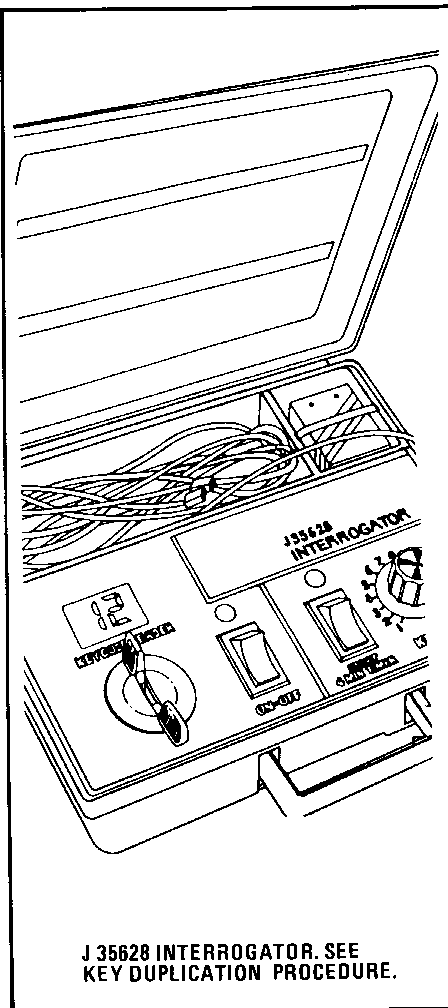
3. Check all of the owner's ignition keys using the J35628 Interrogator or equivalent. If the Key Code window shows "E", or reading is erratic replace the owner's key.
4. Check the Security Indicator bulb.
5. Check the ENG CNL (Camaro) and GAGES Fuses by visual inspection.
Note: When the PASS Key Decoder Module is replaced, the new module will store the key resistance value the first time the car is started. The Security Indicator will remain on for this first ignition cycle, and not turn off until the Ignition Switch is turned to OFF.
Go to System Check for a guide to normal operation.
Go to System Diagnosis for diagnostic tests.
SYSTEM CHECK
Use the System Check Table as a guide to normal operation.
Refer to System Diagnosis for a list of symptoms and diagnostic steps.
COMPONENT LOCATION
Pass Key Decoder Module . . . . . . . . . Behind center of I/P on HVAC/Heater Module Starter Enable Relay . . . . . . . . . . Behind LH Kick Panel
Refer to applicable Service Manual for additional Component Location information.
SYSTEM CHECK TABLE
Put the Ignition Security Indicator Switch in RUN lights for approximately 2 seconds and then goes out
Turn Ignition If engine starts, Switch to START proceed to next step. If engine does not start, proceed to System Diagnosis.
Do the following to check that PASS Key will detect the use of an incorrect key: Shut off engine. Remove hush panel under steering column and disconnect C228 (Two-cavity connector at base of steering column). Connect the J35628 Interrogator (or equivalent) between both halves of C228. Set the Key Code Selector on the J35628 Interrogator to an incorrect resistance value (any code but the one noted in step 3 of Troubleshooting Hints).
Attempt to start Engine should not engine crank and the Security Indicator will stay on, indicating an incorrect key code If engine cranks, go to Symptom Table in System Diagnosis
Disconnect the Engine should not J35628 Interrogator crank Reconnect C228 and If engine cranks, attempt to start replace PASS Key engine again (must Decoder Module be done within two minutes of first attempt)
Turn Ignition Engine starts Switch to OFF normally Wait four minutes and tum Ignition Switch to START Replace hush panel
Refer to System Diagnosis when a result is not normal.
SYSTEM DIAGNOSIS
Use the following table to determine the procedure to use.
SYMPTOM TABLE
SYMPTOM TESTS
No crank; Security B: PASS Key Indicator did not Decoder Module come on during Test System Check
No crank; Security A: Lock Cylinder Indicator stays on and Harness Test B: PASS Key Decoder Module Test No crank; Security C: Starter Enable Indicator operates Relay Test normally
Crank but no start; D: ECM Enable Test Security Indicator operates normally
Security Indicator E: Security does notlight but Indicator open engine starts Test
Security Indicator F: PASS Key stays on with Decoder Module Ignition Switch in Programming Test RUN but engine starts
Security Indicator Check GRY 923 wire stays on at all times for a short to ground. If OK, replace PASS Key Decoder Module.
Engine cranks when Check the Starter an incorrect Enable Relay for resistance is used shorted contacts during the System and the DK GRN Check (965) wire for a short to ground. If OK, replace the PASS Key Decoder Module.
A: LOCK CYLINDER AND HARNESS TEST
1. Remove the hush panel under the steering column. Disconnect the two-cavity connector in the wire leading into the steering column. Connect the male and female parts to the mating connectors on the pigtails from the J35628 Interrogator or equivalent.
2. Insert the customer's ignition key into the ignition lock cylinder.
3. Press the On-Off switch on the J35628 Interrogator to the ON position.
The window above the Key Code Reader indicates the electrical code for the key (1 to 15) or "E " error.
Rotate the ignition lock cylinder while the key is inserted to insure that the correct code is read in all positions.
If code is correct in all positions, proceed to step 4.
If the code shows "E " or is erratic in some positions, obtain a spare key or make a replacement key (See Key Duplication Procedure). Read the code again while rotating the ignition lock cylinder with the spare/ replacement key. A correct code in all positions indicates that the original key was defective. An incorrect code indicates a defective lock cylinder. See section 3B5 for lock cylinder replacement procedures.
4. Set the Key Code Selector on the J35628 Interrogator to the same electrical code determined in step 3. Turn the Ignition Switch to START.
If the SECURITY Indicator remains on and the engine starts, turn the Ignition Switch to OFF and repeat step 4. Replace the PASS Key Decoder Module.
If engine starts, and the Security Indicator goes out, reconnect vehicle wiring and check that the two-cavity connector at the base of the steering column mates correctly.
If engine does not start, go to Test B, PASS Key Decoder Module Test.
B: PASS KEY DECODER MODULE TEST (TABLE 1)
Measure: VOLTAGE
At: PASS KEY DECODER MODULE CONNECTOR (Disconnected)
Condition:
- Ignition Switch: RUN
Measure Correct For Diagnosis Between Voltage ------- ------- -------------- A1 (PNK/ BLK)& Battery See 1 Ground
B8 (ORN) & Battery See 2 Ground
A1 (PNK/ BLK) & B1 Battery See 3 (BLK/WHT)
A2 (DK BLU) 5 Volts See 4
Ignition Switch: START
A3 (DK GRN) Battery See 5 & Ground
If voltages are correct, go to Table 2.
1. Check the PNK/BLK (439) wire and ECM IGN Fuse for an open.
2. Check the ORN (440) wire and VATS Fuse for an open.
3. Check the BLK/WHT (450) wire for an open.
4. Check the DK BLU (229) wire for an open. If wire is good, replace ECM.
5. Check DK GRN (965) wire for an open. If wire is good, do Test C.
B: PASS KEY DECODER MODULE TEST (TABLE 2)
Measure: RESISTANCE
At: PASS KEY DECODER MODULE CONNECTOR (Disconnected)
Conditions:
-Negative Battery Terminal (Disconnected)
-Key Not in ignition Switch
Measure Correct For Diagnosis Between Resistance -------- ---------- ---------------- A6 (WHT/ BLK) & B2 Open circuit See 1 (PPL/YEL) (1989)
- Key in Ignition
A6 (WHT/ 380 to 12.3K BLK) & B2 ohms See 2 (PPL/YEL)
If resistance is correct but engine will not crank, replace the PASS Key Decoder Module.
Note: When the PASS Key Decoder Module is replaced, the new module will store the key resistance value the first time the car is started. The Security Indicator will remain on for this first ignition cycle, and not turn off until the Ignition Switch is turned to OFF.
1. Check WHT/BLK (1073) and PPL/YEL (1074) wires for shorts to ground or between the two wires.
2. Check WHT/BLK (1073) and PPL/YEL (1074) wires for an open.
C: STARTER ENABLE RELAY TEST
Measure: VOLTAGE At: STARTER ENABLE RELAY CONNECTOR (Disconnected) Condition: -Ignition Switch: START
Measure Correct For Diagnosis Between Voltage ------- ------- -------------- E (YEL) & Battery See 1 Ground
C (YEL) & Battery See 1 Ground
-If voltages are correct, go to C2.
1. Check YEL (5) wire for an open. If wire is good but voltage is not present, go to 8A-30 for diagnosis of Starter and Ch ing circuits.
C2. Connect a fused jumper between terminals E (YEL) wire and A (DK GRN/WHT) wire of the Starter Enable Relay Connector. Turn Ignition Switch to START.
If engine cranks proceed to C3.
If engine does not crank, go to page 30-0 for diagnosis of Starter and Charging circuits.
C3. Reconnect the Starter Enable Relay and connect a fused jumper from terminal A3 (DK GRN) wire of the PASS Key Decoder Module to ground. Turn Ignition Switch to START.
If engine cranks, replace the PASS Key Decoder Module.
If engine does not crank, check the DK GRN (965) wire for an open. If wire is OK, replace the Starter Enable Relay.
D: ECM ENABLE SIGNAL TEST (TABLE 1)
Measure: VOLTAGE At: PASS KEY DECODER MODULE CONNECTOR (Connected) Condition: -Ignition Switch: RUN
Measure Correct For Diagnosis Between Voltage ------- ------- --------------- A2 (DK BLU) 2-3 Volts See 1 & Ground
-If the voltage is correct but the car will not start, the PASS Key Module is OK. See Section 6E.
1. Go to Test D Table 2.
D: ECM ENABLE SIGNAL TEST (TABLE 2)
Measure:VOLTAGE At: PASS KEY DECODER MODULE CONNECTOR (Disconnected) Condition: - Ignition Switch: RUN
Measure Correct For Diagnosis Between Voltage ------- ------- --------------- A2 (DK BLU) 5 Volts See 1 & Ground
- If voltage is correct, check for good contact between the PASS Key Decoder Module and its connector. If contact is good, replace the PASS Key Decoder Module.
1. Check DK BLU (229) wire for an open or a short to ground. If the wire is good, check for good contact between the Electronic Control Module (ECM) and its connectors. If contact is good, replace the Electronic Control Module (ECM).
E: SECURITY INDICATOR OPEN TEST
Measure: VOLTAGE At: PASS KEY DECODER MODULE CONNECTOR (Disconnected) Condition: - Ignition Switch: RUN
Measure Correct For Diagnosis Between Voltage ------- ------- -------------- A4 (GRY) & Battery See 1 Ground
-If voltage is correct replace PASS Key Decoder Module.
1. Check the GRY (923) wire for an open. If OK, replace the Instrument Cluster (see section 8C).
F: PASS KEY DECODER MODULE PROGRAMMING TEST
1. Check that connector C228 is connected clean and tight. With Ignition Switch in OFF, disconnect connector C228. Turn the Ignition Switch to RUN and measure the voltage between terminal A (WHT/BI,K) and a known good ground.
If approximately 5 volts are measured, go to step 2.
If 5 volts are not measured, check the WHT/ BLK (1073) wire for an open or short to ground. If OK, replace the PASS Key Decoder Module.
2. Measure the voltage between connector C228 terminals B and A.
If approximately 5 volts are measured, go to Test A.
If approximately 5 volts are not measured, check the PPL/YEL (1074) wire wire for an open. If OK, replace the PASS Key Decoder Module.
KEY DUPLICATION PROCEDURE
Key Replacement (Spare Key Available)
The J35628 Interrogator or equivalent must be used to determine the proper electrical code of the key.
1. Insert the customer's spare ignition key into the Key Code Reader on the J35628 Interrogator.
2. Press the On-Off switch to ON.
3. A number from 1 to 15, designating the electrical code of the key, will appear in the window.
4. Cut a new key which has the electrical code determined from the J35628 Interrogator.
5. Start the engine using the new key to ensure that the key is correct both mechanically and electrically.
Key Replacement (No Spare Key Available)
1. If the Ignition Key is lost and there is no spare key, determine the mechanical code from the code on the ignition key lock cylinder. The code may also be determined from the dealer invoice for the car, or from the Chevrolet Zone Office.
2. Cut a new key to this mechanical code. This key becomes a test key and is used to operate the Ignition Switch for the remaining steps. The resistance of this key does not matter for the remaining steps.
3. Remove the hush panel under the steering column and disconnect C281 (two-cavity connector leading into the steering column).
4. Insert the male half of the connector into the female pigtail connector from the J35628 Interrogator.
5. Set the Key Code Selector on the Interrogator (J35628 or equivalent) to "1".
6. Attempt to start engine using the key made in step 2.
If engine starts, the Key Code Selector is set to the correct electrical code. Cut a new key having this electrical code. The new key will be the customer's replacement key.
If engine does not start, turn Ignition Switch to OFF, then turn the Key Code Selector to the next higher position. Wait four minutes and attempt to start the engine using the new electrical code. (Use the 4-minute Timer on the J35628 Interrogator to indicate the 4-minute interval. Start the Timer by depressing the "Start" rocker switch. The red indicator will turn off at the end of a four minute interval.) Repeat this step until the engine starts. Cut a new key with the electrical code which allowed the vehicle to start.
CIRCUIT OPERATION
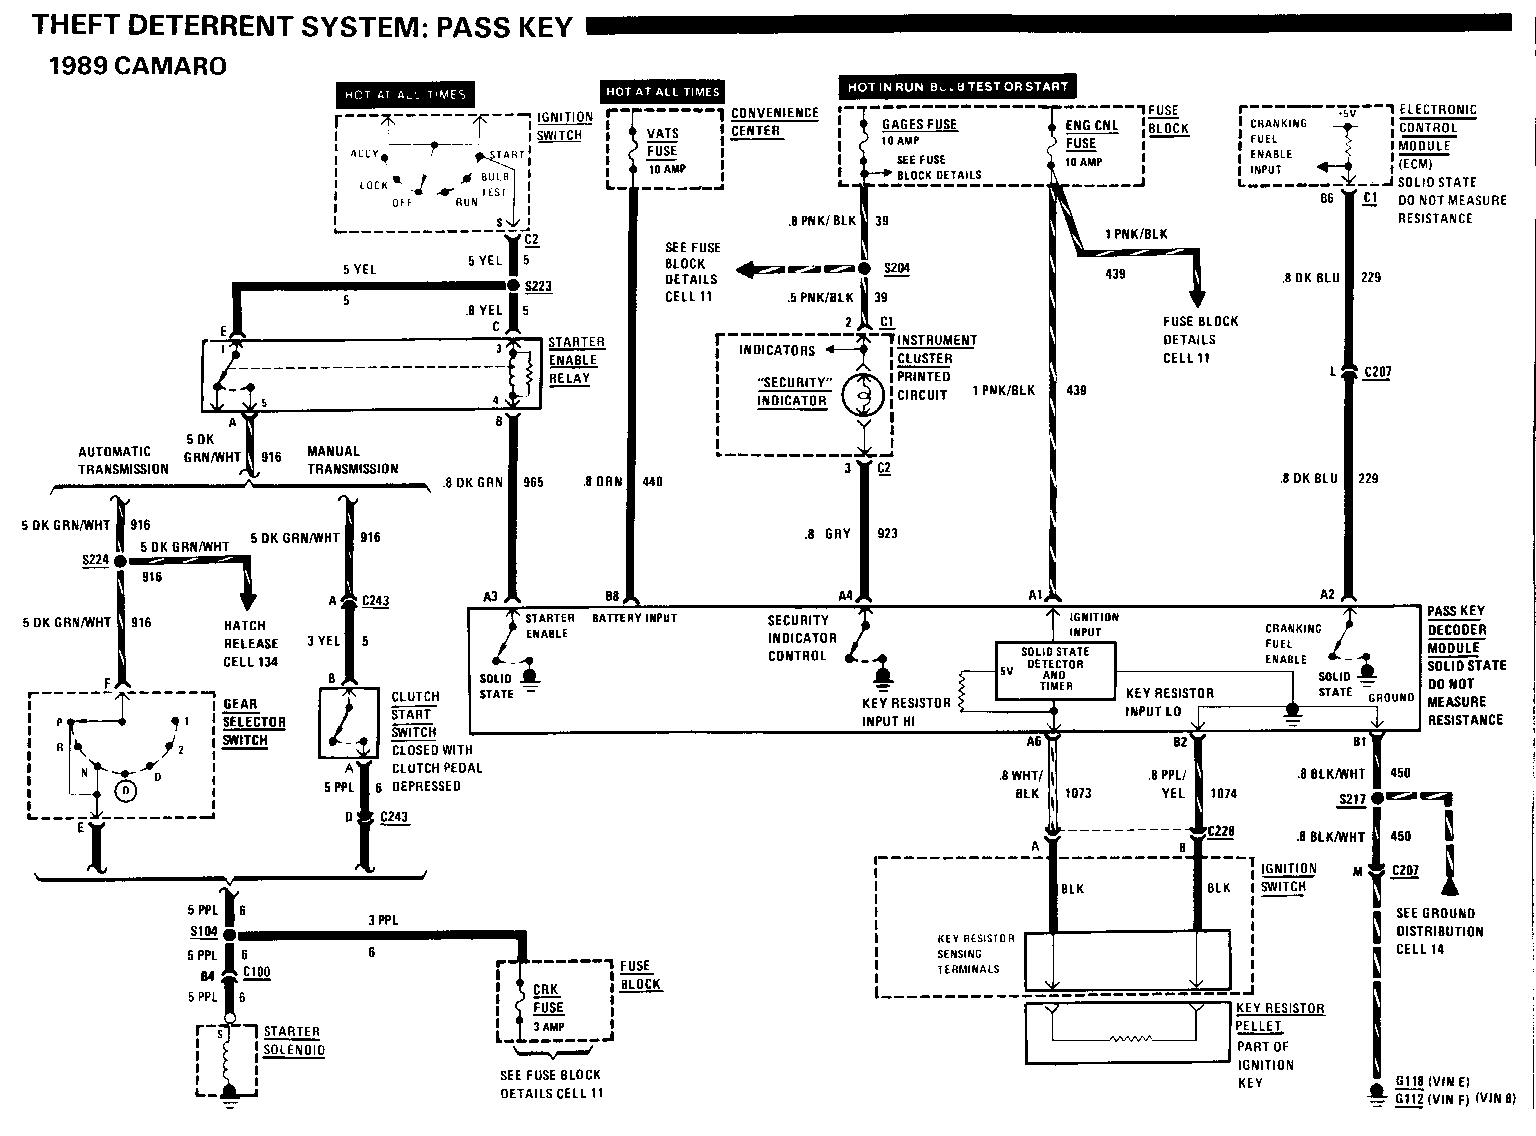
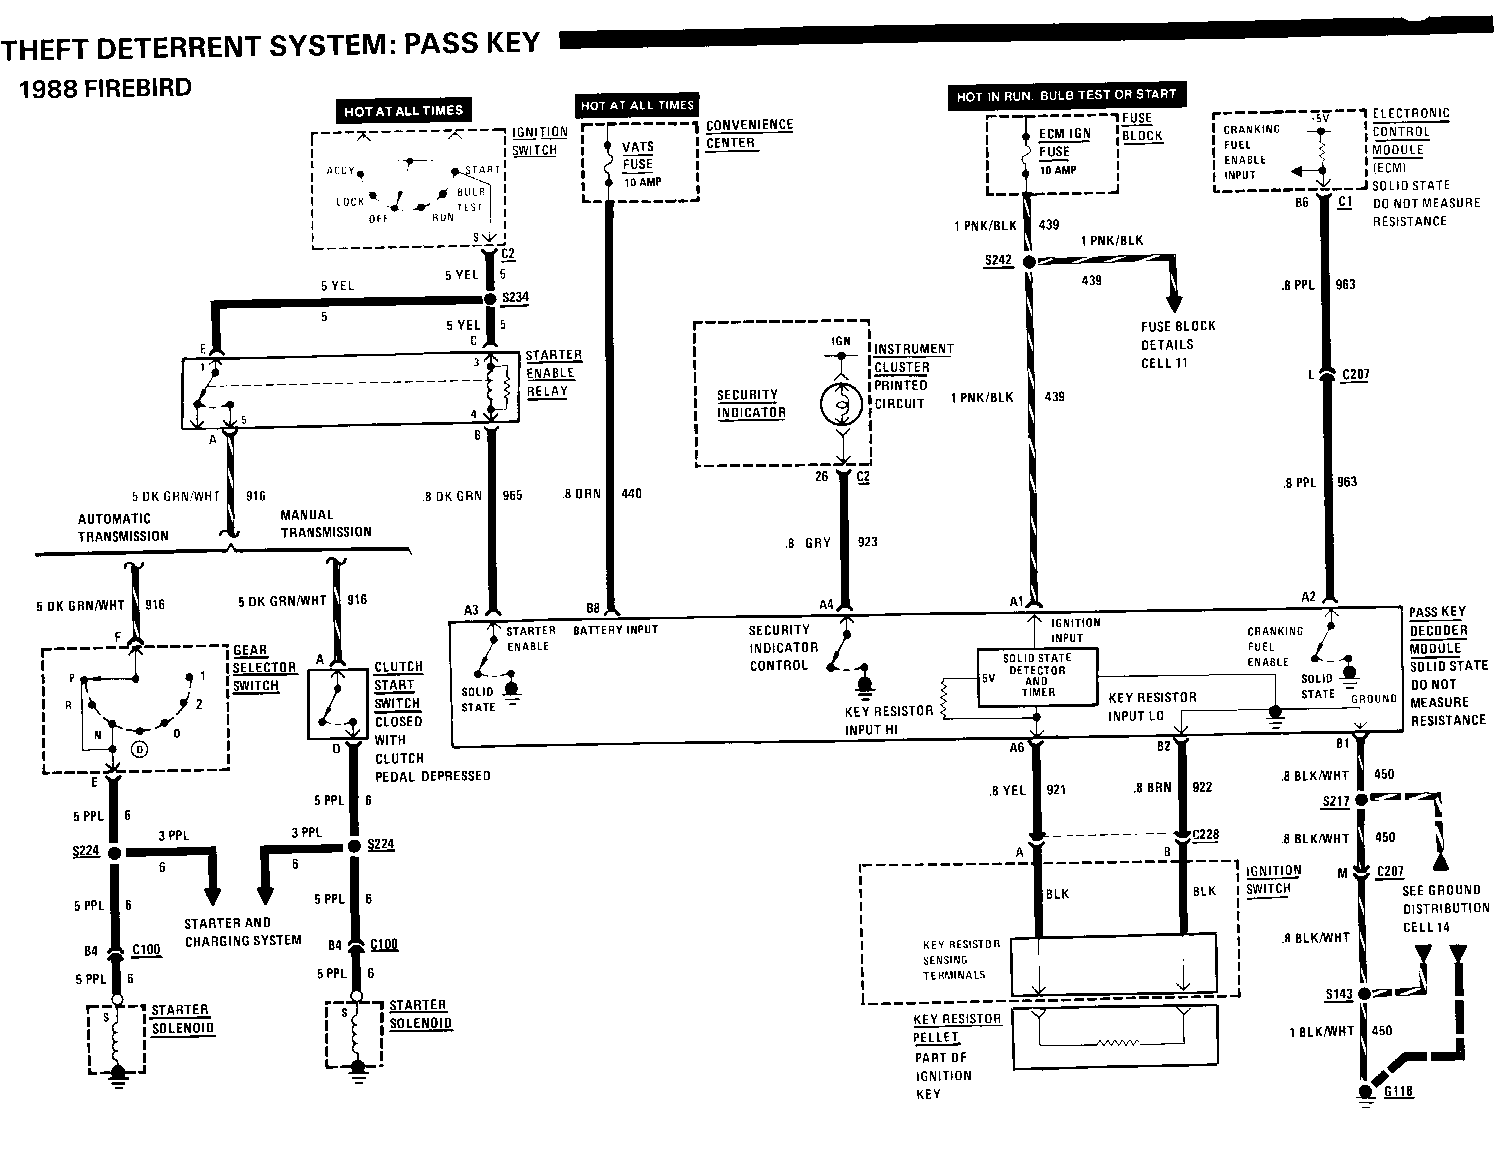
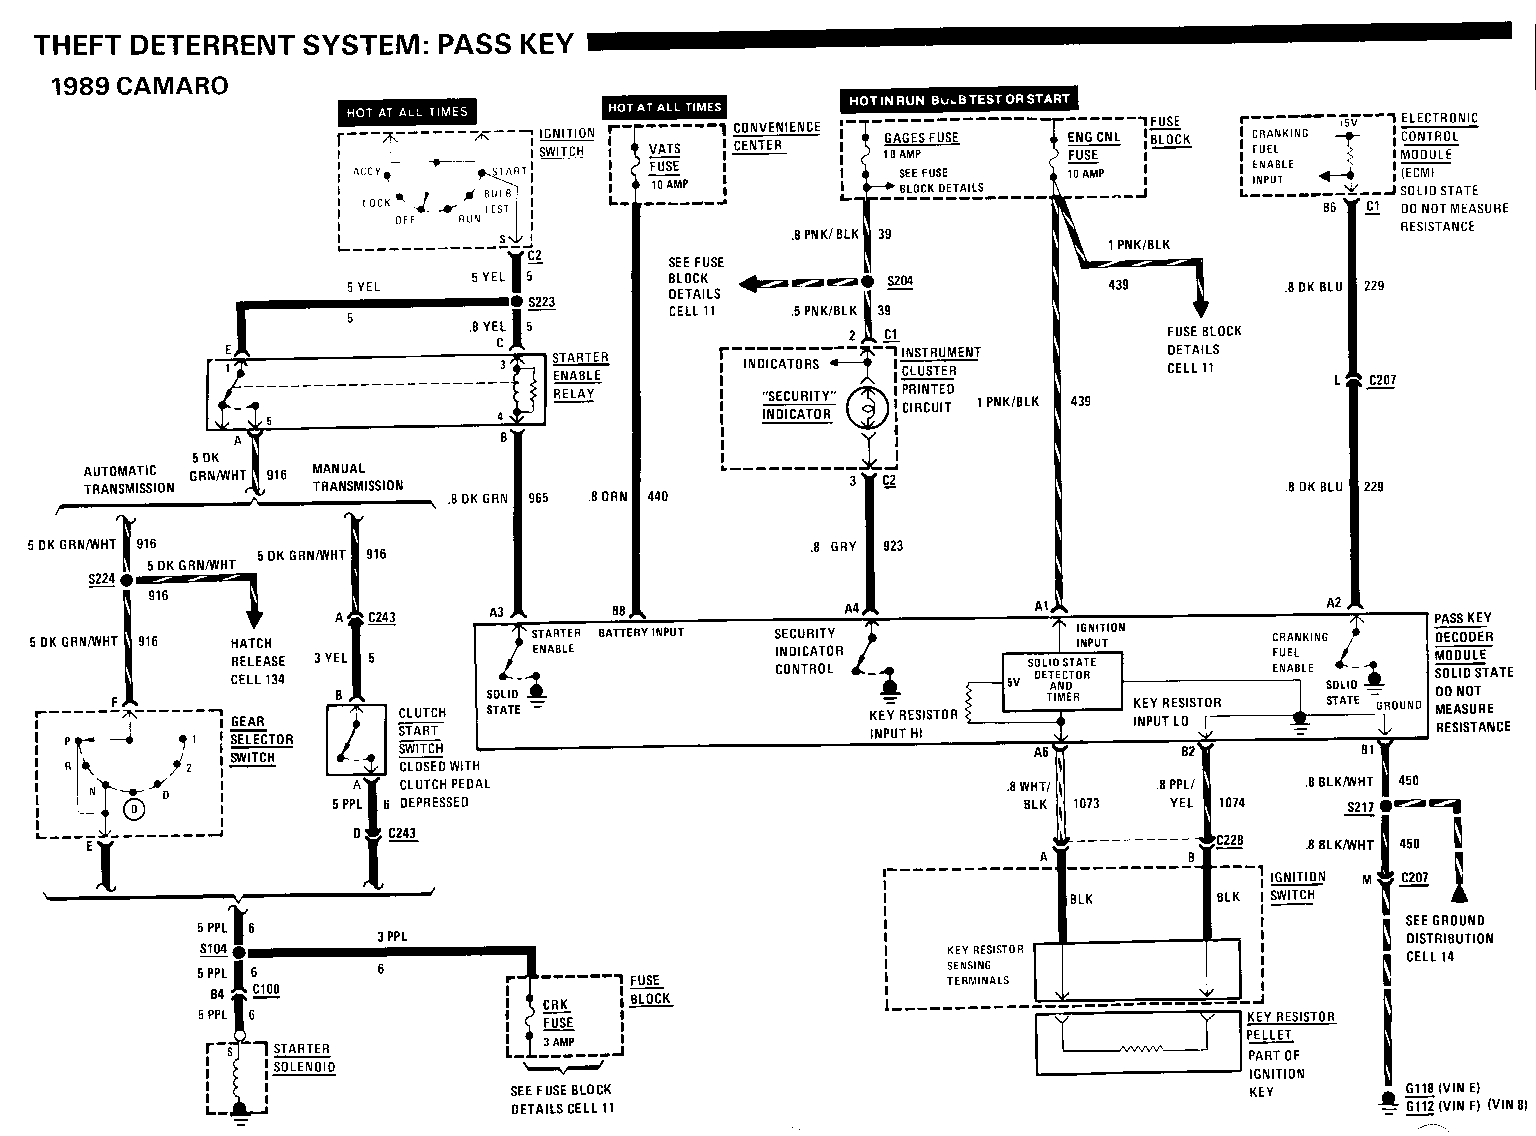
Resistor sensing contacts are located in the Ignition Key Lock Cyhnder. These contact the Key Resistor Pellet on the key when it is inserted. When the lock is rotated, battery voltage is applied through the ENG CNL (Camaro) Fuse to the PASS Key Decoder Module. The Pellet resistance is then compared against the resistance value stored in the Module.
If the Key Resistance Pellet is the proper resistance, terminal A3 is grounded, energizing the Starter Enable Relay. At the same time, a signal is applied at terminal A2 to enable the Electronic Control Module (ECM). When this signal is received by the Electronic Control Module (ECM), it allows fuel injector pulses to begin.
If the Key Resistor Pellet is the wrong value, the PASS Key Decoder Module will shut down for 2 to 4 minutes. During this interval there will be no output at terminals A3 or A2.
If the Ignition Switch is turned on again during this interval, the Timer will begin over again and the PASS Key Decoder Module will remain shut down for another 2 to 4 minutes. The PASS Key Decoder Module will continue this process even if a key with the correct pellet is used to turn the ignition back on. The Timer is restarted by the ignition voltage at terminal A1 when Ignition Switch is turned to RUN.
Once the Timer has completed its 2 to 4 minute cycle with the ignition off, the PASS Key Decoder Module and Timer are reset. A key having the correct code can then be used to start the engine.
The Security Indicator is controlled directly by the PASS Key Decoder Module, If the PASS Key Decoder Module is actively preventing the vehicle from starting, this indicator will be grounded by the PASS Key Decoder Module with the ignition in RUN, BULB TEST or START. When the Ignition Switch is first placed in RUN, BULB TEST or START, the Indicator lights for about 2 seconds as a bulb check.
NOTE:
In the event that the PASS Key Decoder Module must be replaced, there is no special procedure necessary to program the new PASS Key Decoder Module to the resistance in the existing ignition key. The new PASS Key Decoder Module will automatically program itself to the existing ignition key resistance on the first ignition cycle,
If the wiring to the Key Resistance Pellet is defective and a new module is installed, the engine will start but the Indicator will stay on until the Ignition Switch is turned OFF. Use this as a check for proper module instauation. After the module has programmed itself, defective wiring to the resistance pellet will be treated as an incorrect resistance code and the engine will not crank.
General Motors bulletins are intended for use by professional technicians, not a "do-it-yourselfer". They are written to inform those technicians of conditions that may occur on some vehicles, or to provide information that could assist in the proper service of a vehicle. Properly trained technicians have the equipment, tools, safety instructions and know-how to do a job properly and safely. If a condition is described, do not assume that the bulletin applies to your vehicle, or that your vehicle will have that condition. See a General Motors dealer servicing your brand of General Motors vehicle for information on whether your vehicle may benefit from the information.
