CHEVROLET CAMARO CONVERTIBLE (REPAIR PROCEDURE)

Model and Year: 1989 F CAR
Some 1989 Chevrolet Camaro Convertibles may exhibit one or more of the following conditions. This information is being provided to address those conditions. Parts for the repairs can be obtained from ASC (American Sun Roof), the producer of the convertible top by calling:
1-800-327-8054
or
(313) 246-0361 in Michigan or Canada
Squeaks and Rattles
Under Hood Squeak
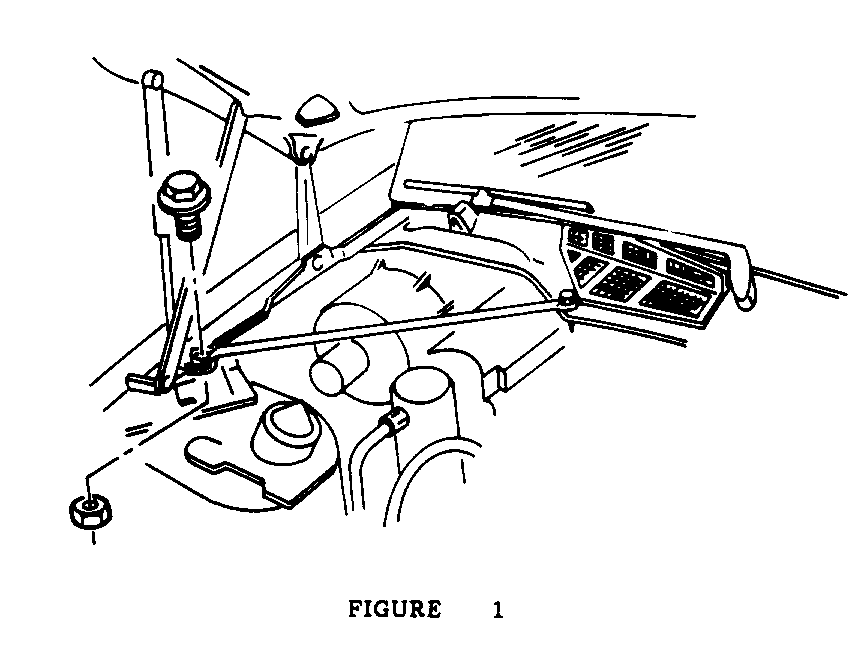
One cause for an under hood squeak on the IROC model may be the fastener used on the fender end of the pencil brace located at the rear of the passenger side engine compartment. This fastener may not provide the retention necessary to adequately hold the brace to the fender. Perform the following steps to address this condition:
1. Open hood.
2. Remove screw aftaching pencil brace to fender. (See Figure 1)
3. Install new bolt through the hole in the fender first, then through the pencil brace. The brace should be located under the fender flange.
4. Attach the nut to the bolt end. Torque the nut to 11 N.m. (8 ft. lbs.)
Labor Operation Number: T1547
Labor Time: 0.2 Hours
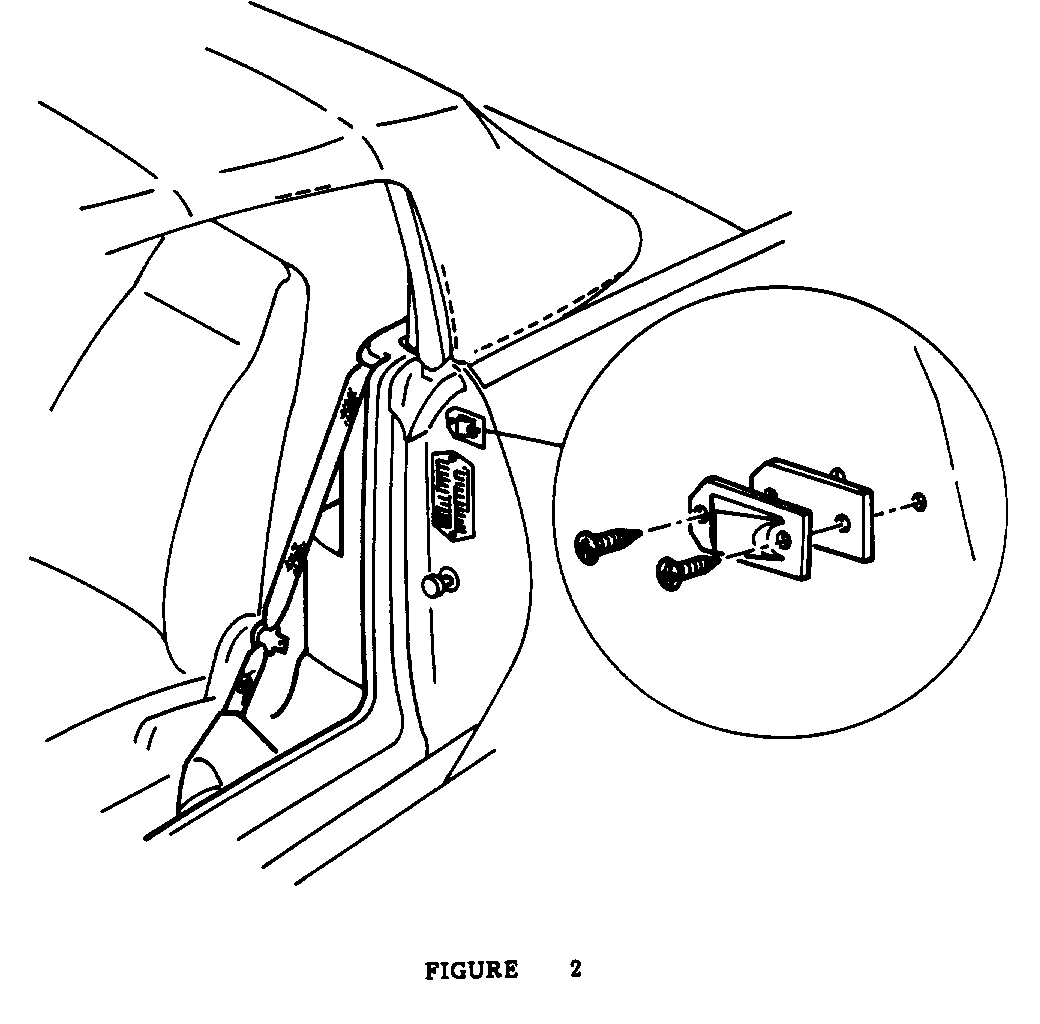
Squeak At Door to Lock Pillar Interface
The wedge plates, originally equipped with the car, have been revised for the 1989 model vehicle. The original plates are a potential source of squeaks.
1. Open door.
2. Remove two (2) screws attaching wedge plate to lock pillar. (See Figure 2)
3. Remove wedge plate.
4. Reverse process to install new wedge plate.
IMPORTANT: The wedge plates received from ASC have been specially coated to address the squeak condition.
5. Repeat steps for remaining side of vehicle
IMPORTANT: The wedge plates must be in light contact when the door is fully closed to maintain the structural integrity of the vehicle. This can be checked by closing a strong piece of paper, such as a dollar bill, in the door at the wedge plate. The piece of paper should not be removable without tearing it. If there is no contact, 1 mm and 2 mm wedge plate shims are available from G.M. Service Parts.
Labor Operation Number: T1548
Labor Time: 0.2 Hours Per Side
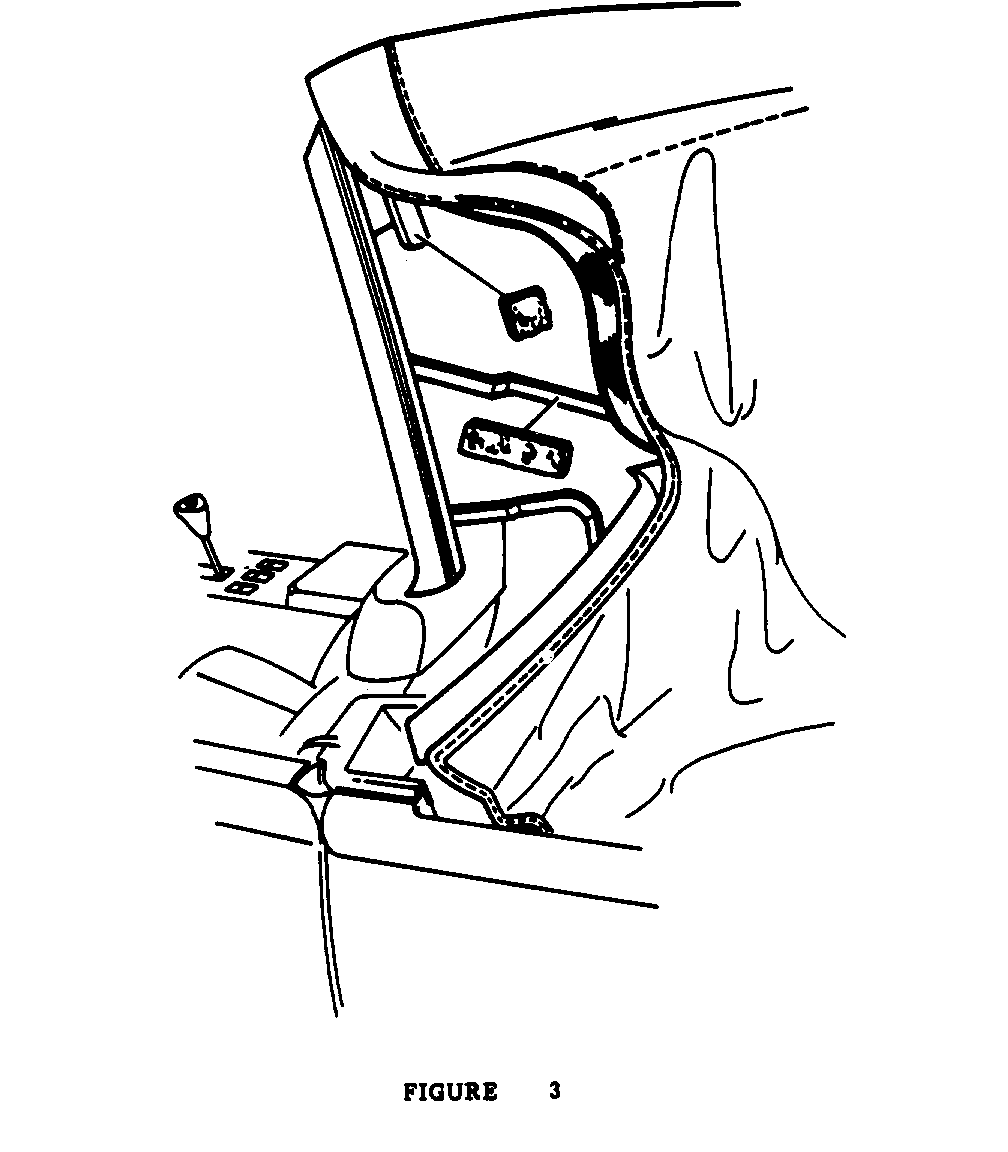
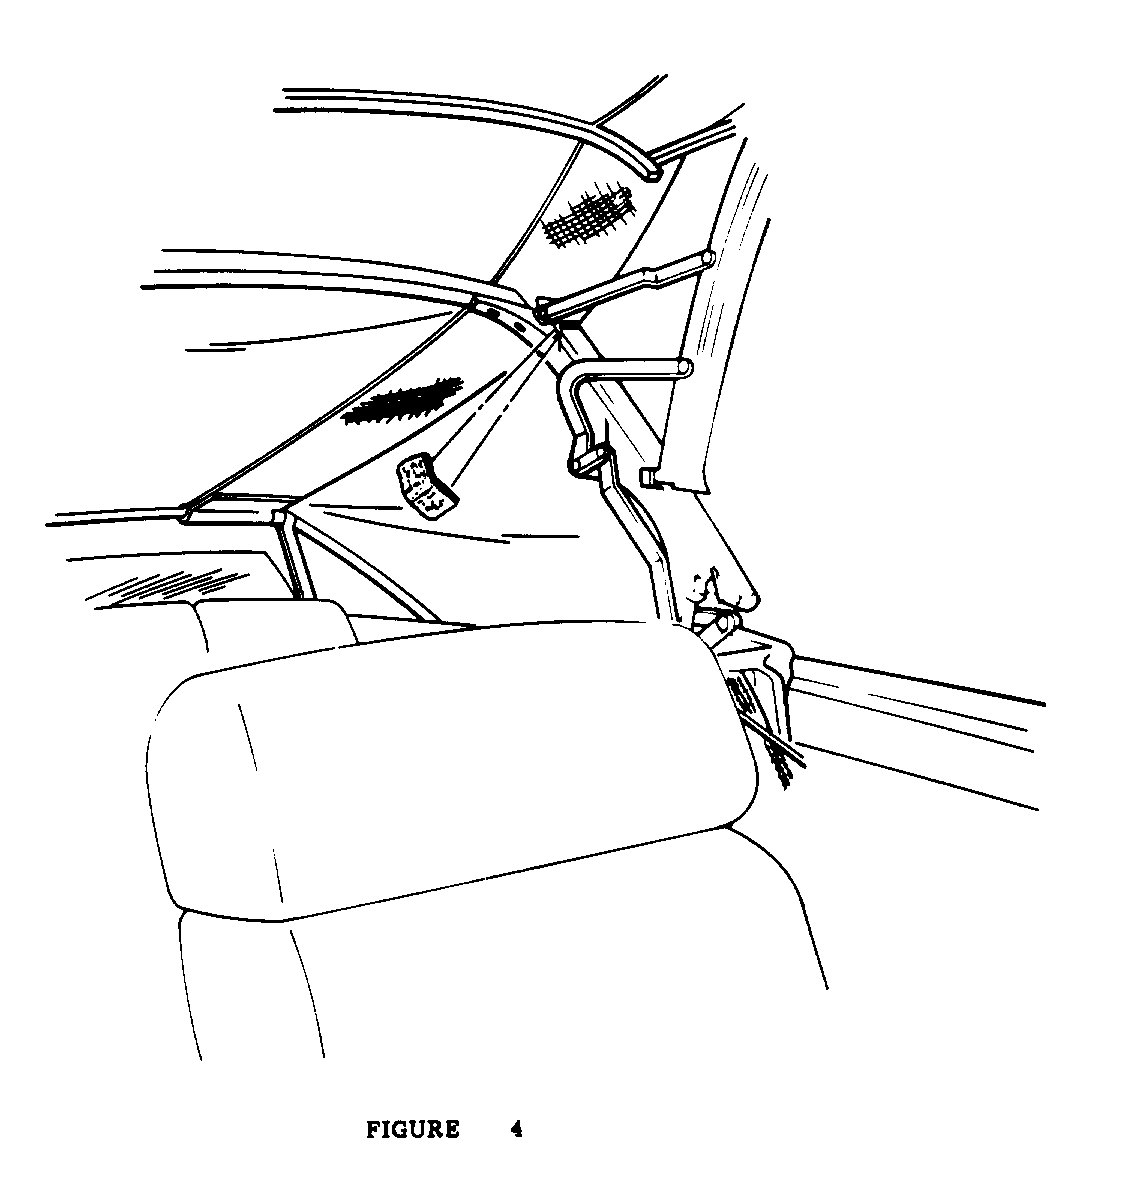
Top Stack Squeaks And Rattles
Some vehicles exhibit rattles due to top stack components making contact with each other. Perform the following to address this condition.
1. Lower the side windows.
2. Pull forward the top release lever located on the left side of the tonneau cover.
3. Raise the rear bow to full vertical position.
4. Push the tonneau cover release switch located on the center of the console.
5. Raise the tonneau cover to full vertical position.
6. Lower the rear bow to the original (horizontal) position.
7. Pull each top latch handle down and rotate it outboard to release the top from the windshield header.
8. Slowly bring the top rearward to the half lowered position.
9. Cut 6 pieces of velcro with the following dimensions:
2 pieces 130 mm X 18 mm ( 5 in. X 3/4 in.)
4 pieces 25 mm x 8 mm (1 in X 3/8 in.)
10. Clean and apply velcro to the areas shown in Figures 3 and 4. Oil-free Naptha or alcohol is recommended for cleaning the areas.
11. Repeat Step 9 for the remaining side of the car.
12. Raise the top to the windshield header and latch the top to the header on both sides.
13. Raise the rear bow to the vertical position.
14. Lower and latch the tonneau cover.
15. Lower and latch the rear bow.
16. Road test vehicle to inspect for top stack squeaks and rattle.
Labor Operation Number: T1549
Labor Time: 0.3 Hours
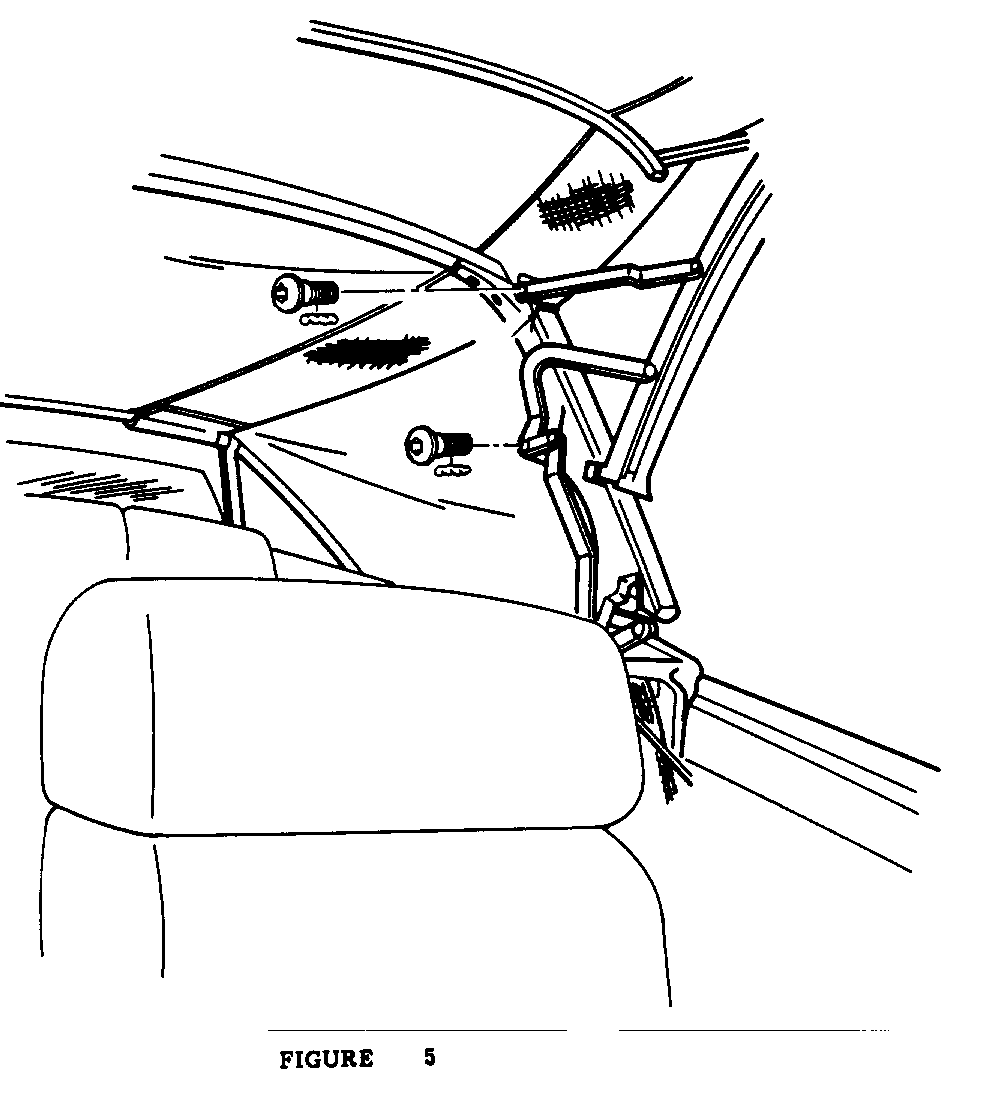
Convertible Top Bolts Loose
Top stack squeaks and rattles may be caused by the bolts in the top linkage working loose. The following procedure should be used to address this condition.
1. Inspect the bolts to insure that they are tight. There are two bolts on each side of the vehicle. (See Figure 5 for locations)
2. If any of the bolts are loose, remove EACH BOLT ONE AT A TIME and apply an adequate amount of Medium strength thread sealant such as G.M. Part #12345382 or Loctite #242 and reinsert the bolt. The proper torque for each of the bolts is 14 N.m. (10 ft. lbs.)
IMPORTANT: Because the bolts are threaded into aluminum, it is critical that the torque for these bolts IS NOT exceeded.
Part is currently available from GMSPO.
Labor Operation Number: T1550
Labor Time: 0.2 Hours
Seals and Windnoise
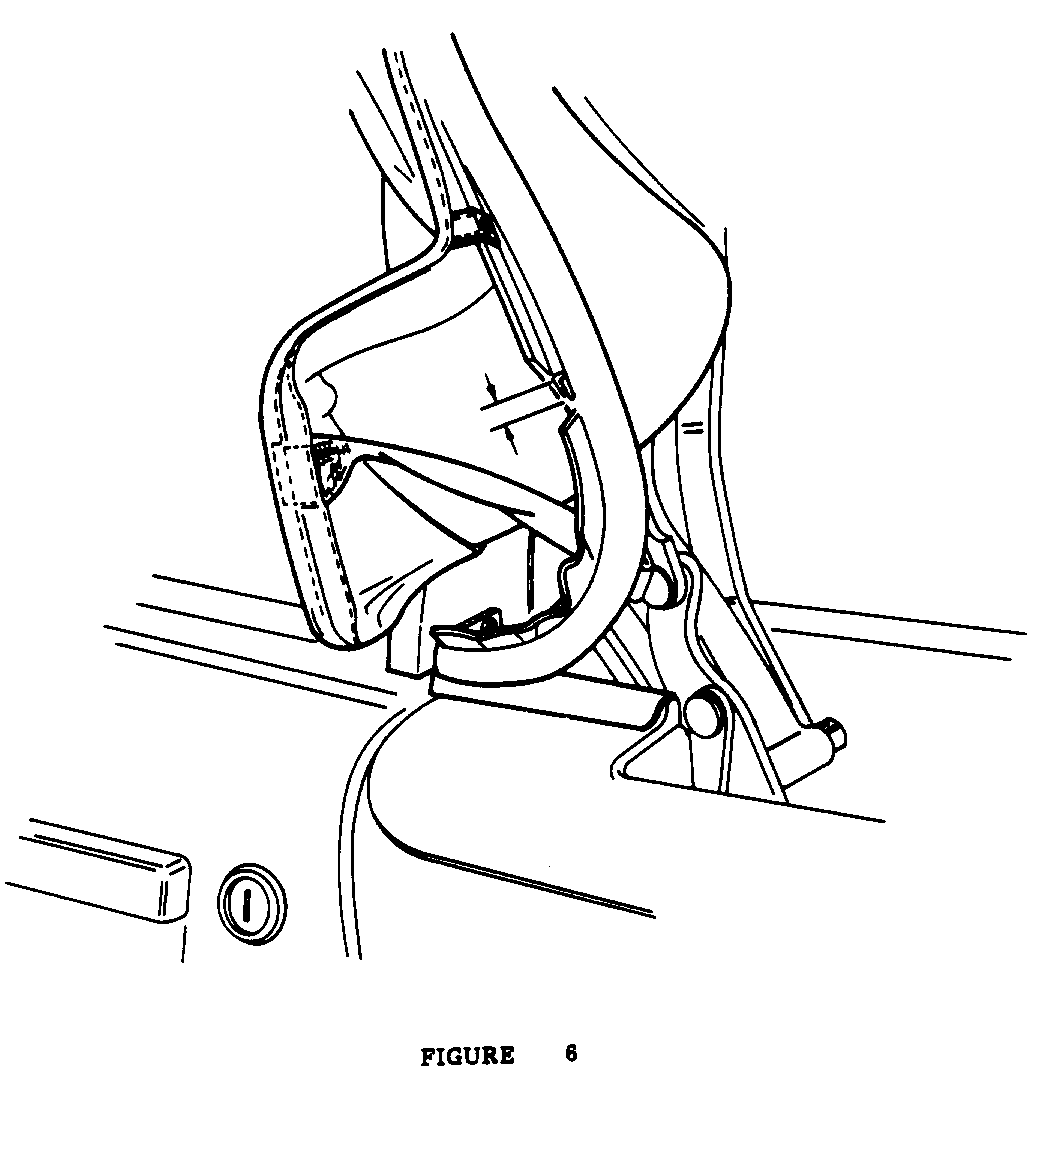
#5 Bow Does Not Seal Properly to Tonneau Panel Near Lock Pillar
Some vehicles may have a mispositioned, loose or torn seal on the #5 bow. This condition may be addressed by performing the following:
1. Pull forward the release lever located on the left (drivers) side of the tonneau cover. Raise the #5 bow to full vertical position.
2. Inspect the seal ends to insure that they are attached to the lock pillar. If they are not, a new seal will be required. Refer to the Service Manual (Section 10-8-13) for replacement of the #5 Bow seal. The seal is G.M. Part #12331772.
3. Verify the position of the seal to the #5 bow as shown in Figure 6. The dimension shown should be at least 10 mm.
4. If the seal is not positioned as in Figure 6, perform the remaining steps.
5. Detach the seal from the #5 bow using a suitable release agent such as 3M 08971 or equivalent.
6. Clean the remaining glue from the seal and from the #5 bow using the same release agent.
7. Apply a continuous bead of weatherstrip adhesive such as 3M 08008 to the retainer channel on the #5 bow.
8. Position the seal on the #5 bow insuring that the seal flap is positioned 10 mm from the end of the #5 bow as shown in Figure 6. Repeat for remaining side.
IMPORTANT: Position both ends BEFORE positioning the rest of the seal.
9. Engage the seal into the seal retainer using a flat-bladed tool.
10. While the #5 bow is vertical, open the tonneau cover using the release switch on the console, lower the #5 bow to horizontal, unlatch the top at the windshield header, and slowly lower the top. Inspect the #5 bow seal as the top is lowered to insure that it is not being pulled tight.
Part is currently available from GMSPO.
Labor Operation Number: T1551
Labor Time: 0.4 Hours
Wind Noise at Window to Lock Pillar Interface
Some vehicles may have lock pillar seals which do not contact the door glass, and thus result in wind noise. To address this condition, perform the following set of instructions.
IMPORTANT: Before carrying out these instructions, be sure that the door glass is properly adjusted. If it is not, adjust it following the instructions in the Service Manual (Section 10-5-23) before continuing.
1. Inspect lock pillar seal at lower rear edge of door glass for contact. If seal does not contact glass, check to see if seal is mispositioned or if the seal is collapsed, if so, proceed with the following steps.
2. Remove lower 150 mm of lock pillar seal using a suitable release agent such as 3M 08971 or equivalent.
3. Using release agent, remove excess adhesive from seal retainer.
4. Apply a continuous bead of weatherstrip adhesive, such as 3M 08008 or equivalent to the seal retainer.
5. If the seal was originally collapsed, insert a 100 mm long, 10 mm (3/8 in.) diameter foam stuffer such as American Dominian Sure Seal product #RRR 3/8 in. or equivalent into the cavity on the carrier side of the seal.
6. Reinstall seal in retainer using a flat bladed tool taking care to insure proper positioning.
Labor Operation Numbers: T1552 Right Side T1553 Left Side
Labor Time: 0.3 Each Side
Appearance
Threaded Seams Pulling Loose
Some top stacks may exhibit seams pulling loose at the sail panel area. In most cases, this condition can be corrected at a trim shop, which is set up for this type of repair. In extreme cases, the top stack may require replacement.
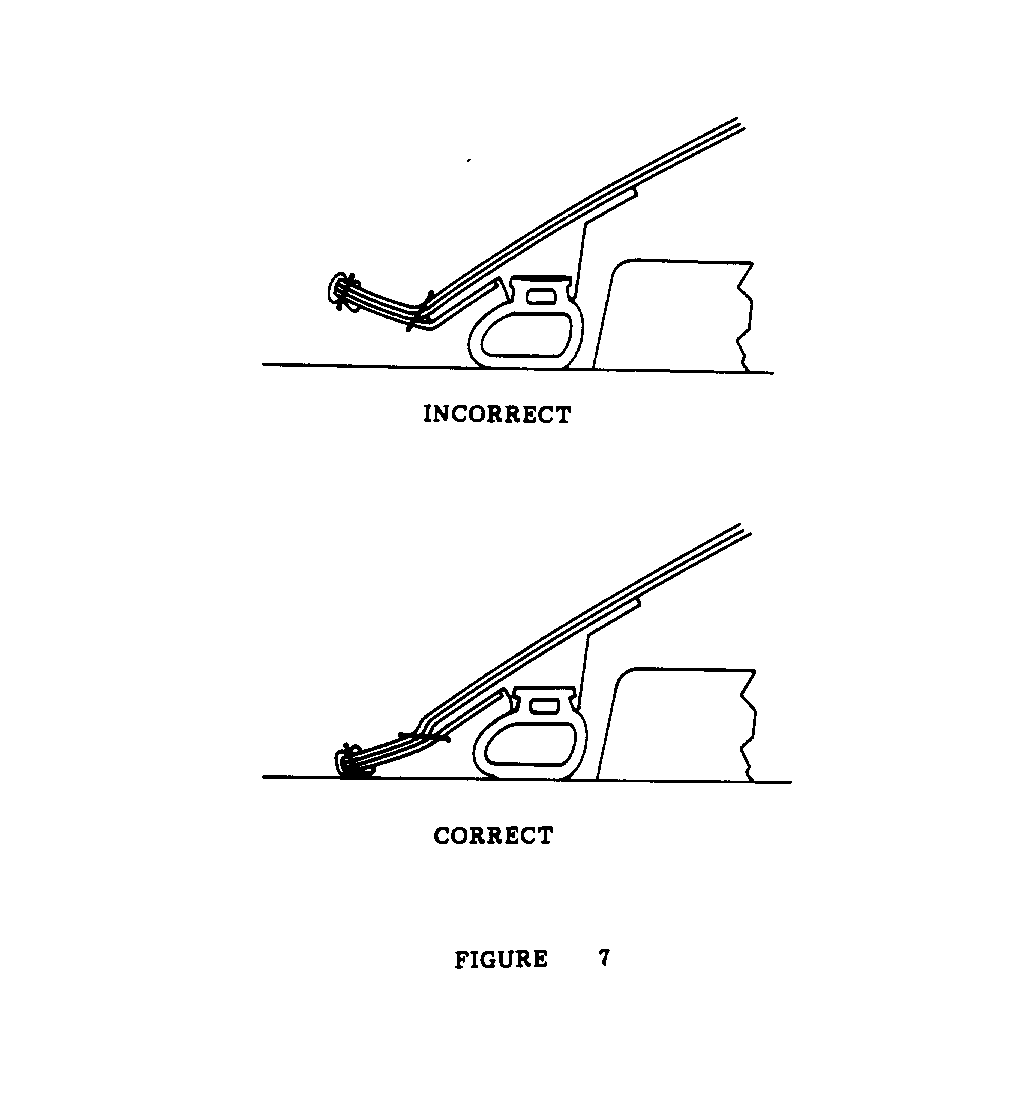
Top Material Coming Loose From #5 Bow
In some cases, the canvas top cover may come unglued from the #5 bow causing the top material to "kick up" at the interface between the tonneau cover and the rear edge of the top. Perform the following to address this condition.
1. Pull forward the top release lever located on the left side of the tonneau cover.
2. Raise the rear bow to full vertical position.
3. Remove the top cover from the #5 bow. The use of a heat gun is recommended to help loosen the cover from the bow.
IMPORTANT: Heat a large area with the heat gun in order to avoid overheating the top.
4. Remove the remaining glue from the #5 bow using a suitable release agent such as 3M 08971 or equivalent.
5. Apply a continuous bead of 3M 08001 Super Weatherstrip adhesive or equivalent to both the surface of the #5 bow and to the gluing area of the top cover.
6. Attach the top cover to the #5 bow starting at the center of the bow and working outboard.
IMPORTANT: When attaching the cover to the #5 bow, the stitch line must be positioned slightly underneath the lower edge of the #5 bow. (See Figure 7)
7. Lower and latch the rear of the top.
8. Inspect appearance along #5 bow.
Labor Operation Number: T1554
Labor Time: 1. 2 Hours
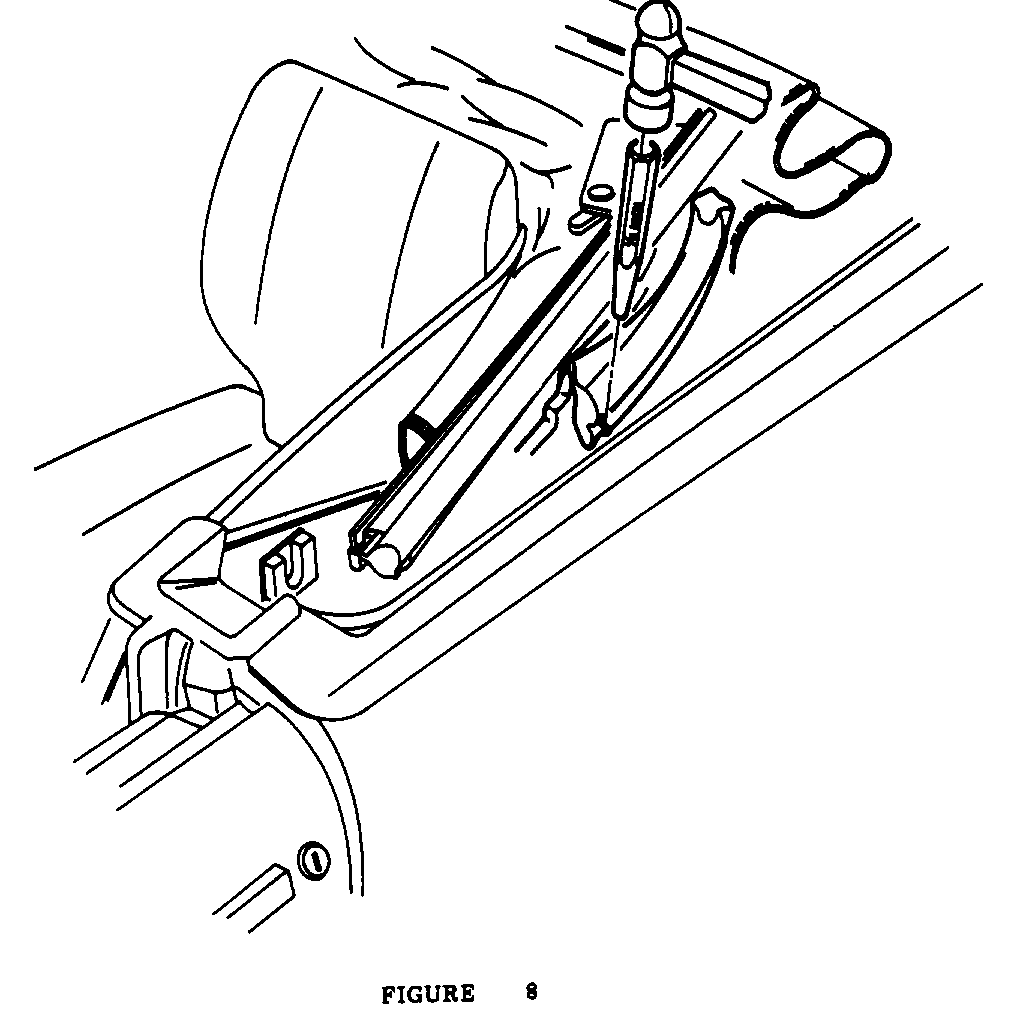
Lock Pillar Weatherstrip Retainer
The lower outboard corner of the lock pillar weatherstrip retainer may cause pinching of the top cover when the top is folded. To avoid this, perform the following:
1. Lower the side windows.
2. Pull forward the top release lever located on the left side of the tonneau cover.
3. Raise the rear bow to full vertical position.
4. Push the tonneau cover release switch located on the center of the console.
5. Raise the tonneau cover to full vertical position.
6. Lower the rear bow to the original (horizontal) position.
7. Pull each top latch handle down and rotate it outboard to release the top from the windshield header.
8. Slowly bring the top rearward to the full down position.
9. Using a hammer and 1/4 in. punch, bend the seal retainer inboard to obtain clearance needed to avoid top cover pinching. (See Figure 8)
10. Repeat for remaining side.
11. Slowly raise top and inspect clearance.
12. Raise the top to the windshield header and latch the top to the header on both sides.
13. Raise the rear bow to the vertical position.
14. Lower and latch the tonneau cover.
15. Lower and latch the rear bow.
Labor Operation Number: T1555
Labor Time: 0.2 Hour
General Motors bulletins are intended for use by professional technicians, not a "do-it-yourselfer". They are written to inform those technicians of conditions that may occur on some vehicles, or to provide information that could assist in the proper service of a vehicle. Properly trained technicians have the equipment, tools, safety instructions and know-how to do a job properly and safely. If a condition is described, do not assume that the bulletin applies to your vehicle, or that your vehicle will have that condition. See a General Motors dealer servicing your brand of General Motors vehicle for information on whether your vehicle may benefit from the information.
