CAMPAIGN: CONVERTIBLE TOP LATCH DISENGAGEMENT

Models: 1989-90 Chevrolet Camaros with Convertible Tops (IROC and RS Models) - (GM Body Style 67)
TO: ALL AFFECTED DEALERS:
General Motors of Canada has determined that certain 1989-90 Chevrolet Camaros (IROC and RS models) with convertible tops may have faulty convertible top latch handles. These latch handles may loosen, which could lead to the latch disengagement when a twisting load is applied. Additionally, the guide pins on the latch handles may fatigue and break. Either of these conditions may result in the front of the convertible top coming away from the windshield frame.
To correct this condition, new latch handle assemblies will be installed with integral anti-ramp stops and stainless steel locating pins.
VEHICLES INVOLVED:
Involved are certain 1989-90 Chevrolet Camaro IROC and RS models equipped with convertible tops (GM body style 67) with the following breakpoints:
YEAR/MODEL PLANT FROM THROUGH ----------- ----- ---- ------- 1989 F Van Nuys (L) SOP KL210721 1990 F Van Nuys (L) SOP LL121103
All affected vehicles have been identified by the VIN listing provided to involved dealers with this bulletin. Any dealer not receiving a listing was not shipped any of the affected vehicles.
DEALER CAMPAIGN RESPONSIBILITY:
Dealers are to service all vehicles subject to this campaign at no charge to owners, regardless of mileage, age of vehicle, or ownership, from this time forward.
Whenever a vehicle subject to this campaign is taken into your new or used vehicle inventory, or it is in your dealership for service in the future, you should take the steps necessary to be sure the campaign correction has been made before reselling or releasing the vehicle.
Owners of vehicles recently sold from your new vehicle inventory are to be contacted by the dealer, and arrangements made to make the required modification according to instructions contained in this bulletin.
CAMPAIGN PROCEDURE:
Refer to Section 4 of the Service Policies and Procedures Manual for the detalled procedure on handling Product Campaigns. Dealers are requested to complete the campaign on all transfers as soon as possible.
OWNER NOTIFICATION:
All owners of record at the time of campaign release are shown on the attached computer listing and have been notified by first class mail from General Motors. The listings provided are for campaign activity only and should not be used for any other purpose.
PARTS INFORMATION:
Parts required to complete this campaign will be shipped directly to involved dealers. Parts will be shipped on a 'NO CHARGE' basis.
PARTS AND LABOUR CLAIM INFORMATION:
Credit for the campaign work performed will be paid upon receipt of a properly completed campaign claim card, RAPID terminal or DCS transmission in accordance with the following:
Repair Code Description Time Allowance ------------ ------------ -------------- 1A Inspect for Modified Latch Handles .3 (previously installed)
2A Inspect and Install Modified Latch Kit .8
An allowance of $92.00 has been included in Repair Code 2A for handling.
SERVICE PROCEDURE:
THE FOLLOWING INFORMATION OUTLINES AND ILLUSTRATES THE PROCEDURE WHICH MUST BE USED TO CORRECTLY REPLACE THE CONVERTIBLE TOP LATCH HANDLE ASSEMBLIES. RETAINING BRACKETS (INCLUDED IN THE 1989 KIT) FOR THE NO. 1 BOW GARNISH MOULDING WILL BE INSTALLED ON SOME 1989 VEHICLES AS PART OF THE PROCEDURE.
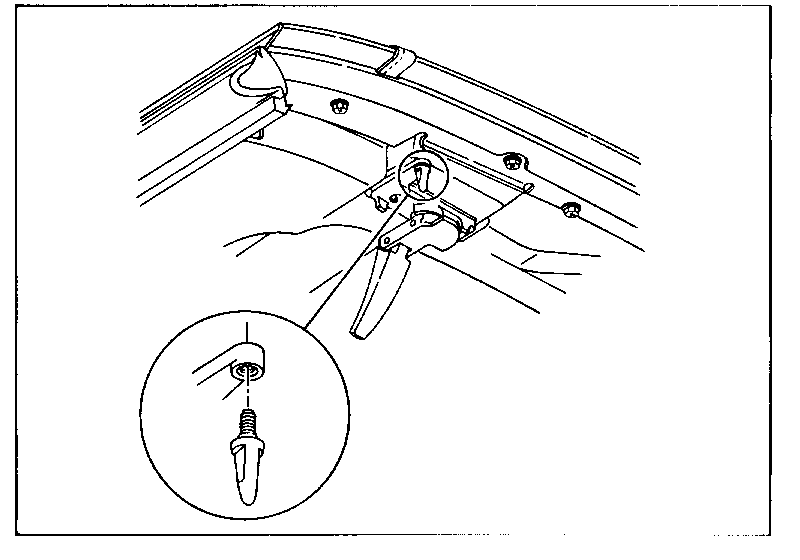
1. Inspect both sides for previously installed modified latch handles. (Figure A below - correct latch handles will have stainless steel pins with flats. If vehicle has modified latch handles install Campaign Identification Label and return vehicle to customer. If vehicle does not have modified latch handles proceed with steps 2 through 25.
2. Lower side windows.
3. Pull release lever on left side of tonneau cover forward to release rear bow.
4. Raise rear bow to full vertical position.
5. Push tonneau cover release switch, located on console, rearward to release tonneau cover.
6. Assure tonneau cover raises to full vertical position.
7. Lower rear bow to original position.
8. Pull each top latching handle down and rotate to release top from windshield header.
9. Slowly bring top rearward until all the way down.
NOTICE: No. 1 bow garnish moulding on some vehicles may have been previously modified with a retaining bracket (see 8, Fig. 3). If moulding has already been modified, perform Step 14 and then Steps 20 through 25, otherwise proceed with Steps 10 through 25.
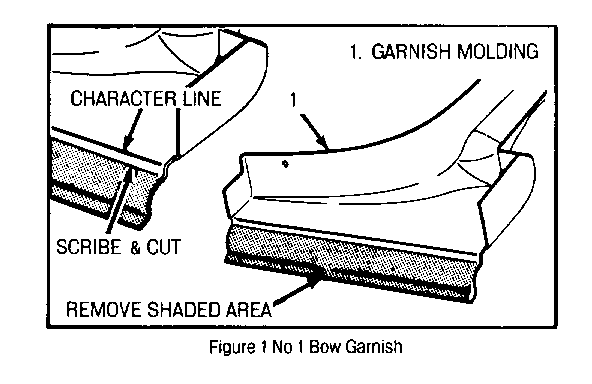
10. Remove No. 1 bow garnish moulding (1, Fig. 1).
11. Scribe a line across underside of No. 1 bow garnish moulding (1, Fig. 1) at character line.
12. Cut No. 1 bow garnish moulding (1, Fig. 1) along scribe line using tin snips of other appropriate tool.
13. Remove all burrs from No. 1 bow garnish moulding (1, Fig. 1) using a file.
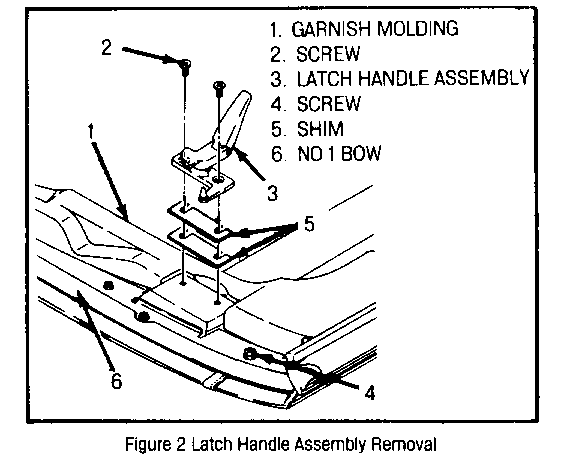
14. Remove screws (2, Fig. 2) retaining latch handle assemblies (3, Fig. 2) to top No. 1 bow assembly, 6, Fig. 2) and discard old latch handles (retain 2 shims per side to be installed in step 20).
NOTICE: Screws retaining latch handles have Locktite applied to them when installed and may be difficult to remove. Be careful not to strip screw heads when removing (an impact wrench may help in breaking loose Locktite on screws.)
15. Remove second most inner screw on both sides (4, Fig. 2) retaining the No. 1 bow retaining strip to the No. 1 bow (6, Fig. 2).
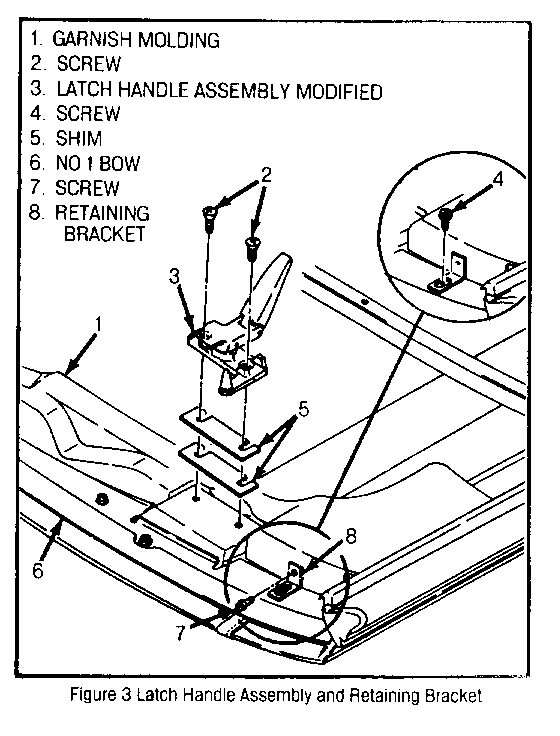
16. Position No. 1 bow garnish moulding retaining brackets (8, Fig. 3) onto No. 1 bow retaining strip at second most inner screw hole and install screws (4, Fig. 3).
17. Position No. 1 bow garnish moulding (1, Fig. 3) onto No. 1 bow (6, Fig. 3).
NOTICE: Be sure No. 1 bow garnish moulding (1, Fig. 3) covers No. 1 bow garnish moulding retaining bracket (8, Fig. 3).
18. Using a 9/64 in. drill bit, firmly press No. 1 bow garnish moulding (1, Fig. 3) against No. 1 bow garnish moulding retaining bracket (8, Fig. 3) and drill a hole through No. 1 bow garnish moulding (1, Fig. 3) and through centre of No. 1 bow garnish moulding retaining bracket (8, Fig. 3).
19. Install screws (7, Fig. 3) to secure No. 1 bow garnish moulding retaining bracket (8, Fig. 3) to No. 1 bow garnish moulding (1, Fig. 3).
20. Install new latch handle assembly (3, Fig. 3) to top bow (6, Fig. 3) first installing two shims per side (from step 14) between latch handle assembly and No. 1 bow. If assembly includes more than two shims per side, eliminate extra shims.
21. Secure latches with new screws (2, Fig. 3) provided in kit.
NOTICE: When installing latch handle screws, apply Locktite or equivalent to screw threads.
22. Raise and latch top to windshield header.
23. Push each latch handle up into stowed position.
24. Check each latch handle to ensure it will not rotate backward when in stowed position.
25. Install Campaign Identification Label.
INSTALLATION OF CAMPAIGN IDENTIFICATION LABEL
Clean surface of radiator upper mounting panel and apply a Campaign Identification Label. Make sure the correct campaign number is inserted on the label. This will indicate that the campaign has been completed.
Dear General Motors Customer:
General Motors of Canada has determined that certain 1989-90 Chevrolet Camaros (IROC and RS models) equipped with convertible tops may have faulty convertible top latch handles. These latch handles may loosen, which could lead to the latch disengagement when a twisting load is applied. Additionally, the guide pins on the latch handles may fatigue and break. Either of these conditions may result in the front of the convertible top coming away from the windshield frame.
To correct this condition, new latch handle assemblies will be installed with integral anti-ramp stops and improved stainless steel locating pins (with flats). This serviee will be performed for you at no charge.
Please contact your GM deater as soon as possible to arrange a service date.
This letter identifies your vehicle. Presentation of this letter to your dealer will assist their Service personnel in completing the necessary correction to your vehicle in the shortest possible time.
Further assistance, if required, may be obtained from our Customer Assistance Centre, toll free, by calling 1-800-263-3777.
We are sorry to cause you this inconvenience; however, we have taken this action in the interest of your continued satisfaction with our products.
General Motors bulletins are intended for use by professional technicians, not a "do-it-yourselfer". They are written to inform those technicians of conditions that may occur on some vehicles, or to provide information that could assist in the proper service of a vehicle. Properly trained technicians have the equipment, tools, safety instructions and know-how to do a job properly and safely. If a condition is described, do not assume that the bulletin applies to your vehicle, or that your vehicle will have that condition. See a General Motors dealer servicing your brand of General Motors vehicle for information on whether your vehicle may benefit from the information.
