Tools Required
| • | EN-47623 Rear Main Seal Installer |
| • | J 8092 Drive Handle |
| • | J 45059 Torque Angle Meter |
Removal Procedure
- Raise and support the vehicle. Refer to Lifting and Jacking the Vehicle in General Information.
- Drain the cooling system. Refer to Draining and Filling the Cooling System in Engine Cooling.
- Drain the engine oil. Refer to Engine Oil and Oil Filter Replacement.
- Remove the engine flywheel. Refer to Engine Flywheel Replacement .
- Remove the oil pan. Refer to Oil Pan Replacement .
- Remove the crankshaft rear oil seal housing bolts.
- Remove the crankshaft rear oil seal housing and gasket.
- Place the crankshaft rear oil seal housing face down on a clean surface and support with blocks of wood.
- Use a suitable driving tool and hammer and lightly tap around the outer edge of the seal to remove it.
- Clean and inspect the crankshaft rear oil seal housing making sure it is free of any foreign material.
- Inspect the ID of the bore. Correct or replace the crankshaft rear oil seal housing as required.
- Inspect the crankshaft for nicks or burrs on the surface that contacts the seal.
- Repair or replace the crankshaft as required.
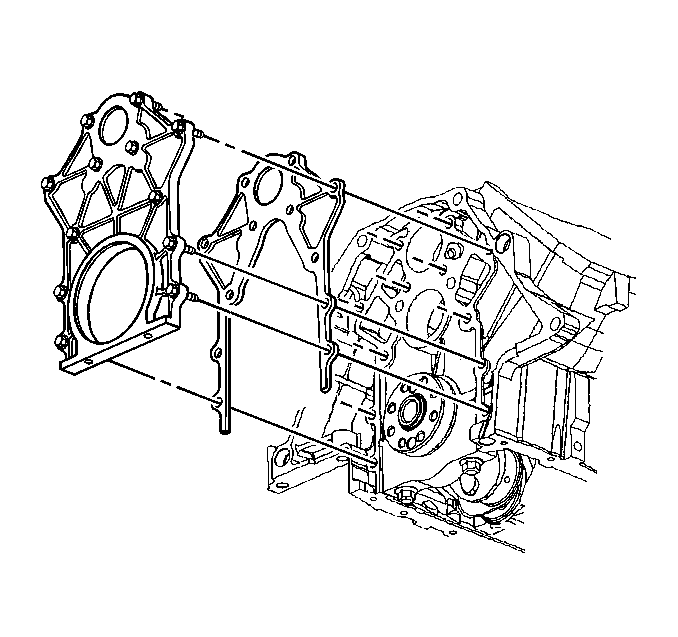
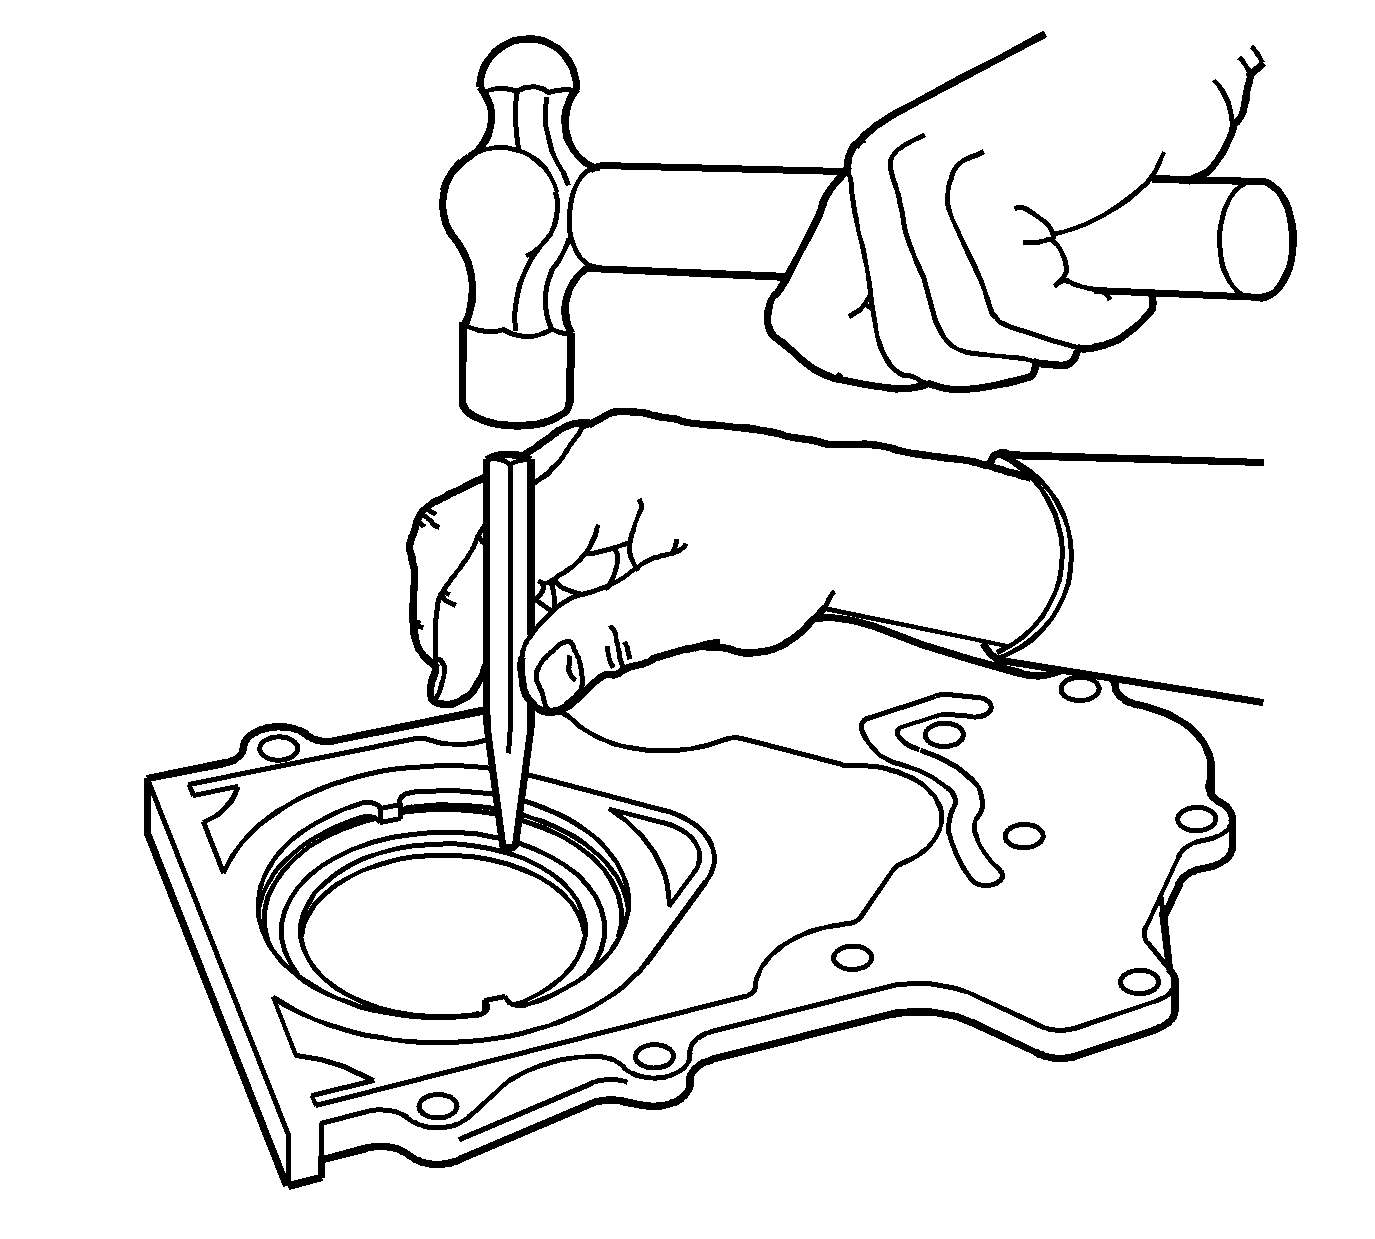
Important: Ensure not to damage the crankshaft outside diameter surface with any tool.
Installation Procedure
- Carefully remove protection sleeve from the new rear oil seal assembly.
- Install the seal onto EN-47623 by placing the seal on an angle and using a twisting motion until it is fully seated.
- Place EN-47623 along with J 8092 onto the housing as shown and apply a constant downward force until the seal is fully seated.
- Install the crankshaft rear oil seal housing and finger tighten all the bolts (loose enough to adjust the crankshaft rear oil seal housing) to hold the crankshaft rear oil seal housing in place. Make sure the gasket is not higher than the crankshaft rear oil seal housing.
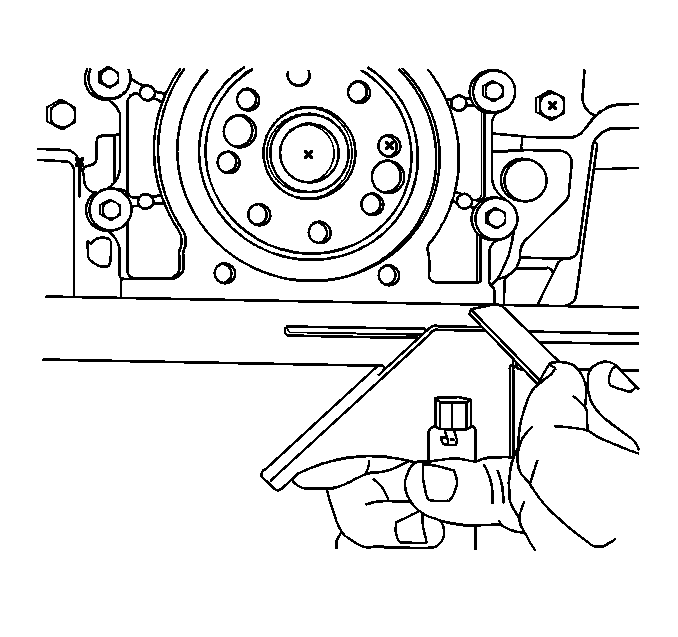
- Place a straight edge on the cylinder block oil pan flange and the rear oil seal housing flange. Use a feeler gage to make sure that there is no more than 0.1016 mm (0.004 in) step (high or low) on each side. Rotate the crankshaft rear oil seal housing to get the step equal on each side, if necessary. If the crankshaft rear oil seal housing can not be rotated to get the step within specification, replace the crankshaft rear oil seal housing.
- Tighten the crankshaft rear oil seal housing bolts.
- Tighten the crankshaft rear oil seal housing bolts to 15 N·m (11 lb ft).
- Use the J 45059 to rotate the crankcase rear oil seal housing bolts an additional 50 degrees.
- Recheck the step height on each side to make sure that the crankshaft rear oil seal housing did not move while tightening the bolts. If the step height is beyond specification, repeat steps 4 through 8 and measure again. If excessive clearance is still present, replace the crankshaft rear oil seal housing.
- Install the new crankshaft rear oil seal.
- Install the oil pan. Refer to Oil Pan Replacement .
- Install the engine flywheel. Refer to Engine Flywheel Replacement .
- Lower the vehicle.
- Fill the cooling system. Refer to Draining and Filling the Cooling System in Engine Cooling.
- Fill the crankcase with engine oil. Refer to Engine Oil and Oil Filter Replacement.
- Inspect for leaks.
Important: Do not apply or use any oil lubrication on the rear main oil seal, rear main oil seal housing or rear main seal installer EN-47623 . Do not touch the sealing lip of the rear main oil seal once the protection sleeve is removed. Doing so will damage/deform the seal.
Clean the crankshaft sealing surface with a clean lint-free towel. Inspect lead-in edge of the crankshaft for burrs/sharp edges that could damage the rear main oil seal. Remove burrs/sharp edges with crocus cloth before proceeding.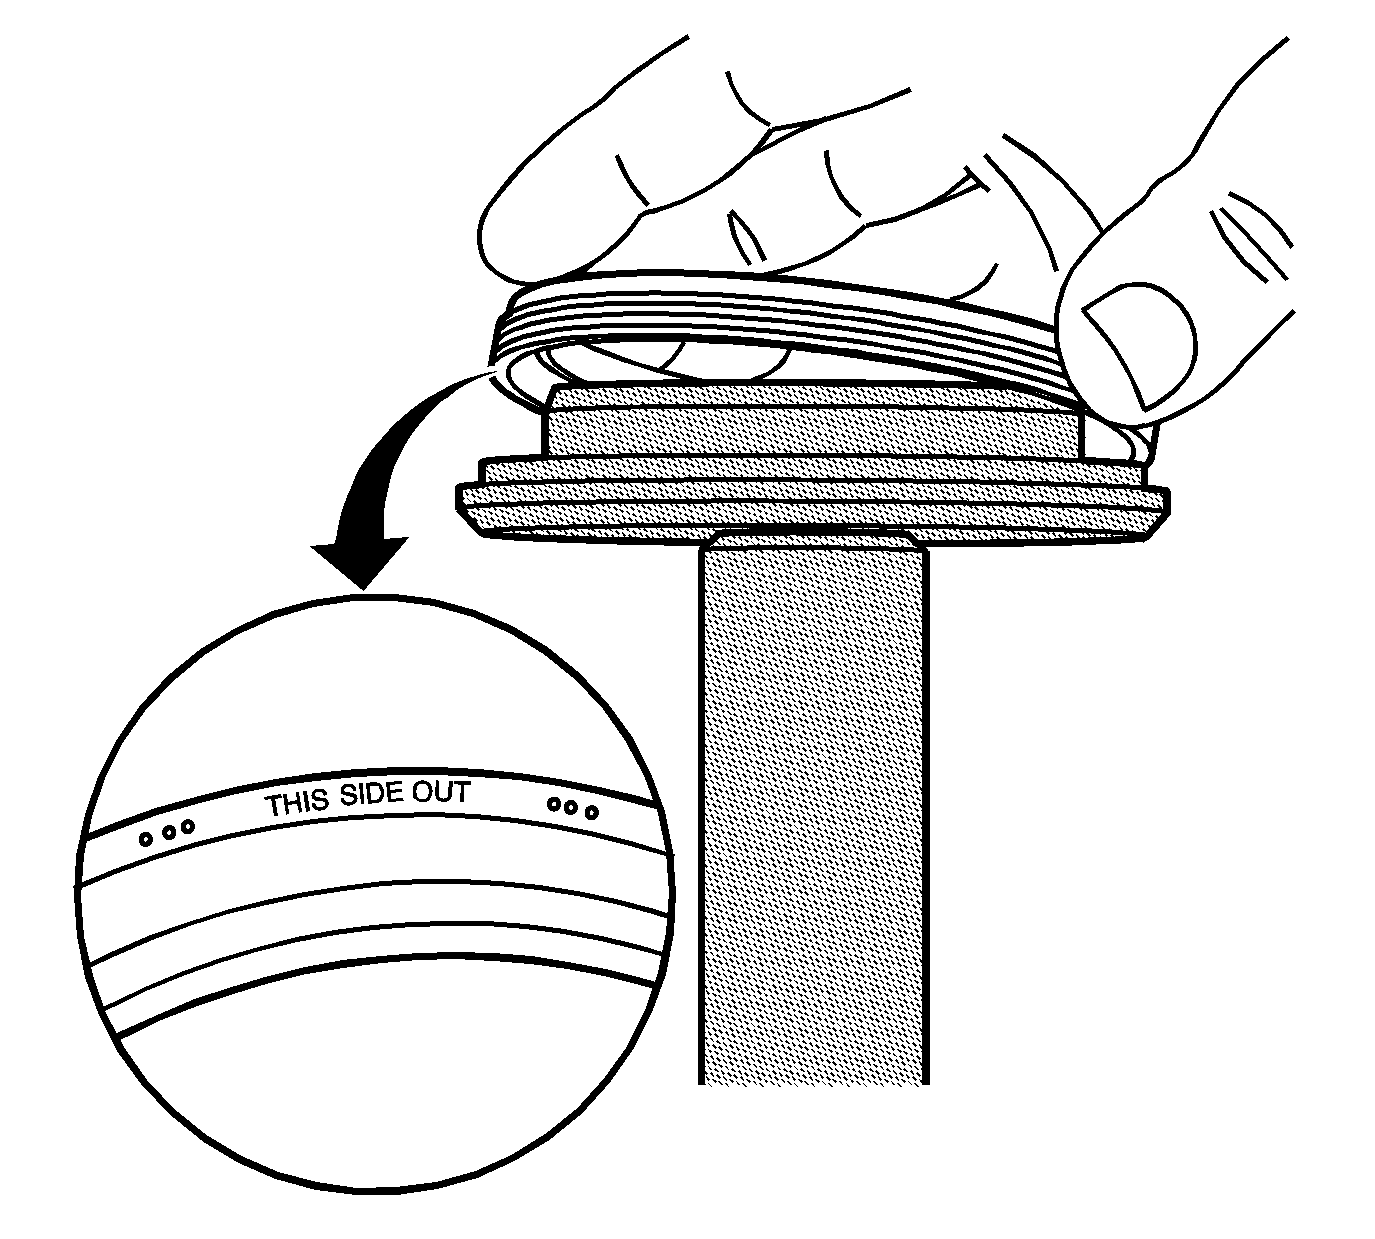
Important: Notice the direction of the rear oil seal. The new design seal is a reverse style as opposed to what has been used in the past. THIS SIDE OUT has been stamped into the seal as shown in the graphic.
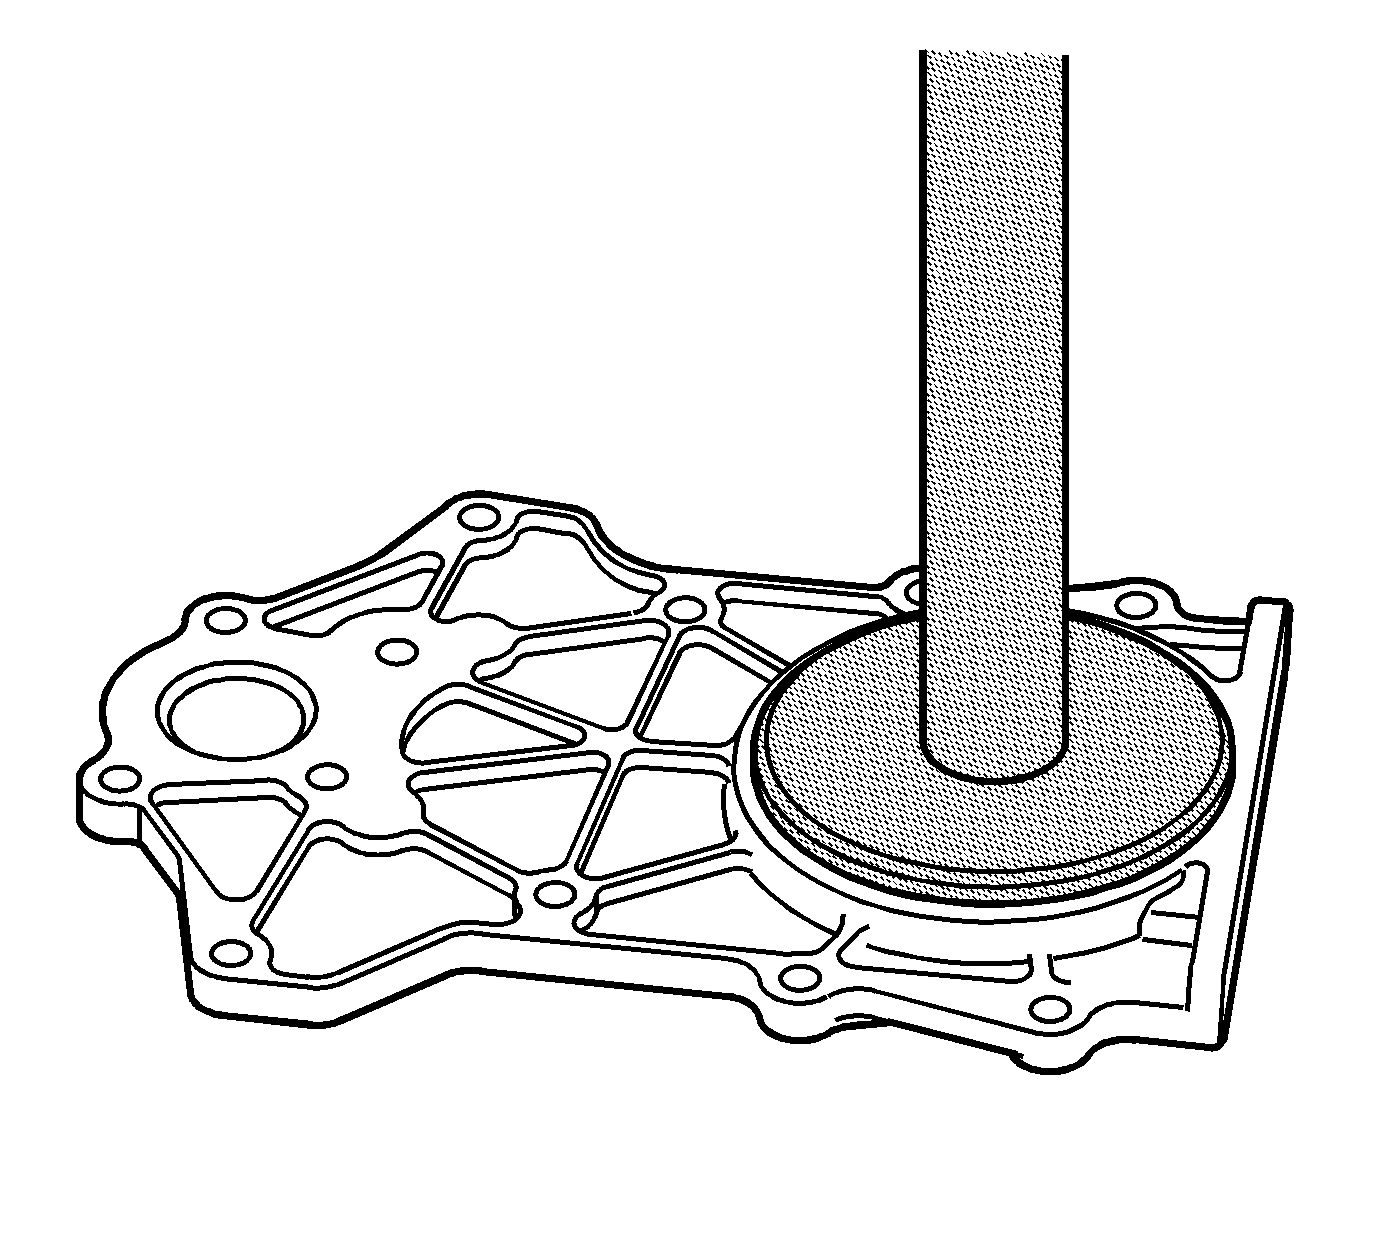
Important: Do not use a sealant or adhesive when installing the rear oil seal. Use of a sealant or adhesive can cause improper sealing.

Notice: Correct alignment of the housing is crucial to sealing ability of the rear main and the oil pan. Take care when installing the housing to ensure that the housing is properly aligned. Failure to follow these procedures may result in oil leaks.
Plastic inserts in the crankshaft rear oil seal housing are only used as an assembly aid and are not required for service.
Notice: Use the correct fastener in the correct location. Replacement fasteners must be the correct part number for that application. Fasteners requiring replacement or fasteners requiring the use of thread locking compound or sealant are identified in the service procedure. Do not use paints, lubricants, or corrosion inhibitors on fasteners or fastener joint surfaces unless specified. These coatings affect fastener torque and joint clamping force and may damage the fastener. Use the correct tightening sequence and specifications when installing fasteners in order to avoid damage to parts and systems.
Tighten
