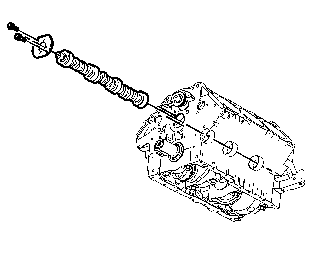
Removal Procedure
- Recover the refrigerant. Refer to SECTION 1B.
- Remove the radiator with the A/C condenser. Refer to SECTION 6B.
- Remove the valve lifters. Refer to
Valve Lifter Replacement
.
- Remove the engine front cover. Refer to
Engine Front Cover Replacement
.
- Remove the camshaft sprocket. Refer to
Timing Chain and Sprocket Replacement
.
Notice: All camshaft journals are the same diameter, so care must be used in
removing or installing the camshaft to avoid damage to the camshaft bearings.

- Remove the camshaft thrust plate bolts.
- Remove the camshaft thrust plate.
Important: Do not attempt to repair the camshaft, replace it if it is damaged.
If a new camshaft is installed, all valve lifters must be replaced. Replace
trhe camshaft bearings, if necessary.
- Use the following procedure to remove the camshaft:
| 8.1. | Install three 5/16-18 x 4 in bolts in the camshaft
bolt holes. |
| 8.2. | Carefully rotate and pull the camshaft out of the bearings. |
- Inspect the sprocket.
- Inspect the keyway and threads.
- Inspect the bearing surfaces lobes for the following conditions:
| • | Overheating (discoloration) |
- Measure the bearing journals. Use a micrometer in order to measure
the diameter and run-out. If the journals are out of specification replace
the camshaft.
Installation Procedure
- Coat the camshaft with prelube GM P/N 12345501 or equivalent
before installation.

- Install the camshaft.
- Install the camshaft thrust plate.
- Install the camshaft thrust plate bolts.
Tighten
Tighten the thrust plate bolts to 15 N·m (11 lb ft).
- Install the camshaft sprocket. Refer to
Timing Chain and Sprocket Replacement
.
- Install the engine front cover. Refer to
Engine Front Cover Replacement
.
- Install the valve lifters. Refer to
Valve Lifter Replacement
.
- Install the radiator with the A/C condenser. Refer to SECTION
6B.
- Charge the A/C system. Refer to SECTION 1B.


