For 1990-2009 cars only
Oil Pan Replacement With Manual Transmission
Removal Procedure
- Disconnect the negative battery cable.
- Disconnect the Intake Air Temperature (IAT) sensor connector.
- Remove the resonator and air intake duct from the throttle body.
- Raise and suitably support the vehicle. Refer to SECTION 0A.
- Drain the engine oil.
- Remove the starter motor. Refer to SECTION 6D2.
- Remove the flywheel housing cover.
- Remove the manual transmission. Refer to SECTION 7B.
- Support the engine.
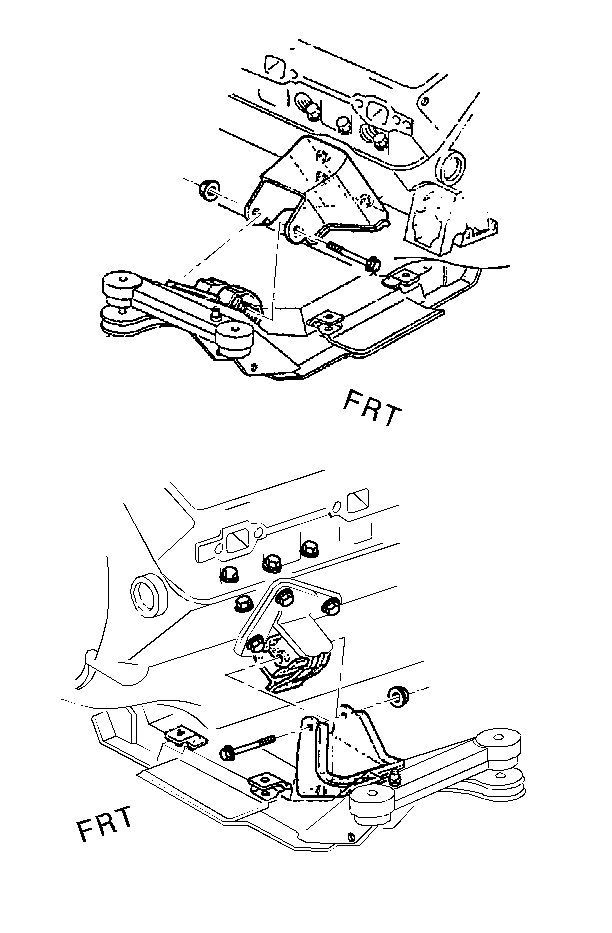
- Remove the engine mount through bolts.
- Remove the oil filter and adapter.
- Disconnect the oil level sensor electrical connector.
- Remove the oil level sensor from the oil pan.
- Remove the oil pan bolts, the stud and the nuts.
- Remove the engine wire harness brackets, the oil pan reinforcements and the oil pan gasket.
- Rotate the crankshaft to reposition the counterweights if necessary.
- Clean the oil pan and the engine block gasket surfaces.


Installation Procedure
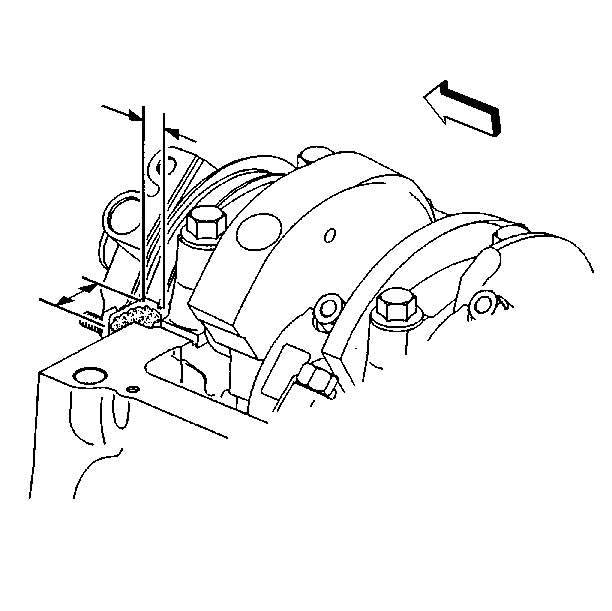
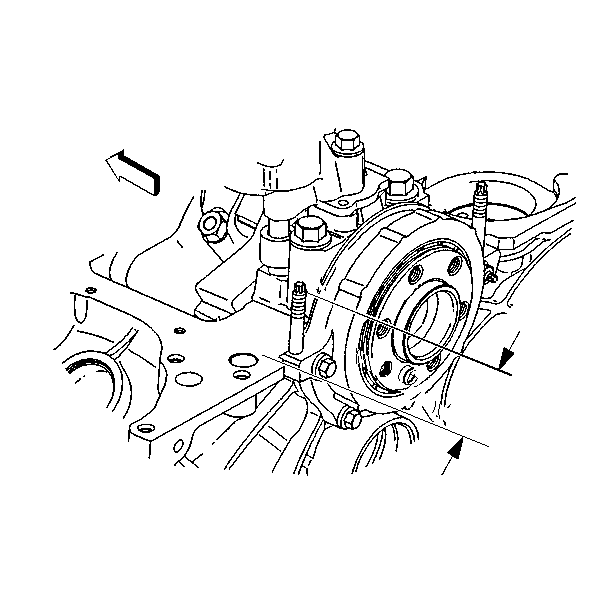
Important: Apply the sealer 25 mm (1.0 in) in either direction of the radiuse cavity of the junctions.
- Apply a small amount of the sealer, GM P/N 12346004 or the equivalent 10 mm (0.393 in) wide and 20 mm (0.787 in) long to the engine front cover to engine block junction.
- Apply a small amount of sealer, GM P/N 12346004 or the equivalent, 25 mm (1 in) long to the crankshaft rear oil seal housing to engine block junction.
- Install the following parts:
- Lower the engine.
- Install the oil pan nuts, the bolts, and the stud.
- Install the oil level sensor to the oil pan.
- Install the oil level sensor electrical connector.
- Install the oil filter and adapter.
- Install the engine mount through bolts.
- Install the manual transmission. Refer to SECTION 7B.
- Remove the engine support.
- Install the flywheel housing cover.
- Install the starter motor. Refer to SECTION 6D2.
- Lower the vehicle.
- Refill the engine with oil.
- Install the resonator and air intake duct to the throttle body.
- Install the intake air temperature (IAT) sensor connector.
- Connect the negative battery cable.


| • | The oil pan gasket |
| • | The oil pan |
| • | The oil pan reinforcements and the engine wire harness brackets |
Tighten
| • | Tighten the corner oil pan and nuts to 20 N·m (15 lb ft.). |
| • | Tighten the remainder of the oil pan bolts and stud to 12 N·m (106 lb in). |

Tighten
Tighten the oil level sensor to 20 N·m (15 lb ft).

Tighten
Tighten the engine mount through bolts to 95 N·m (70 lb ft).
Tighten
Tighten the flywheel housing cover bolts to 8.5 N·m (75 lb in).
Tighten
Tighten the negative battery cable to 15 N·m (11 lb ft).
Oil Pan Replacement With Automatic Transmission
Removal Procedure
- Disconnect the negative battery cable.
- Disconnect the Intake Air Temperature (IAT) sensor electrical connector.
- Remove the resonator and air intake duct from the throttle body.
- Raise and suitably support the vehicle. Refer to SECTION 0A.
- Drain the engine oil.
- Remove the oxidation catalytic converter. Refer to SECTION 6F.
- Remove the exhaust pipe hanger bolt and reposition the exhaust pipe.
- Remove the starter motor. Refer to SECTION 6D2.
- Remove the transmission converter cover. Refer to SECTION 7A.
- Remove the engine mount through bolts.
- Raise the engine with a jacking fixture.
- Disconnect the oil level sensor electrical connector.
- Remove the transmission fluid cooler lines from the clip at the oil pan bracket.
- Remove the oil level sensor from the oil pan.
- Remove the oil pan bolts, the stud, and the nuts.
- Remove the engine wire harness brackets, oil pan reinforcements, and the oil pan gasket.
- Rotate the crankshaft to reposition the counterweights, if necessary.
- Clean the oil pan and the engine block gasket surfaces.


Installation Procedure
Important: Apply the sealer 25 mm (1.0 in) in either direction of the radius cavity of the junctions.
- Apply a small amount of the sealer, GM P/N 12346004 or the equivalent, 10 mm (0.393 in) wide and cover 20 mm (0.787 in) long to the engine front cover to engine block junction.
- Apply a small amount of sealer, GM P/N 12346004 or the equivalent, 25 mm (1.0 in) long to the crankshaft rear oil seal housing to engine block junction.
- Install the following parts:
- Install the oil pan nuts, the bolts, and the stud.
- Install the transmission oil cooler lines to the clip at the oil pan bracket.
- Install the oil level sensor to the oil pan.
- Connect the oil level sensor electrical connector.
- Lower the engine and remove the jacking fixture.
- Install the engine mount through bolts.
- Install the transmission converter cover. Refer to SECTION 7A.
- Install the starter motor. Refer to SECTION 6D2.
- Install the exhaust pipe hanger bolt.
- Install the oxidation catalytic converter. Refer to SECTION 6F.
- Lower the vehicle.
- Refill the engine with oil.
- Install the resonator and air intake duct to the throttle body.
- Install the Intake Air Temperature (IAT) sensor connector.
- Connect the negative battery cable.


| • | The oil pan gasket |
| • | The oil pan |
| • | The oil pan reinforcements, and the engine wire harness brackets |
Tighten
| • | Tighten the corner oil pan nuts to 20 N·m (15 lb ft). |
| • | Tighten the remainder of the oil pan bolts and stud to 12 N·m (106 lb in). |

Tighten
Tighten the oil level sensor to 20 N·m (15 lb ft).

Tighten
Tighten the engine mount through bolts to 95 N·m (70 lb ft).
Tighten
Tighten the negative battery cable to 15 N·m (11 lb ft).
