Aluminum Radiator Service
This radiator uses an aluminum core with plastic side tanks. The core
and side tanks can be replaced separately. Core repair is easily made with
the hot melt adhesive method. An automatic transmission oil cooler is located
in one of the side tanks. The radiator drain cock is also located on the lower
part of one of the side tanks. The following components are serviceable:
| • | Tanks and gaskets (Tanks cannot be repaired if broken or cracked.) |
| • | Radiator drain cock and gasket |
Precautions
| • | DO NOT remove the radiator cap while the engine is at normal operating
temperature. The cooling system will release scalding fluid and steam if the
cap is removed while the engine and radiator are still hot. |
| • | DO NOT use boil-out tanks or any tank that has been used for copper
or brass radiators. |
| • | DO NOT open the hood if steam or coolant can be seen escaping
from the engine compartment. |
| • | DO NOT remove the cap on the coolant recovery reservoir if an
engine over heat condition is suspected. |
Leak Testing
Clean the core so the damaged area is easier to find. Some radiator
leaks can sometimes be detected without pressurizing the system. After filling
the cooling system, inspect the radiator for leaks before proceeding with
what may be an unnecessary step of pressurizing the cooling system.
On-Vehicle Pressure Testing
Tools Required
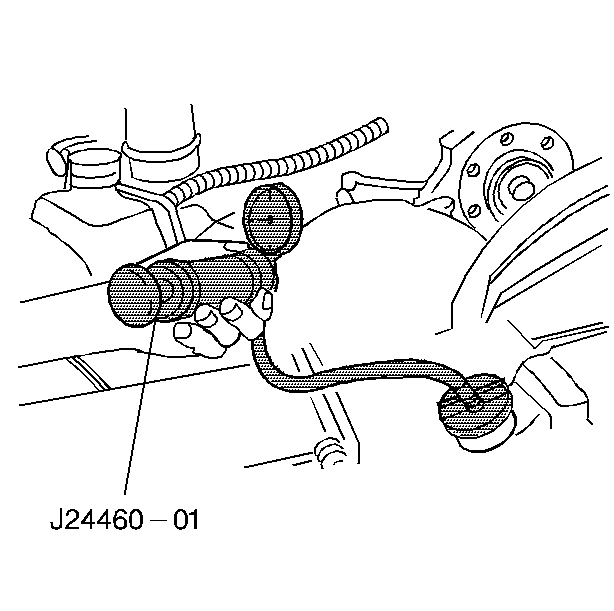
J 24460-01 Cooling
System Pressure Tester
Important:
| • | A very slight amount of seepage may occur at the water pump vent
hole during vehicle operation. Traces of residue may occur from the lower
vent hole. The water pump should be replaced only if the coolant is dripping
from the vent hole while the engine is in operation or while the cooling system
is pressurized. |
| • | Minor water pump seepage and minor engine cooling system leaks
may be corrected by adding two engine coolant supplement pellets to the cooling
system. The pellets are available from GMSPO in packages of six under GM P/N
3634621. |
Important: Do not add pellets into nonpressurized coolant recovery bottles.
- Add two pellets to the coolant system under the following conditions:
| • | Vehicles encounter water pump seepage or minor coolant leak/loss
that cannot be corrected through normal service procedures. |
| • | When the cooling system is drained and the coolant is replaced
with new coolant, due to engine repair work or at recommended coolant change
intervals (5 years or 150,000 miles). |
| • | Whenever the engine water pump is replaced. The addition of the
pellets provides a mild lapping of the new water pump seal that improves conformability
of the mating surfaces. Water pump seal seepage is minimized by the addition
of these pellets. |
Important: If pellets have been installed to correct an excessive water pump seal
seepage condition, one to two weeks of normal vehicle operation may be required
to lap in the mating seal surfaces. Some staining due to minor seepage may
continue to occur. This is considered normal.
- Install the two pellets into the radiator. Use case in order to avoid
contamination of the pressure/radiator fill cap and mating sealing surfaces
with pellet debris. The use of sealant pellets may cause a film to appear
around the sides of nonpressurized coolant recovery reservoirs. The presence
of this film is considered to be normal. Following installation of the pellets,
run the engine for approximately 15 minutes, then check for coolant leaks
and proper cooling system operation.
Caution: As long as there is pressure in the cooling system, the temperature
can be considerably higher than the boiling temperature of the solution in
the radiator without causing the solution to boil. Removal of the pressure
cap while the engine is hot and pressure is high will cause the solution
to boil instantaneously -- possibly with explosive force -- spewing
the solution over the engine, fenders and the person removing the cap.
- Ensure that the radiator and the heater hose clamps are properly positioned
and secured.
- Inspect the connections for any leaks. Repair the connections
as required.
- Remove the radiator fill cap.
- Fill the cooling system to the FULL COLD mark.

- Attach the J 24460-01
to
the radiator neck. Follow the instructions supplied with the cooling system
tester.
- Apply normal system operating pressure. Do not exceed 138 kPa
(20 psi).
- The system should hold pressure for two minutes.
| • | If a measurable amount of pressure drops in less than two minutes,
check the radiator for leaks. |
| • | A leak may be internal or external. If no visible leak si found,
including heater core, engine disassembly may be required. Refer to Engine
Mechanical. |
Off-Vehicle Pressure Testing
Tools Required
J 24460-01 Cooling
System Pressure Tester
Notice: Do not use boil-out tanks or any other tank that has been used for copper
or brass radiators. The remaining solutions or chemicals in these tanks could
cause radiator failure.
- Plug the inlet and outlet tubes. Make sure the drain cock is closed.
- Attach the J 24460-01
to the radiator.
- Apply pressure to the radiator. Do not exceed 138 kPa (20 psi)
of pressure.
- Observe the gauge for any pressure loss.
- Run water over the repair area and look for any bubbles. If a
large tank is available, the radiator can be submerged in order to check for
air bubbles.

