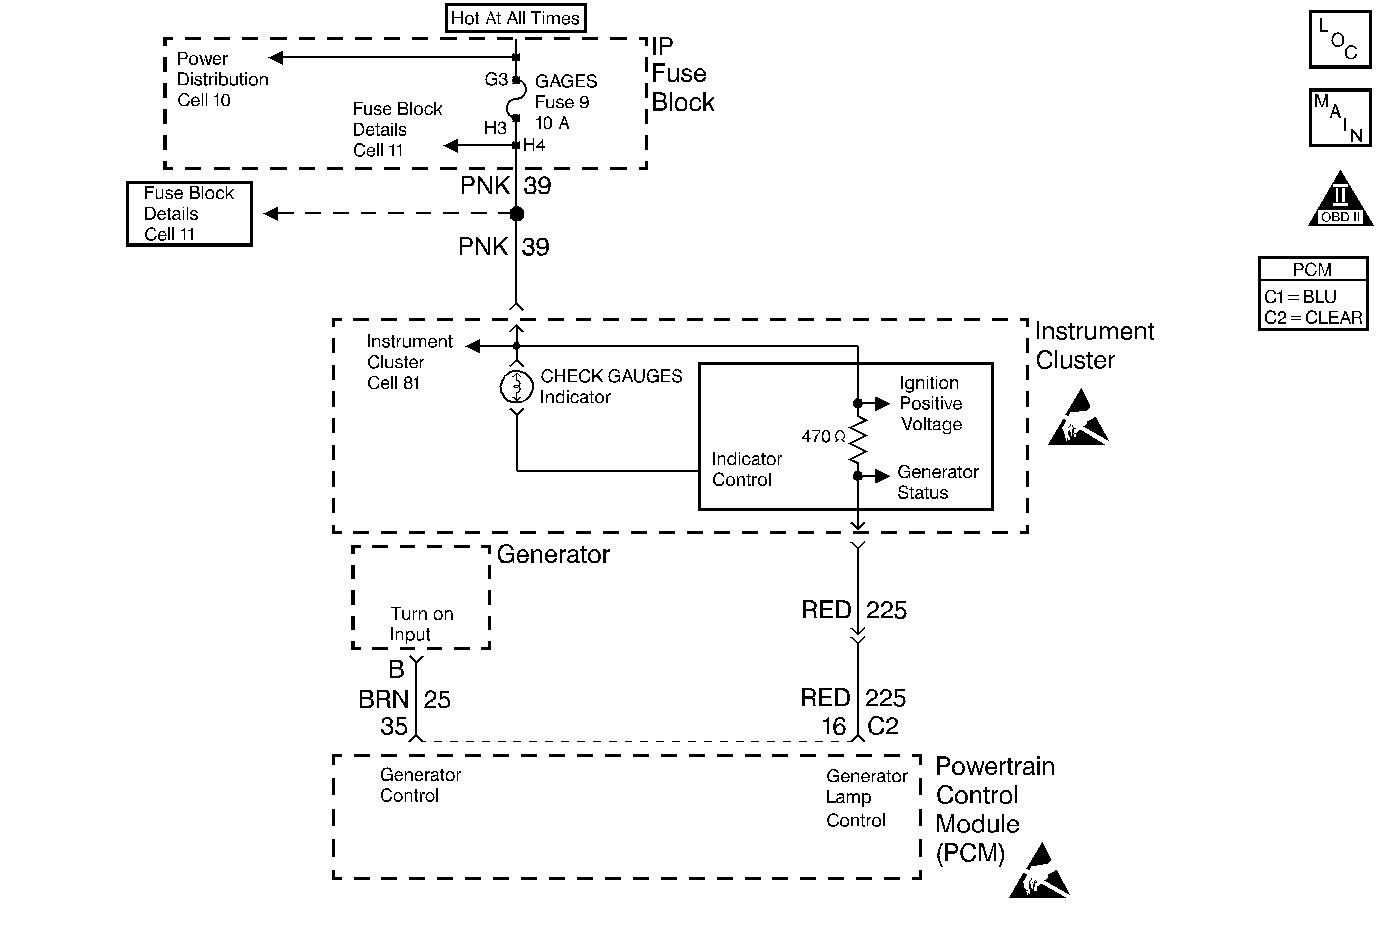
Circuit Description
The PCM controlled lamps are powered through an ignition positive voltage feed fuse. The PCM commands the instrument panel cluster to turn ON the Check Gauges indicator by grounding the generator lamp control circuit.
Diagnostic Aids
A PCM controlled lamp ON at all times most likely indicates that a condition is present which requires the attention of the vehicle operator.
Check Gauges Lamp
The PCM will apply ground to the generator lamp control circuit if Ignition 1 voltage decreases to less than 10 volts. The PCM will remove ground from the generator lamp control circuit when Ignition 1 voltage increases to greater than 12 volts. If DTC P0560 is set, refer to DTC P0560 System Voltage . If the Check Gages lamp is illuminated and Ignition 1 voltage is not within specifications, refer to Charging System for diagnosis. The PCM Controlled Lamps diagnostic table only checks the integrity of the generator lamp control circuit wiring and the PCM output driver.
If the Check Gages lamp is ON and the generator lamp control circuit is not grounded, any of the following conditions may be causing the Check Gauges lamp to be illuminated:
| • | High engine coolant temperature. |
| • | Low oil pressure. |
Refer to Instrument Cluster in Electrical Diagnosis.
Check for the following conditions:
| • | Poor connection at the PCM |
| Inspect harness connectors for backed out terminals, improper mating, broken locks, improperly formed or damaged terminals, and poor terminal to wire connection. |
| • | Damaged harness |
| Inspect the wiring harness for damage. If the harness appears to be OK, disconnect the PCM and turn the ignition ON. Observe a voltmeter connected between the generator lamp control circuit and ground while moving connectors and wiring harnesses related to the I/P. A change in voltage will indicate the location of the fault. |
Test Description
Number(s) below refer to the step number(s) on the Diagnostic Chart.
-
Normally, ignition feed voltage should be present on the output control circuit with the PCM disconnected and the ignition turned ON.
-
Checks for a shorted component or a short to B+ on the output control circuit. Either condition would result in a measured current of over 1.5 amps. Also checks for a component that is going open while being operated, resulting in a measured current of 0 amps.
-
Checks for a faulty instrument cluster.
-
This vehicle is equipped with a PCM which utilizes an Electrically Erasable Programmable Read Only Memory (EEPROM). When the PCM is being replaced, the new PCM must be programmed.
Step | Action | Value(s) | Yes | No |
|---|---|---|---|---|
1 | Was the Powertrain On-Board Diagnostic (OBD) System Check performed? | -- | ||
2 | Was the Instrument Cluster System Check in Electrical Diagnosis performed? | -- | Go to the Instrument Cluster System Check in Electrical Diagnosis | |
Is voltage near the specified value? | B+ | |||
Does the current reading remain between the specified value? | 0.002-0.5 amps 2-500 mA | |||
Is voltage at the specified value? | 0 V | |||
6 | Locate and repair the short to voltage in the affected lamp control circuit. Refer to Repair Procedures in Electrical Diagnosis. Is action complete? | -- | -- | |
7 | Check the ignition positive voltage feed fuse for the instrument cluster indicator lamps. Is the the fuse open? | -- | ||
8 |
Is action complete? | -- | -- | |
9 |
Is voltage near the specified value? | B+ | ||
10 |
Was a problem found? | -- | ||
11 |
Was a problem found? | -- | ||
12 |
Does the test light flash ON and OFF? | -- | Go to Diagnostic Aids | |
13 |
Was a problem found? | -- | ||
14 | Locate and repair open in the ignition positive voltage circuit to the instrument cluster indicator lamps. Refer to Repair Procedures in Electrical Diagnosis. Is action complete? | -- | -- | |
15 | Replace the instrument cluster. Refer to On-Vehicle Service in Instrument Panel, Gages, and Console. Is action complete? | -- | -- | |
Replace the PCM. Important: The replacement PCM must be programmed. Refer to Powertrain Control Module Replacement/Programming . Is action complete? | -- | -- | ||
17 | Operate the affected lamp control circuit using the scan tool output tests function. Does the affected lamp control circuit operate properly? | -- | System OK |
