For 1990-2009 cars only
Secondary Air Injection Check Valve and Pipe Replacement Bank 1
Removal Procedure
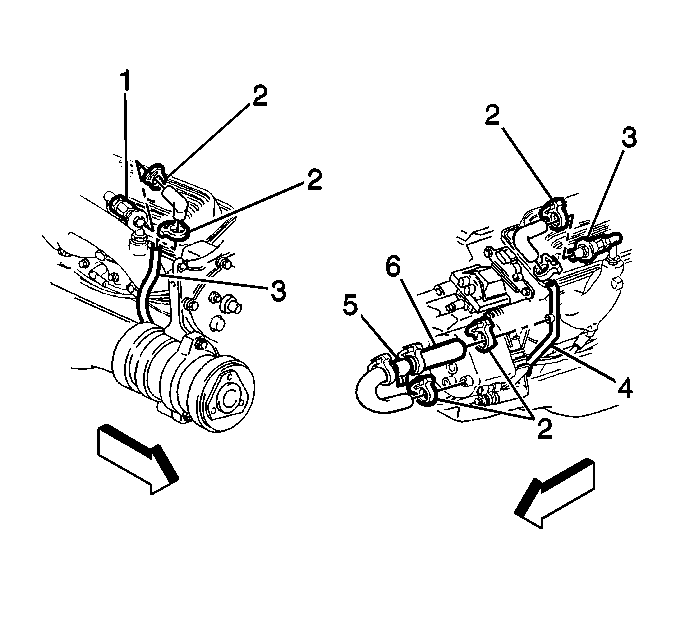
- Loosen the check valve clamp (3).
- Disconnect the AIR hose from the check valve (3).
- Disconnect the left check valve pipe.
- Unscrew the check valve from the AIR pipe (3).
- Before replacing a check valve, test the valve for proper operation.

| 5.1. | Install a vacuum pump to the nipple side of the check valve, AIR pump side. |
| 5.2. | Pump the vacuum pump to 10 inches Hg. and observe the gauge. |
| 5.3. | If the vacuum bleeds down to zero within 5 seconds, replace the check valve. |
Installation Procedure
- Screw the check valve (3) onto the AIR pipe.
- AIR pipe to the exhaust manifold.
- Install the air hose to the check valve (3).
- Install the check valve clamp (2).

Tighten
Tighten the Check valve to the AIR pipe 23 N·m (17 lb ft).
Secondary Air Injection Check Valve and Pipe Replacement Bank 2
Removal Procedure
- Remove the clamps (2) and AIR hoses from the AIR system right pipe (3).
- Remove the right check valve pipe.
- Unscrew the check valve (1) from the AIR pipe.
- Before replacing a check valve, test the valve for proper operation.

| 4.1. | Install a vacuum pump to the nipple side of the check valve, AIR pump side. |
| 4.2. | Pump the vacuum pump to 10 inches Hg. and observe the gauge. |
| 4.3. | If the vacuum bleeds down to zero within 5 seconds, replace the check valve. |
Installation Procedure
- Screw the check valve (1) onto the AIR pipe.
- Connect the right AIR pipe to the exhaust manifold.
- Install the Hose and clamp to the check valve (1).
- Check the AIR system for proper operation.

Tighten
Tighten the Check valve to 23 N·m (17 lb ft).
Secondary Air Injection Check Valve and Pipe Replacement Cross Under Pipe
Removal Procedure
- Loosen the AIR clamps.
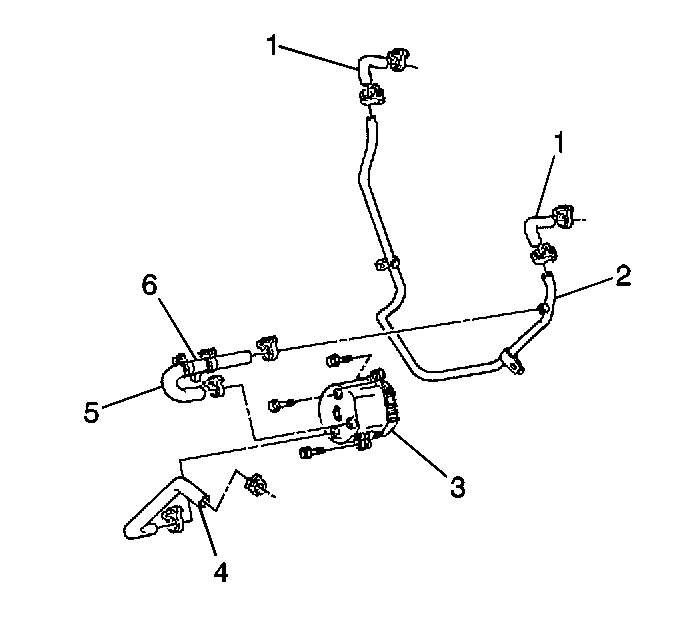
- Remove the AIR hoses (1) to the check valves (both sides)
- Loosen the AIR clamp at the AIR pump outlet (5).
- Remove the outlet hose (5) at the AIR pump (3).
- Raise the vehicle.
- Remove the fasteners to the AIR cross under pipe (2) bracket, both sides.
- Cut the cross under pipe near center of the oil pan to aid in removal.
- Remove the cross under pipe.

Installation Procedure
- Install the cross under pipe.
- Use the appropriate length of 5/8" heater hose to join both halves of the cross under pipe. Clamp both ends of the hose securely with stainless steel clamps.
- Install the fasteners to the AIR cross under pipe (2) bracket, both sides.
- Lower the vehicle.
- Install the outlet hose (5) at the AIR pump (3).
- Tighten the AIR clamp at the AIR pump outlet hose (5).
- Install the AIR hoses (1) to the check valves (both sides)
- Tighten the AIR clamp at the check valves and AIR pipes.
- Check the AIR system for proper operation and for leaks.

Important: The new cross under pipe must be cut similarly to the old pipe before installation.
