For 1990-2009 cars only
Air Filter Element and Air Cleaner Assembly w/o WS6
Removal Procedure
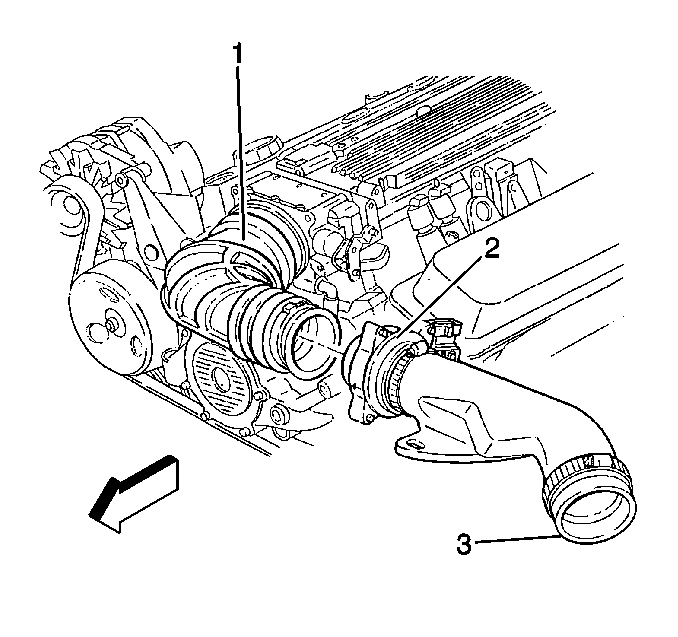
- Loosen the clamp at the air intake duct (1) at the throttle body.
- Disconnect the IAT and MAF sensor electrical connectors.
- Disconnect the air intake duct (1) from the throttle body.
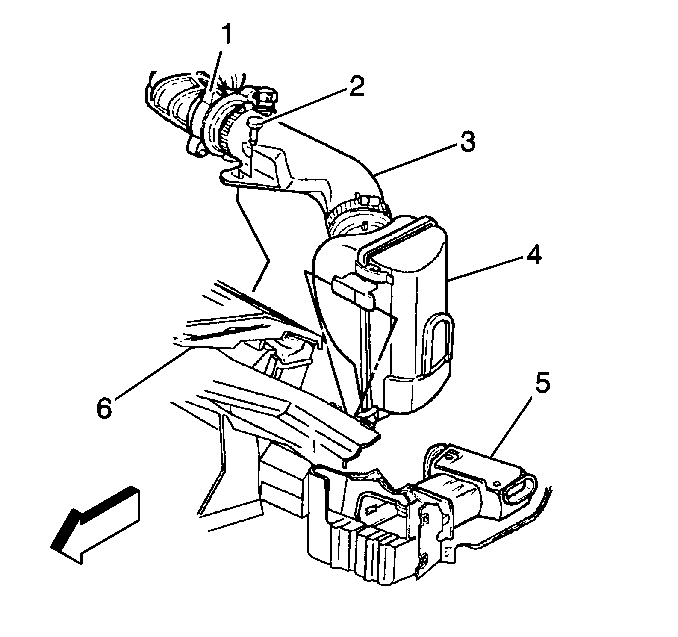
- Remove the retainer (2) from the upper radiator support (6).
- Disconnect the hose from the air intake duct.
- Slide the air cleaner housing up and the air intake duct as a whole assembly.
- Release the latches from the air cleaner housing (4).
- Remove the air filter element from the air cleaner assembly (4).


Installation Procedure
- Install the air filter element into the air cleaner housing (4).
- Connect the latches into place on the air cleaner assembly (4).
- Install the air cleaner housing (4) and the air intake duct as a whole assembly into the retainers.
- Connect the air intake duct to the throttle body and tighten the clamp.
- Connect the IAT and the MAF sensor electrical connectors.
- Connect the retainer (2) to the upper radiator support (6).
- Install the hose to the air intake duct.


Important: If the Mass Air Flow sensor is installed backwards, the system will go rich. An arrow cast into the plastic portion of the sensor indicates proper air flow direction. The arrow must point toward the engine.
Air Filter Element and Air Cleaner Assembly w/WS6
Removal Procedure-Air Filter Element (w/WS6)
- Release the latches from the air cleaner assembly.
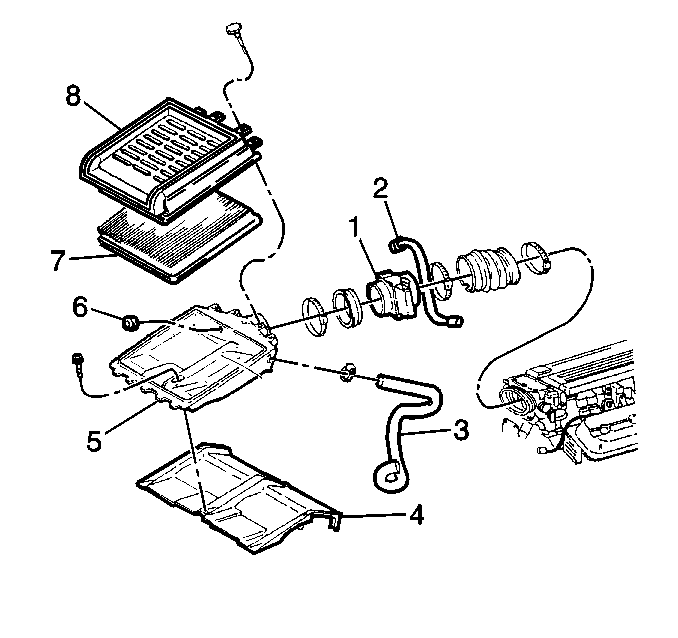
- Remove the air filter housing cover assembly (8).
- Remove the air filter element (7).
- Inspect the air filter element (7) for dust, dirt, water and clean or replace if required. Refer to Section OB.

Installation Procedure-Air Filter Element (w/WS6)
- Install the air filter element (7) into the air filter housing (5).
- Install the air cleaner cover assembly (8) on the lower air cleaner housing (5).
- Install the fasteners on the air cleaner assembly (8).

Important: If the Mass Air Flow sensor is installed backwards, the system will go rich. An arrow cast into the plastic portion of the sensor indicates proper air flow direction. The arrow must point toward the engine.
Removal Procedure-Air Cleaner Assembly (w/WS6)
- Remove the fasteners from the air cleaner assembly (5).
- Remove the clamp from inter air intake duct.
- Remove the inter air intake duct from the air cleaner assembly (5).
- Remove the air cleaner assembly from the upper radiator support (4).

Installation Procedure-Air Cleaner Assembly (w/WS6)
- Install the Pre-assembly fastener to the air cleaner assembly (5).
- Install the air cleaner assembly to the upper radiator support (4) and secure.
- Clamp assembly to the front of the inter air intake duct and install on the air cleaner duct assembly (5). Force the duct forward until the duct assembly flange contacts the forward edge of the duct and air cleaner assembly (5).
- Tighten the front clamp assembly to the inter air intake duct.

Important: If the Mass Air Flow sensor is installed backwards, the system will go rich. An arrow cast into the plastic portion of the sensor indicates proper air flow direction. The arrow must point toward the engine.
