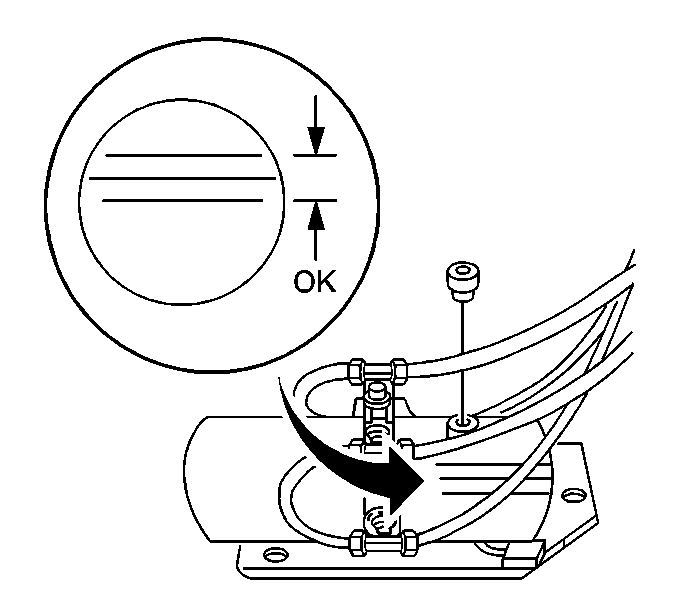
- Open the rear compartment lid and remove the trim from the left rear side compartment. Refer to Cargo Area Side Trim Panel Replacement .
- Remove the left rear seat side trim panel in order to gain access to the left cylinder.
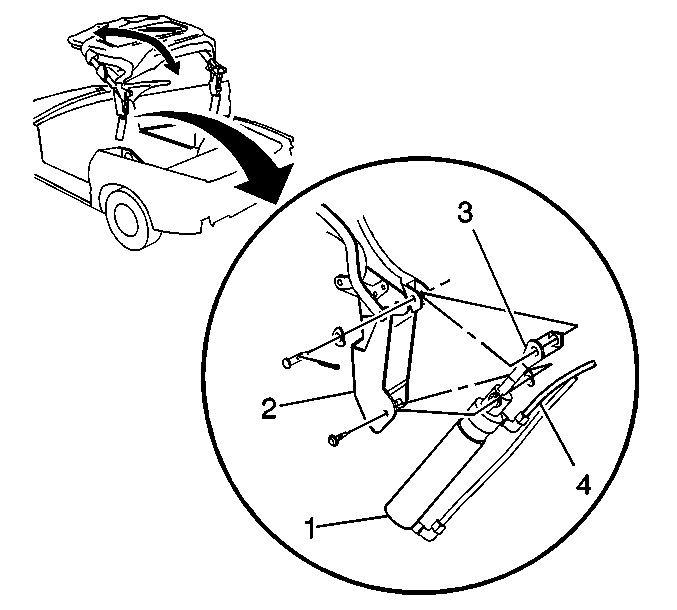
- Remove the cylinder from the outer arm (1).
- Remove the cylinder from the main pivot bracket (2).
- Position the cylinder so that the cylinder rods (3) will not touch any body components or the folding top when fully extended
- Remove the reservoir filler plug.
- Remove one pink hose (4) from the pump motor and place the hose at the reservoir opening.
- Using a rubber plug, such as a snug-fitting vacuum fitting cap, seal the open pump fitting.
- Push and hold the UP button on the convertible top switch. After the cylinders are fully extended, continue to press the switch until the hose being bled is free of air bubbles.
- Install the pink hose (4) to the pump/motor.
- If the fluid level is low, add DEXRON® III Automatic Transmission Fluid to the reservoir.
- Repeat the bleed procedure for the other cylinder.
- Install the reservoir filler plug.
- Install the side trim panel to the rear compartment.
- Rotate the pump bypass valve fully clockwise (¼ turn) to the Open position.
- Install the cylinder to the outer arm (1).
- Install the cylinder to the main pivot bracket (2).
- Install the trim panel to the left rear seat. Refer to Cargo Area Side Trim Panel Replacement .
- Rotate the pump bypass valve fully counter-clockwise (¼ turn) to the Closed position.
- Cycle the folding top up and down several times in order to verify the hydraulic system operation.
- Install the side trim to the left rear compartment. Refer to Rear Quarter Trim Panel Replacement .
- Close the rear compartment lid.

Notice: When servicing the hydraulic system, perform the following precautions:
• Leave the folding top raised but unlatched from the windshield
header. This will keep the cylinder rods extended and minimize fluid leakage. • Do not allow the oil level to drop below the lower indicator line
on the reservoir, or pump damage may occur. • In order to avoid part damage during the bleeding procedure, verify
that the cylinder rod does not touch any body components or the folding top
when extending.
Remove the right rear seat trim panel in order to gain access to the right cylinder.
Refer to Rear Quarter Trim Panel Replacement .

Important: Seal the fitting in order to prevent air from entering the system.
Notice: Use the correct fastener in the correct location. Replacement fasteners must be the correct part number for that application. Fasteners requiring replacement or fasteners requiring the use of thread locking compound or sealant are identified in the service procedure. Do not use paints, lubricants, or corrosion inhibitors on fasteners or fastener joint surfaces unless specified. These coatings affect fastener torque and joint clamping force and may damage the fastener. Use the correct tightening sequence and specifications when installing fasteners in order to avoid damage to parts and systems.
Tighten
Tighten the hose fitting to 7 N·m (62 lb in).
