INADEQUATE WINDSHIELD DEFROST PERFORMANCE INSTALL NEW SEAL

Subject: WINDSHIELD DEFROSTER PERFORMANCE
Model and Year: 1991 CAPRICE
TO: ALL CHEVROLET DEALERS
Condition: Slow defrost at bottom edge of windshield.
Cause: Loss of air flow at gap between the HVAC module and the distributor defroster nozzle due to build variation at assembly.
Improvement: Add a strip of foam seal (1/2" X 1/2") around the lower surface perimeter of the distributor defroster nozzle. Using the following part and procedure.
Quantity Part Number Part Name -------- ----------- ---------------------- 1 3963794 Seal-Polyurethane Foam
Part is currently available from GMSPO.
Procedure:
1. Remove steering column filler panel and screws.
2. Remove tilt lever.
3. Remove right hand I.P. molding.
4. Remove left hand I.P. trim plate.
5. Remove the upper 1. P. trim pad and screws.
6. Remove the right hand sound insulator panel and screws.
7. Disconnect the temperature cable from the HVAC module.
8. Remove the I.P. carrier screws (7) and pull back the carrier.
9. Disconnect the main I.P. wire harness clip at the center front area of the air distributor duct for clearance to remove the defroster nozzle.
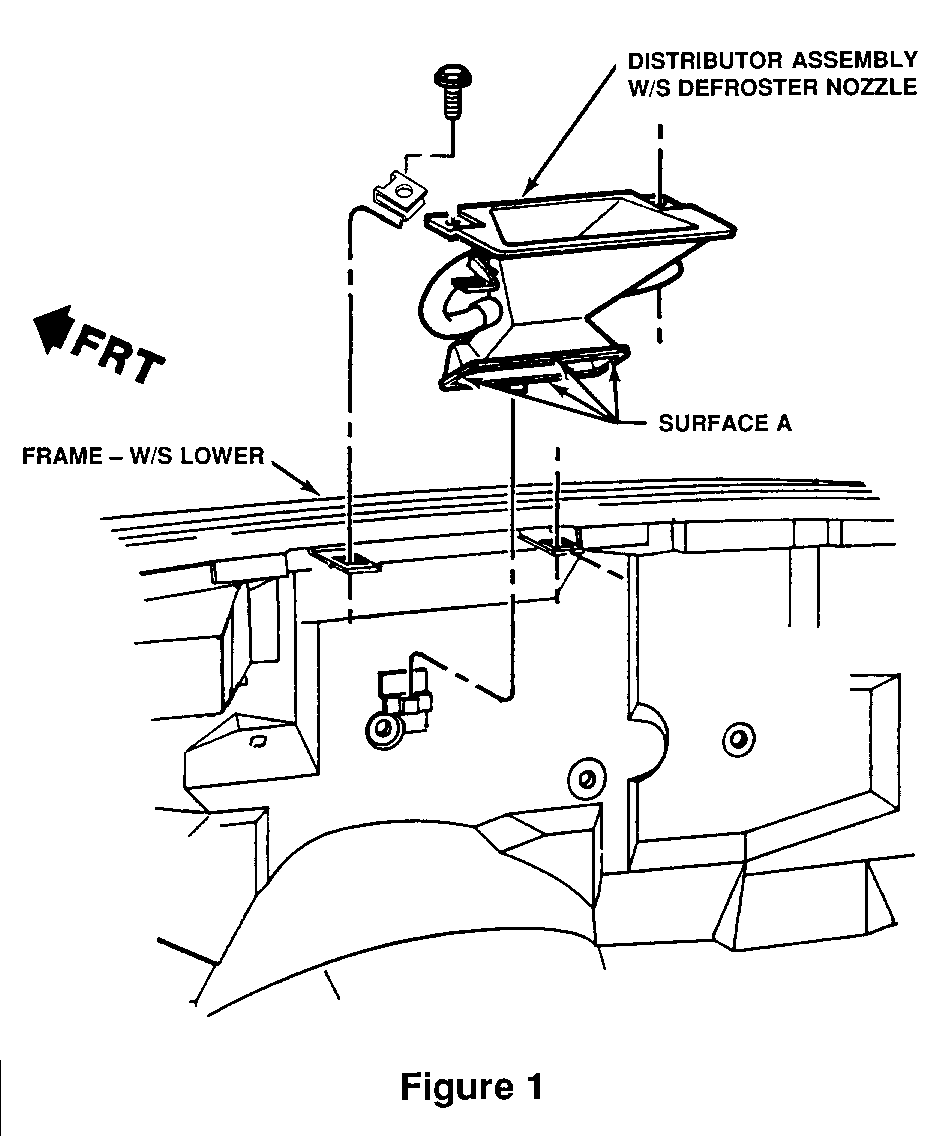
10. Remove the defroster nozzle screws (2), as shown in Figure 1.
11. Remove the defroster nozzle, shown in Figure 1 with an upward rearward motion.
12. Install the foam seal around the perimeter on surface "A" of the defroster nozzle, as shown in Figure 1.
13. Install the defroster nozzle.
IMPORTANT: Make sure the mounting tab on the bottom front edge of the defroster nozzle is located in the mounting clip on the front of the dash panel, as shown in Figure 1.
14. Install the (2) defroster nozzle screws.
15. Clip the I.P. wire harness to the air distributor.
16. Position I.P. carrier and install screws (7).
17. Connect temperature cable to the HVAC module.
18. Install right hand sound insulator panel and screws.
19. Install upper 1. P. trim pad and screws.
20. Install left hand I.P. trim plate and screws.
21. Install right hand 1. P. molding.
22. Install tilt lever.
23. Install steering column filler panel and screws.
Labor Operation Number: T1585
Labor Time: 0.9 Hours
Trouble Code: 92

General Motors bulletins are intended for use by professional technicians, not a "do-it-yourselfer". They are written to inform those technicians of conditions that may occur on some vehicles, or to provide information that could assist in the proper service of a vehicle. Properly trained technicians have the equipment, tools, safety instructions and know-how to do a job properly and safely. If a condition is described, do not assume that the bulletin applies to your vehicle, or that your vehicle will have that condition. See a General Motors dealer servicing your brand of General Motors vehicle for information on whether your vehicle may benefit from the information.
