SERVICE MANUAL UPDATE SEC. 8A ELECT. DIAGNOSIS/HORN FUSE

SUBJECT: SERVICE MANUAL UPDATE - SECTION 8A - ELECTRICAL DIAGNOSIS - HORN FUSE AND HORN CIRCUIT IDENTIFICATION
VEHICLES AFFECTED: 1991 'B'
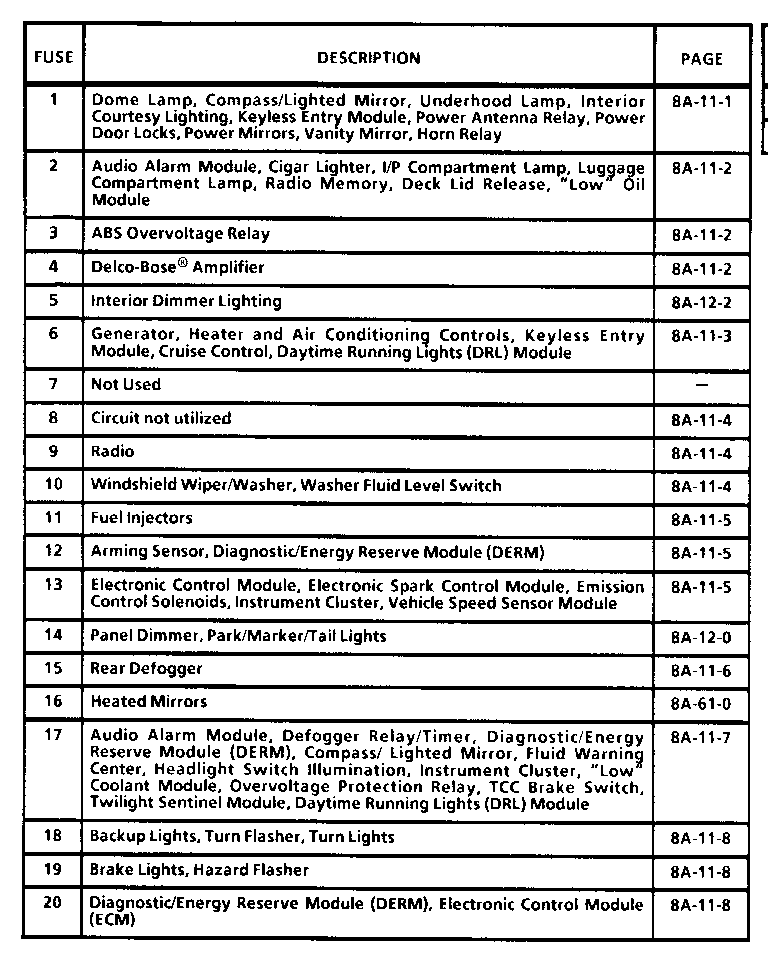
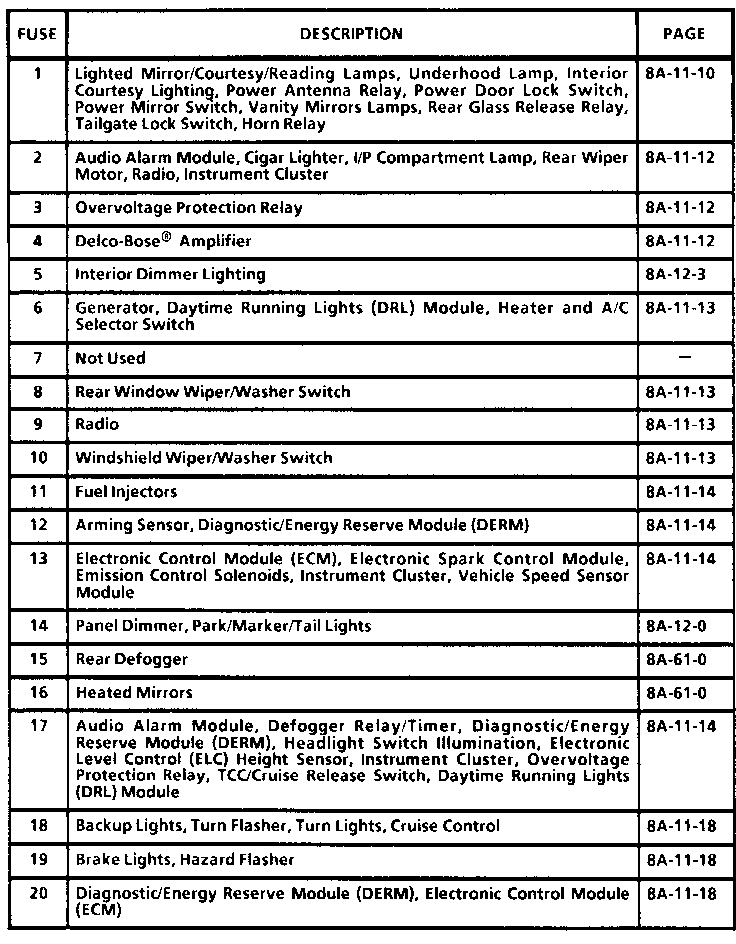
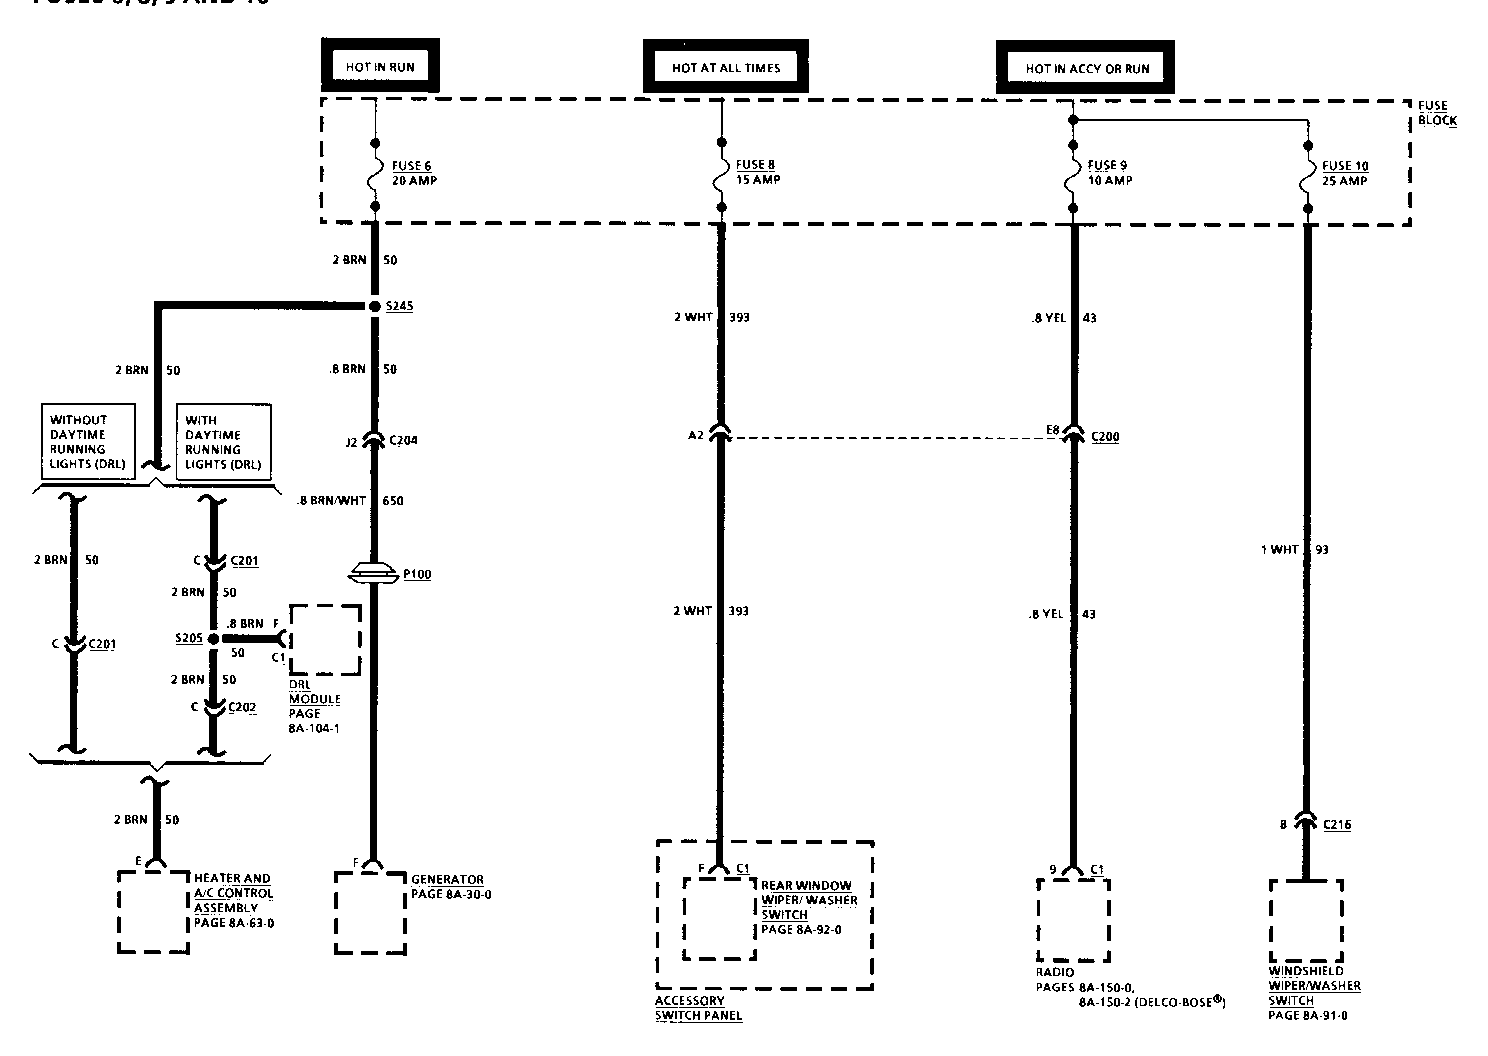
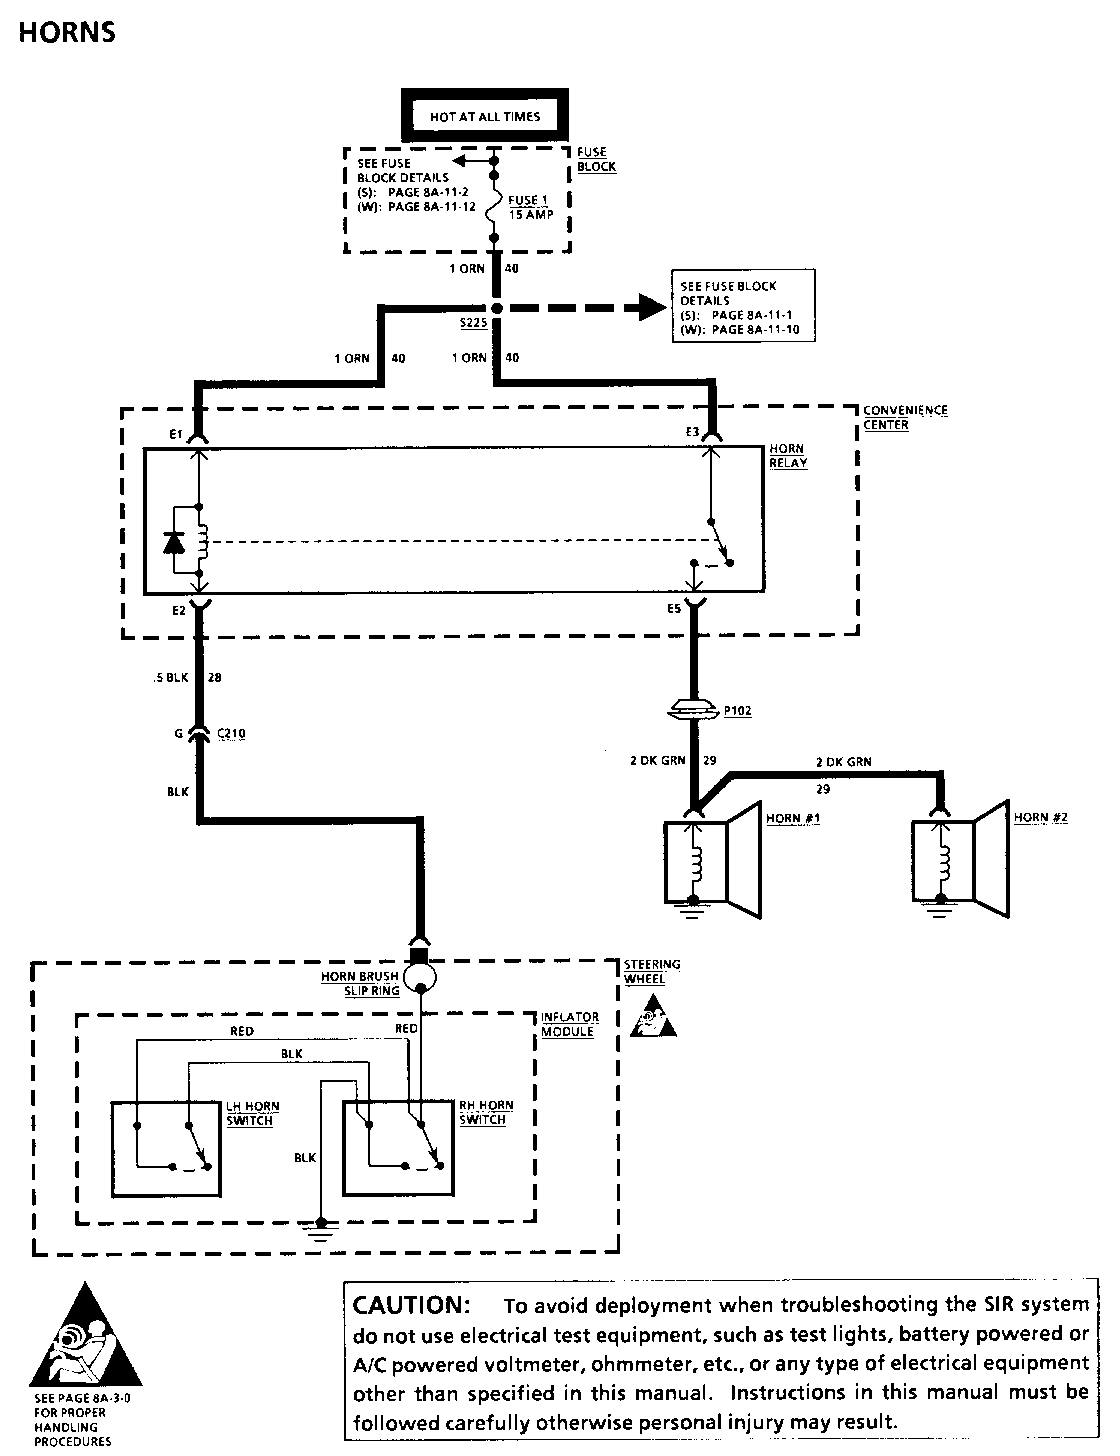
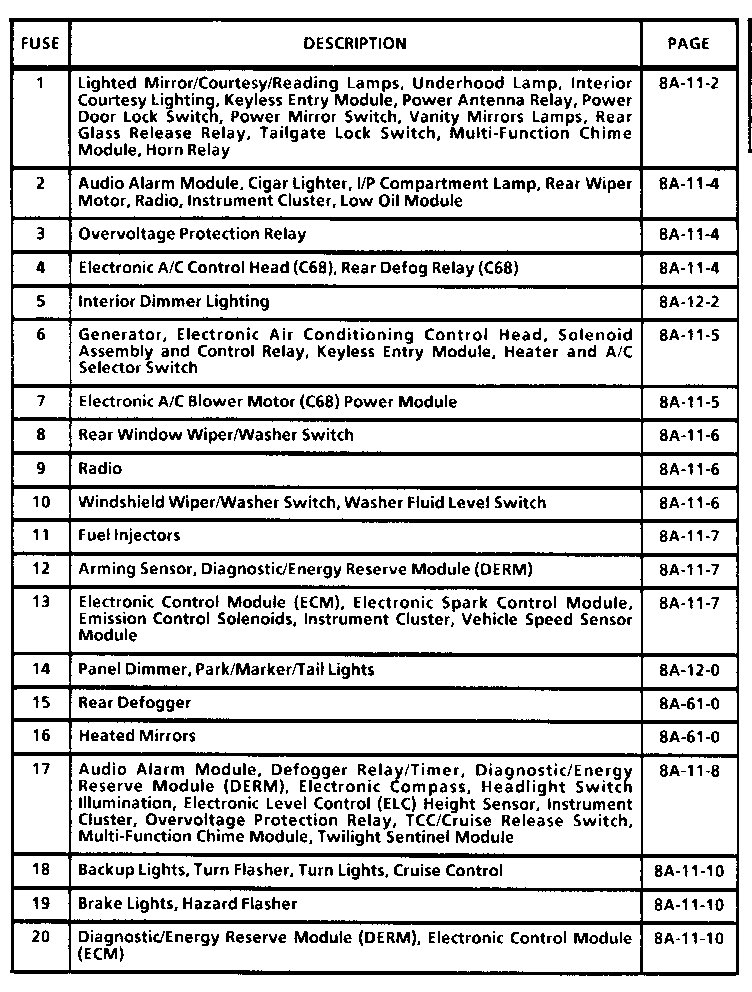
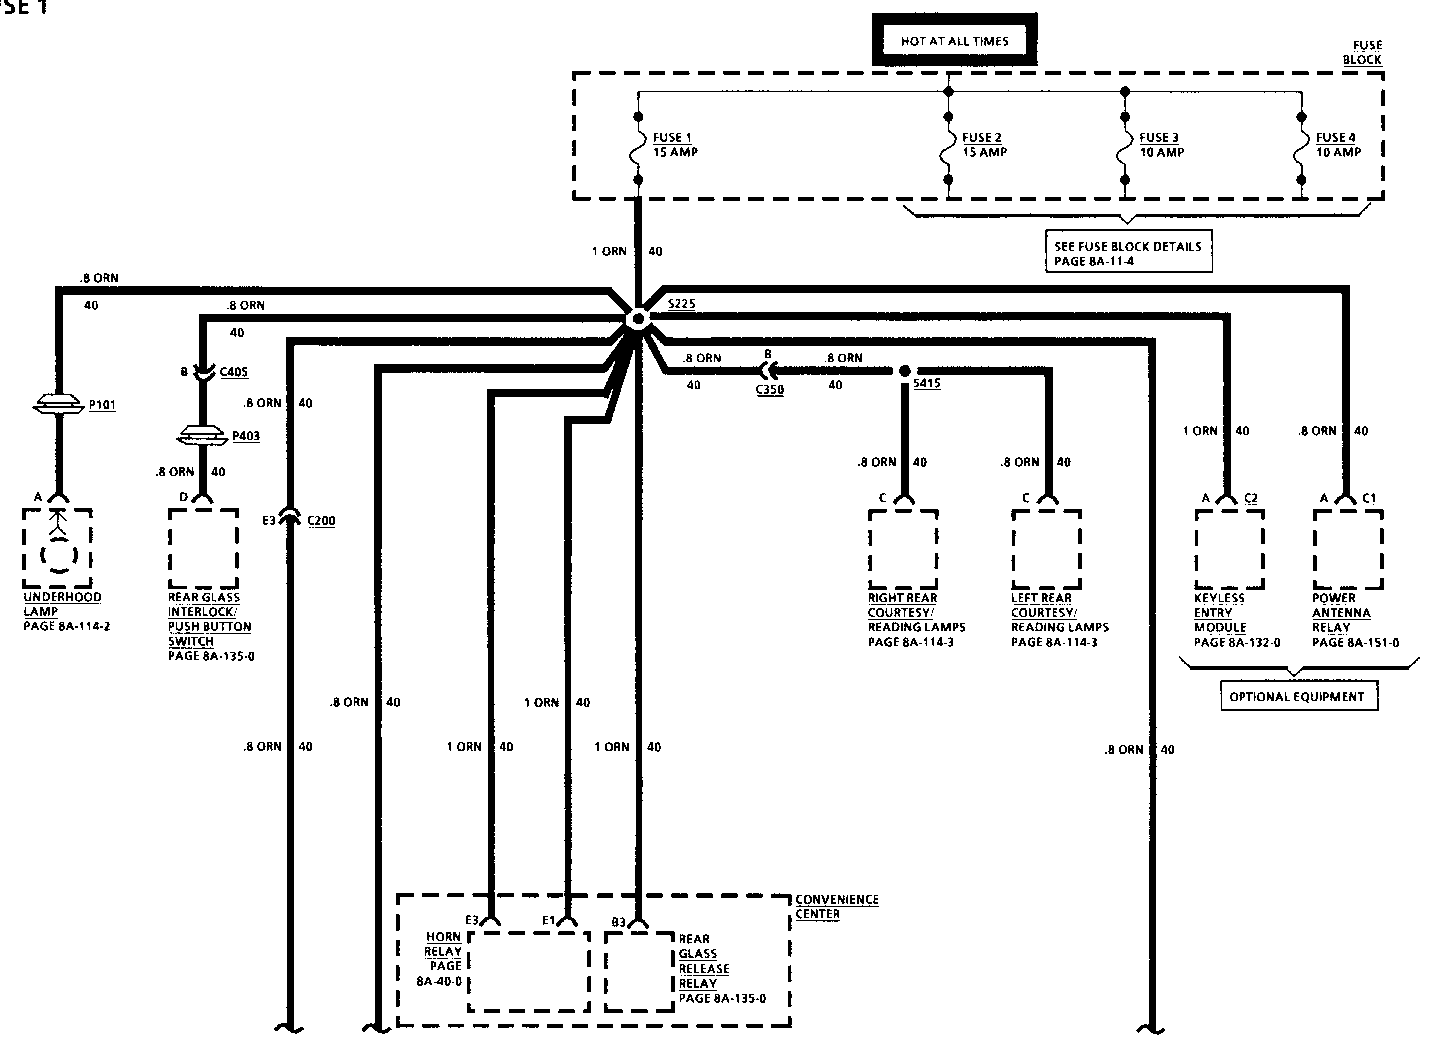
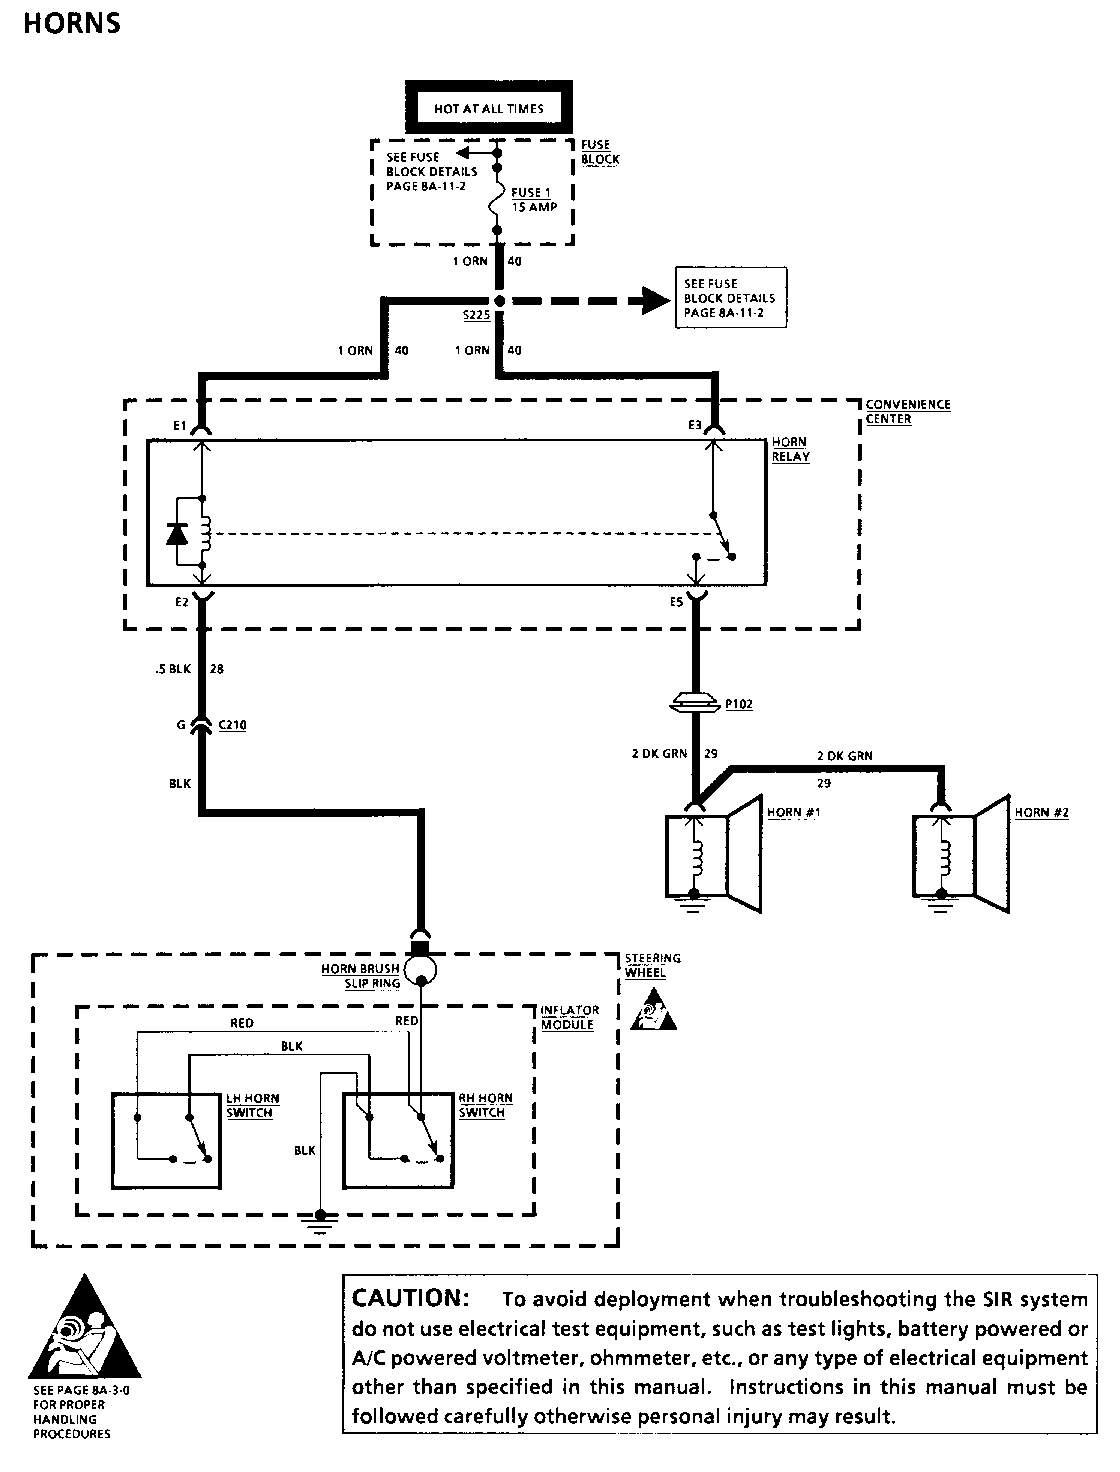
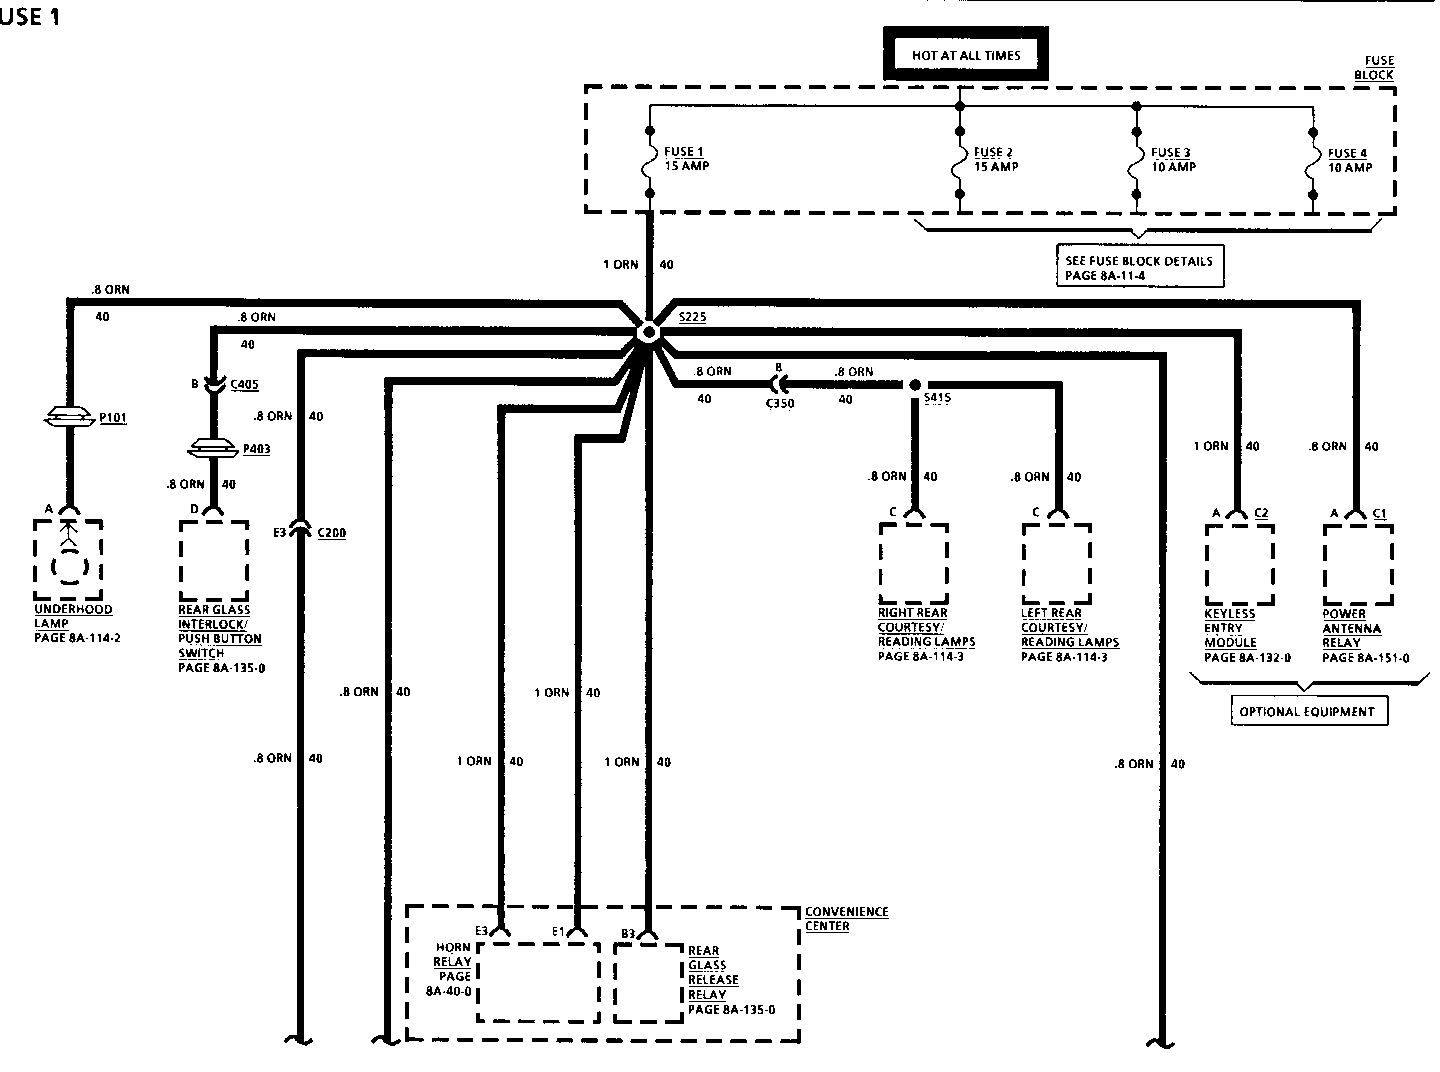
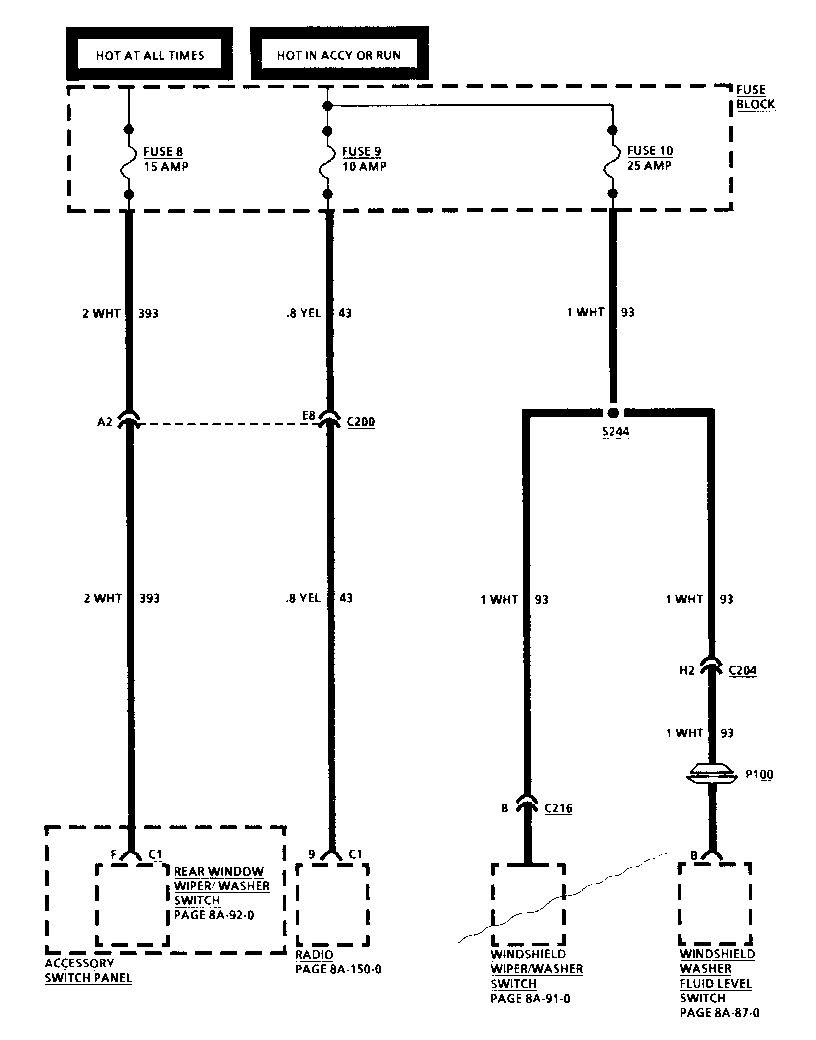
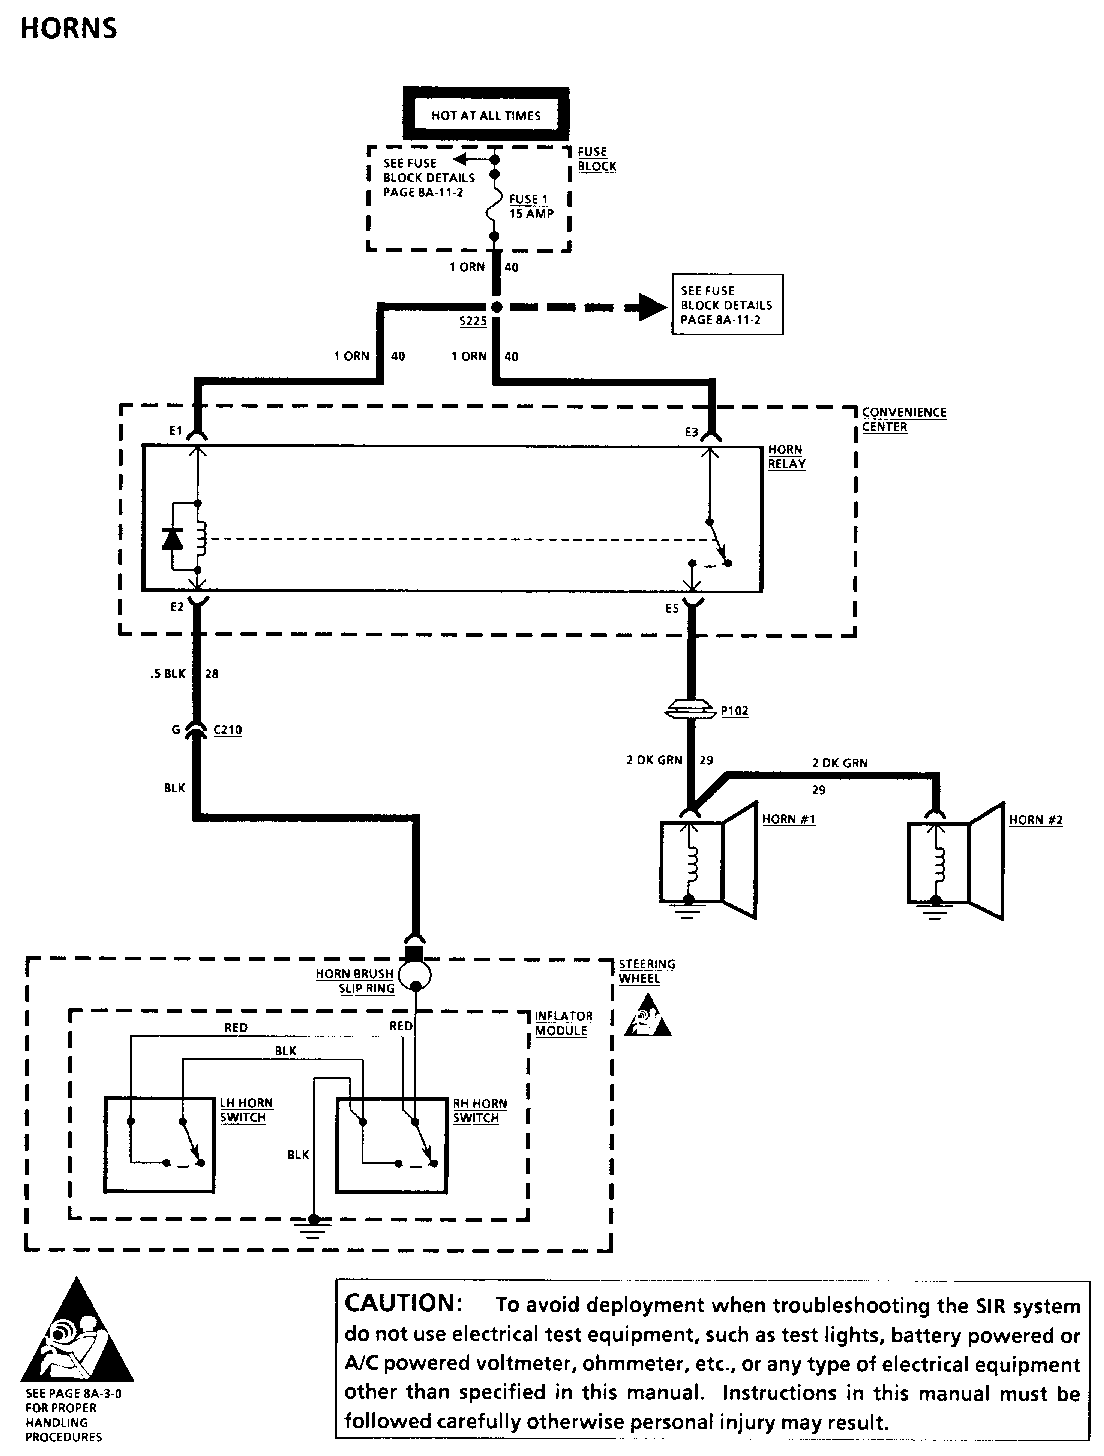
Some early 1991 Chevrolet Caprice Sedan/Wagons, 1991 oldsmobile Custom Cruisers, and 1991 Buick Roadmasters were built with Fuse 8 supplying battery voltage to the horn relay through Circuit 393. A change was made to supply battery voltage to the horn relay from Fuse 1 through Circuit 40. Fuse 1 and Fuse 8 are both 15 amp fuses.
Please update the 1991 Service Manual art, component location, and Chart #1 in the Service Manual Section 8A-40 Horns. Please update fuse block details in Section 8A-11 Fuse Block Details.
CHEVY ELECTRICAL DIAGNOSIS 8A-40-1
COMPONENT LOCATION 201-PG FIG. CONN ------------------ ----------------------------- ------ --- ---- Convenience Center .... LH side of I/P, left of Steering Column..............18...26
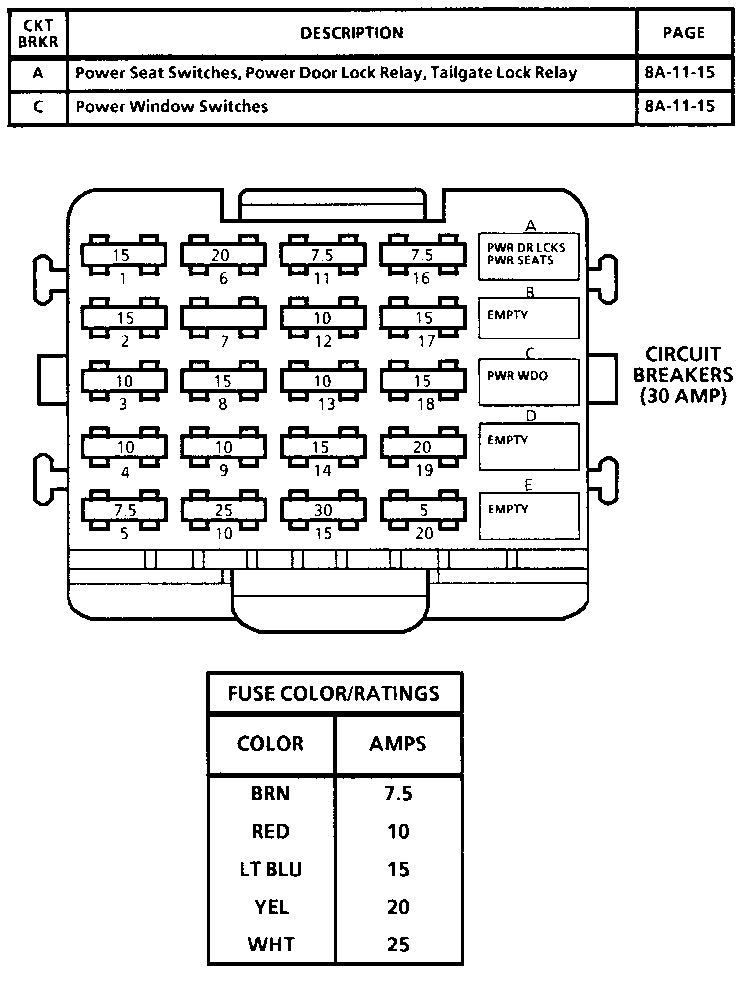
Fuse Block...... Mounted to LH side of I/P, accessible with LH Front Door open......................... 18...26 11-0
Fusible Link A....RH side of engine compartment, bolted to Battery Junction Block.................... 22...31
Horn Relay .............. In Convenience Center ............ 31...43
Horn Switches......One on either side of Inflator Module, in Steering Wheel
Horn #1.....In LH front fender, at front of LH wheelhouse....25...35
Horn #2....In LH front fender, at front of LH wheelhouse ....25...35
C210 (11 cavities).... Body Harn to Turn/Hazard Switch Assembly Conn, under Steering Column.................20...28 202-3
P102..................In dash panel, visible from engine compartment,
behind LH front wheelhouse............ 25...35
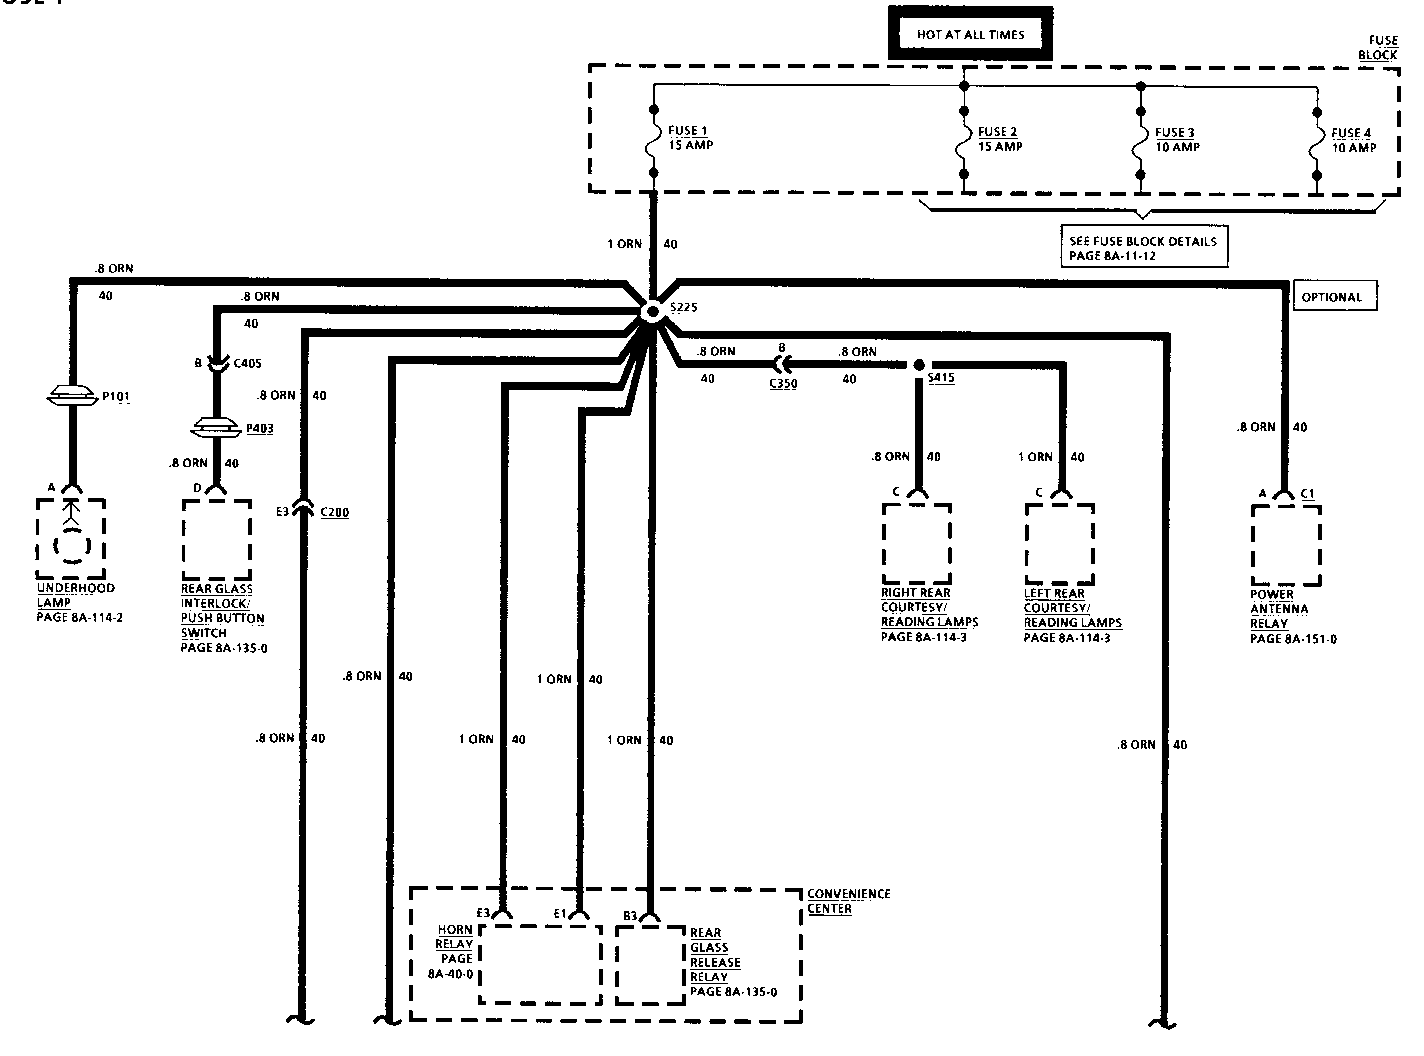
S225 .................... Body Harn, approx 36 cm from Fuse Block
TROUBLESHOOTING HINTS
(Perform before beginning System Diagnosis)
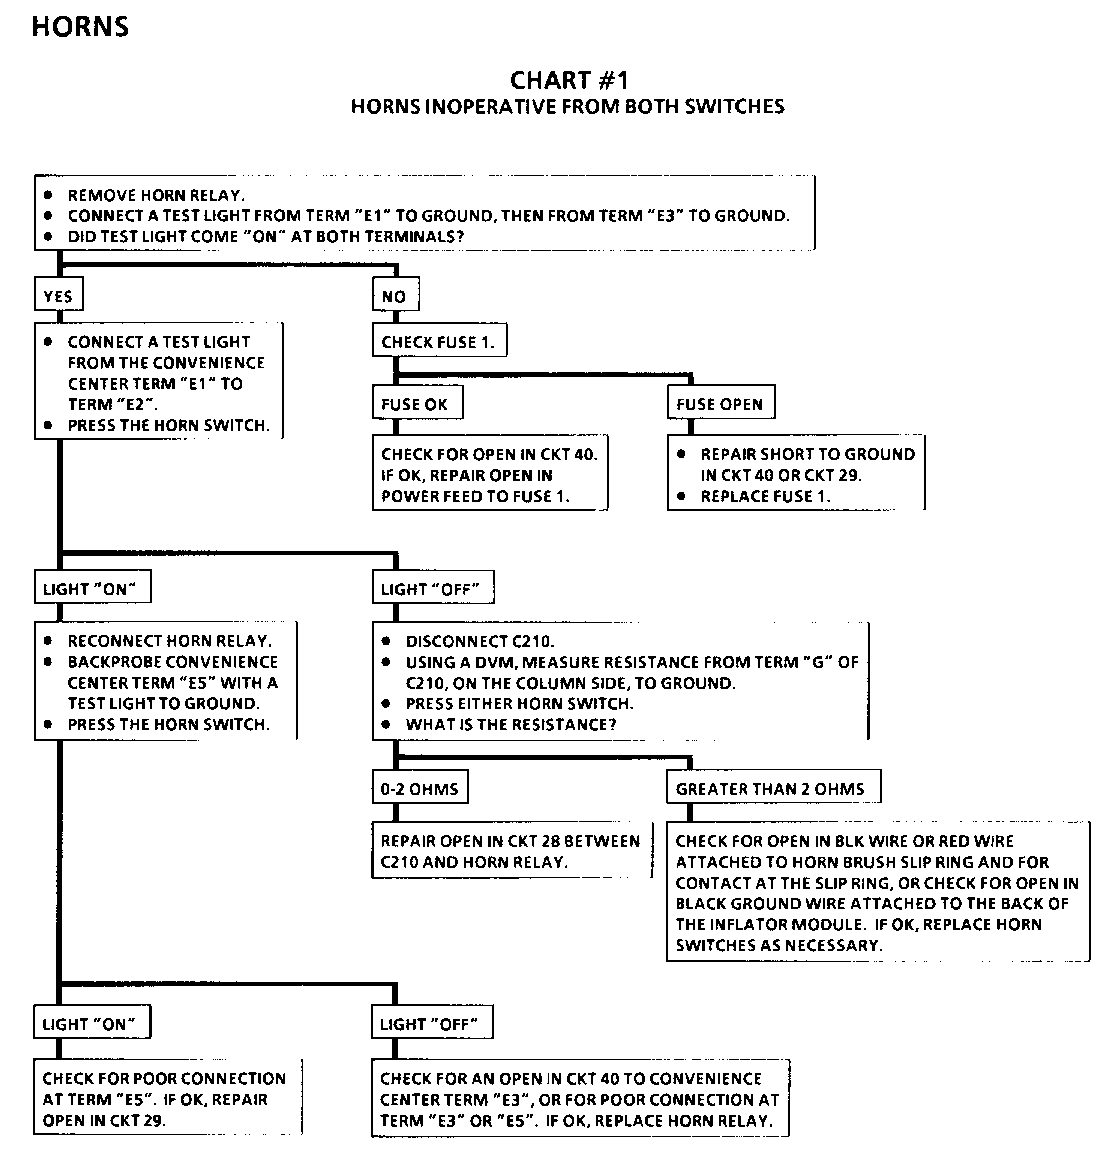
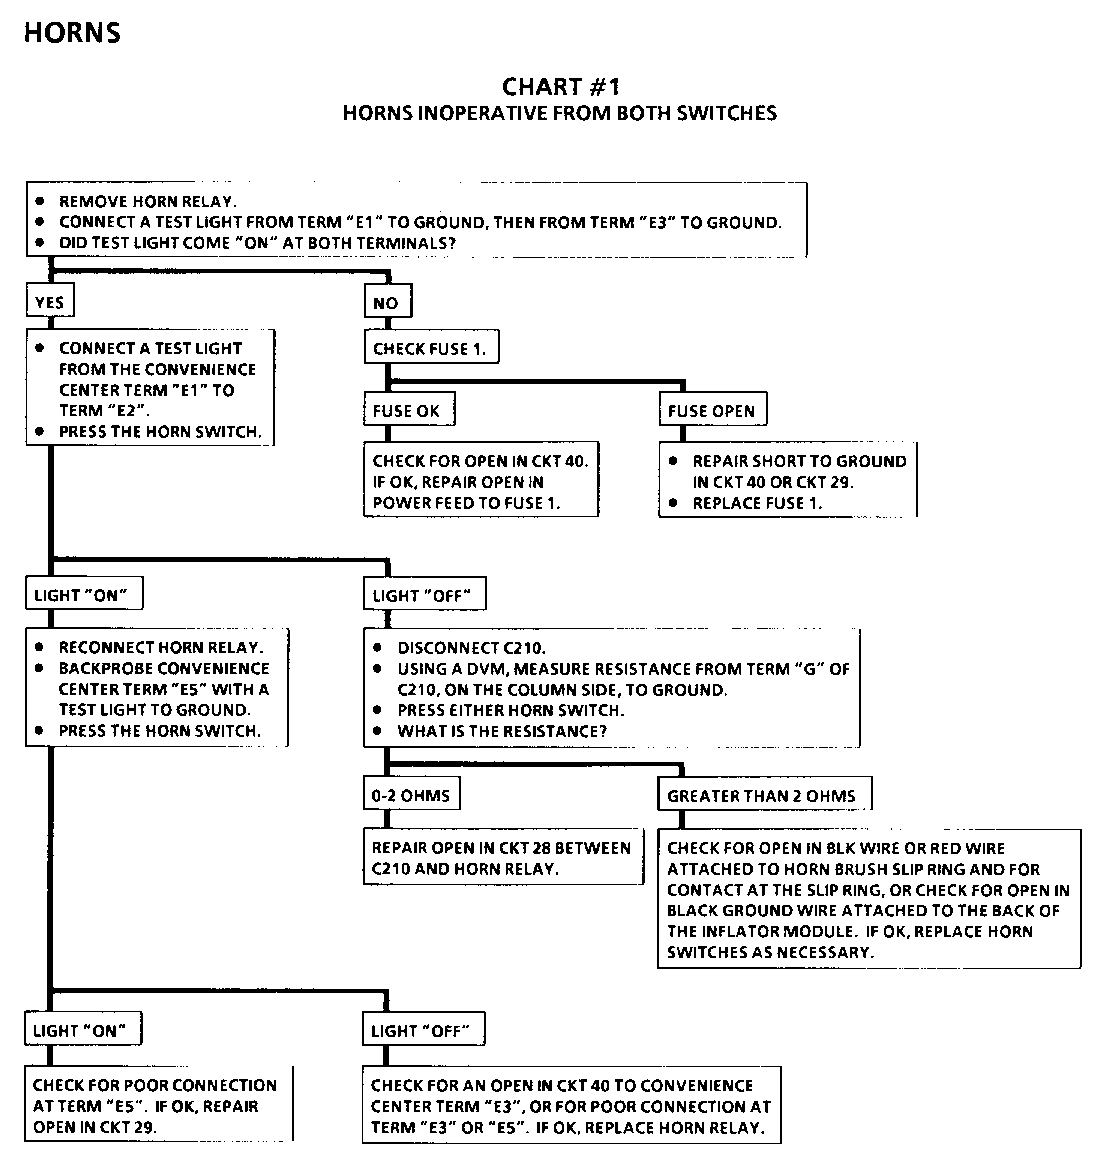
Check Fuse 1. If Fuse 1 is open, check for a short to Ground in CKT 40 or CKT 29. o Refer to System Diagnosis.
SYSTEM DIAGNOSIS
o See Symptom Table for the appropriate diagnostic procedure(s).
SYMPTOM TABLE
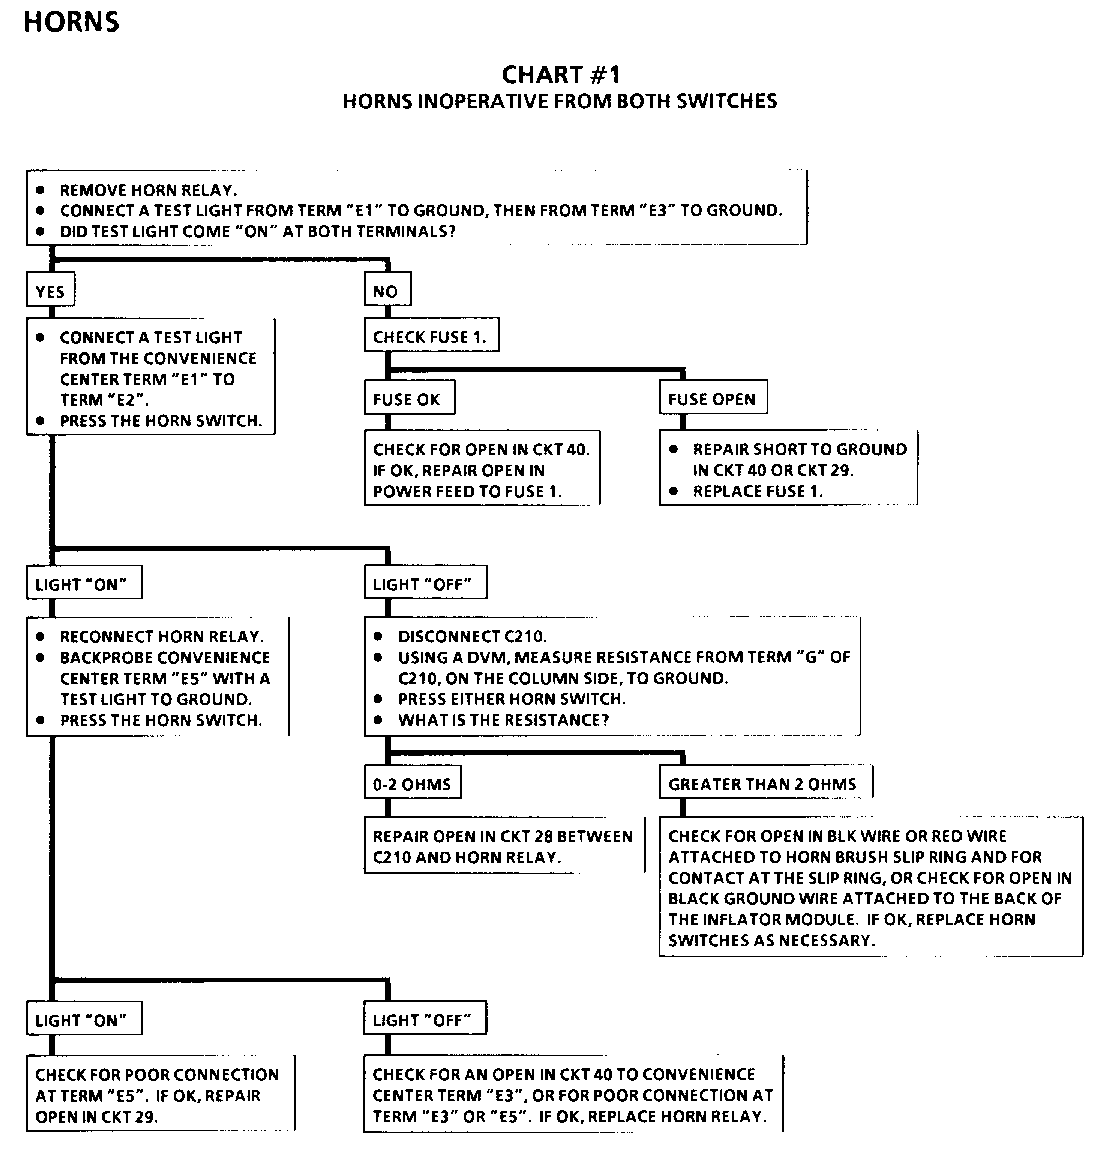
SYMPTOM PROCEDURE PAGE NUMBER -------------------- -------------------------------------------------- Horns inoperative from Chart # 1 8A-40-2 both switches
Horns inoperative from Check for open in circuitry on back side of one switch only inflator Module. If OK, replace Horn Switch as necessary.
One Horn inoperative Remove connector from inoperative Horn. Attach one end of a fused jumper to B +. Momentarily touch the other end to the Horn's connector. If the Horn activates, repair open in CKT 29. If the Horn does not activate, check the Horn for a clean and tight ground at its case. If OK, replace Horn.
Horns "ON" at all times Chart #2 8A-40-3
COMPONENT LOCATION 201-PG FIG. CONN ------------ ------------------------------ ------ --- ----- Convenience Center...LH side of I/P, left of Steering Column .......................18...26
Fuse Block..........Mounted to LH side of I/P, accessible with
LH Front Door open ........................18...26 11-0
Fusible Link A .... RH side of engine compartment, bolted to Battery Junction Block ................... 22...31
Horn Relay .............. In Convenience Center............... 31...43
Horn Switches...... One on either side of Inflator Module, in Steering Wheel
Horn #1.......In LH front fender, at front of LH wheelhouse....25...35
Horn #2........In LH front fender, at front of LH wheelhouse...25...35
C210 (11 cavities)......Body Harn to Turn/Hazard Switch Assembly Conn,
under Steering Column..................20...28 202-3
P102............In dash panel, visible from engine compartment,
behind LH front wheelhouse..................25...35
S225................. Body Harn, approx 36 cm from Fuse Block
TROUBLESHOOTING HINTS
(Perform before beginning System Diagnosis)
Check Fuse 1. If Fuse 1 is open, check for a short to ground in CKT 40 or CKT 29. o Refer to System Diagnosis.
SYSTEM DIAGNOSIS
o See Symptom Table for the appropriate diagnostic procedure(s).
SYMPTOM TABLE
SYMPTOM PROCEDURE PAGE NUMBER ---------------------- ----------------------------------------------- Horns inoperative from Chart #1 8A-40-2 both switches
Horns inoperative from Check for open in circuitry on back side of one switch only inflator Module. If OK, replace Horn Switch as necessary.
One Horn inoperative Remove connector from inoperative Horn. Attach one end of a fused jumper to B +. Momentarily touch the other end to the Horn's connector. If the Horn activates, repair open in CKT 29. If the Horn does not activate, check the Horn for a clean and tight ground at its case. If OK, replace Horn.
Horns "ON" at all times Chart #2 8A-40-3
COMPONENT LOCATION 201-PG FIG. CONN
Convenience Center...LH side of I/P, left of Steering Column....18... 26
Fuse Block...........Mounted to LH side of I/P, accessible with LH Front Door open.........................18...26 11-0
Fusible Link A.......RH side of engine compartment, bolted to
Battery Junction Block.....................22...31
Horn Relay..........In Convenience Center.......................31...43
Horn Switches.....One on either side of Inflator Module, in Steering Wheel
Horn #1 ..........In LH front fender, at front of LH wheelhouse...25...35
Horn #2........In LH front fender, at front of LH wheelhouse......25...35
C210 (11 cavities).....Body Harn to Turn/Hazard Switch Assembly Conn, under Steering Column....................20...28 202-3
P102 .............In dash panel, visible from engine compartment, behind LH front wheelhouse....................25...35
S225 ....................Body Harn, approx 36 cm from Fuse Block
TROUBLESHOOTING HINTS
(Perform before beginning System Diagnosis)
Check Fuse 1. If Fuse 1 is open, check for a short to ground in CKT 40 or CKT 29.
o Refer to System Diagnosis.
SYSTEM DIAGNOSIS
o See Symptom Table for the appropriate diagnostic procedure(s).
SYMPTOM TABLE
SYMPTOM PROCEDURE PAGE NUMBER ----------------------- ------------------------------------------------ Horns inoperative from Chart #1 8A-40-2 both switches
Horns inoperative from Check for open in circuitry on back side of one switch only Inflator Module. If OK, replace Horn Switch as necessary.
One Horn inoperative Remove connector from inoperative Horn. Attach one end of a fused jumper to B +. Momentarily touch the other end to the Horn's connector. If the Horn activates, repair open in CKT 29. If the Horn does not activate, check the Horn for a clean and tight ground at its case. If OK, replace Horn.
Horns "ON" at all times Chart #2 8A-40-3


General Motors bulletins are intended for use by professional technicians, not a "do-it-yourselfer". They are written to inform those technicians of conditions that may occur on some vehicles, or to provide information that could assist in the proper service of a vehicle. Properly trained technicians have the equipment, tools, safety instructions and know-how to do a job properly and safely. If a condition is described, do not assume that the bulletin applies to your vehicle, or that your vehicle will have that condition. See a General Motors dealer servicing your brand of General Motors vehicle for information on whether your vehicle may benefit from the information.
