COMPASS MIRROR CALIBRATION PROCEDURE ON NEW DESIGNS

Subject: COMPASS MIRROR CALIBRATION PROCEDURE ON NEW DESIGNS
Model and Year: 1991-92 CAPRICE
THIS BULLETIN CANCELS AND SUPERSEDES DEALER SERVICE BULLETIN NO. 91-67-10 DATED SEPTEMBER 1990. THE 1992 MODEL YEAR HAS BEEN ADDED. ALL COPIES OF 92-67-10 SHOULD BE DISCARDED.
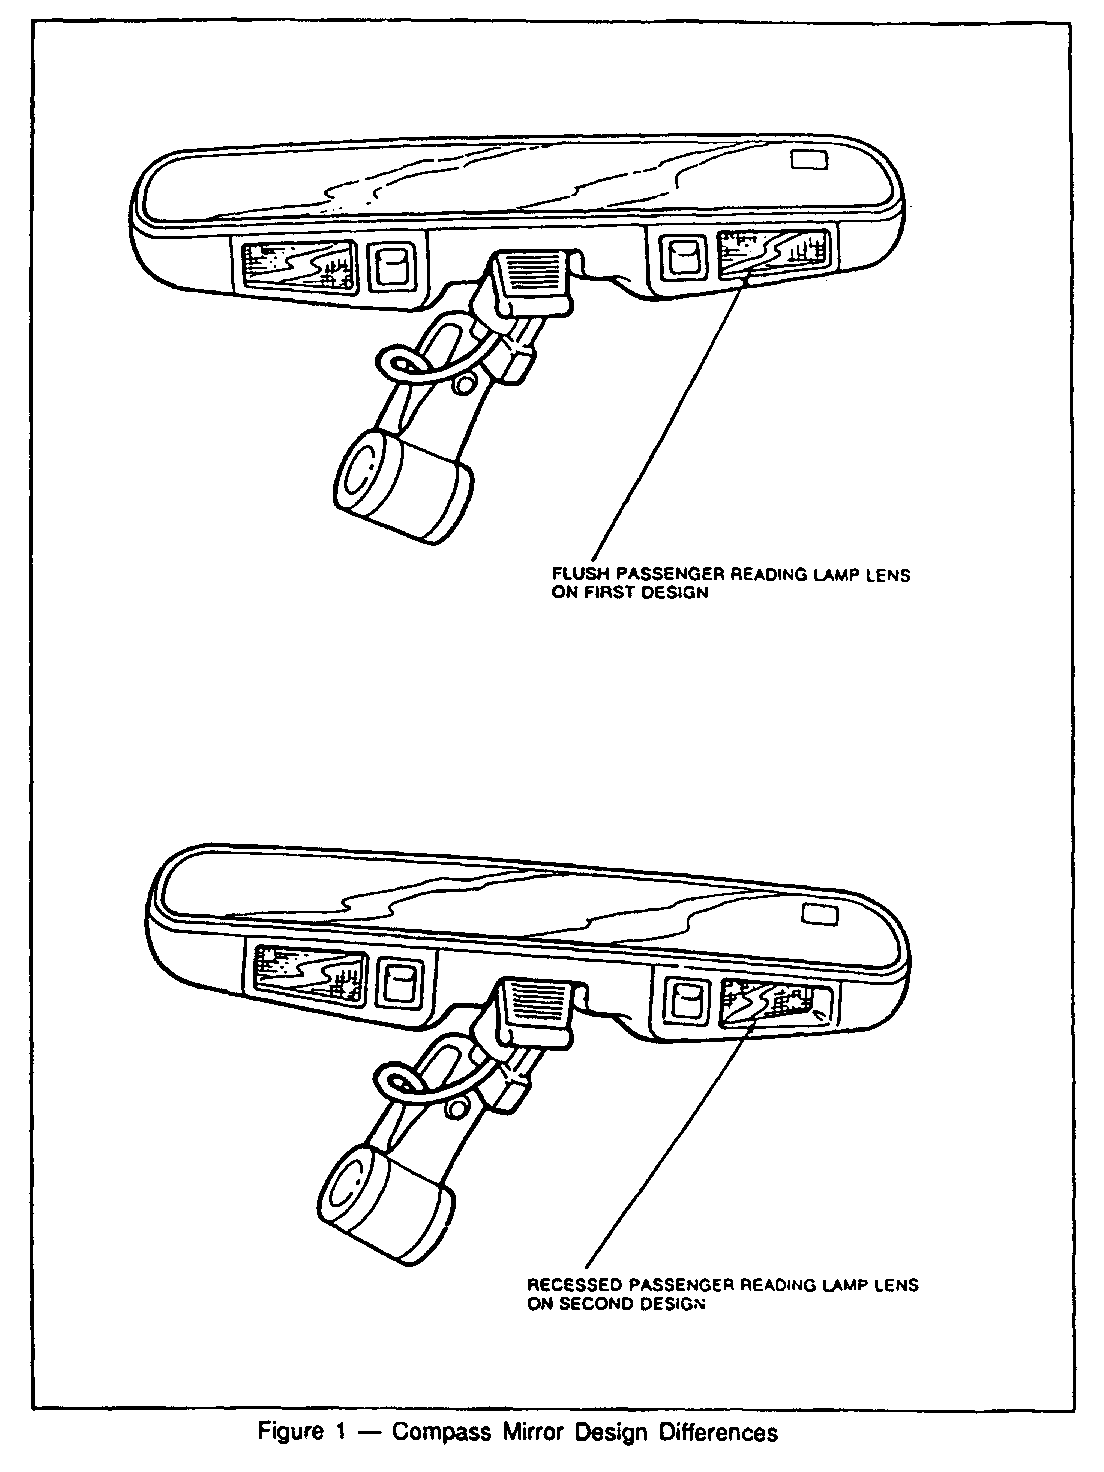
Two different compass mirror designs can be used on 1991 and 1992 Models. Each design requires a different calibration procedure. There is a cosmetic difference between the mirrors. The first design mirror has both reading lamp lenses flush with the bottom of the mirror assembly; the second design mirror has a recessed lens for the passenger reading lamp (See Figure 1). If the vehicle is equipped with the first design mirror, use procedure "A" for initial calibration. if the vehicle is equipped with the second design, use procedure "B" for initial calibration.
Procedure "A"
Compass Calibration For Mirrors With Flush Passenger Reading Lamp Lens
1. Start the vehicle and locate it on a level surface maintaining a distance of 100 feet from any large structures (buildings or large metal objects) and 20 feet from other vehicles. A parking lot or similar area is recommended.
2. Determine the proper directions of Magnetic North and Magnetic West and align them with a recognizable landmark for later reference. (Note: if you do not know these directions, they can be found by using a simple hand-held compass. Be sure to stand at least 1 0 feet from the vehicle when using it to prevent erroneous readings). You are now ready to begin compass calibration.
3. Align the vehicle so that it is facing in the direction of Magnetic West and stop. Push the calibration button and hold it in. The compass display will immediately go blank, followed in about three seconds by a flashing "CAL" symbol. Continue to hold the button in until (W) appears, then release it. Wait 20 seconds for compass to stabilize then push the button until the display begins to flash rapidly, then release.
4. After about a minute or so, the display will change to a slowly flashing (N). Now re-align the vehicle so that it is facing in the direction of Magnetic North and stop. Push the button until the display begins to flash rapidly, then release.
5. In about another minute or so, the display will stop flashing and show the characters (N) with the "CAL" symbol flashing slowly. Now point the vehicle in the direction you want to reference as North (as shown on a local road map for example). Stop the vehicle and push the button a final time, until the "CAL" symbol disappears. The compass is now properly calibrated to work in your vehicle, and requires no other preparation.
Notes:
------ o Do not turn on rear window defrost during calibration procedure as it will affect accuracy of compass settings.
o Any time the compass is waiting for you to push the button during calibration, it will time out after two minutes and abort the calibration procedure. If this happens, you will need to begin again from step 1.
o If at any time during calibration you wish to abort the procedure, either wait for two minutes as described above or remove power to the unit by cycling the ignition switch. The compass will automatically revert to using its most recent previous setting.
Procedure "B"
Compass Calibration For Mirrors With Recessed Passenger Reading Lamps Lenses
1. Start the vehicle and locate it on a level surface maintaining a distance of 100 feet from any large structures (buildings or large metal objects) and 20 feet from other vehicles. A parking lot or similar area is recommended. Align the car with a physical reference such that you will be able to point it in the opposite direction accurately (e. g., align it on a painted line, etc.).
2. When the car is aligned, you are ready to begin compass calibration. Push the calibration button and hold it in. The display will immediately go blank. In about three seconds, the symbol "CAL" will appear. Continue to hold the button in until the display shows the symbol (0), then release it. The display will begin to flash.
3. After a minute or two, the display will stop flashing and change to show the symbol (00). Turn the vehicle around to face in the opposite direction (1 80 degree turn), and push the button until the display begins to flash, then release.
4. After another minute or two, the display will change to show the characters (N) flashing slowly. Now point the vehicle in the direction you want to reference as North (as shown on a local road map for example), and push the button a final time, until the "N" disappears. Release the button; the "CAL" symbol will continue to flash momentarily, then disappear. The display will reappear reading North ("N"). The compass is now calibrated to work properly in your vehicle, and requires no further preparation.
Notes:
------ o To save time, you can begin step 2 with the vehicle pointed South. Then when it is turned around for step 3, it would not need to be moved again for step 4, since it would already be facing North.
o Do not turn on rear window defrost during calibration procedure as it will affect accuracy of compass settings.
o Any time the compass is waiting for you to push the button during calibration, it will time out after two minutes and abort the calibration procedure. If this happens, you will need to begin again from step 1.
o If at any time during calibration you wish to abort the procedure, either wait for two minutes as described above or remove power to the unit by cycling the ignition switch. The compass will automatically revert to using its most recent previous setting.
General Motors bulletins are intended for use by professional technicians, not a "do-it-yourselfer". They are written to inform those technicians of conditions that may occur on some vehicles, or to provide information that could assist in the proper service of a vehicle. Properly trained technicians have the equipment, tools, safety instructions and know-how to do a job properly and safely. If a condition is described, do not assume that the bulletin applies to your vehicle, or that your vehicle will have that condition. See a General Motors dealer servicing your brand of General Motors vehicle for information on whether your vehicle may benefit from the information.
