Fuel Hose and Pipes Fuel Feed and Return Pipes
Removal Procedure
Tools Required
J 37088-A, Tool Set, Fuel Line Quick-Connect Separator
- Disconnect the negative battery cable.
- Relieve the fuel system pressure. Refer to the Fuel Pressure Relief Procedure.
- Disconnect the quick-connect fittings at the fuel rail. Refer to Servicing Quick-Connect Fittings.
- Remove the fuel feed and return pipes from the retaining clip at the brake booster.
- Raise the vehicle.
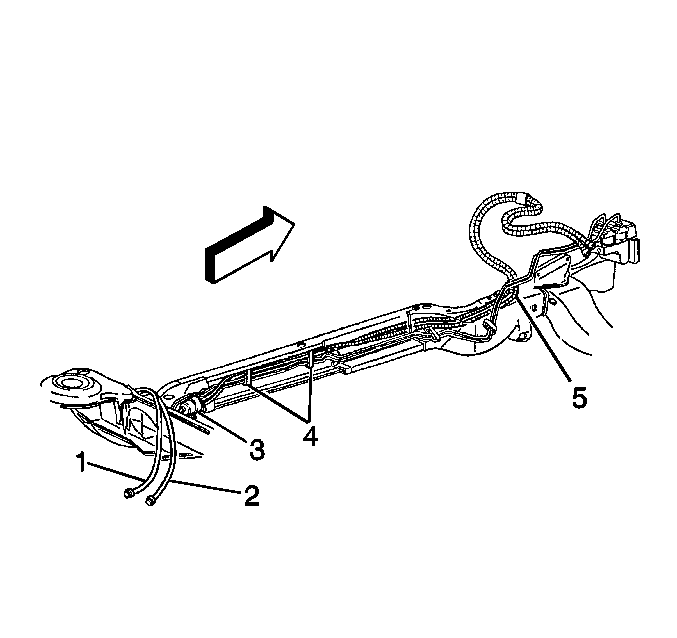
- Disconnect the quick-connect fittings at the fuel filter (3). Refer to Servicing Quick-Connect Fittings.
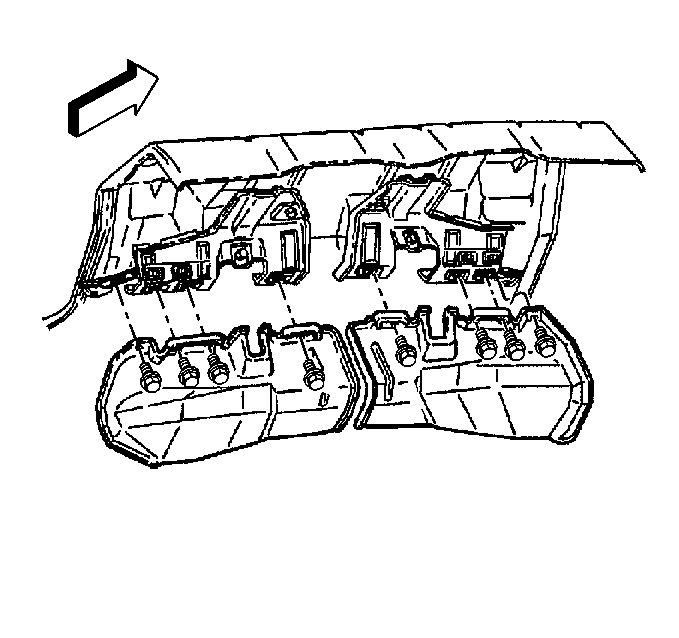
- Remove the lower fuel tank shield attaching screws and the lower fuel tank shields.
- Remove the fuel feed, return, and EVAP pipe underbody retainer.
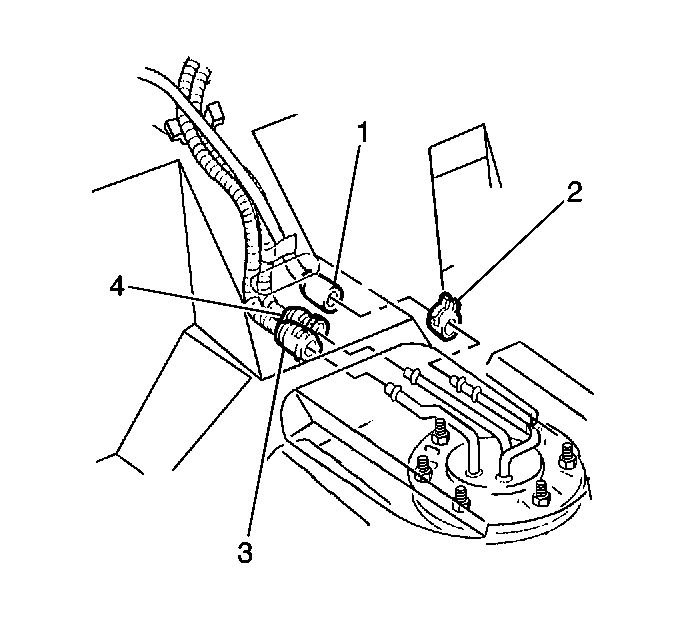
- Disconnect the quick-connect fittings (3 and 4) at the fuel sender. Refer to Servicing Quick-Connect Fittings.
- Disconnect the fuel feed and return pipes from the retaining clips (4).
- Remove the fuel feed and return pipes. Note the position of the pipes for installation.

Notice:
• Replace kniked nylon fuel feed or return pipes that cannot be
straightened. • Do not repair nylon fuel feed or return pipes. Replace damaged
pipes.


Installation Procedure
- Lower the vehicle.
- Insert the rear ends of the fuel feed pipe (1) and fuel return pipe (2) into the top forward frame hole (5).
- Raise the vehicle.
- Route the pipes in the same position as noted during disassembly.
- Connect the quick-connect fittings (3 and 4) at the fuel sender.
- Install the fuel feed, return, and EVAP pipe underbody retainer.
- Install the lower fuel tank shields and the tank shield attaching screws.
- Connect the quick-connect fittings at the fuel filter (3).
- Close all the retaining clips (4).
- Lower the vehicle.
- Install the fuel feed and return pipes into the retaining clip at the brake booster.
- Connect the quick-connect fittings to the fuel rail. Refer to Servicing Quick-Connect Fittings.
- Connect the negative battery cable.
- Inspect for leaks.

Caution: To Reduce the Risk of Fire and Personal Injury:
• If nylon fuel pipes are nicked, scratched or damaged during installation,
they must be replaced. • When installing new fuel pipes, Do Not hammer directly on the
fuel harness body clips as this may damage the nylon pipes resulting in a
possible fuel leak.


Tighten
Tighten the lower fuel tank shield attaching screws to 1 N·m
(9 lb in).

| 14.1. | Turn the ignition switch ON for 2 seconds. |
| 14.2. | Turn the ignition switch OFF for 10 seconds. |
| 14.3. | Turn the ignition switch ON. |
| 14.4. | Check for fuel leaks. |
Fuel Hose and Pipes EVAP Pipes
Removal Procedure
- Raise the vehicle.
- Remove the fuel feed, return, and EVAP pipe underbody retainer.
- Disconnect the EVAP pipe and the clamp (2) from the fuel sender.
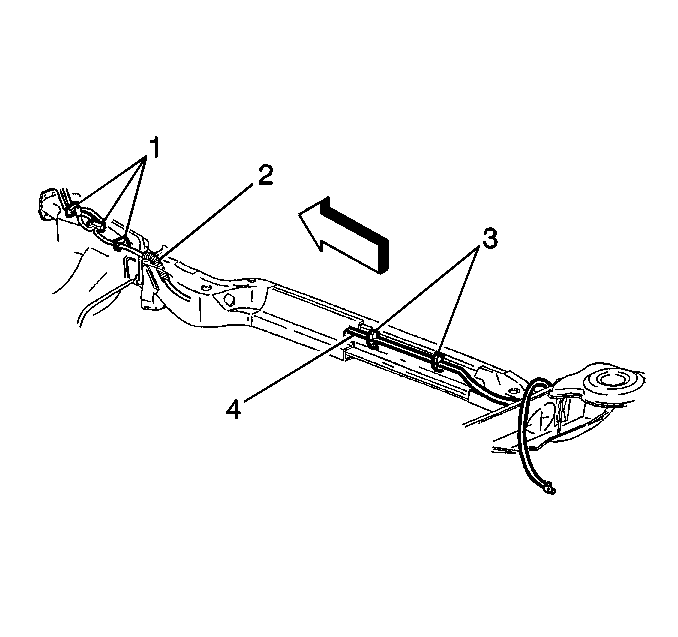
- Disconnect the EVAP pipe (4) from the retaining clips (3). Note the position of the EVAP pipe for installation.
- Lower the vehicle.
- Disconnect the EVAP pipe hose end clamp at the EVAP canister.
- Disconnect the EVAP pipe from the forward pipe retaining clips (1).
- Remove the EVAP pipe (4).

Notice:
• Replace nylon pipes if the pipes become kinked and cannot be straightened. Replace kniked nylon fuel that cannot be straightened. • Do not repair sections of nylon pipes. Replace the damaged pipes. • Replace the EVAP pipes with the original equipment or parts that
meet the GM specifications. • Replace EVAP hoses with the original equipment or parts that meet
the GM specifications for those parts. Use only reinforced fuel resistant
hose which is identified with the word Fluoroelastomer or GM 6163-M on the
hose.

Installation Procedure
- Insert the rear end of the EVAP pipe (4) into the top forward frame hole (2). Load the pipe until the formed pipe/conduit reaches into the hole.
- Install the EVAP pipe into the forward pipe retaining clips (1).
- Connect the EVAP pipe hose end and clamp to the EVAP canister.
- Raise the vehicle.
- Install the new EVAP pipe (4) into the retaining clips (3) in the same position as noted during disassembly.
- Connect the EVAP pipe and clamp (2) at the fuel sender.
- Install the fuel feed, return, and EVAP pipe underbody retainer.
- Lower the vehicle.


