General Exhaust System Replacement 4.3L
Removal Procedure
- Raise and suitably support the vehicle. Refer to General Vehicle
Jacking and Lifting in General Information.
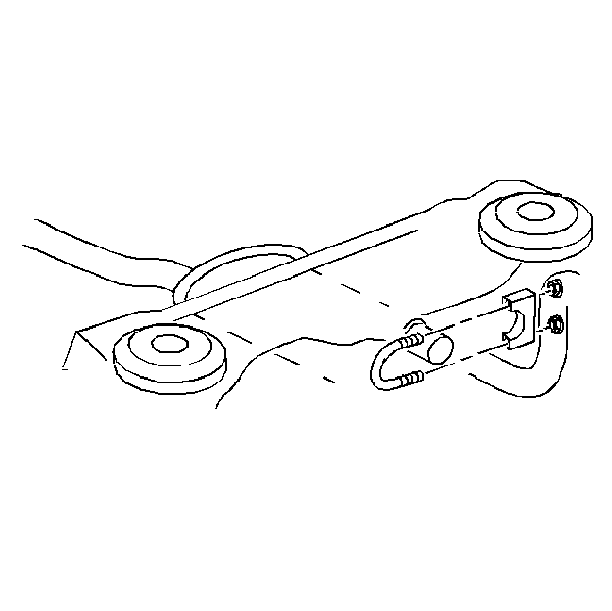
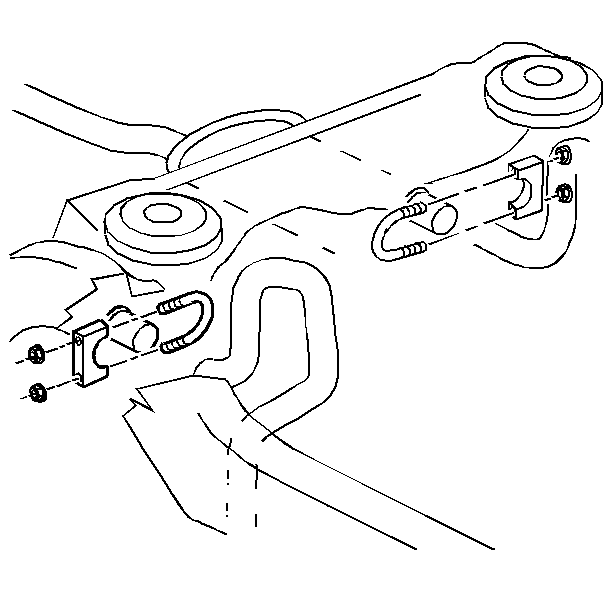
- Remove the muffler clamp.
- Remove the rear hanger
bracket bolts.
- Remove the resonator, the insulators and the bracket from the
muffler outlet.
Important: Ensure that the resonator pipe does not hang on the axle, so as not
to damage the axle brake line.
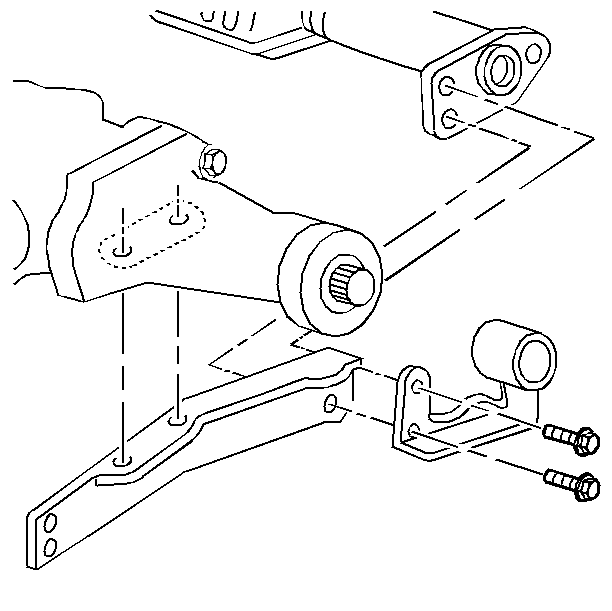
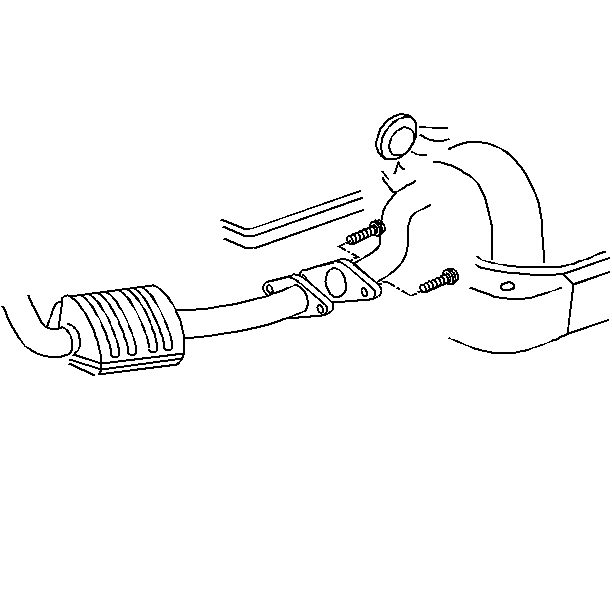
- Support the crossover pipe and catalytic converters.
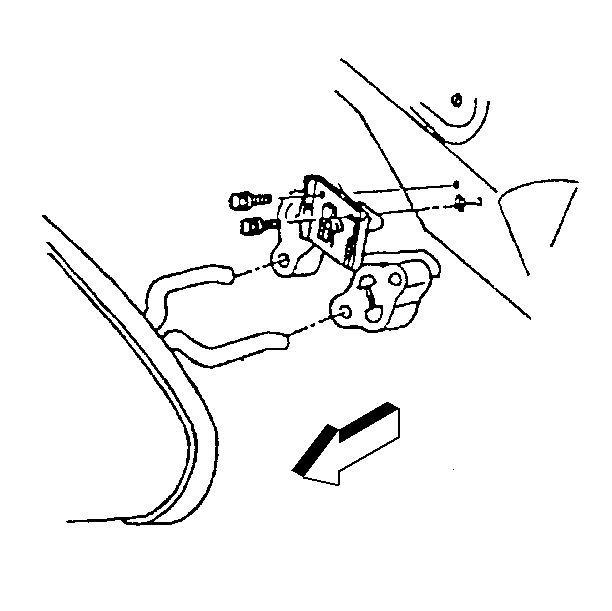
- Remove the heated oxygen sensor. Refer to
Heated Oxygen Sensor Replacement
in Engine Controls.
- Remove the muffler bolts.
- Remove only the two converter
hanger bolts that attach the hanger bracket to the converter support.
- Remove the tailpipe front
hanger bracket bolts.
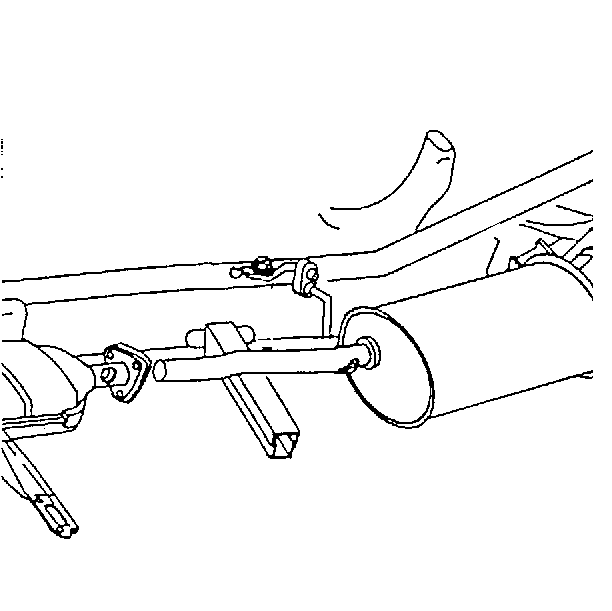
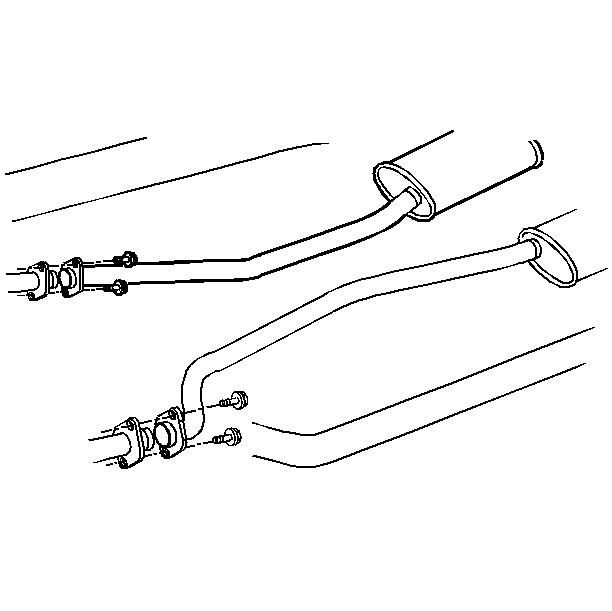
- As an assembly, remove
the exhaust muffler with the crossover pipe, the insulators and the bracket.
- Remove the exhaust tailpipe
ground strap bolts.
- Remove the dampener.
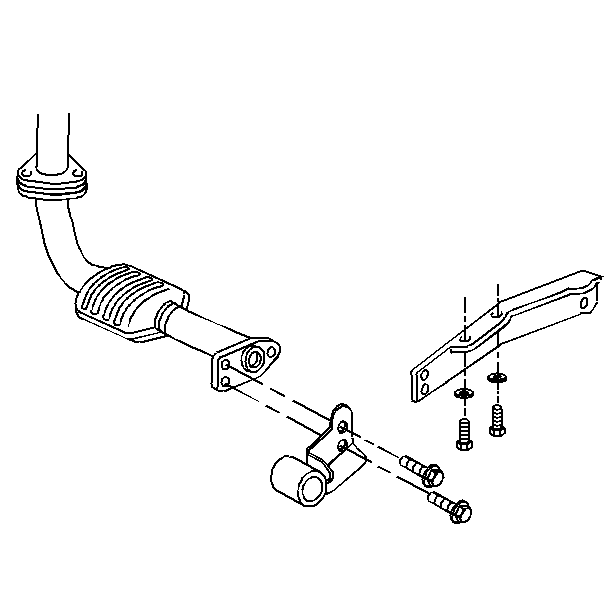
- Remove the converter nuts.
- Remove only the two converter hanger bolts that attach the dampener
and the converter support to the converter.

- Remove the converters.
- Remove the gaskets.
- Remove the transmission support crossmember. Refer to Transmission
Replacement in Automatic Transmission On-Vehicle Service.
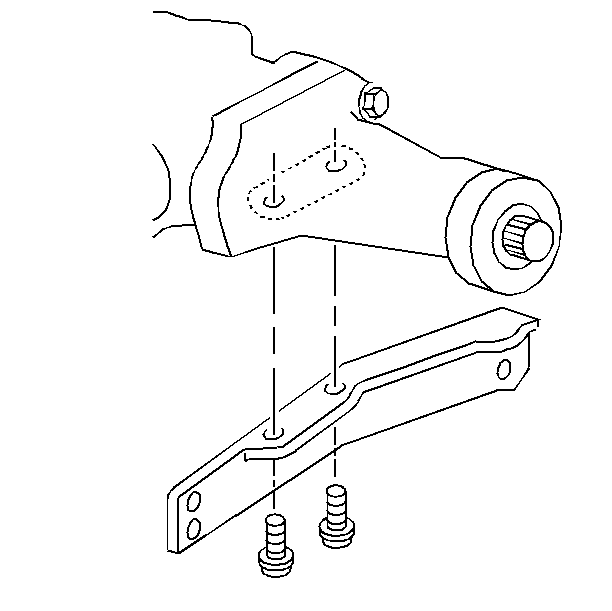
- Remove the two remaining
catalytic converter support bolts and washers.
- Remove the catalytic converter support.
Installation Procedure
- Install the new exhaust
manifold outlet gaskets.
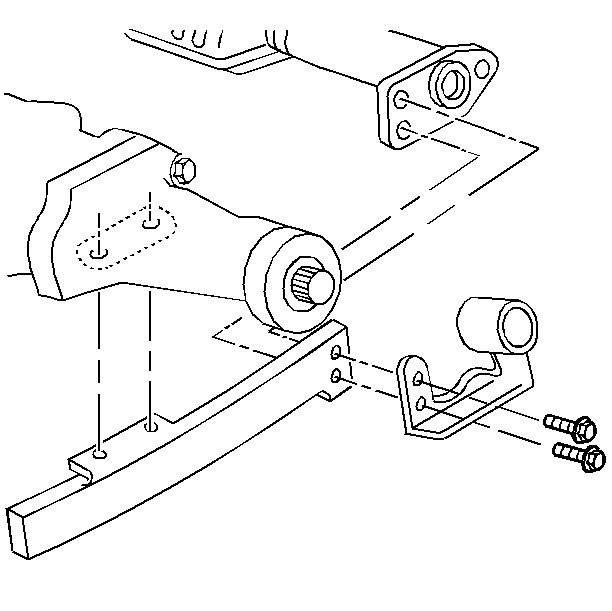
- Install the converters.
- Loosely install the converter nuts.
- Install the converter
support to the underside of the transmission case.
- Install only the two converter hanger bolts, with washers, that
attach the converter support to the transmission case.
Tighten
Tighten the converter hanger bolts/screw to 34 N·m (25 lb ft).
Notice: Use the correct fastener in the correct location. Replacement fasteners
must be the correct part number for that application. Fasteners requiring
replacement or fasteners requiring the use of thread locking compound or sealant
are identified in the service procedure. Do not use paints, lubricants, or
corrosion inhibitors on fasteners or fastener joint surfaces unless specified.
These coatings affect fastener torque and joint clamping force and may damage
the fastener. Use the correct tightening sequence and specifications when
installing fasteners in order to avoid damage to parts and systems.
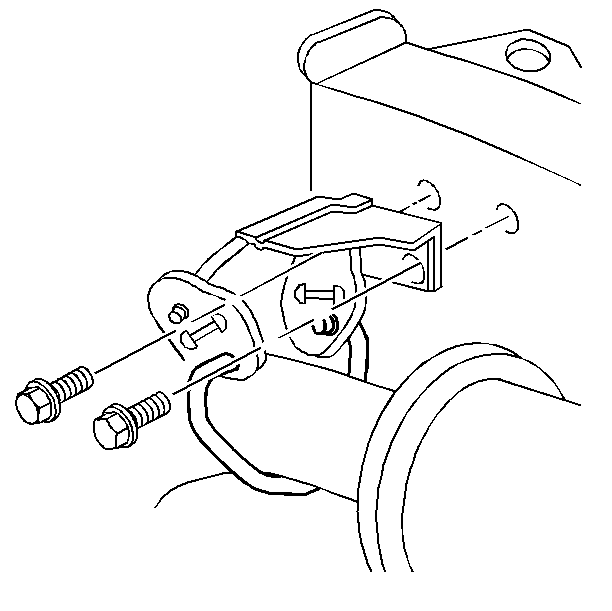
- Install the dampener.
- Loosely install only the two converter hanger bolts that secure
the dampener and the support to the converter.
Tighten
| • | Tighten the converter nuts to 50 N·m (37 lb ft). |
| • | Tighten the hanger bolts to 34 N·m (25 lb ft). |
| • | Ensure that the bottom edge of the dampener is horizontal. |
- Install the transmission
support crossmember. Refer to Transmission Replacement in Automatic Transmission
On-Vehicle Service.
- Install the front tailpipe hanger bracket rods into the upper
insulator holes.
- Attach the insulators, with the hanger bracket, onto the muffler
rods.
- Attach the hanger bracket to the rear crossmember.
- Loosely install the hanger bracket bolts.
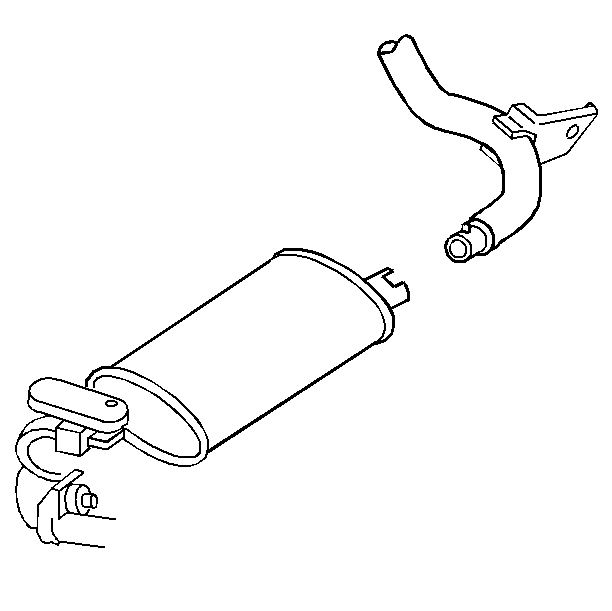
- Install the muffler, with
the crossover pipe, to the converters.
- Loosely install the muffler bolts.
- Install the dampener.
- Loosely install the bolts.
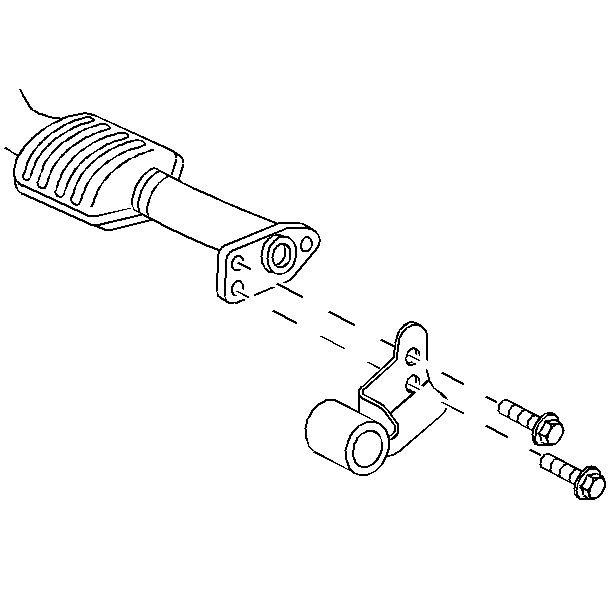
- Attach the resonator rear
hanger bracket to the frame rail.
- Install the resonator rear hanger bracket bolts.
Tighten
| • | Tighten the tailpipe front hanger bracket bolts to 50 N·m
(37 lb ft). |
| • | Tighten the resonator rear hanger bracket bolts to 17 N·m
(13 lb ft). |
- Install the muffler clamp
onto the muffler outlet.
- Install the resonator.
| • | Slide the resonator pipe into the muffler outlet, until the tab
on the resonator contacts the bottom of the slot, located on the top of the
muffler outlet. |
| • | Attach the insulators onto the rear hanger bracket, by inserting
the bracket rods through the upper insulator holes. |
| • | Install the resonator rods into the lower insulator holes. |
| • | Tap the muffler clamp, toward the rear of the vehicle, in order
to contact the resonator tab. |
Tighten
| • | Tighten the nuts on the clamp to 35 N·m (26 lb ft).
Ensure that the clamp U-bolt is positioned with the threaded ends pointed
outboard.
|
| • | Tighten the muffler bolts/screw to 20 N·m (15 lb ft).
|
| • | Tighten the dampener bolts/screw to 41 N·m (30 lb ft).
Ensure that the bottom of the dampener is horizontal.
|
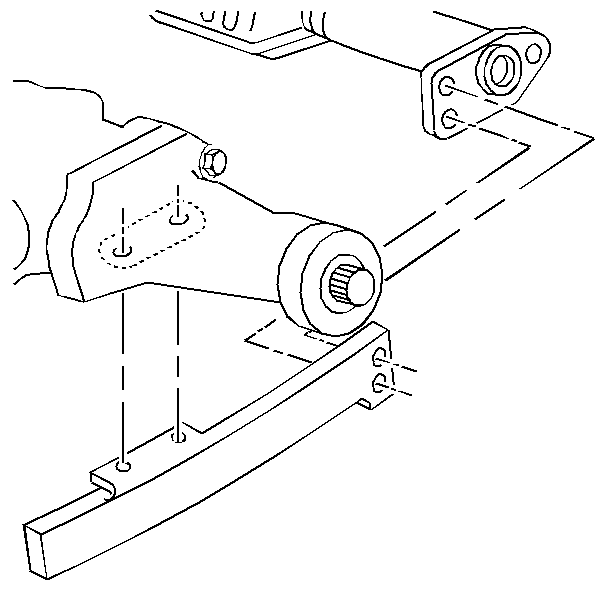
- Position the converter
hanger bracket and clamp (part of the crossover pipe) to the front face of
the converter support.
- Install the remaining two converter hanger bolts.
Tighten
| • | Tighten the converter hanger bolts to 34 N·m (25 lb ft). |
| • | Tighten the converter hanger bracket and clamp nut to 35 N·m
(26 lb ft). |
- Install the heated oxygen sensors. Refer to
Heated Oxygen Sensor Replacement
in Engine Controls.
- Lower the vehicle.
General Exhaust System Replacement 5.7L
Removal Procedure
- Raise and suitably support the vehicle. Refer to General Vehicle
Lifting and Jacking in General Information.
- Remove the muffler clamp.
- Remove the rear hanger
bracket bolts.
- Remove the resonator, with the insulators, and the bracket from
the muffler outlet.
Important: Ensure that the resonator pipe does not hang on the axle, so as not
to damage the axle brake line.
- Support the intermediate
pipes.
- Remove the bolts.
- Remove the dampener.
- Remove the muffler bolts.
- Remove only the two converter
support bolts that attach the support bracket to the converter support.
- Remove the right-hand
tailpipe front hanger bracket bolts.
- As an assembly, remove
the muffler, the intermediate pipe, the insulators and the bracket.
- Remove the two converter support bolts that attach the support
to the hanger bracket, on the intermediate pipe.
- Remove the left-hand tailpipe
front hanger bolts.
- As an assembly, remove the muffler, intermediate pipe, insulators
and the bracket.
- Remove the heated oxygen sensors. Refer to
Heated Oxygen Sensor Replacement
in Engine Controls.
- Remove the converter nuts.
- Remove the converters.
- Remove the gaskets.
- Remove the transmission support crossmember, if removing the converter
support. Refer to Transmission Replacement in Automatic Transmission On-Vehicle
Service.
- Remove the remaining two
converter support bolts and washers.
- Remove the converter support.
Installation Procedure
- Install the new exhaust
manifold outlet gaskets.
- Install the converters.
- Loosely install the converter nuts.
- Install the converter
support to the underside of the transmission case.
- Install the converter support bolts, with washers, that attach
the converter support to the transmission case.
Tighten
Tighten the converter support bolts to 34 N·m (25 lb ft).
Notice: Use the correct fastener in the correct location. Replacement fasteners
must be the correct part number for that application. Fasteners requiring
replacement or fasteners requiring the use of thread locking compound or sealant
are identified in the service procedure. Do not use paints, lubricants, or
corrosion inhibitors on fasteners or fastener joint surfaces unless specified.
These coatings affect fastener torque and joint clamping force and may damage
the fastener. Use the correct tightening sequence and specifications when
installing fasteners in order to avoid damage to parts and systems.
- Install the dampener.
- Loosely install the converter support bolts that attach the dampener
and the support to the converter.
Tighten
| • | Tighten the converter nuts to 50 N·m (37 lb ft). |
| • | Tighten the converter hanger bolts to 34 N·m (25 lb ft). |
- Install the transmission
support crossmember. Refer to Transmission Replacement in Automatic Transmission
On-Vehicle Service.
- Install the front tailpipe hanger bracket rods into the upper
insulator holes.
- Install the insulators, with the hanger bracket, onto the muffler
rods.
- Install the right-hand
hanger bracket to the rear crossmember.
- Loosely install the hanger bracket bolts.
- Install the muffler, with
the intermediate pipe, to the converter.
- Install the left-hand
hanger bracket to the rear crossmember.
- Install the hanger bracket bolts for the left-hand bracket.
Tighten
Tighten the front hanger bracket bolts/screw to 50 N·m
(37 lb ft).
- Install the muffler, with
the intermediate pipe, to the converter.
- Install the muffler bolts.
Tighten
| • | Tighten the tailpipe front hanger bracket bolts to 50 N·m
(37 lb ft). |
| • | Tighten the resonator rear hanger bracket bolts to 17 N·m
(13 lb ft). |
- Attach the resonator rear
hanger brackets to the rear frame rail.
- Install the resonator rear hanger bracket bolts to 17 N·m
(13 lb ft).
Tighten
Tighten the rear hanger bracket bolts to 17 N·m (13 lb ft).
- Attach the muffler clamps
onto the muffler outlets.
- Install the resonators.
| • | Slide the resonator pipe into the muffler outlet, until the resonator
tab contacts the bottom of the slot, located on top of the muffler outlet. |
| • | Attach the insulators onto the rear hanger bracket. |
| • | Insert the bracket rods through the upper insulator holes. |
| • | Install the resonator rods into the lower insulator holes. |
| • | Tap the muffler clamps toward the rear of the vehicle, in order
to contact the resonator tabs. |
Tighten
| • | Tighten the nuts on the clamp to 35 N·m (26 lb ft).
|
| • | Tighten the muffler bolts to 20 N·m (15 lb ft).
|
- Install the dampener.
- Install the bolts.
Tighten
| • | Tighten the bolts to 41 N·m (30 lb ft). |
| • | Ensure that the bottom edge of the dampener is horizontal. |
- Position the converter
support bracket and clamp (part of the left-hand intermediate pipe) to the
front face of the converter support.
- Install the remaining two converter support bolts.
Tighten
| • | Tighten the converter support bolts to 34 N·m (25 lb ft). |
| • | Tighten the converter support bracket and clamp nut to 35 N·m
(26 lb ft). |
- Install the heated oxygen sensors. Refer to
Heated Oxygen Sensor Replacement
in Engine
Controls.
- Lower the vehicle.
