Tail Lamp Assembly and /or Backup, Sidemarker, Stop, Turn Signal Bulb Replacement for Chevrolet Caprice WM 2008
Tail Lamp Assembly and /or Backup, Sidemarker, Stop, Turn Signal Bulb Replacement SWB
Removal Procedure - Backup Light Bulb
- Disconnect the battery ground cable. Refer to Battery Negative Cable Disconnection and Connection .
- Open the rear compartment lid.
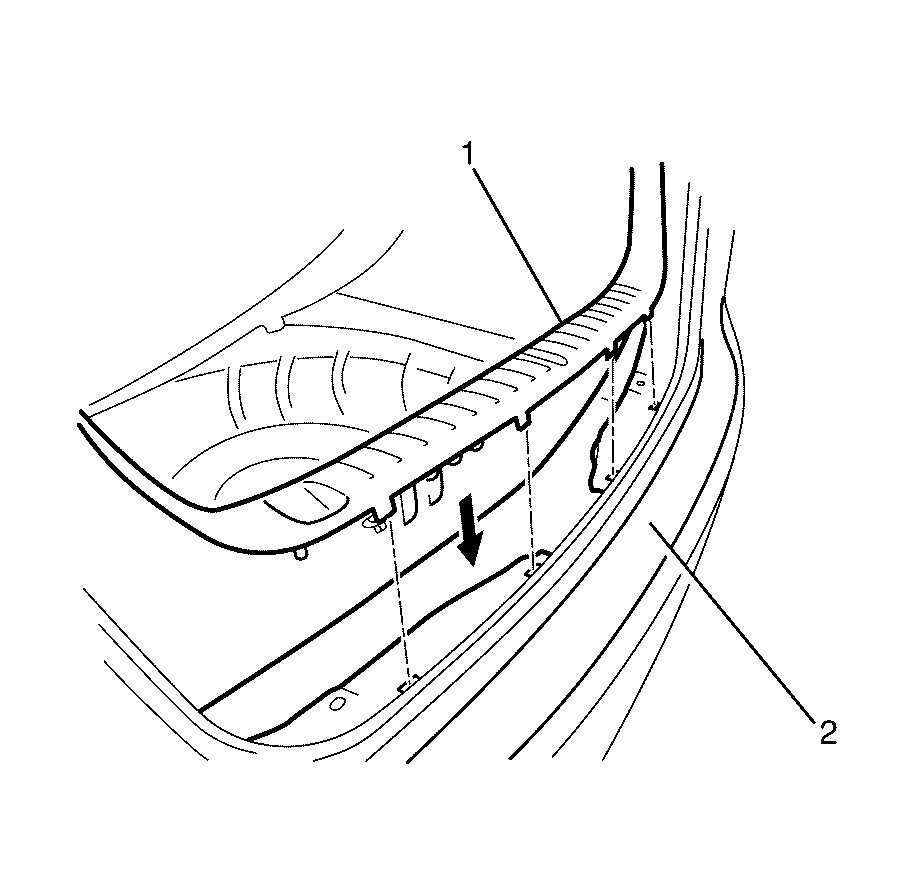
- Remove the rear compartment lid trim clips and remove the trim.
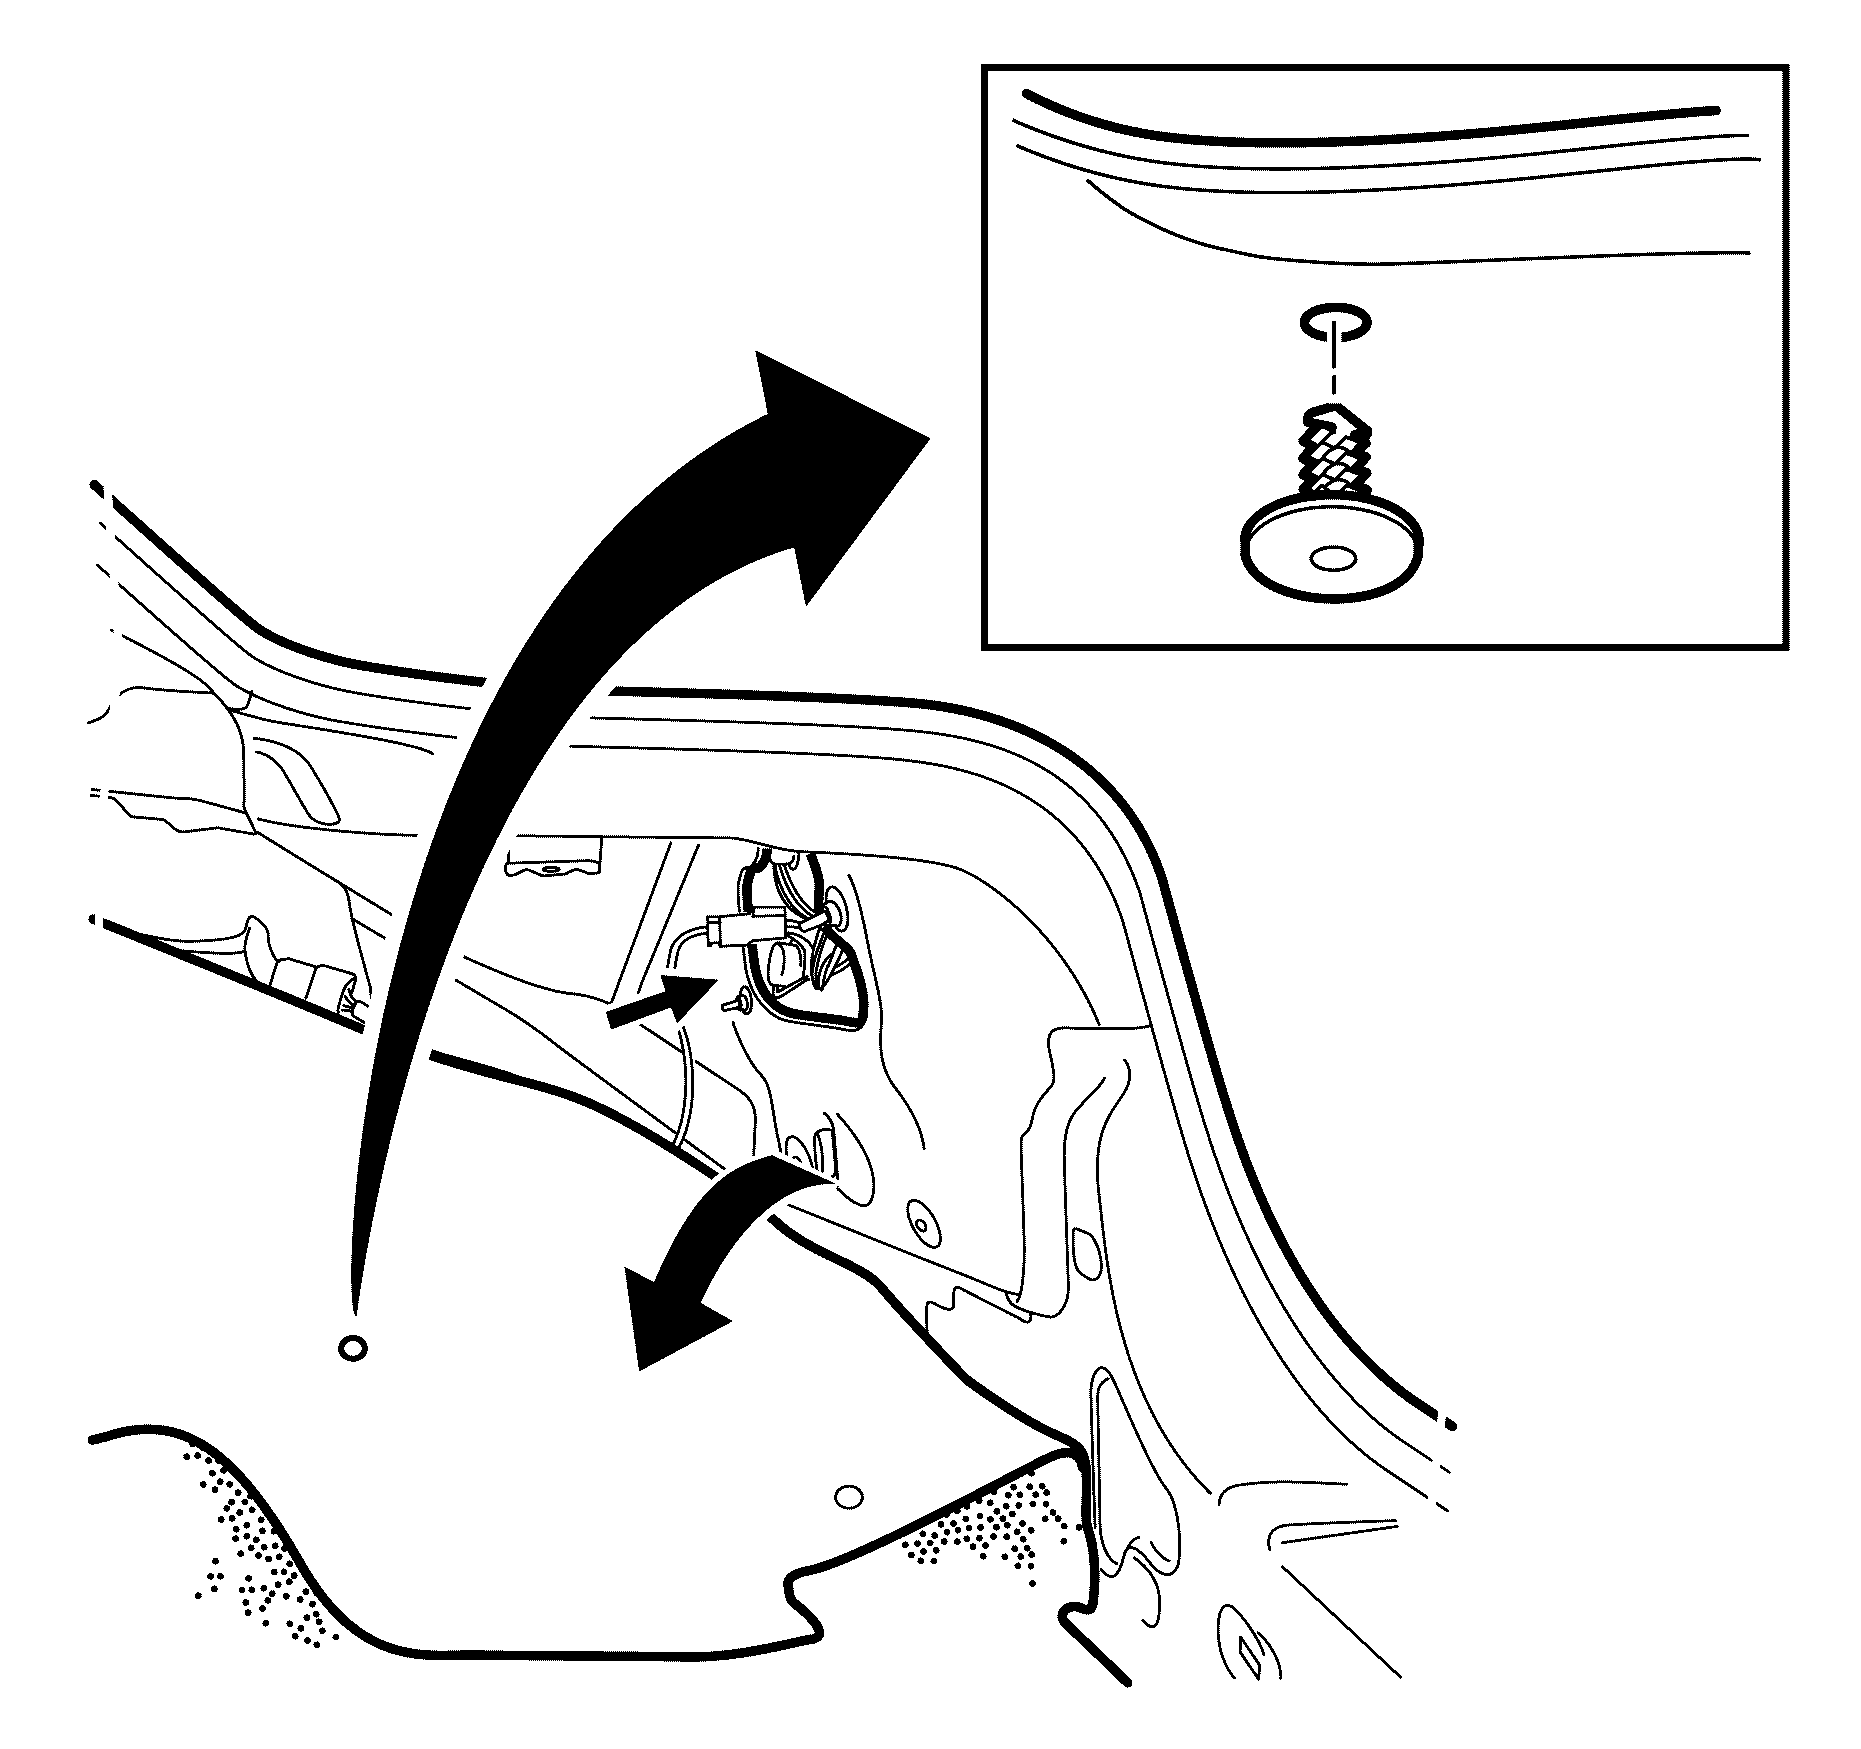
- Remove the rear compartment lining clip and pull back the lining for access to the rear bulbs.
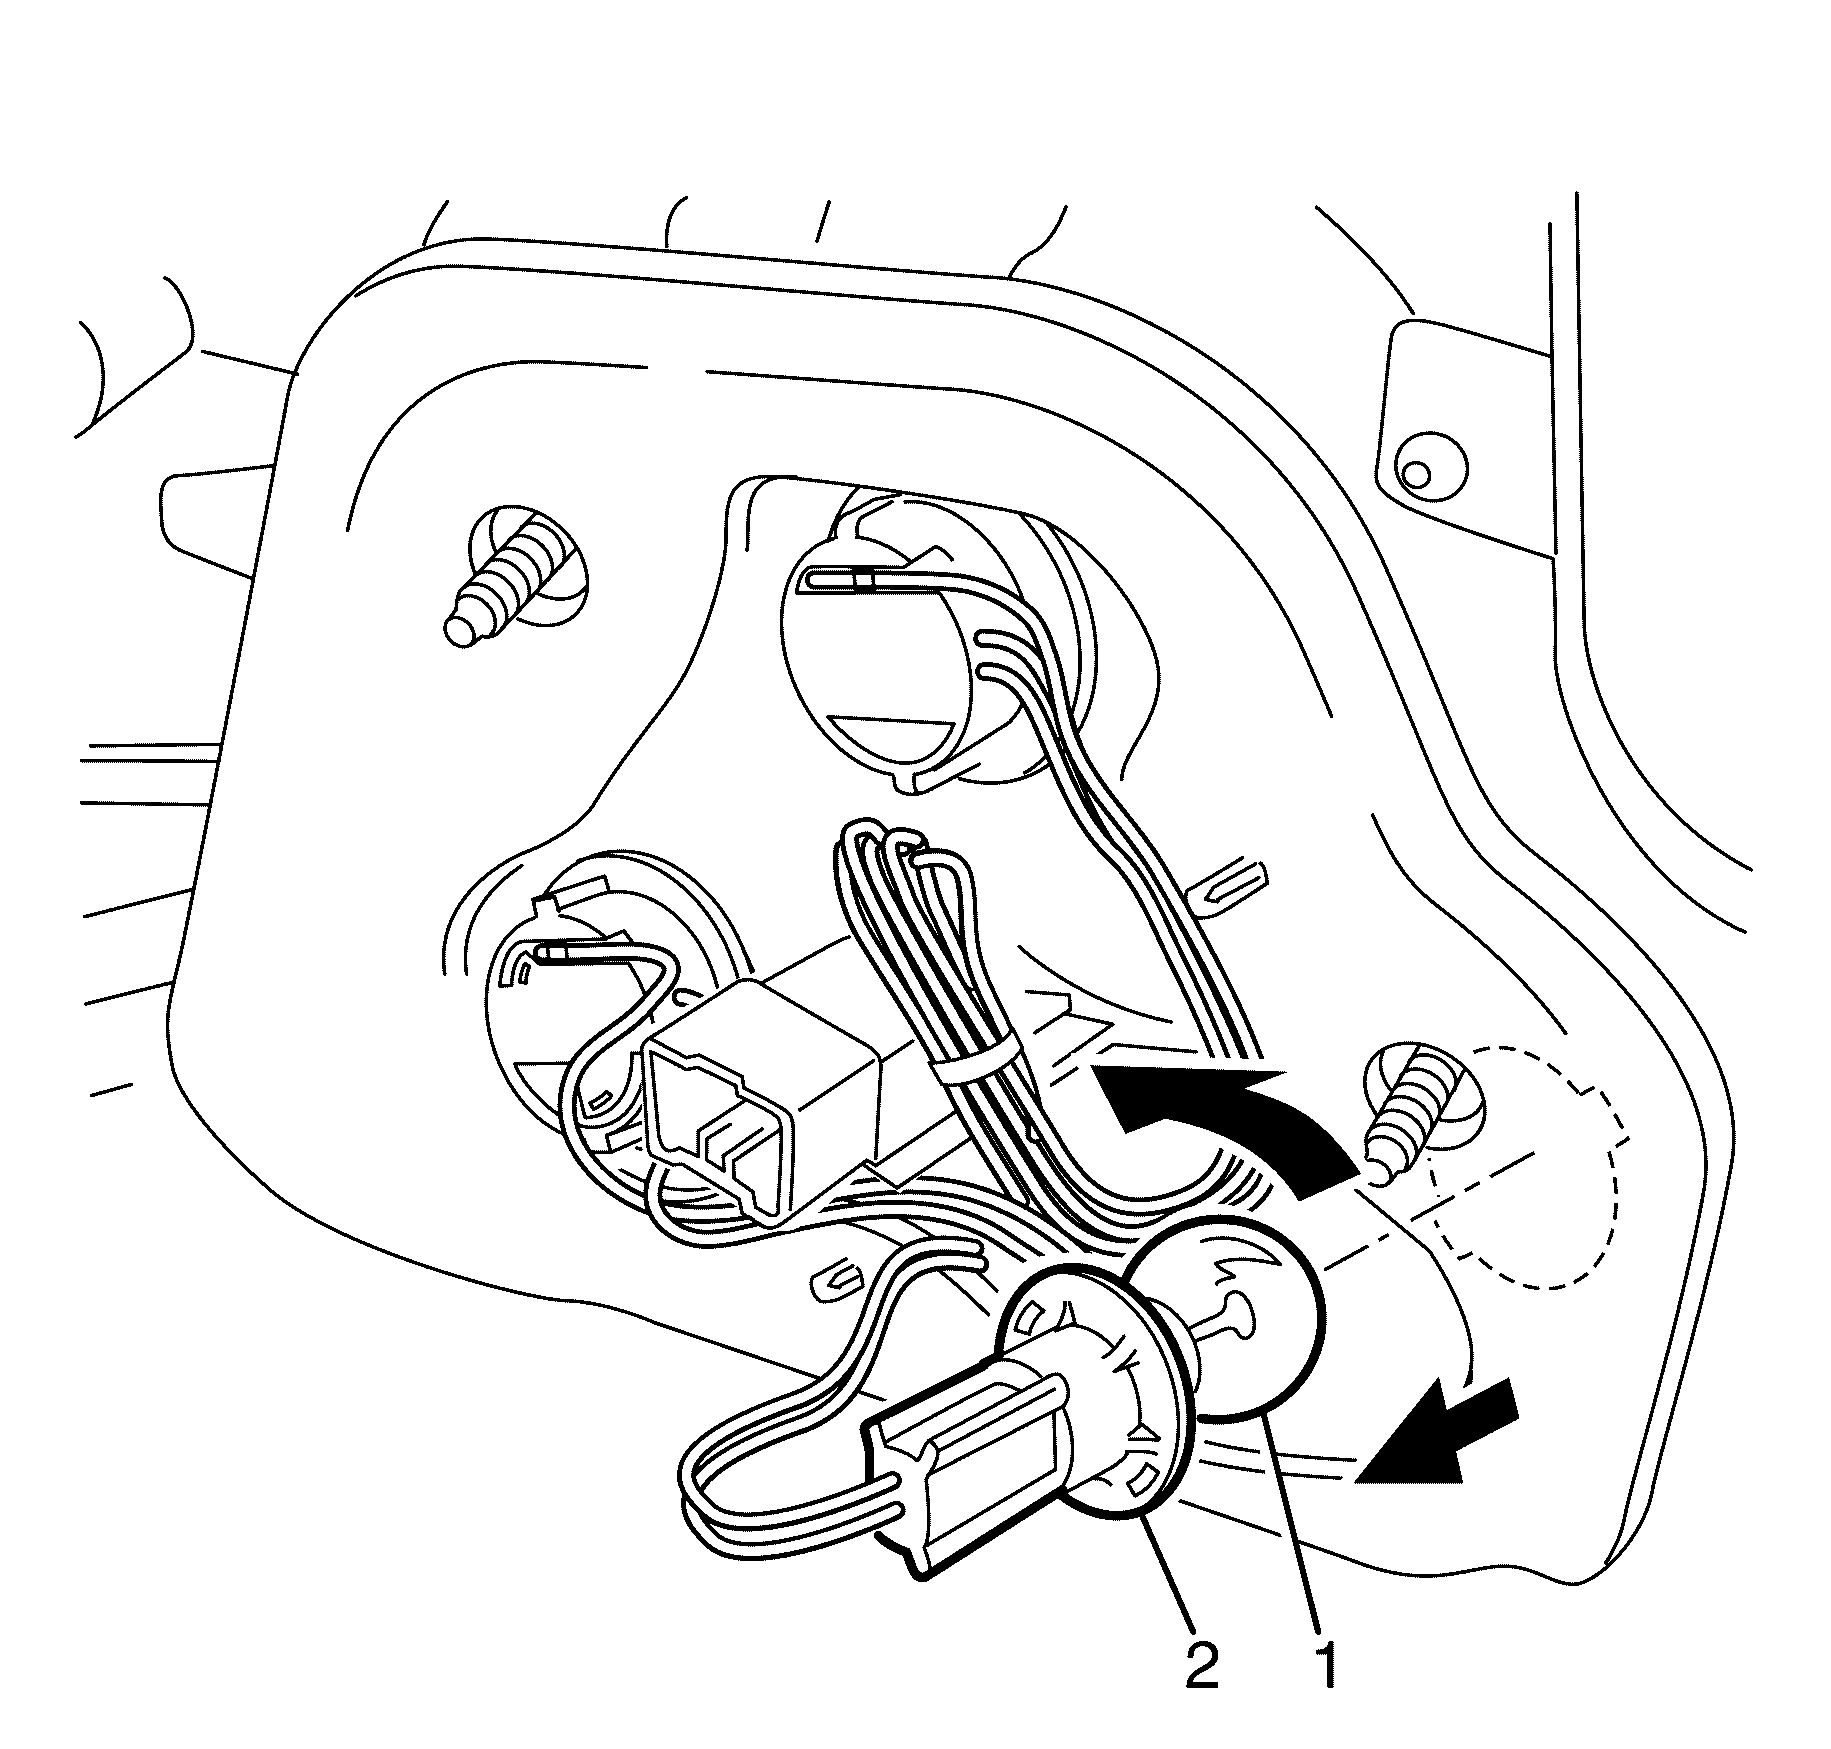
- Remove the backup light bulb (1) and socket (2) from the rear lamp assembly by pushing and rotating the bulb counterclockwise.
- Remove the backup light bulb (1) from the socket by pushing and rotating the bulb counterclockwise.
Caution: Refer to Battery Disconnect Caution in the Preface section.
Installation Procedure - Backup Light Bulb
- Install the new backup light bulb (1) into the socket (2) by pushing and rotating the bulb clockwise.
- Install the backup light bulb (1) and socket (2) into the rear tail lamp assembly and secure by rotating the socket clockwise.
- Connect the battery ground cable. Refer to Battery Negative Cable Disconnection and Connection .
- Check all vehicle lights for correct operation.
- Install the rear compartment lining and reinstall clip to secure lining.
- Install the rear compartment lid trim and reinstall the clips to secure the trim.
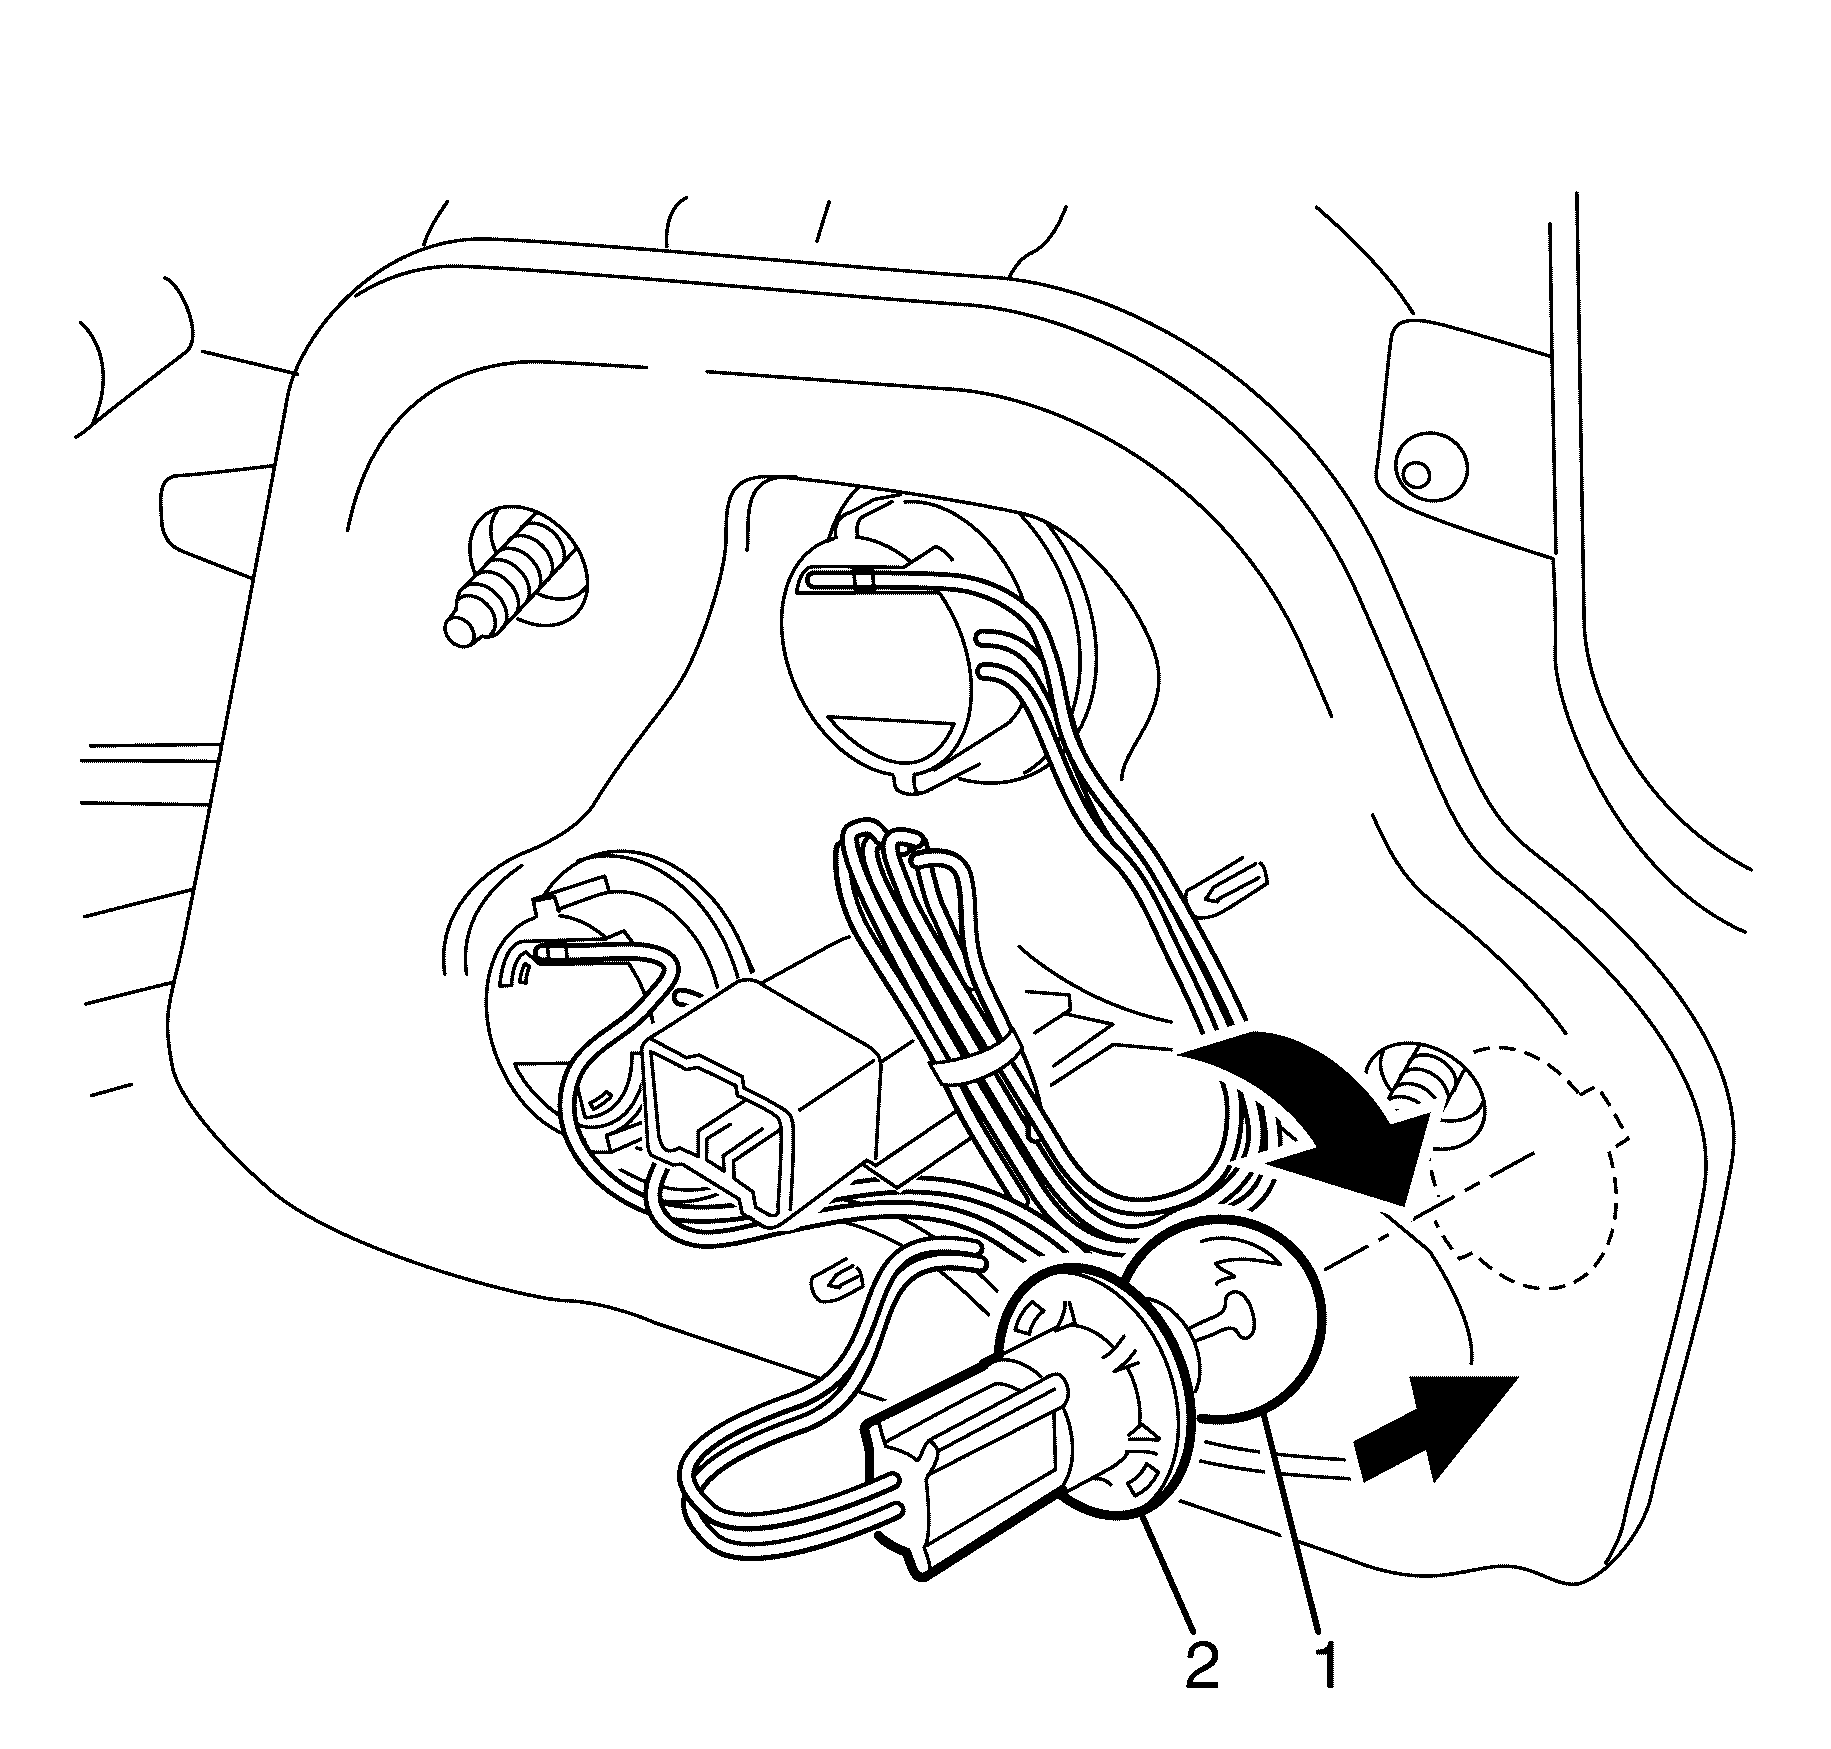
Important: The different-sized tabs on the bulb base and mating cut-outs in the tail lamp assembly allow the bulb to seat correctly.
Removal Procedure - Rear Indicator Bulb
- Disconnect the battery ground cable. Refer to Battery Negative Cable Disconnection and Connection .
- Open the rear compartment lid.
- Remove the rear compartment lid trim clips and remove the trim.
- Remove the rear compartment lining clip and pull back the lining for access to the rear bulbs.
- Remove the rear indicator light bulb (1) and socket (2) from the rear tail lamp assembly by rotating the socket counterclockwise.
- Remove the rear indicator light bulb (1) from the socket (2) by pushing and rotating the bulb counterclockwise.
Caution: Refer to Battery Disconnect Caution in the Preface section.
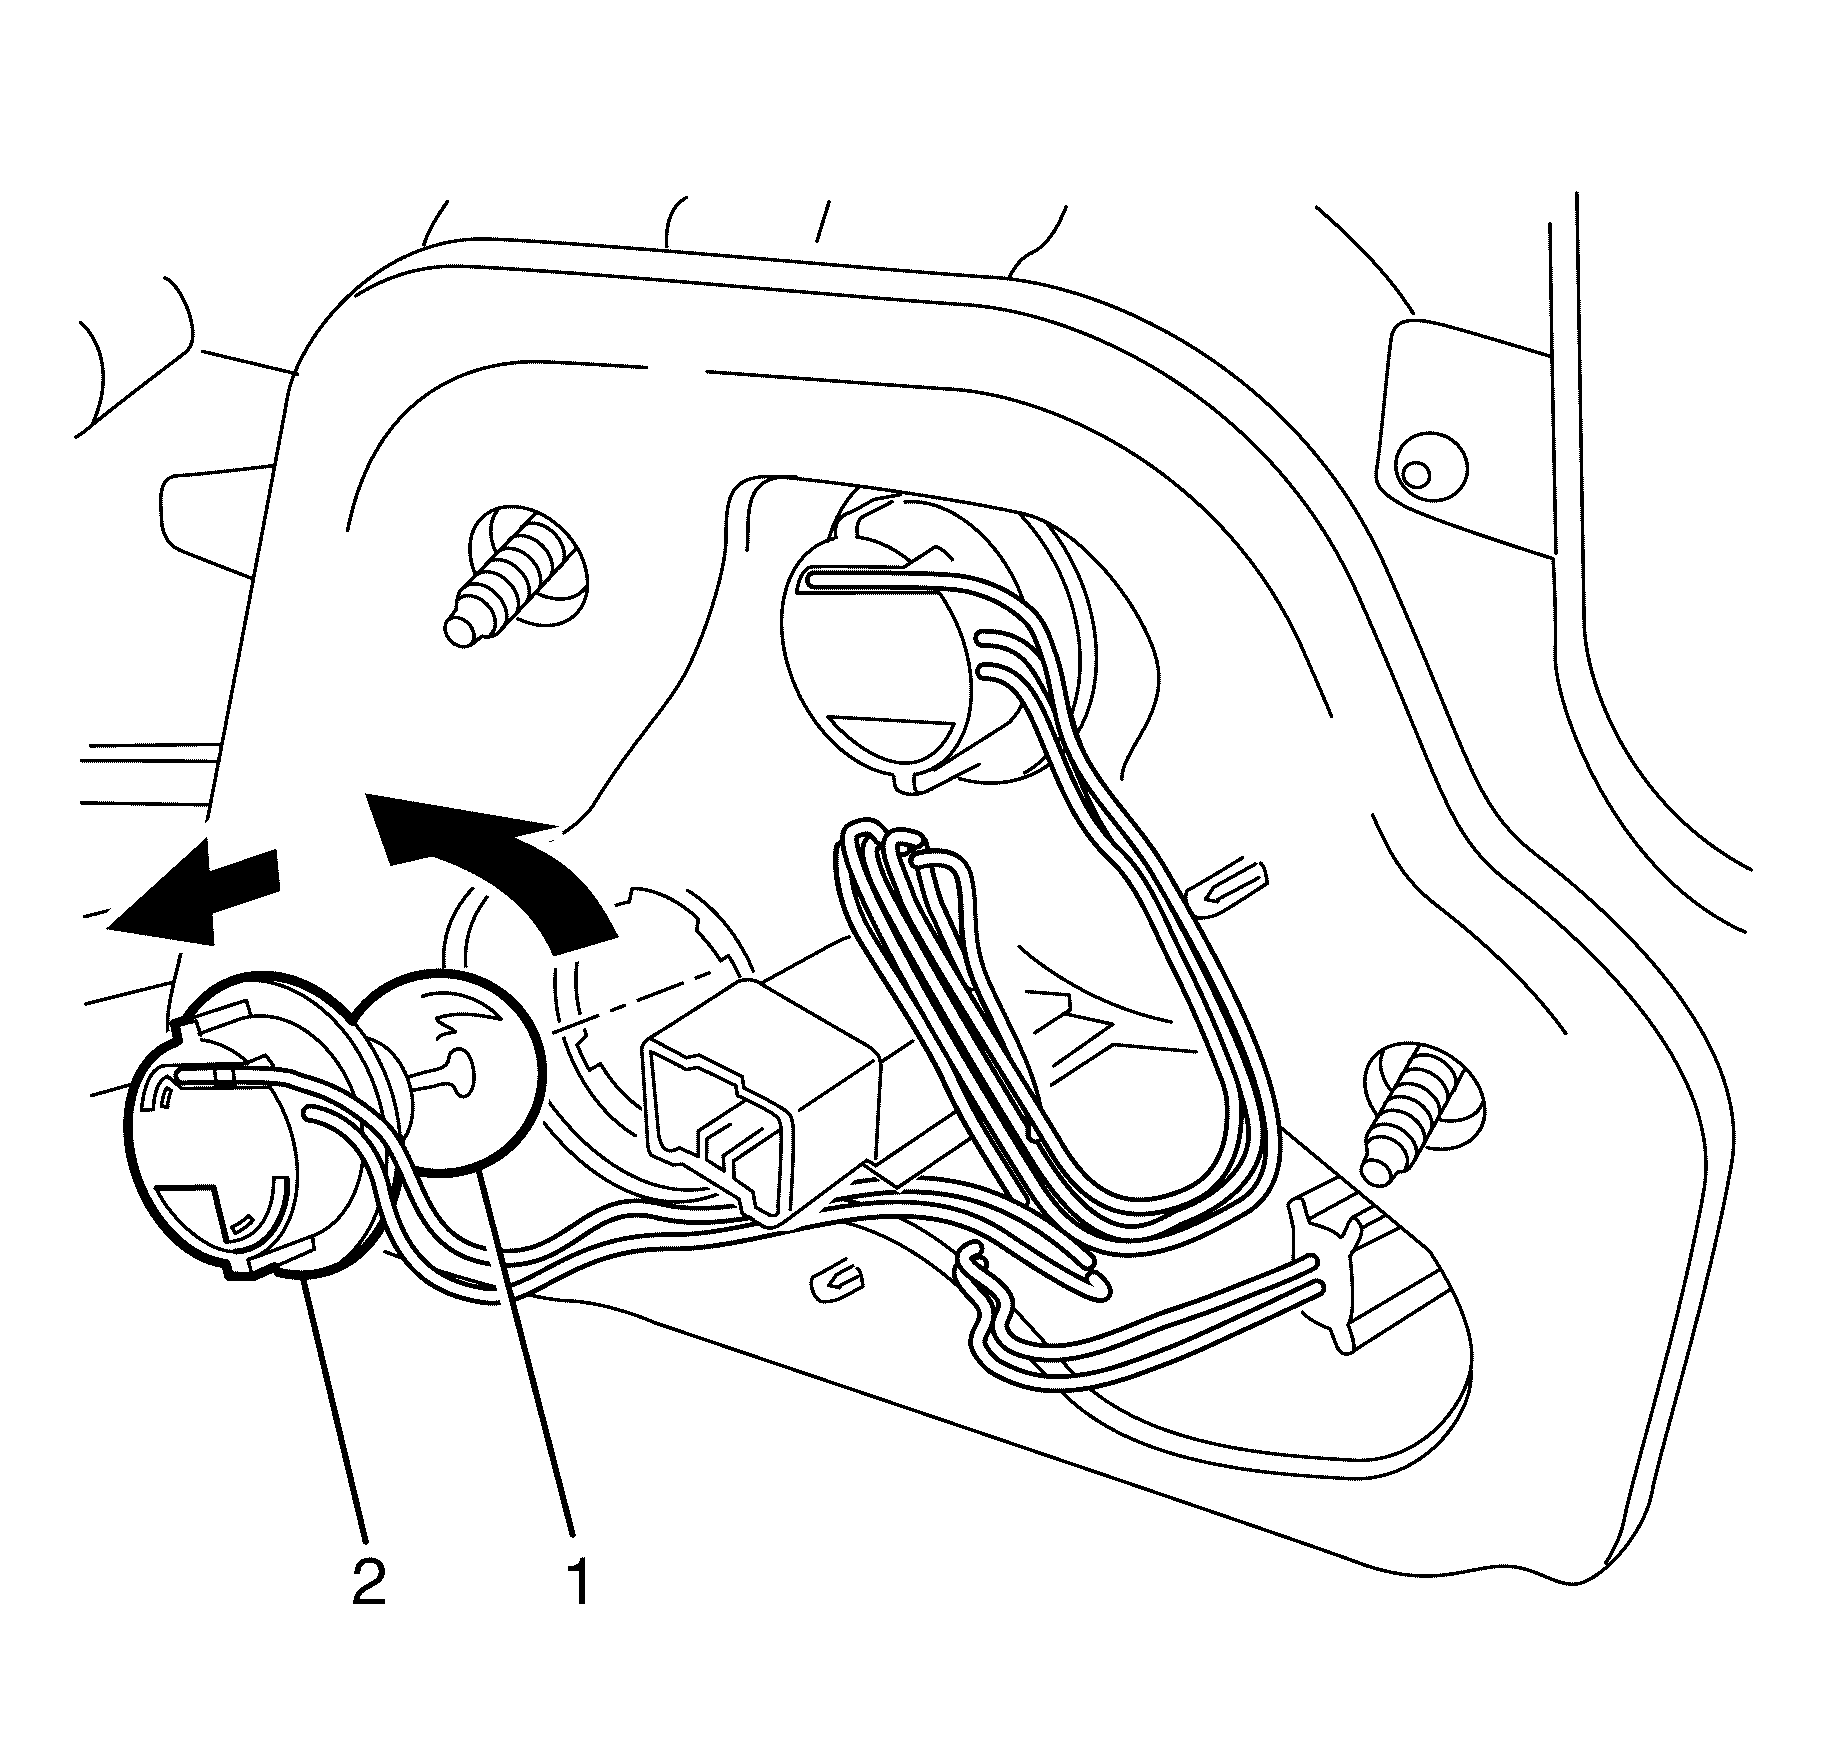
Installation Procedure - Rear Indicator Bulb
- Install the new rear indicator light bulb into the socket by pushing and rotating the bulb clockwise.
- Install the rear indicator light bulb (2) and socket (1) into the rear tail lamp assembly and secure by rotating the socket clockwise.
- Connect the battery ground cable. Refer to Battery Negative Cable Disconnection and Connection .
- Check all vehicle lights for correct operation.
- Install the rear compartment lining and reinstall clip to secure lining.
- Install the rear compartment lid trim and reinstall the clips to secure the trim.
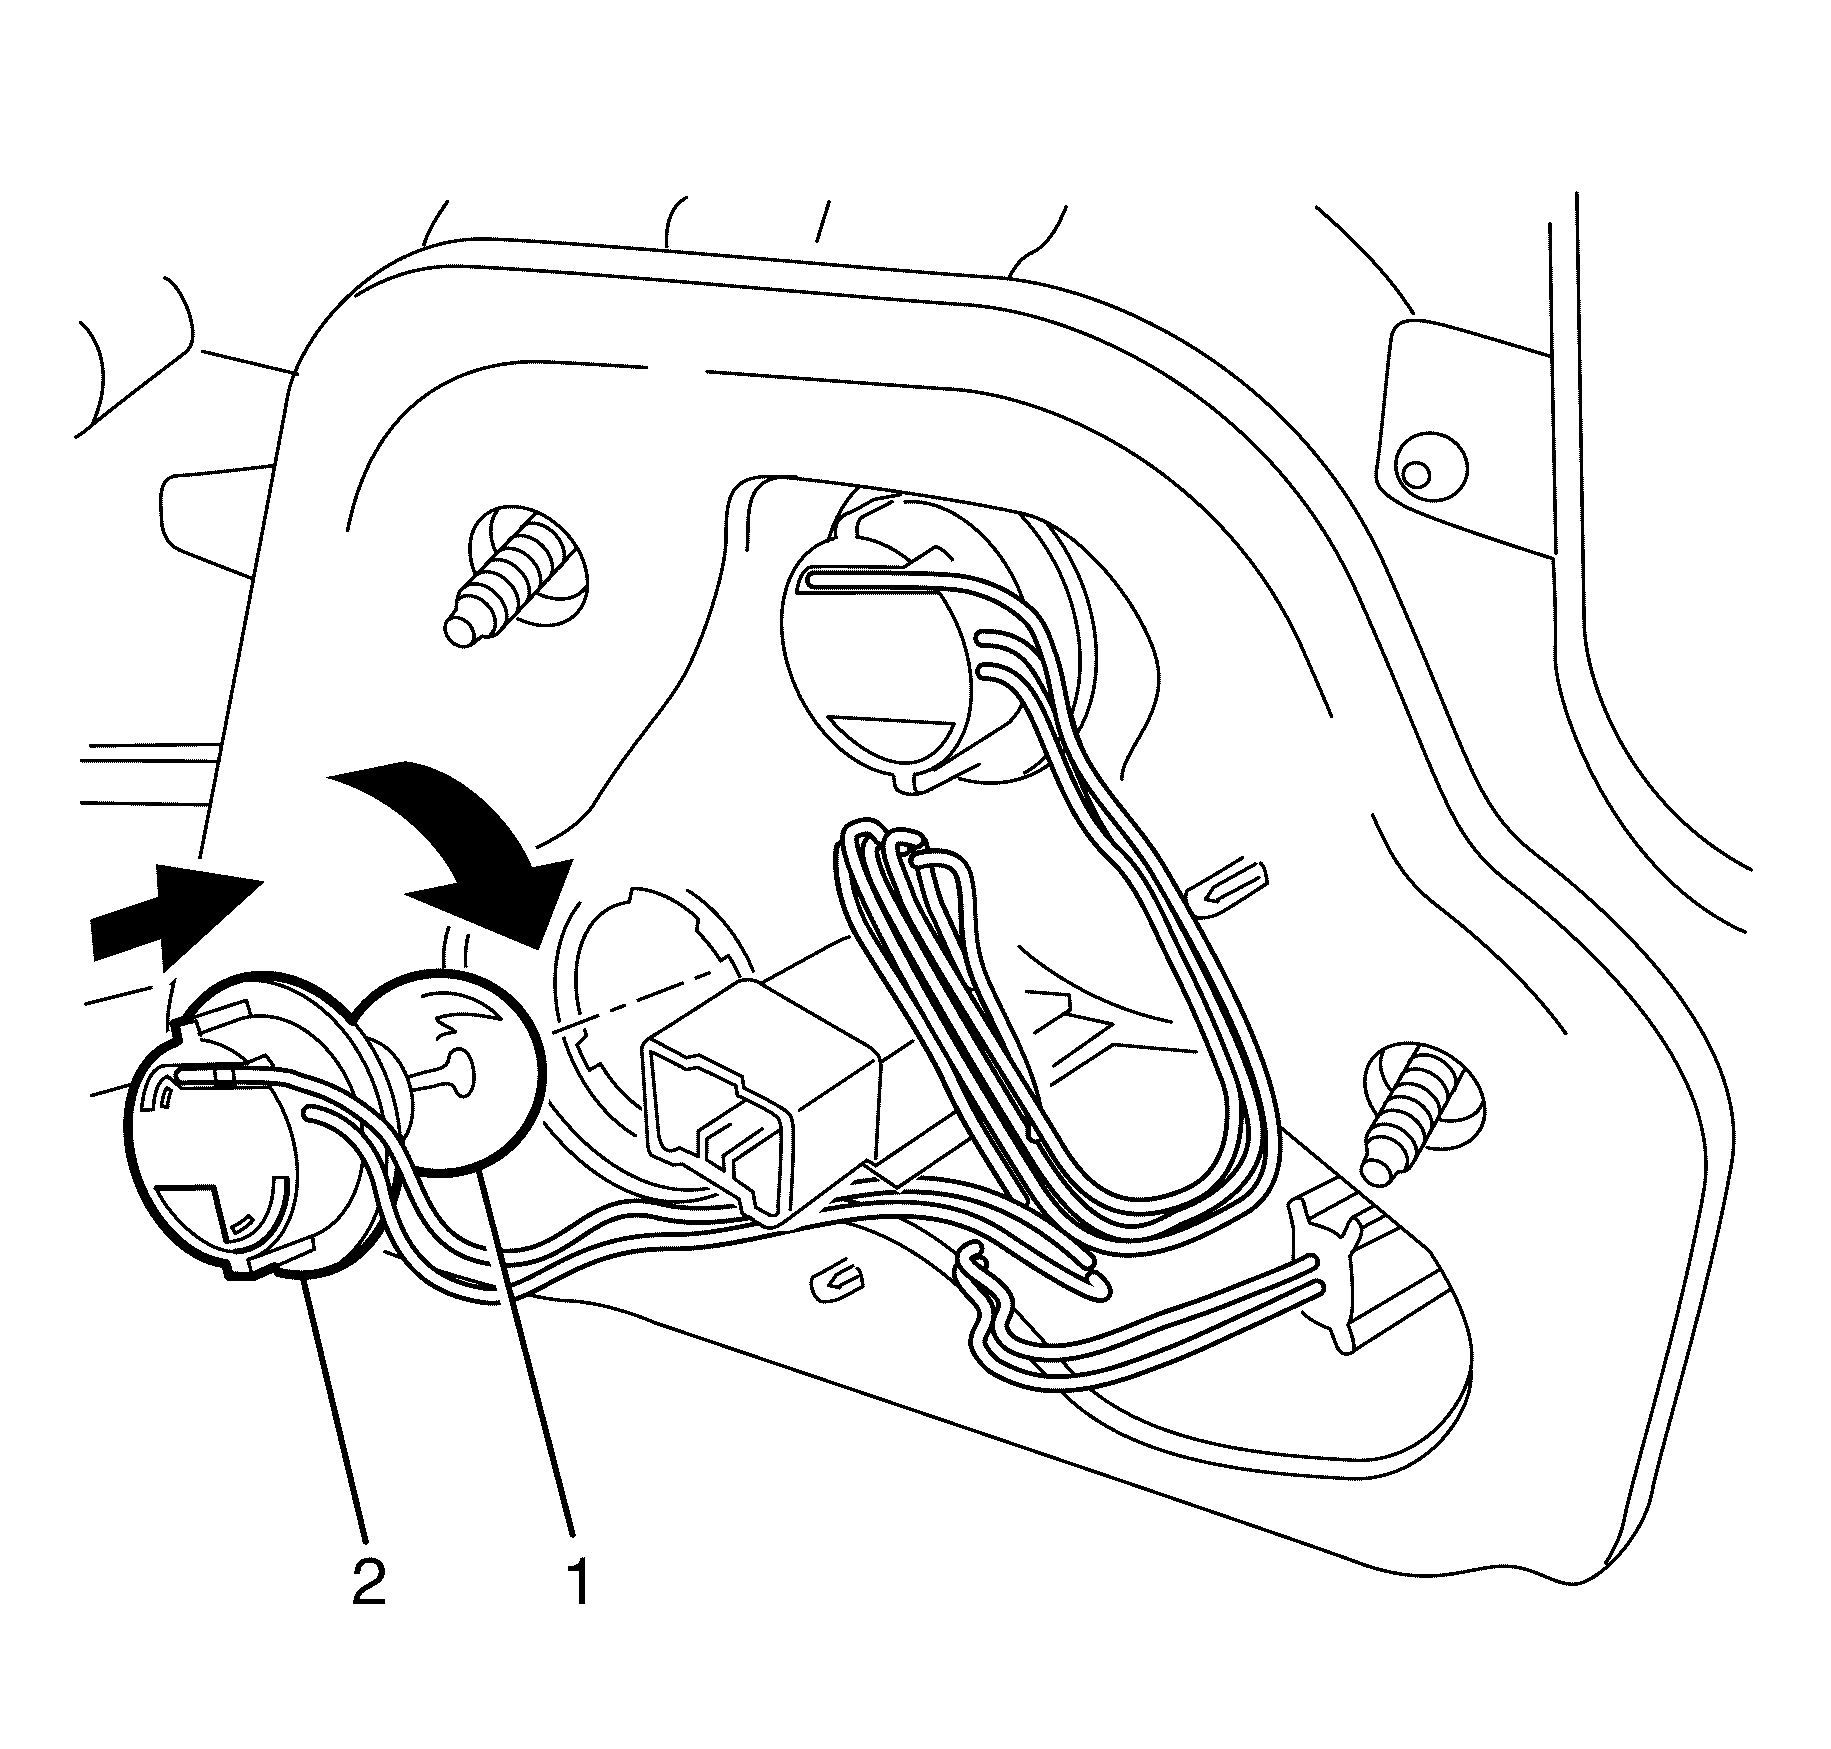
Important: The different-sized tabs on the bulb base and mating cut-outs in the tail lamp assembly allow the bulb to seat correctly.
Removal Procedure - Stop/Tail Lamp Bulb
- Disconnect the battery ground cable. Refer to Battery Negative Cable Disconnection and Connection .
- Open the rear compartment lid.
- Remove the rear compartment lid trim clips and remove the trim.
- Remove the rear compartment lining clip and pull back the lining for access to the rear bulbs.
- Remove the stop/tail lamp bulb (1) and socket (2) from the rear tail lamp assembly by rotating the socket counterclockwise.
- Remove the stop/tail light bulb (1) from the socket (2) by pushing and rotating the bulb counterclockwise.
Caution: Refer to Battery Disconnect Caution in the Preface section.
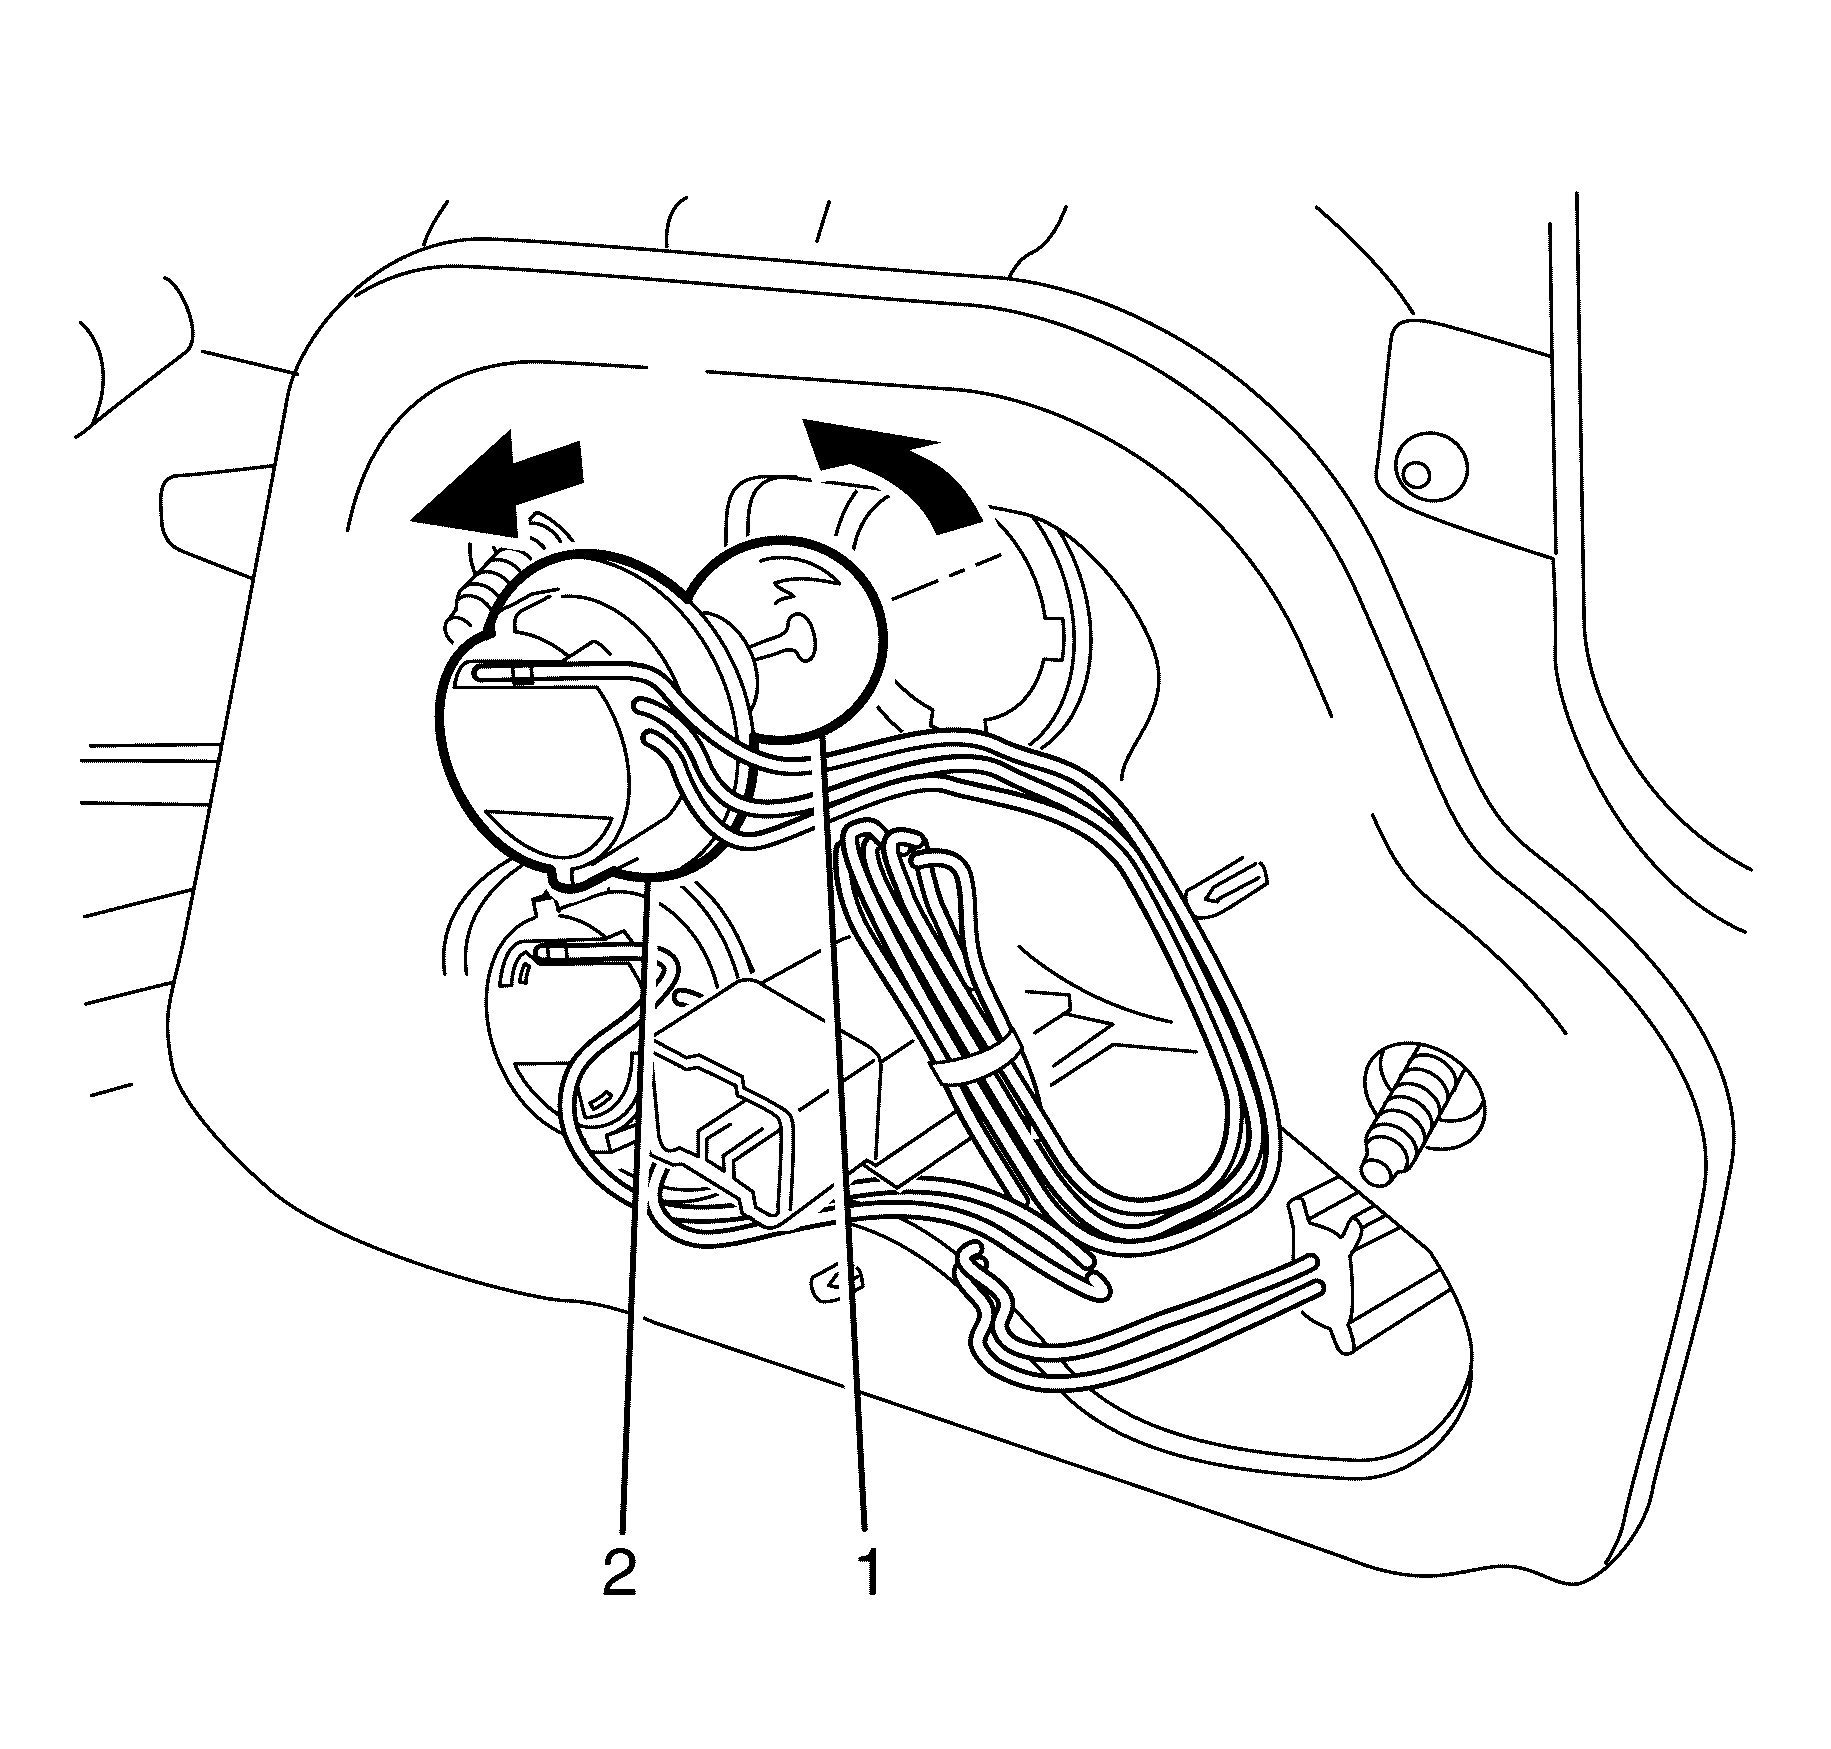
Installation Procedure - Stop/Tail Lamp Bulb
- Install the new stop/tail light bulb (1) into the socket (2) by pushing and rotating the bulb clockwise.
- Install the stop/tail lamp bulb (1) and socket (2) into the rear tail lamp assembly and secure by rotating the socket clockwise.
- Connect the battery ground cable. Refer to Battery Negative Cable Disconnection and Connection .
- Check all vehicle lights for correct operation.
- Install the rear compartment lining and reinstall clip to secure lining.
- Install the rear compartment lid trim and reinstall the clips to secure the trim.
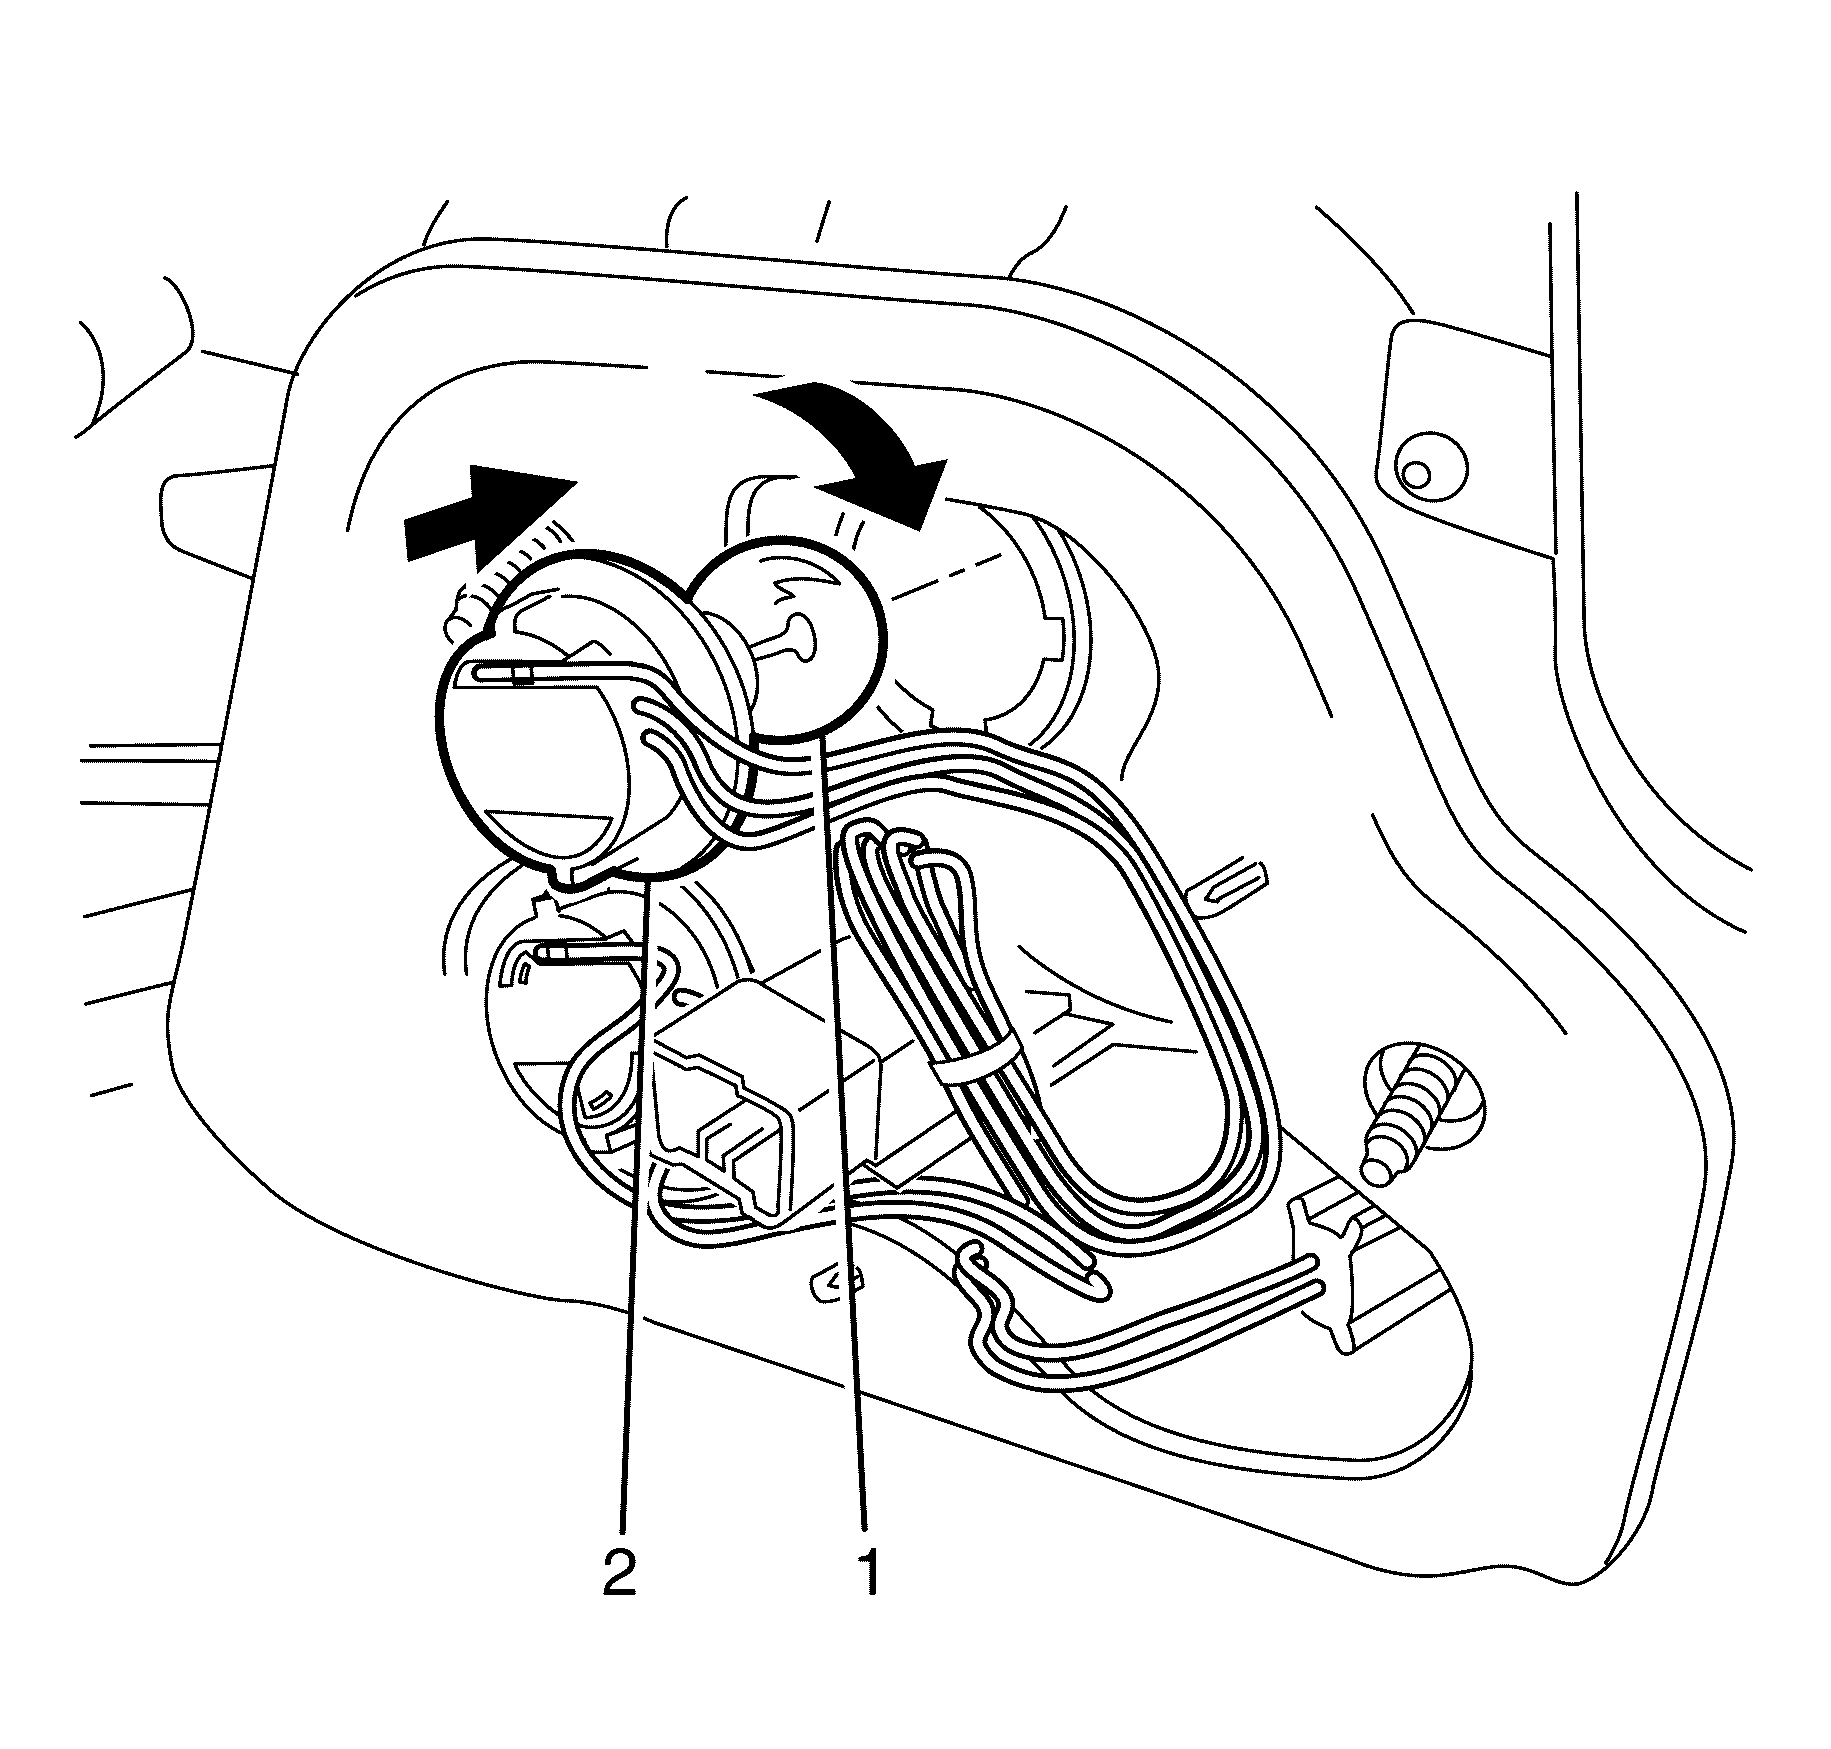
Important: The different-sized tabs on the bulb base and mating cut-outs in the tail lamp assembly allow the bulb to seat correctly.
Removal Procedure - Tail Lamp Assembly
- Disconnect the battery ground cable. Refer to Battery Negative Cable Disconnection and Connection .
- Remove the rear compartment lid trim clips and remove the trim.
- Remove the rear compartment lining clip and pull back the lining for access to the rear tail lamp assembly.
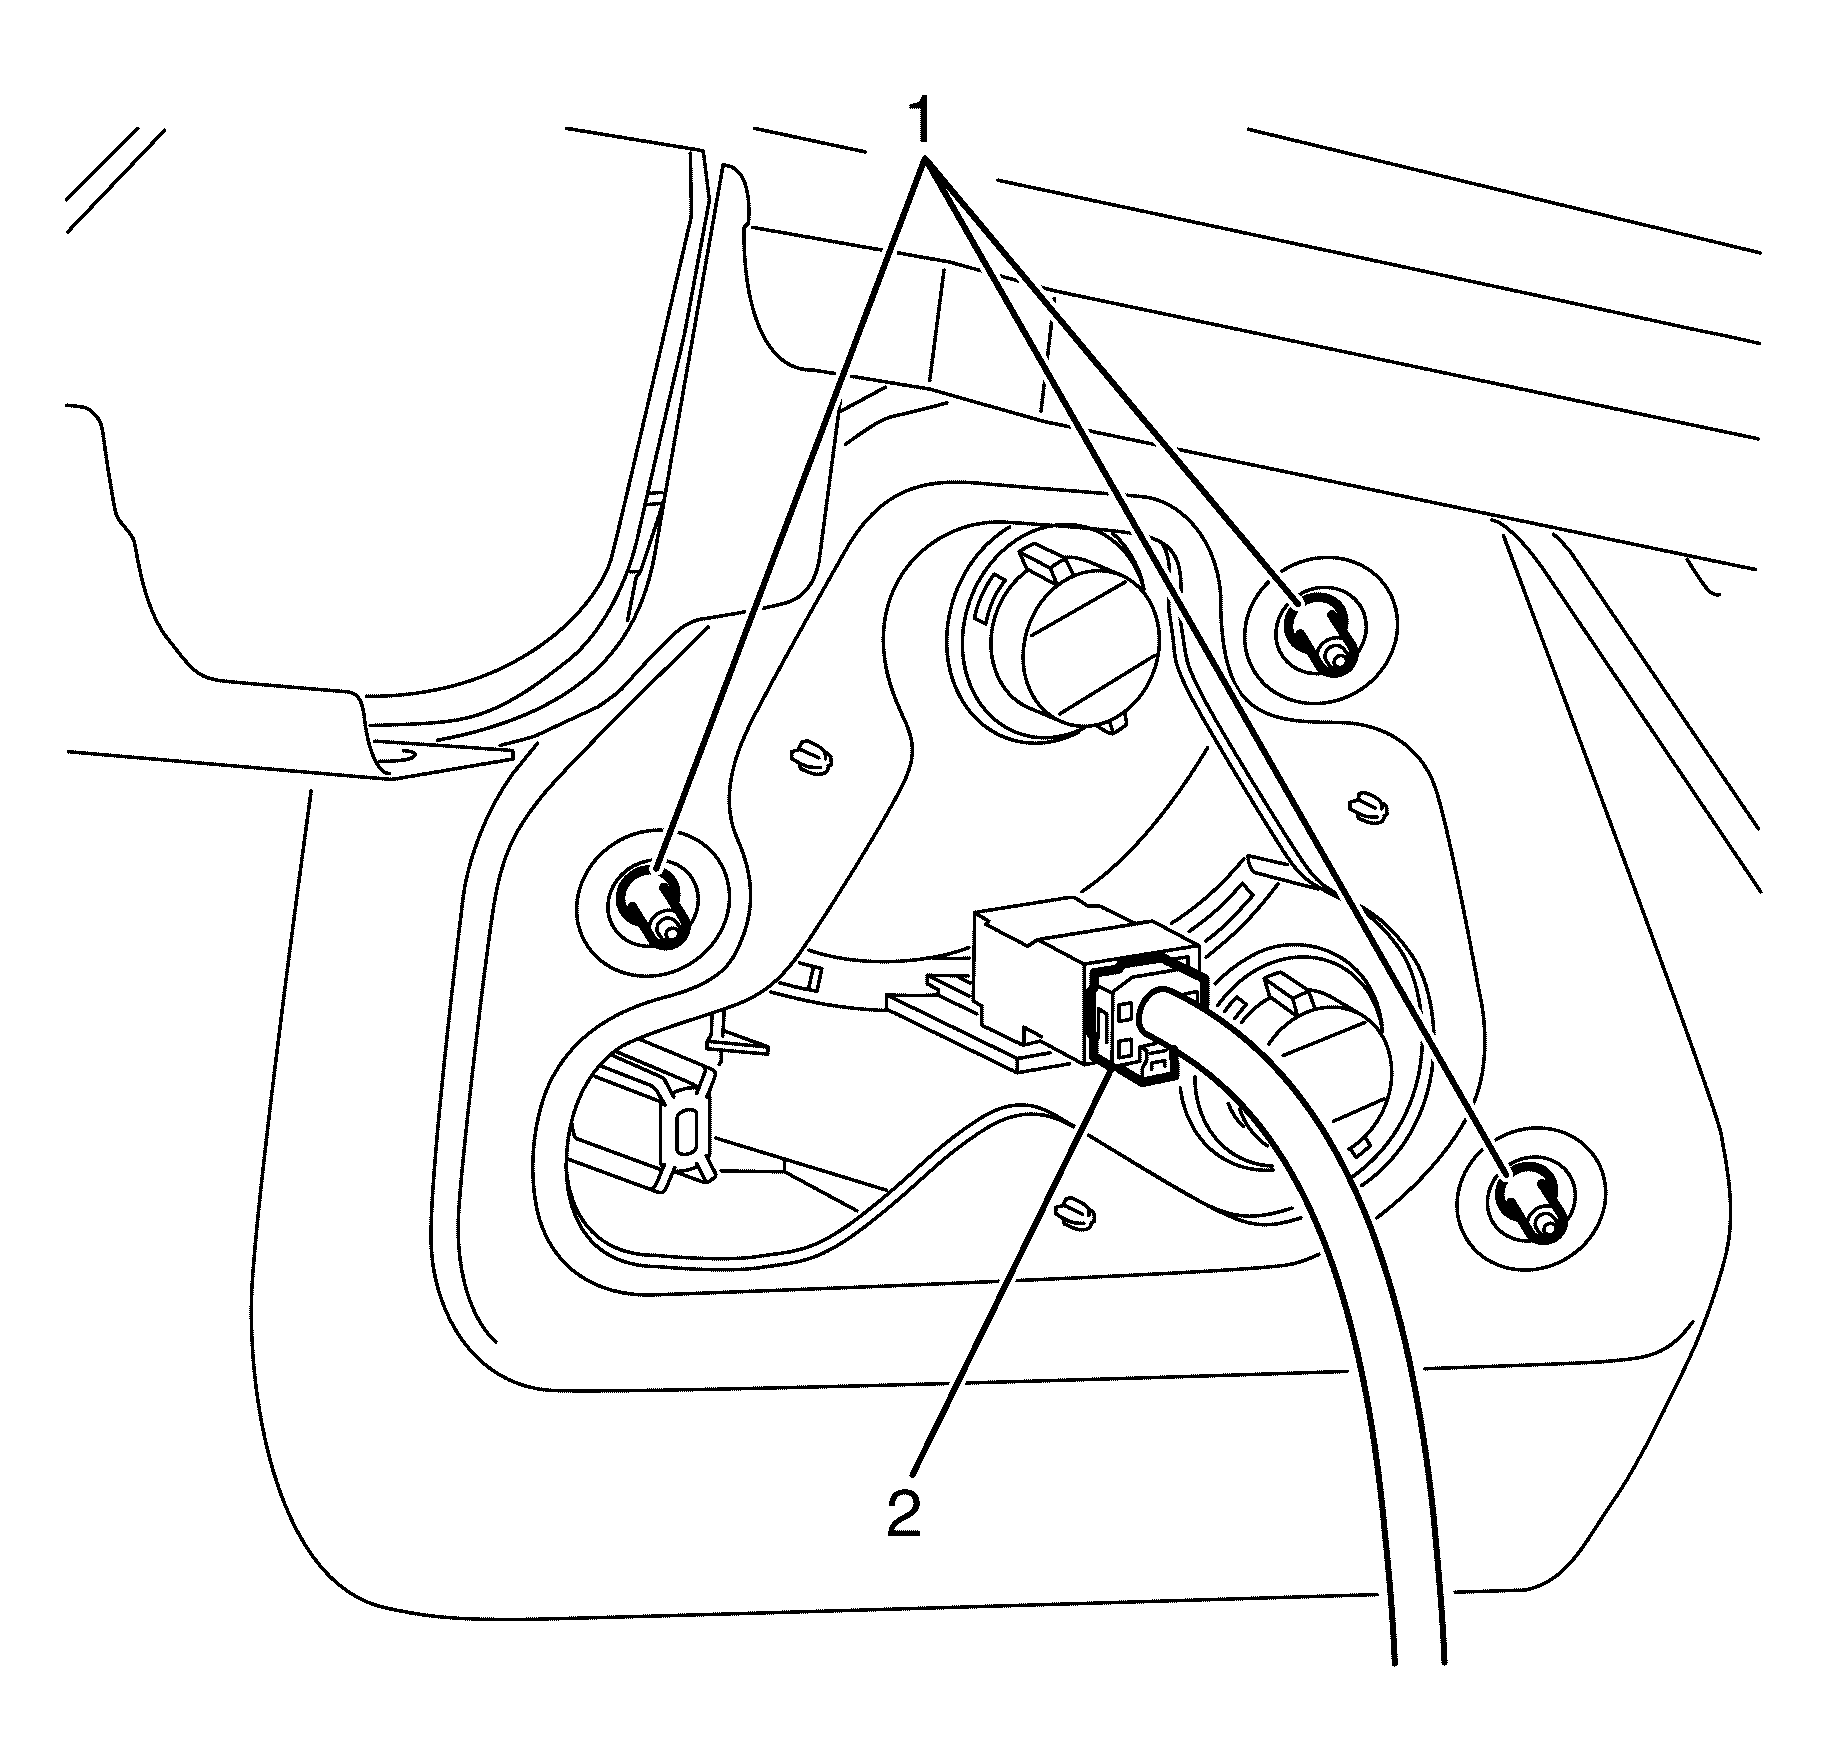
- Disconnect the rear tail lamp electrical connector (2).
- Remove the rear tail lamp to rear end panel retaining nuts (1).
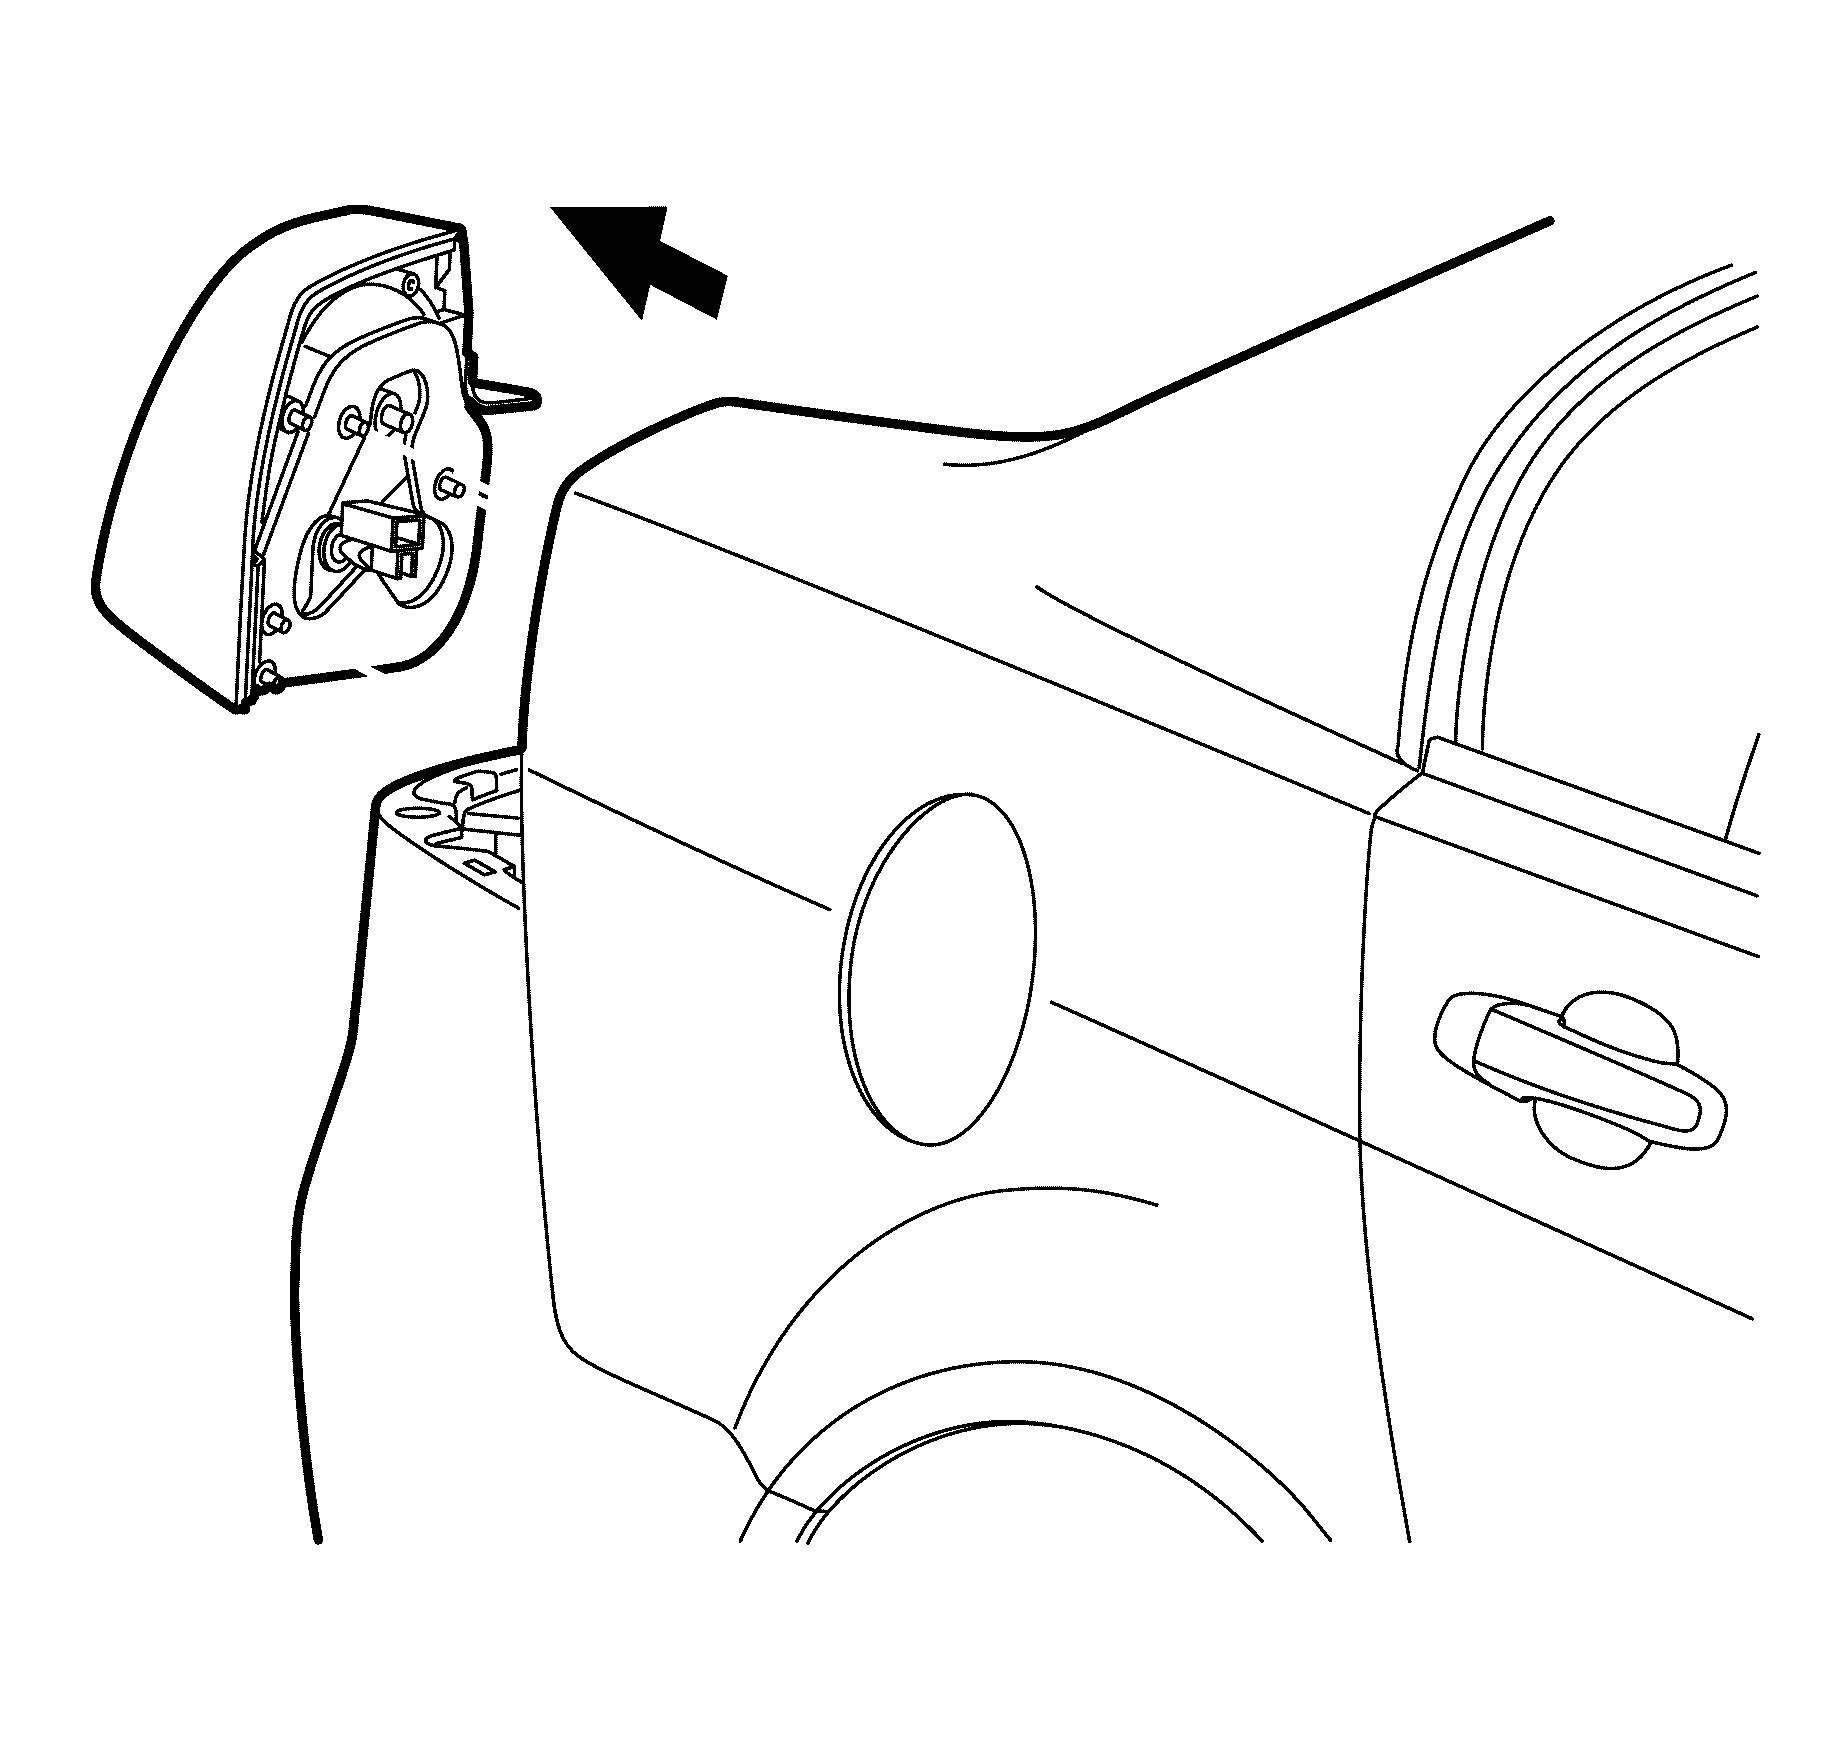
- Remove the rear tail lamp assembly from the vehicle.
Caution: Refer to Battery Disconnect Caution in the Preface section.
Installation Procedure
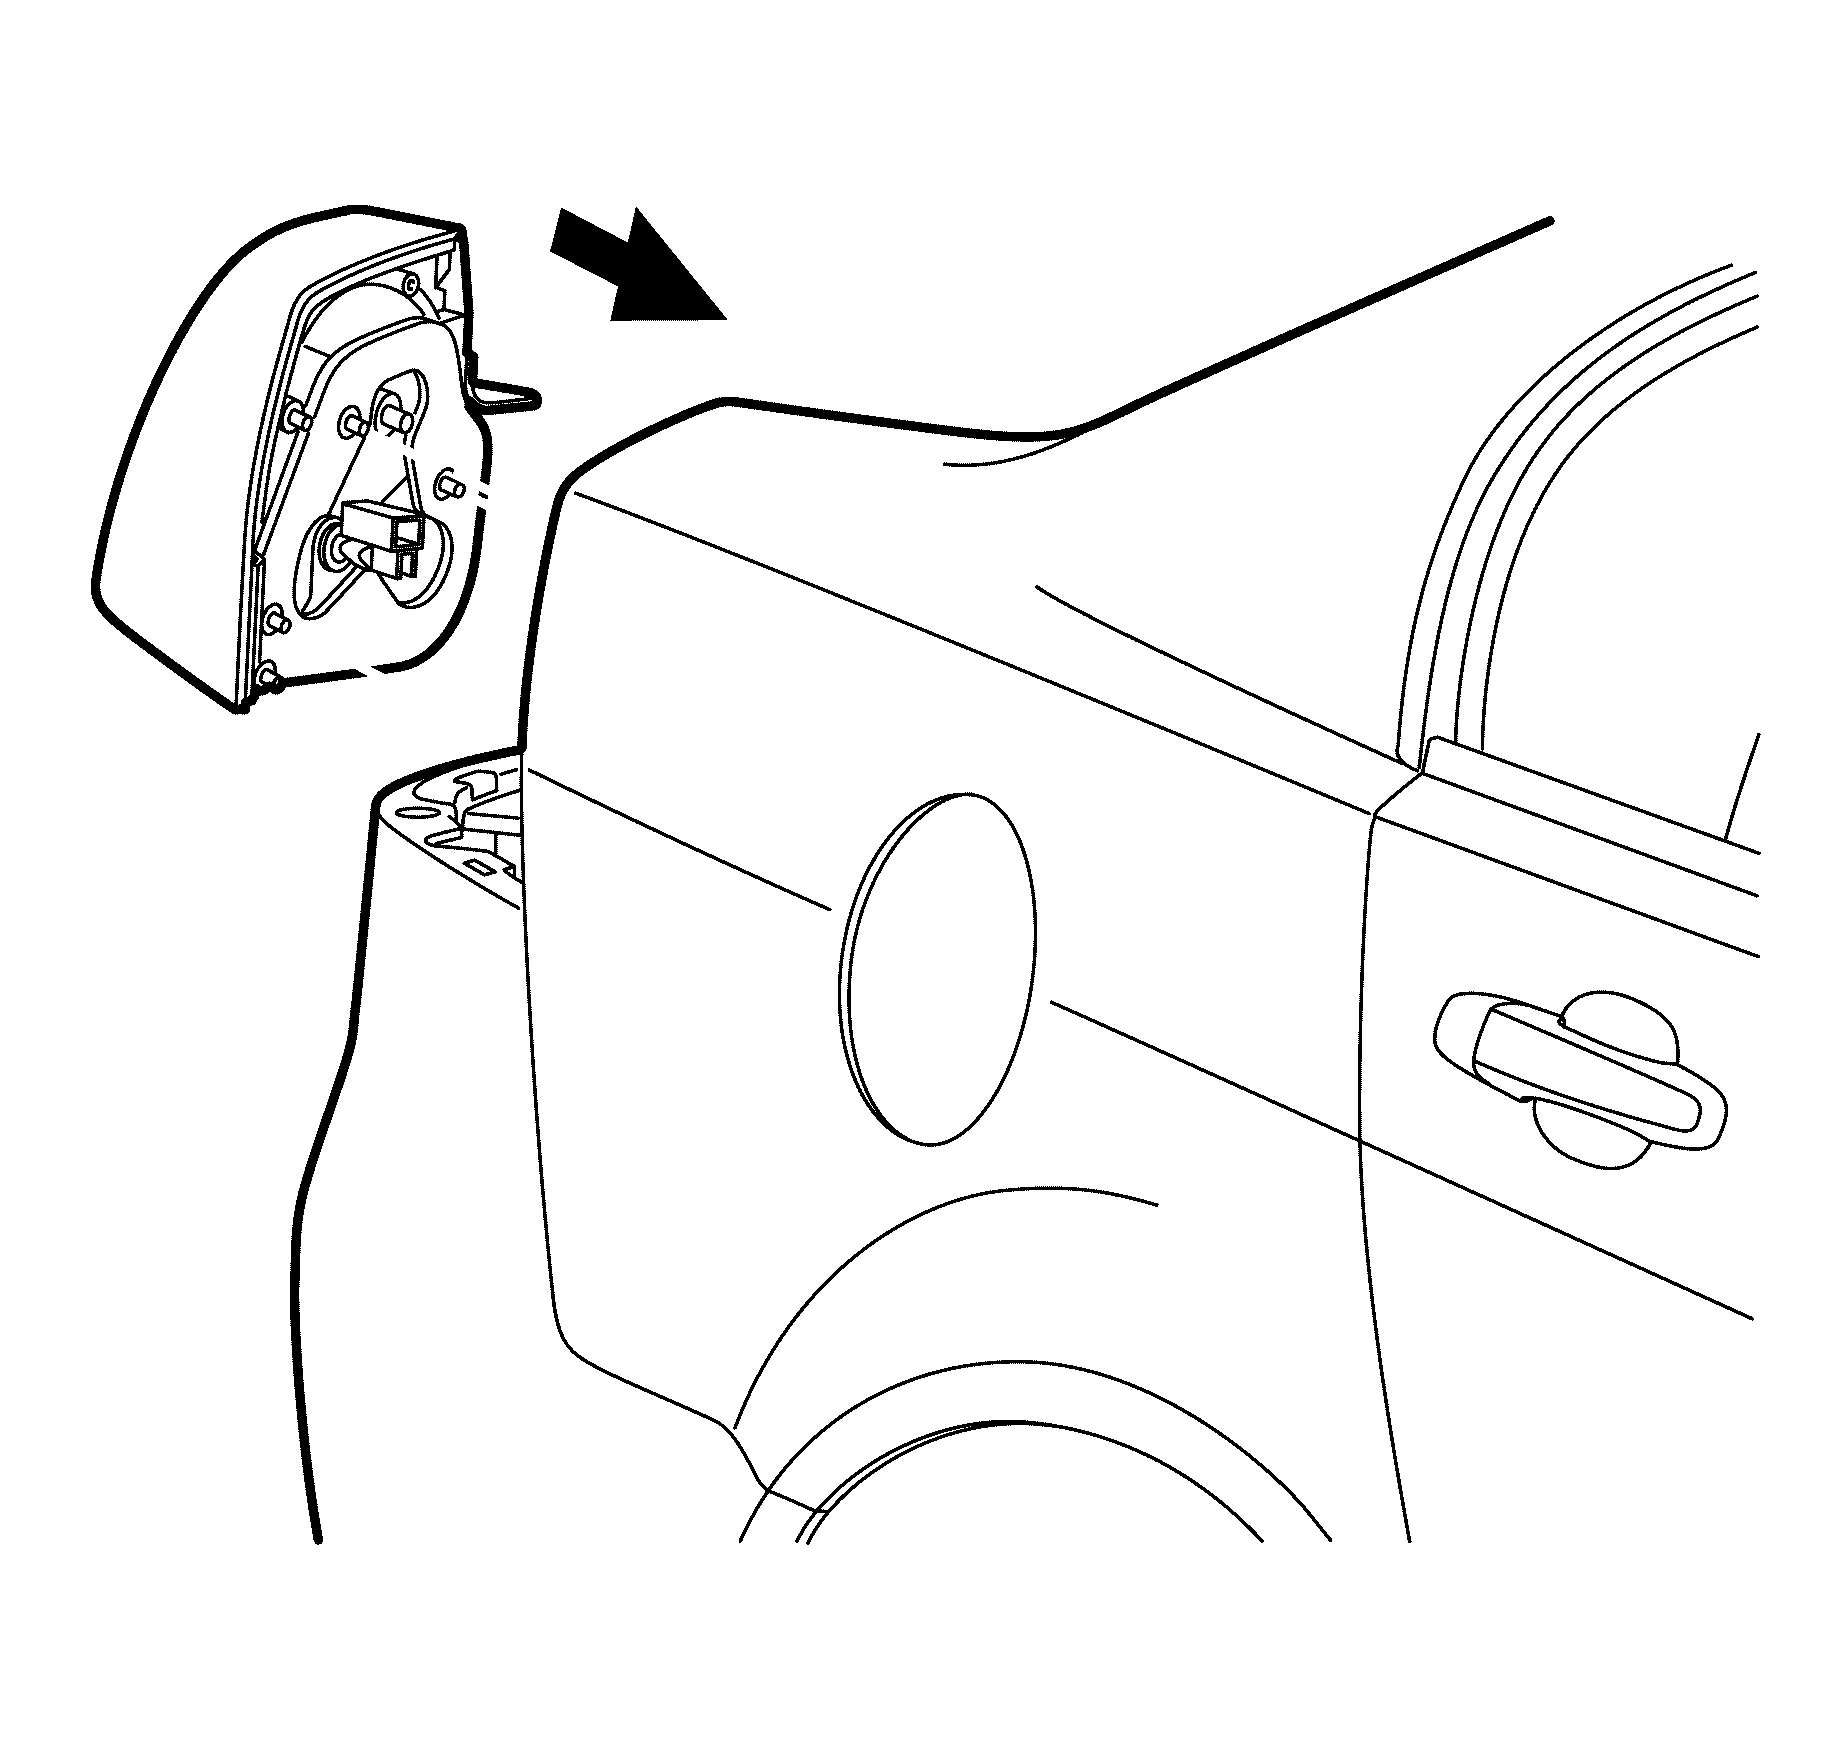
- Install the rear tail lamp assembly to the vehicle.
- Install the rear tail lamp assembly retaining nuts (1).
- Connect the rear tail lamp assembly electrical connector (2).
- Connect the battery ground cable. Refer to Battery Negative Cable Disconnection and Connection .
- Check all lights for the correct operation.
- Install the rear compartment lining clip and pull back the lining for access to the rear tail lamp assembly.
- Install the rear compartment lid trim clips and remove the trim.
Important: Make sure the rear tail lamp sealing surface is clean to avoid damage to painted vehicle surface and to prevent water leaks.
Notice: Refer to Fastener Notice in the Preface section.
Tighten
Tighten the nuts to 3.00 N·m (27 lb in).
Tail Lamp Assembly and /or Backup, Sidemarker, Stop, Turn Signal Bulb Replacement LWB
Removal Procedure - Backup Light Bulb (LED tail lamp)
- Open the rear compartment lid.
- Remove the rear compartment lid trim clips and remove the trim.
- Remove the rear compartment lining clip and pull back the lining for access to the rear bulbs.
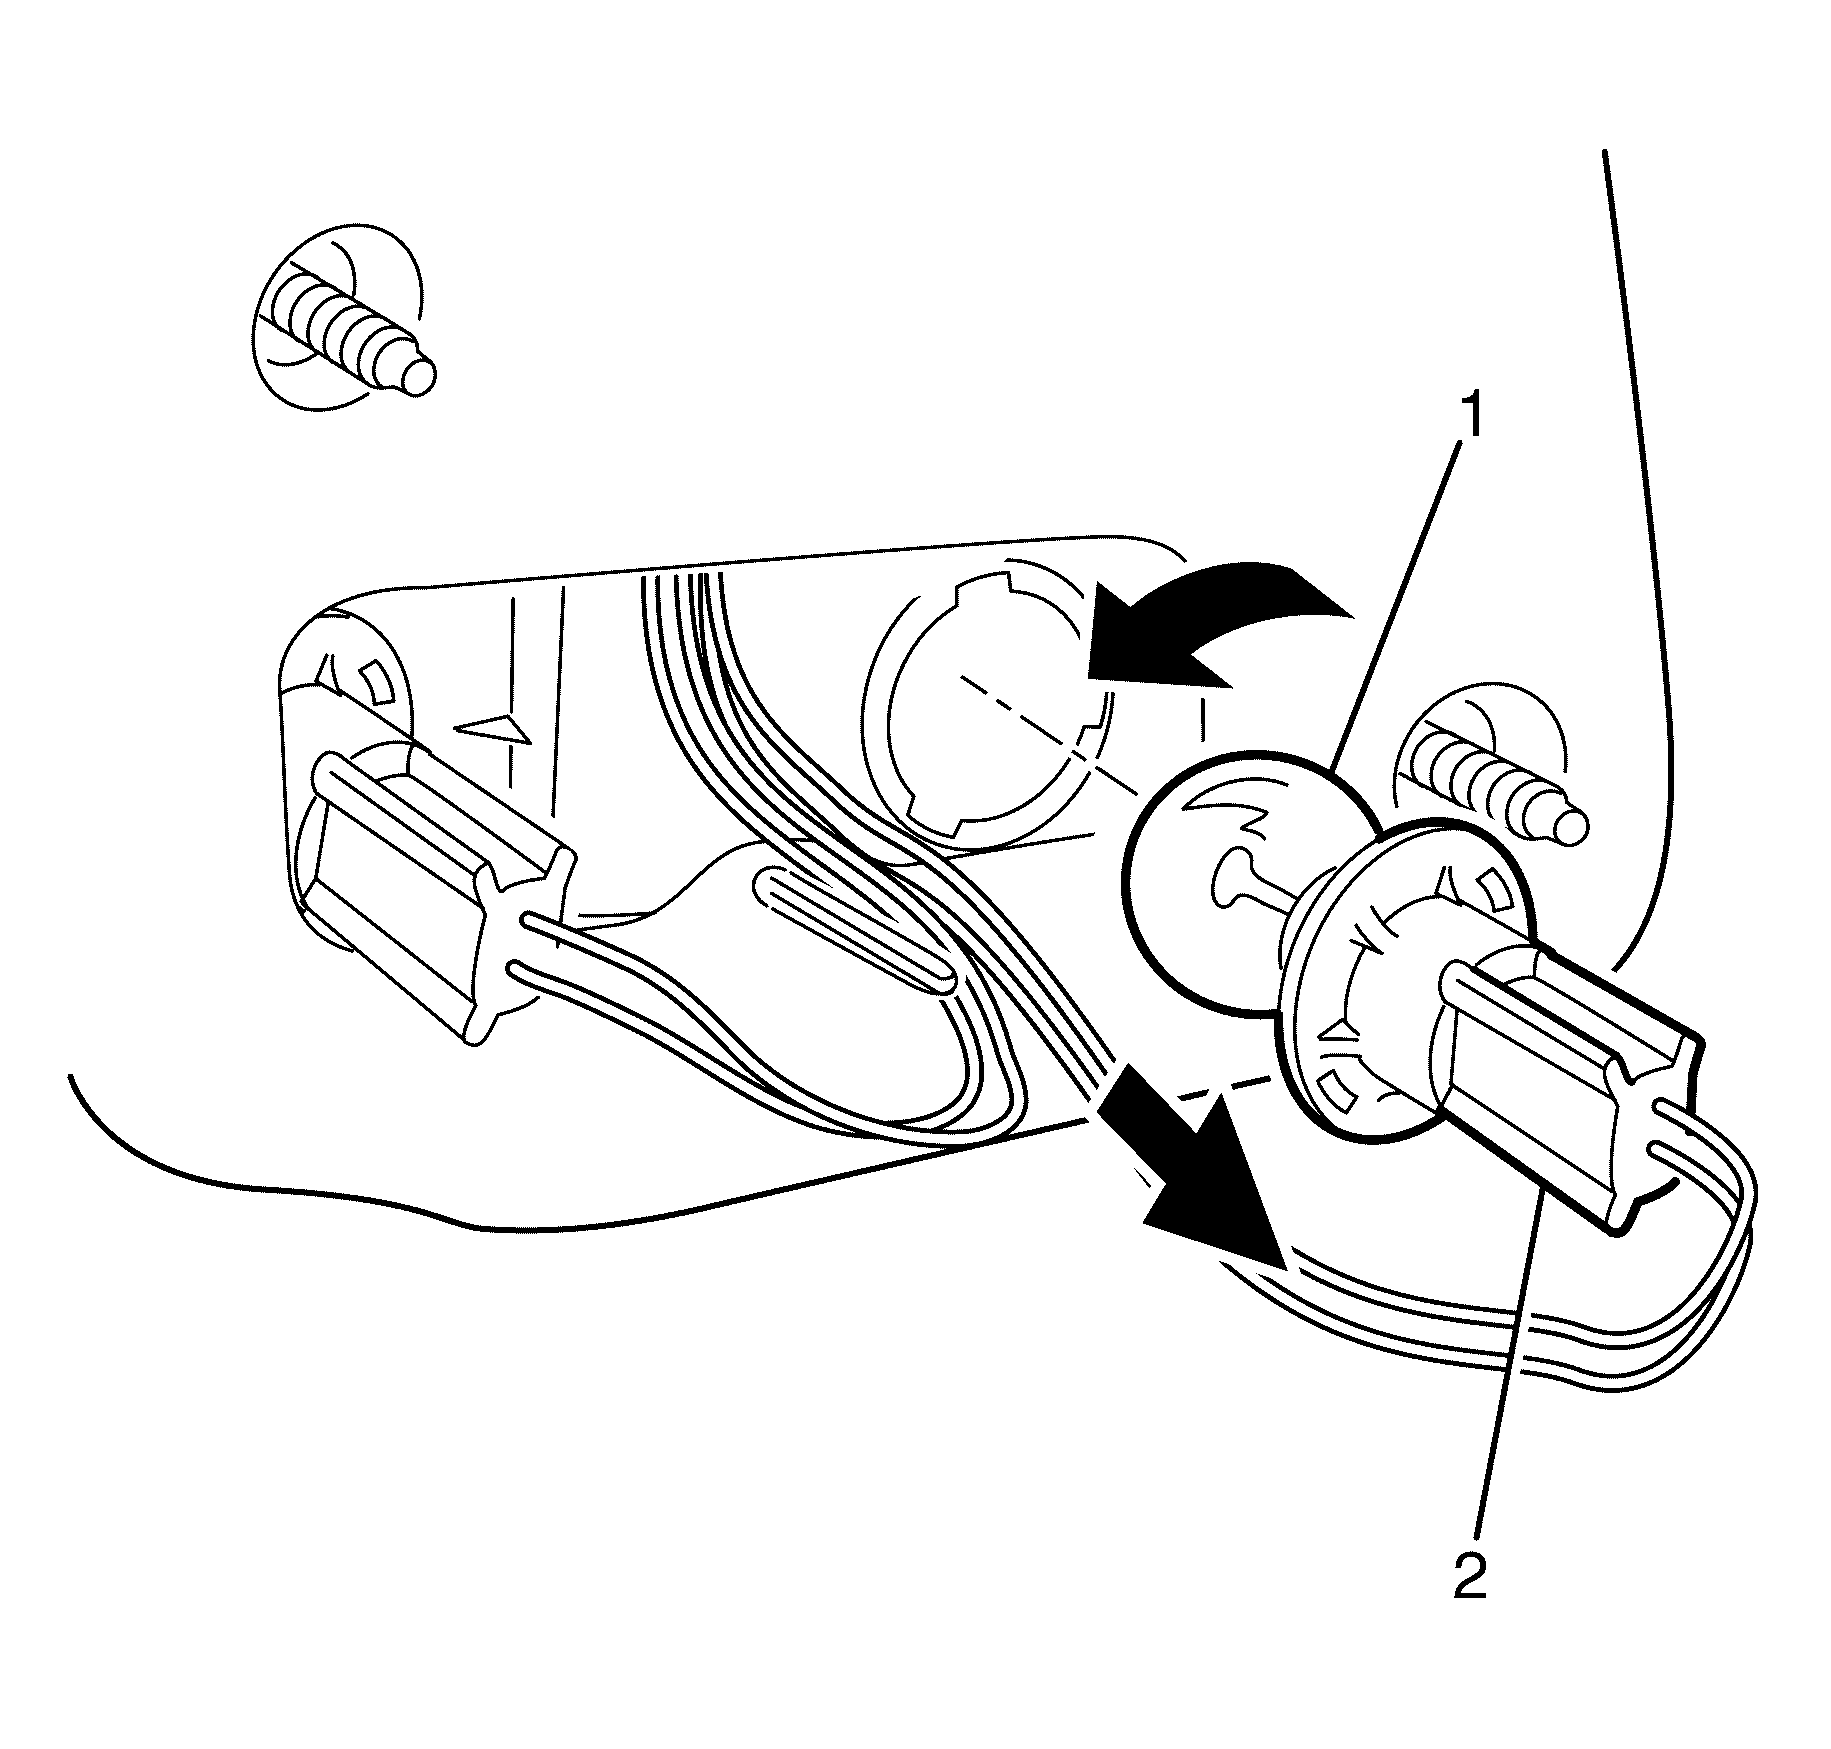
- Remove the backup light bulb (1) and socket (2) from the rear tail lamp assembly by rotating the socket counterclockwise.
- Remove the backup light bulb (1) from the socket (2) by pushing and rotating the bulb counterclockwise.
Installation Procedure - Backup Light Bulb (LED tail lamp)
- Install the new backup light bulb into the socket by pushing and turning the bulb clockwise.
- Install the backup light bulb (1) and socket (2) into the rear tail lamp assembly and secure by rotating the socket clockwise.
- Check all vehicle lights for correct operation.
- Install the rear compartment lining and reinstall clip to secure lining.
- Install the rear compartment lid trim and reinstall the clips to secure the trim.
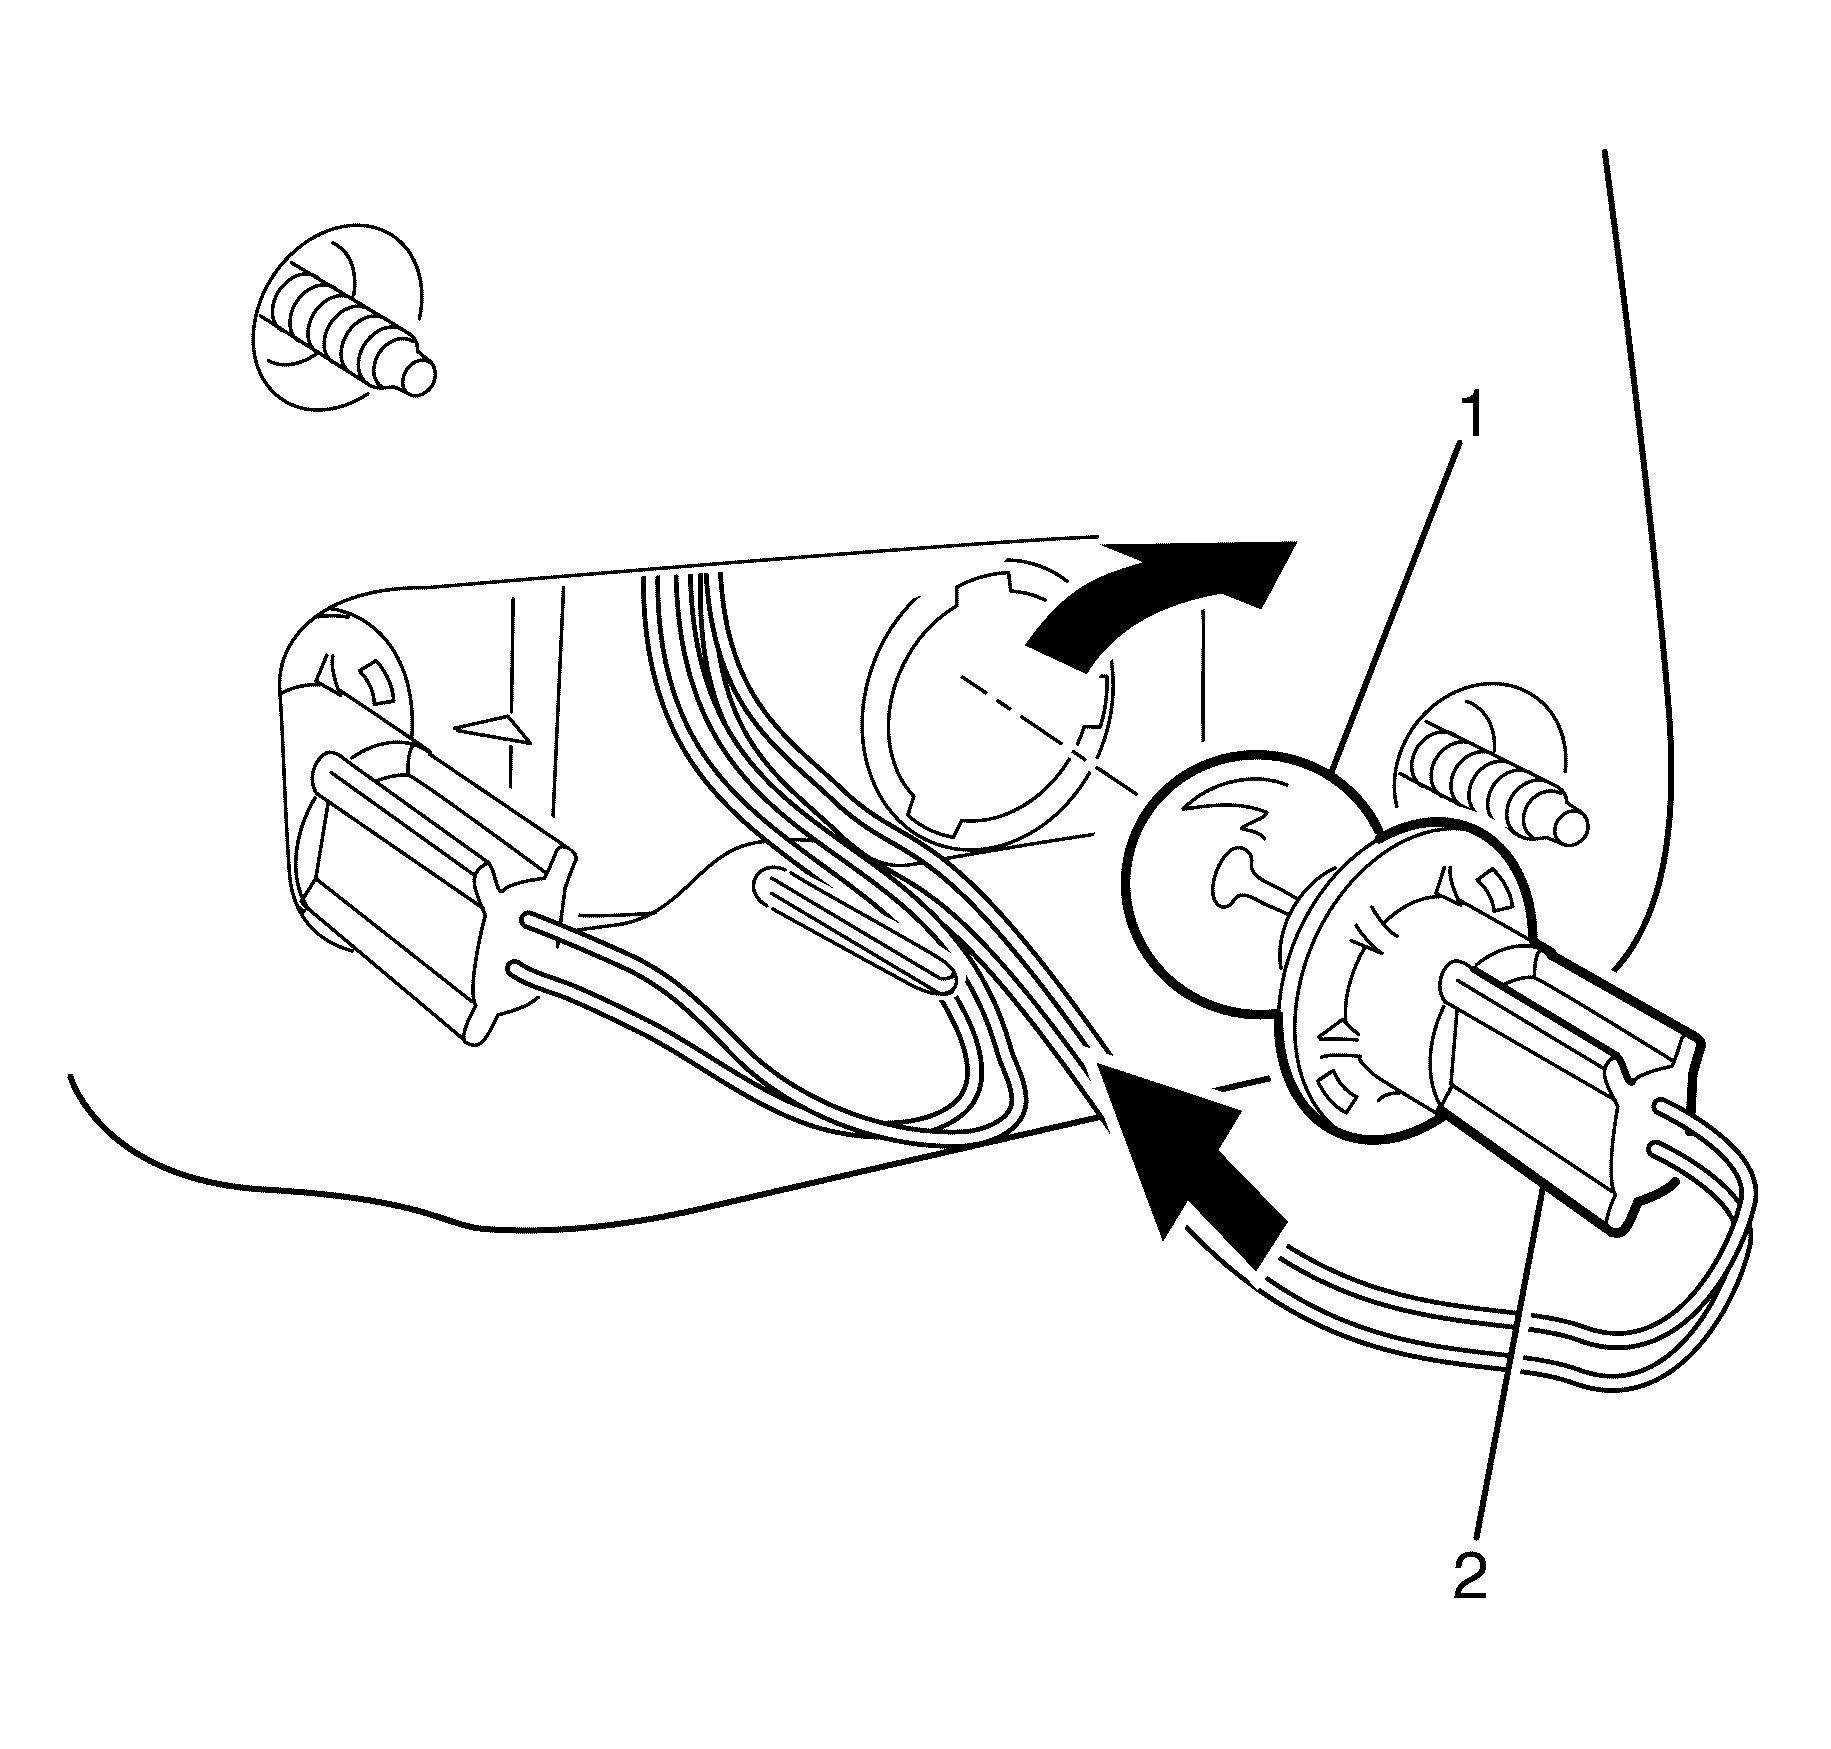
Important: The different-sized tabs on the bulb base and mating cut-outs in the tail lamp assembly allow the bulb to seat correctly.
Removal Procedure - Rear Indicator Bulb (LED tail lamp)
- Open the rear compartment lid.
- Remove the rear compartment lid trim clips and remove the trim.
- Remove the rear compartment lining clip and pull back the lining for access to the rear bulbs.
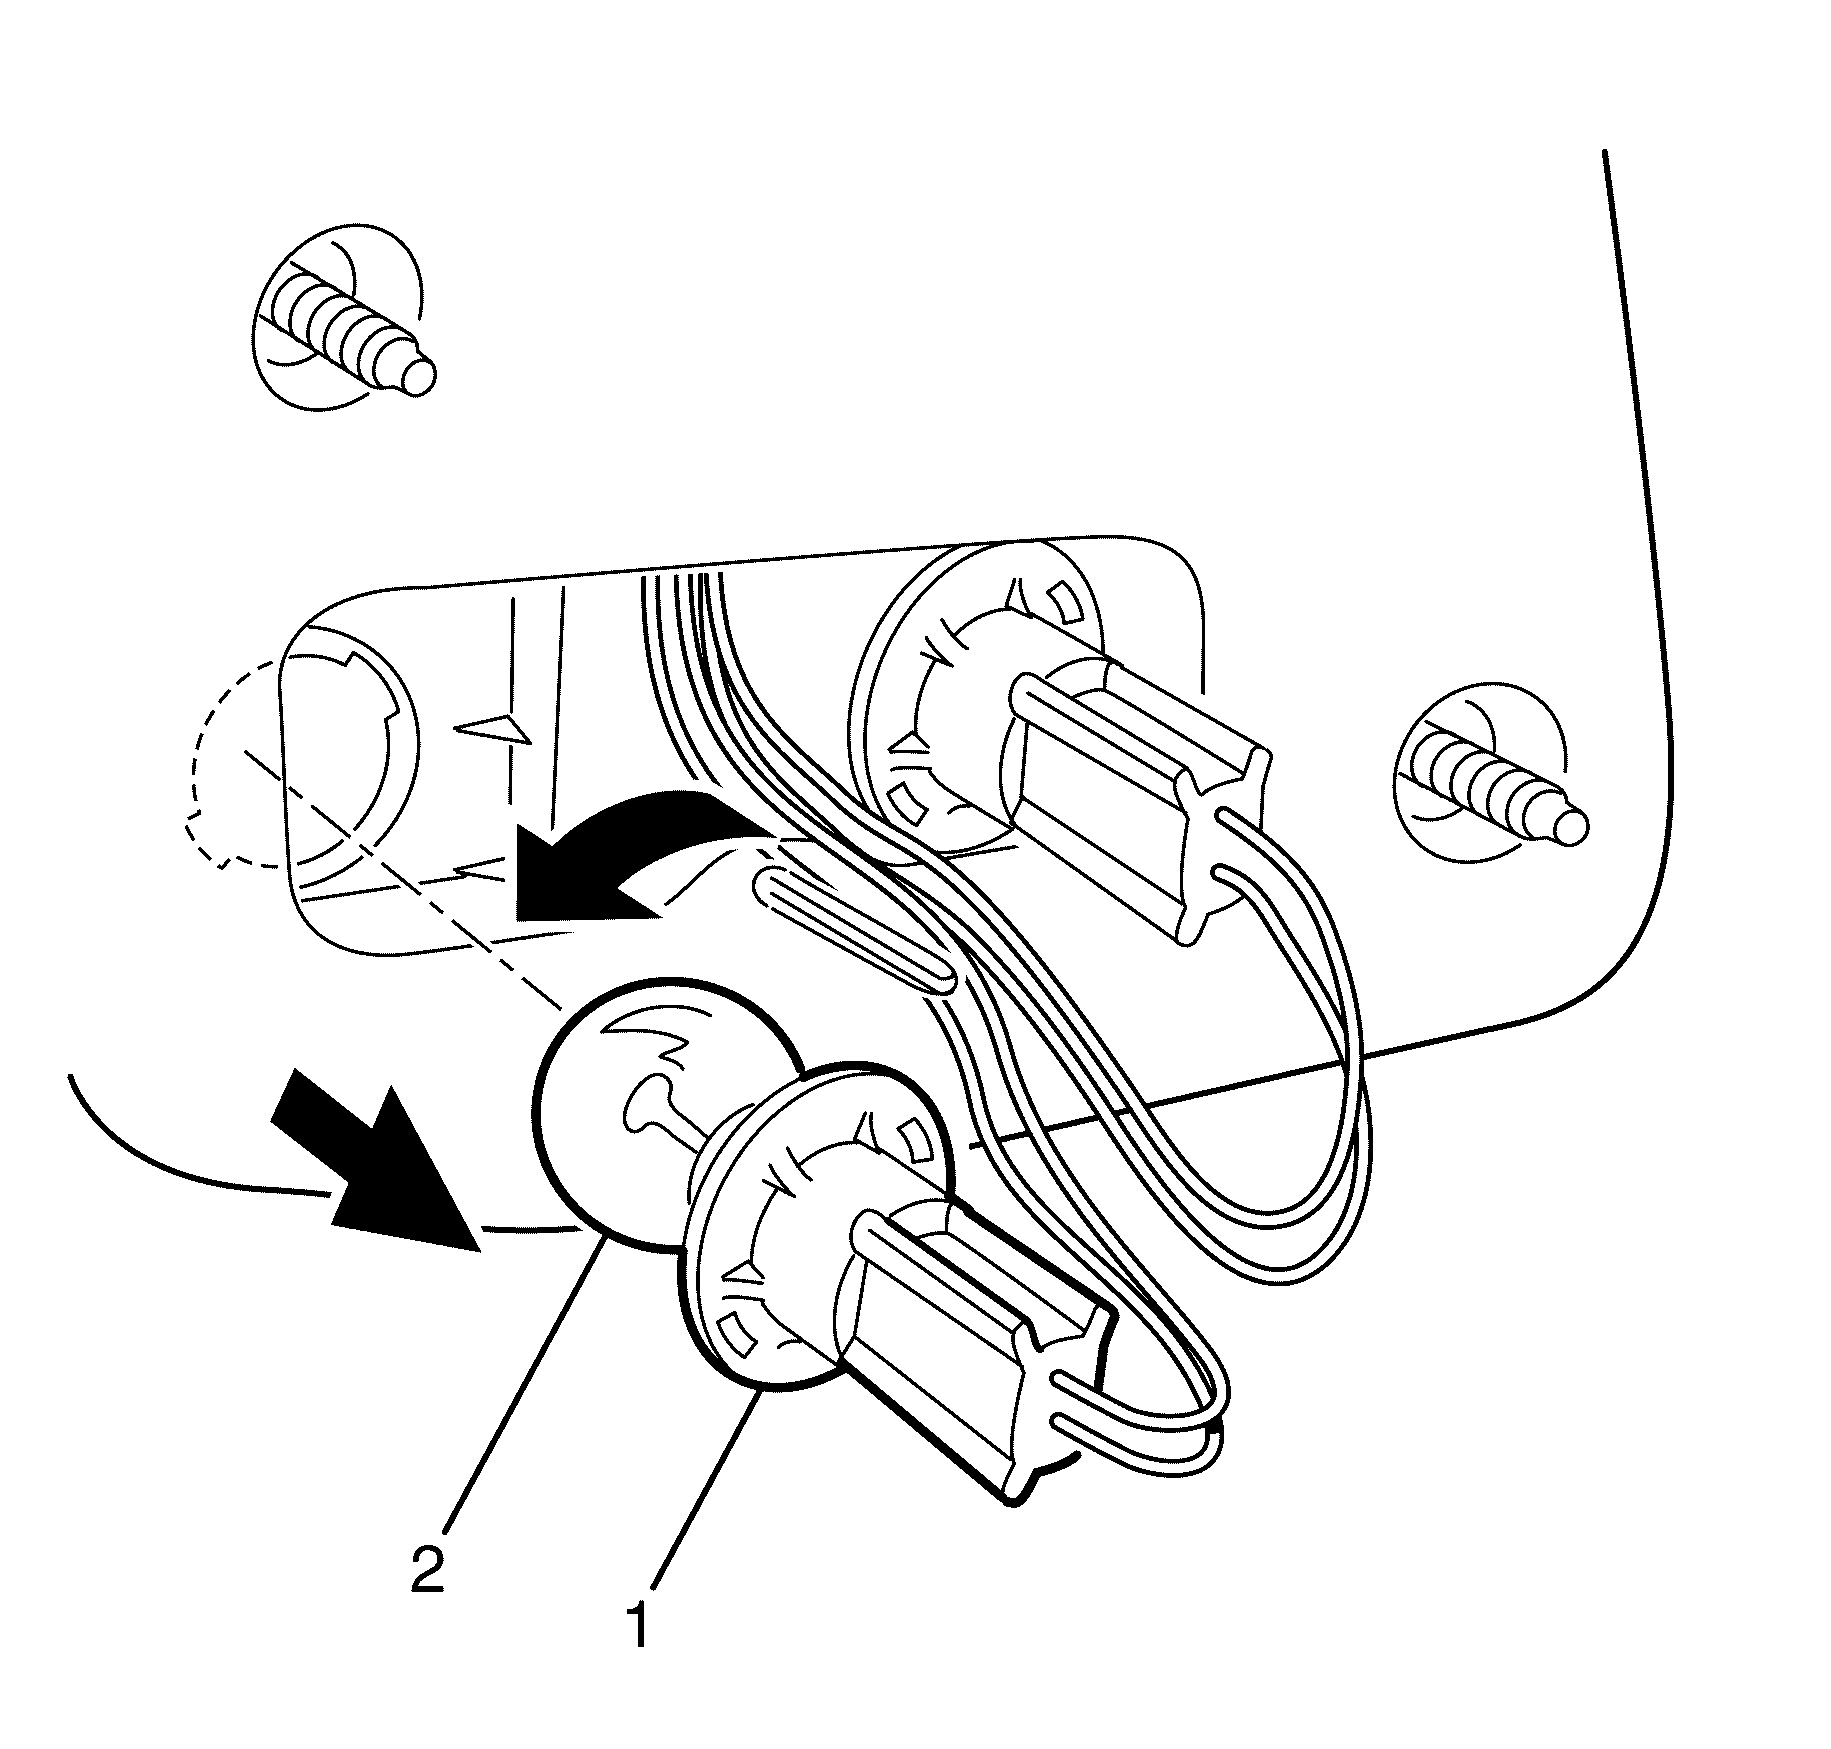
- Remove the rear indicator light bulb (2) and socket (1) from the rear tail lamp assembly by rotating the socket counterclockwise.
- Remove the rear indicator light bulb (2) from the socket (1) by pushing and rotating the bulb counterclockwise.
Installation Procedure - Rear Indicator Bulb (LED tail lamp)
- Install the new rear indicator light bulb (2) into the socket (1) by pushing and rotating the bulb clockwise.
- Install the rear indicator light bulb (2) and socket (1) into the rear tail lamp assembly and secure by rotating the socket clockwise.
- Check all vehicle lights for correct operation.
- Install the rear compartment lining and reinstall clip to secure lining.
- Install the rear compartment lid trim and reinstall the clips to secure the trim.
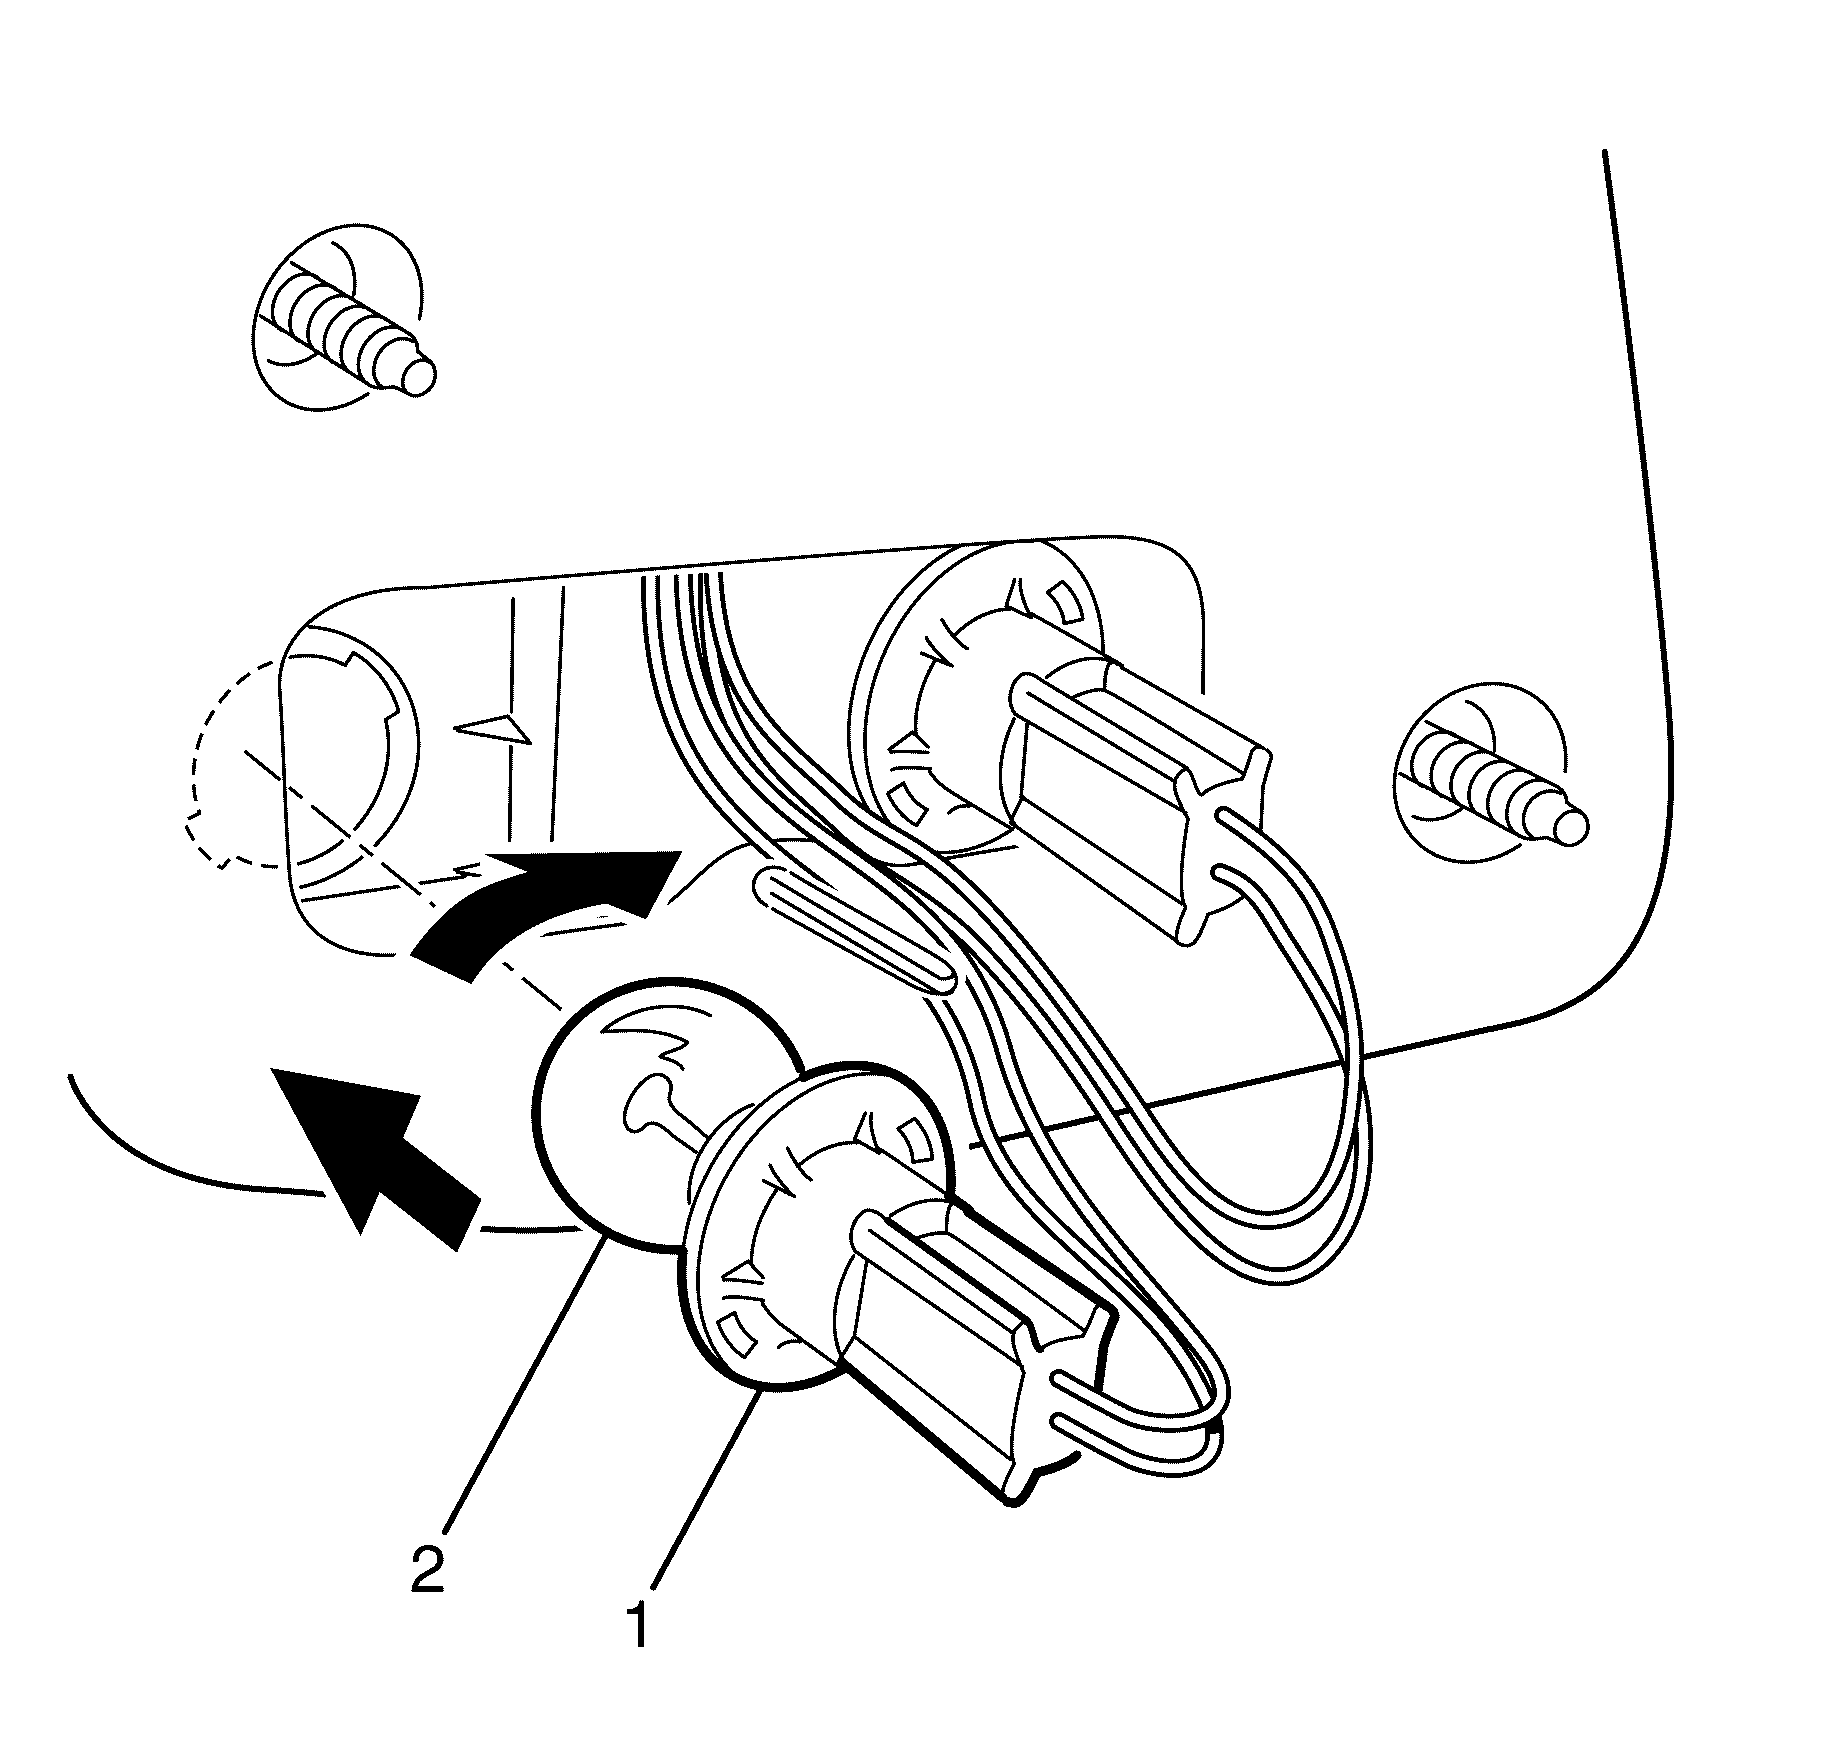
Important: The different-sized tabs on the bulb base and mating cut-outs in the tail lamp assembly allow the bulb to seat correctly.
Removal Procedure - Stop/Tail Lamp Bulb (LED tail lamp)
Important: If the stop or tail LED's are faulty and do not illuminate, the tail lamp assembly must be replaced.
Refer to Removal Procedure - Tail Lamp Assembly (LED tail lamp) within this procedure for LED tail lamp replacement.
Removal Procedure - Tail Lamp Assembly (LED tail lamp)
- Open the rear compartment lid.
- Remove the rear compartment lid trim clips and remove the trim.
- Remove the rear compartment lining clip and pull back the lining for access to the rear tail lamp assembly.
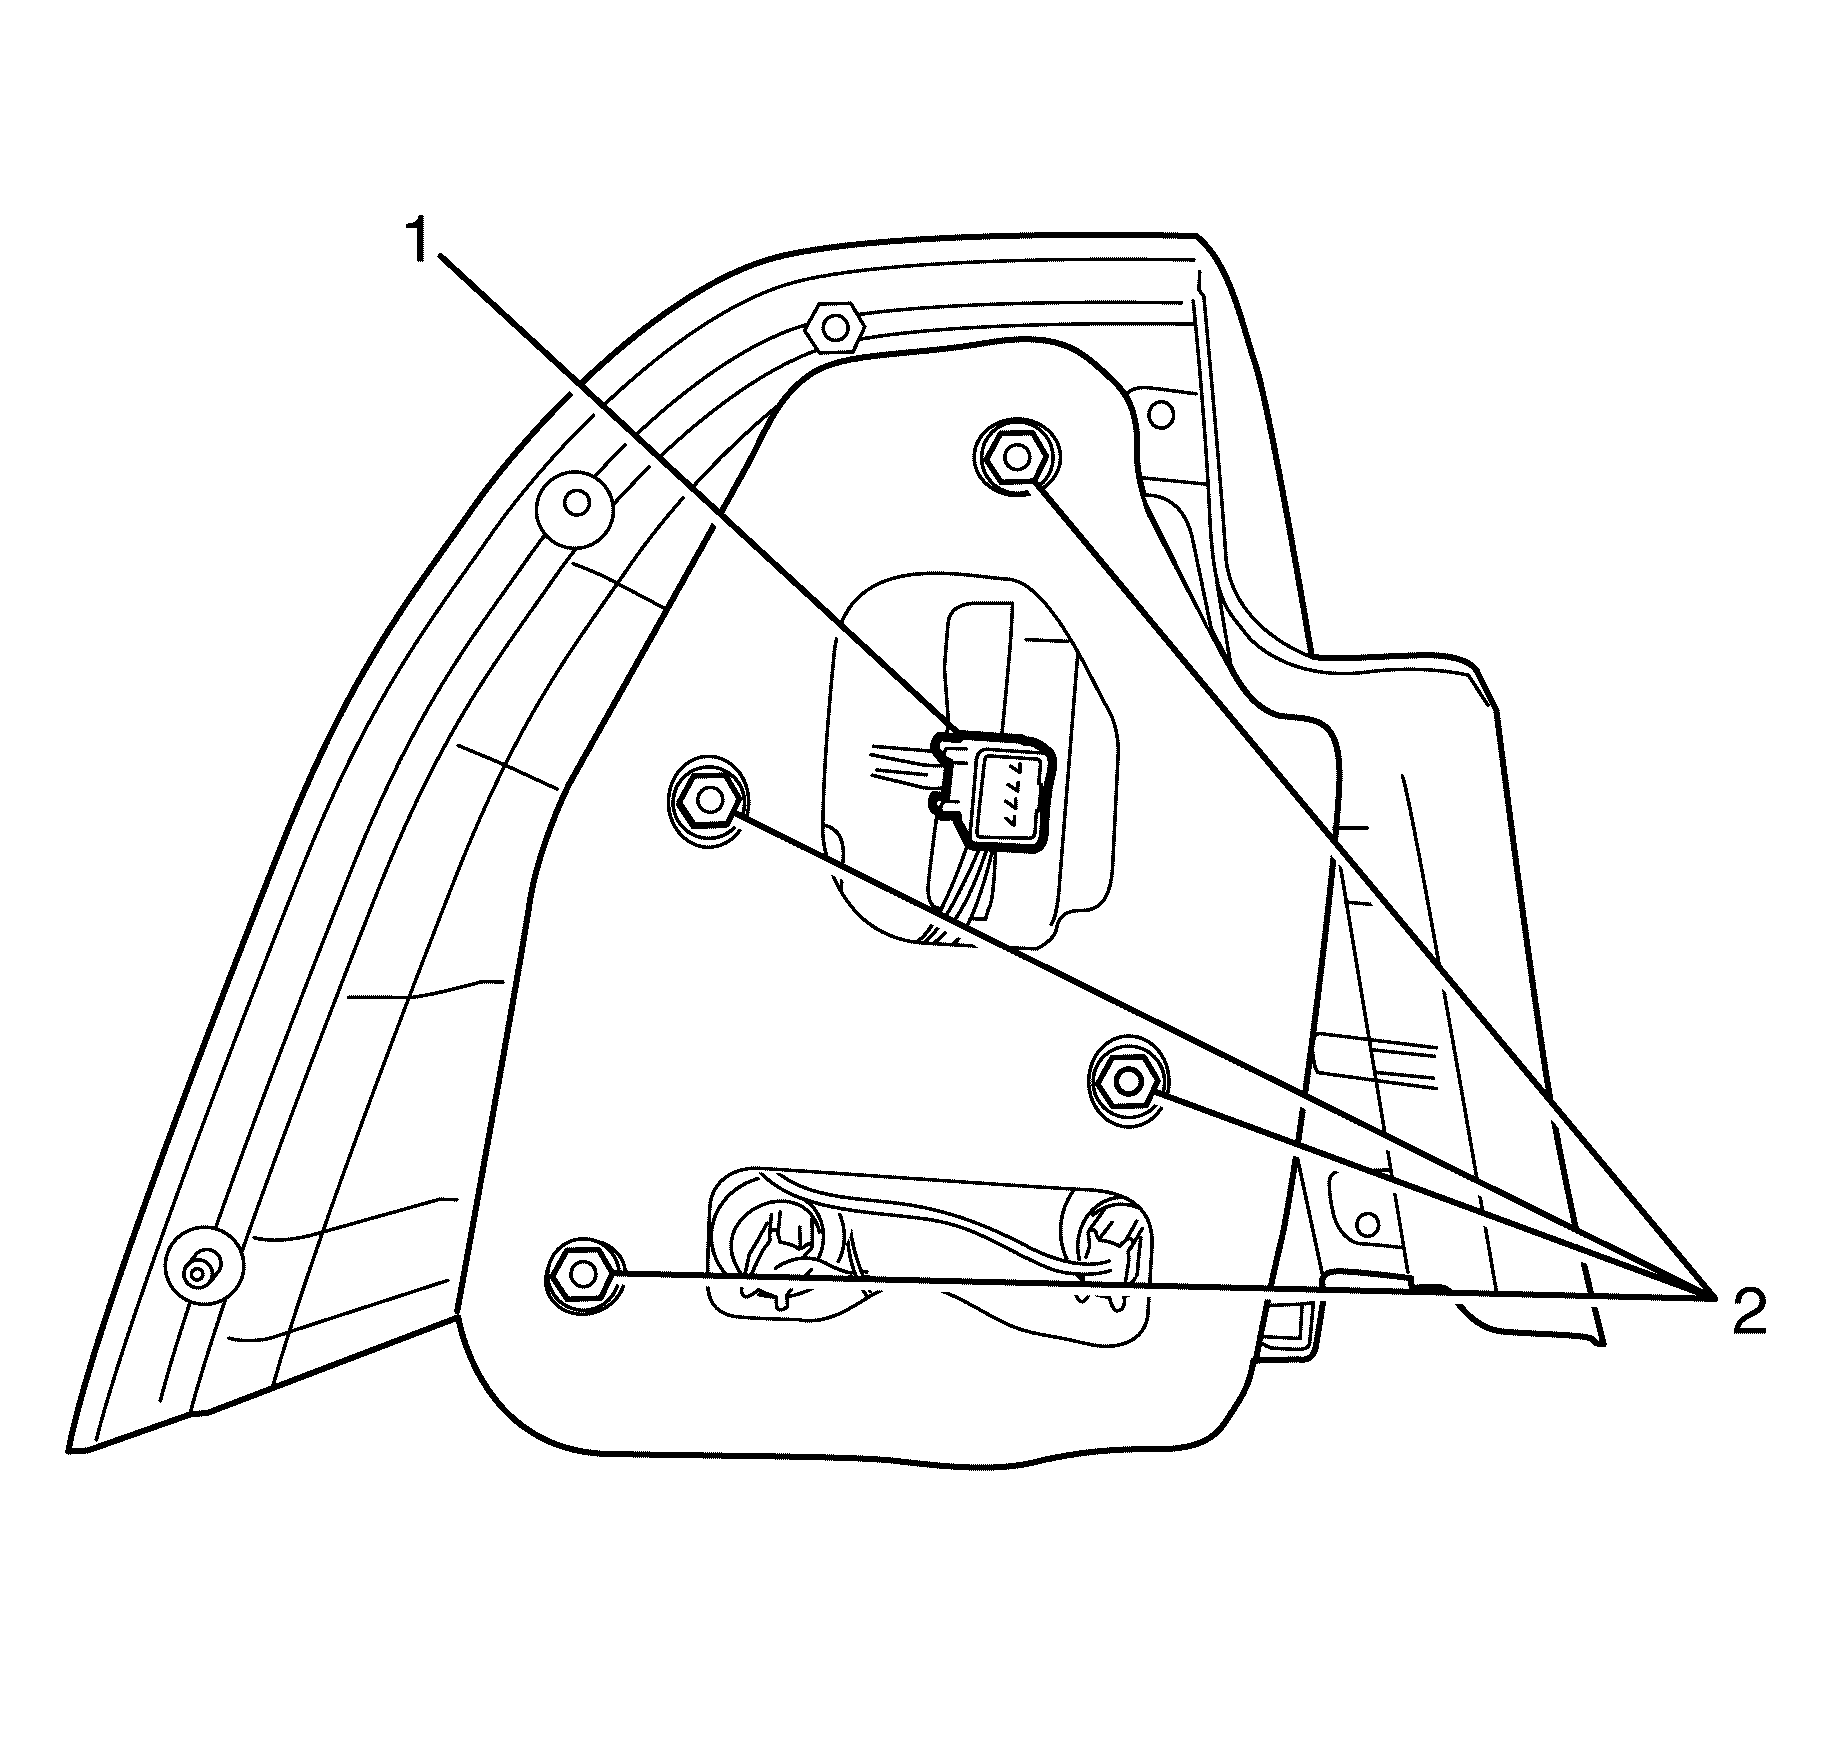
- Disconnect the electrical connector (1) from the rear tail lamp assembly.
- Remove nuts (2) that secure the rear tail lamp assembly, to rear body panel.
- Remove the tail lamp assembly from the vehicle.
Installation Procedure - Tail Lamp Assembly
- Install the new rear tail lamp assembly to the vehicle.
- Install the nuts (2) that secure the rear tail lamp assembly to the rear body panel.
- Connect the electrical connector (1) to the rear tail lamp assembly.
- Check all vehicle lights for correct operation.
- Install the rear compartment lining and reinstall clip to secure lining.
- Install the rear compartment lid trim and reinstall the clips to secure the trim.
Important: Make sure the rear tail lamp sealing surface is clean to avoid damage to painted vehicle surface and to prevent water leaks.
Notice: Refer to Fastener Notice in the Preface section.
Tighten
Tighten the nuts to 3.0 N·m (27 lb in).
