Headlamp Bulb Replacement LWB
Removal Procedure - Low Beam (Type C)
- Remove the radiator air baffle and deflector. Refer to Radiator Air Upper Baffle and Deflector Replacement.
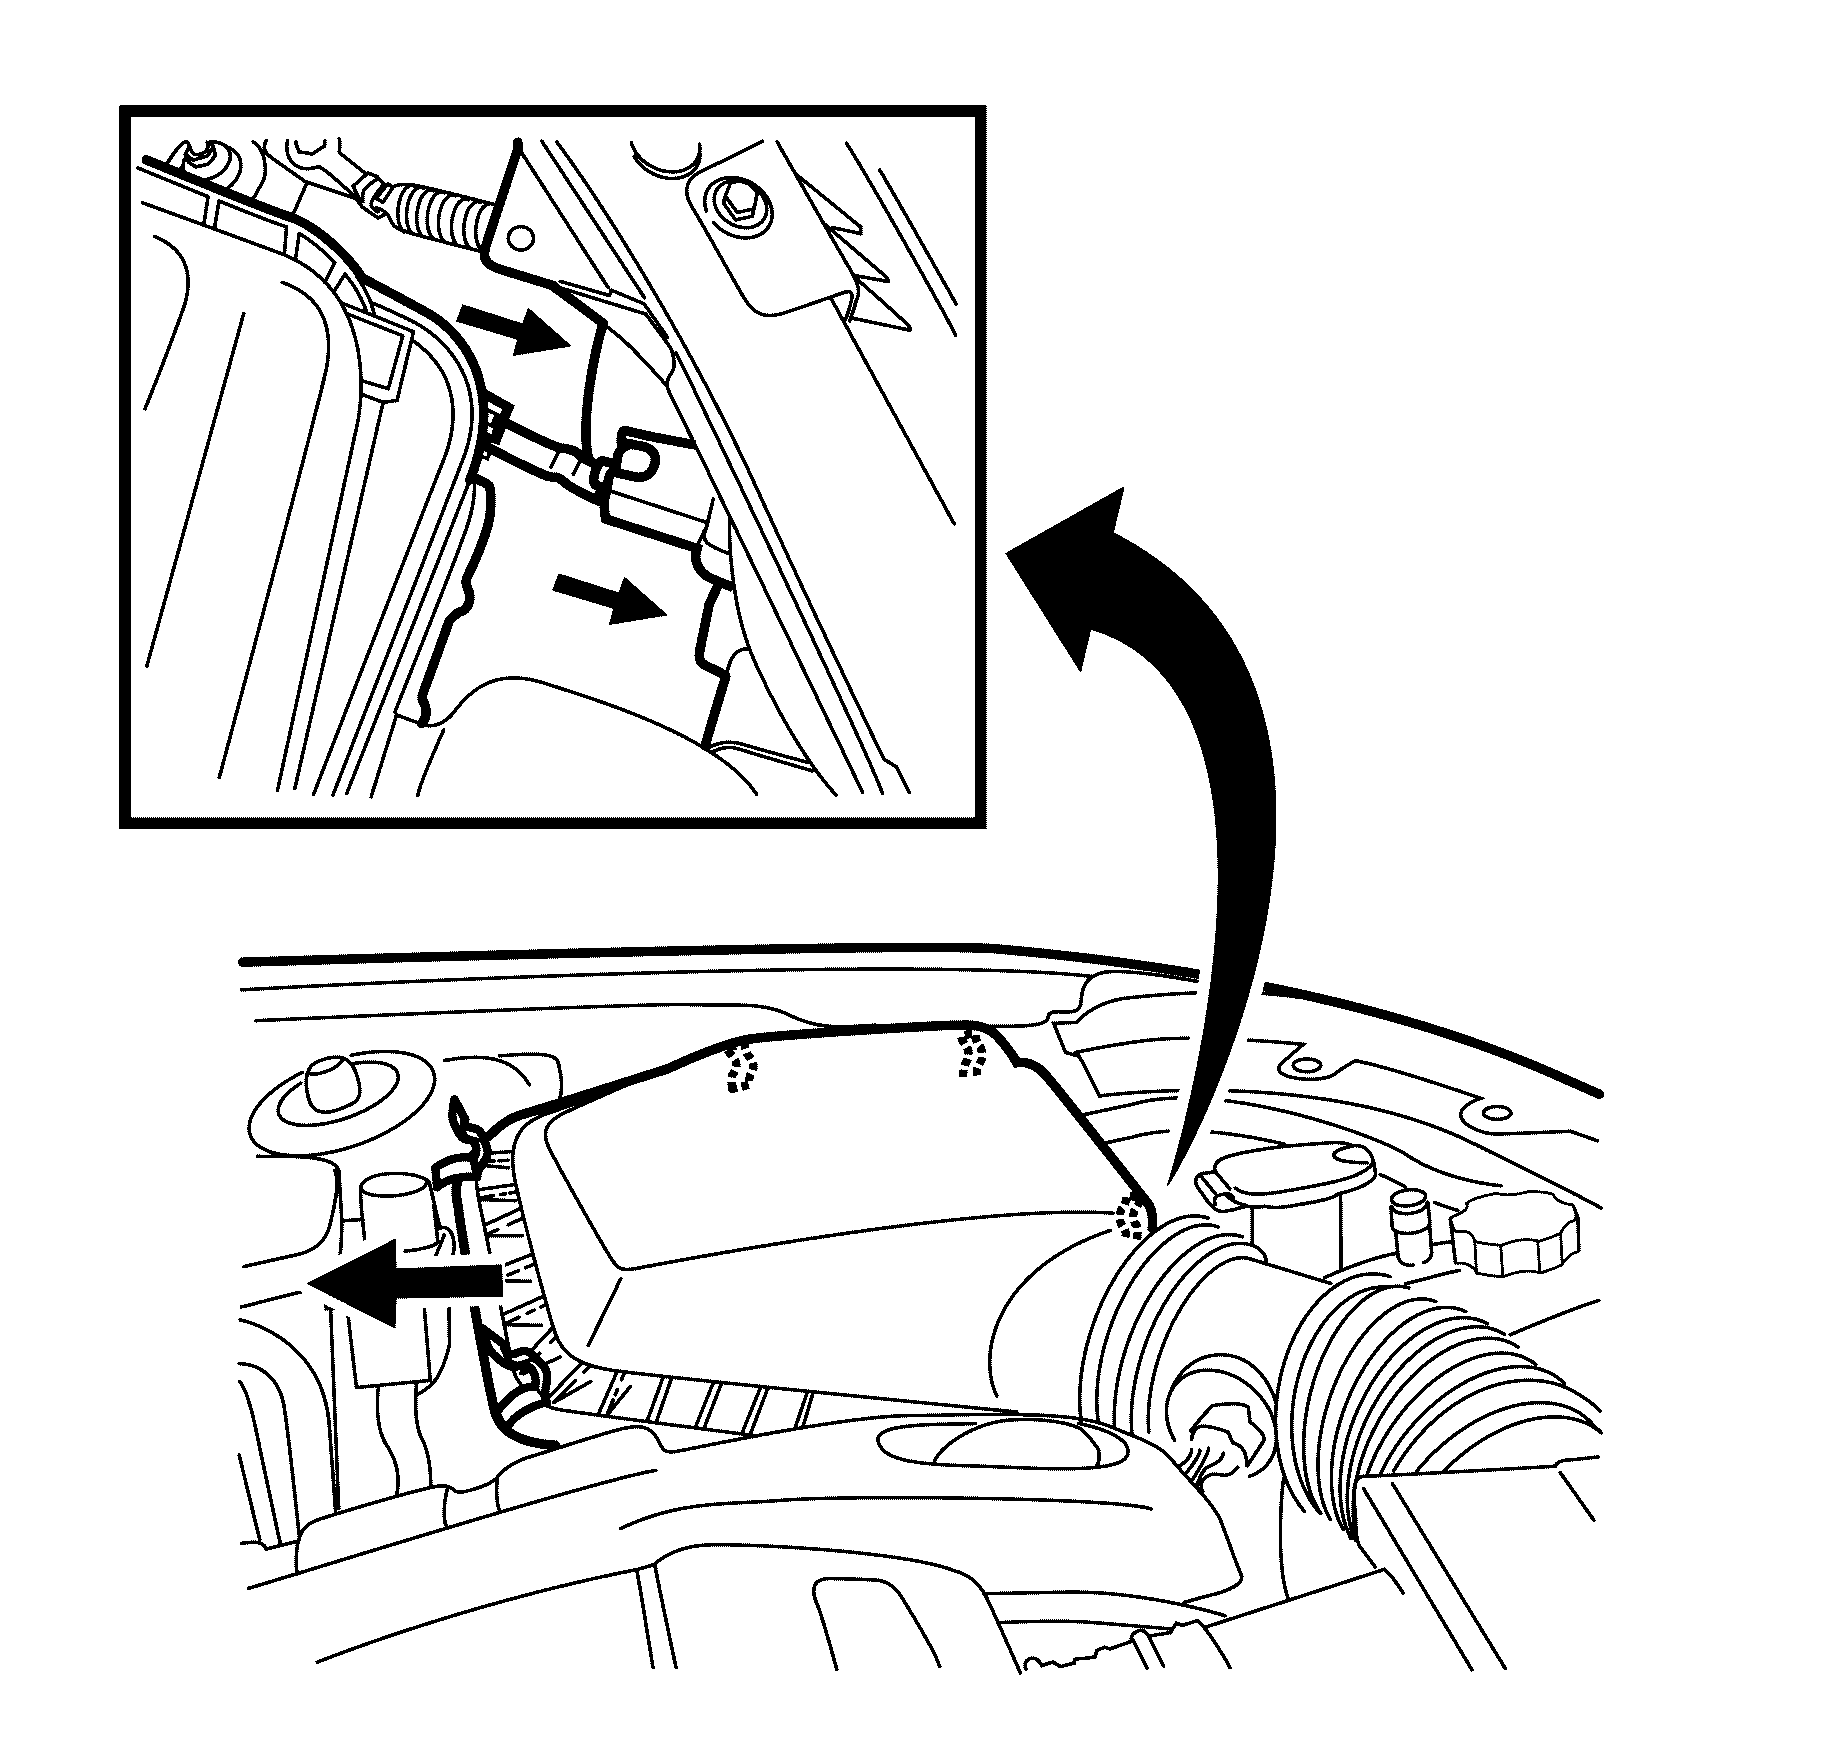
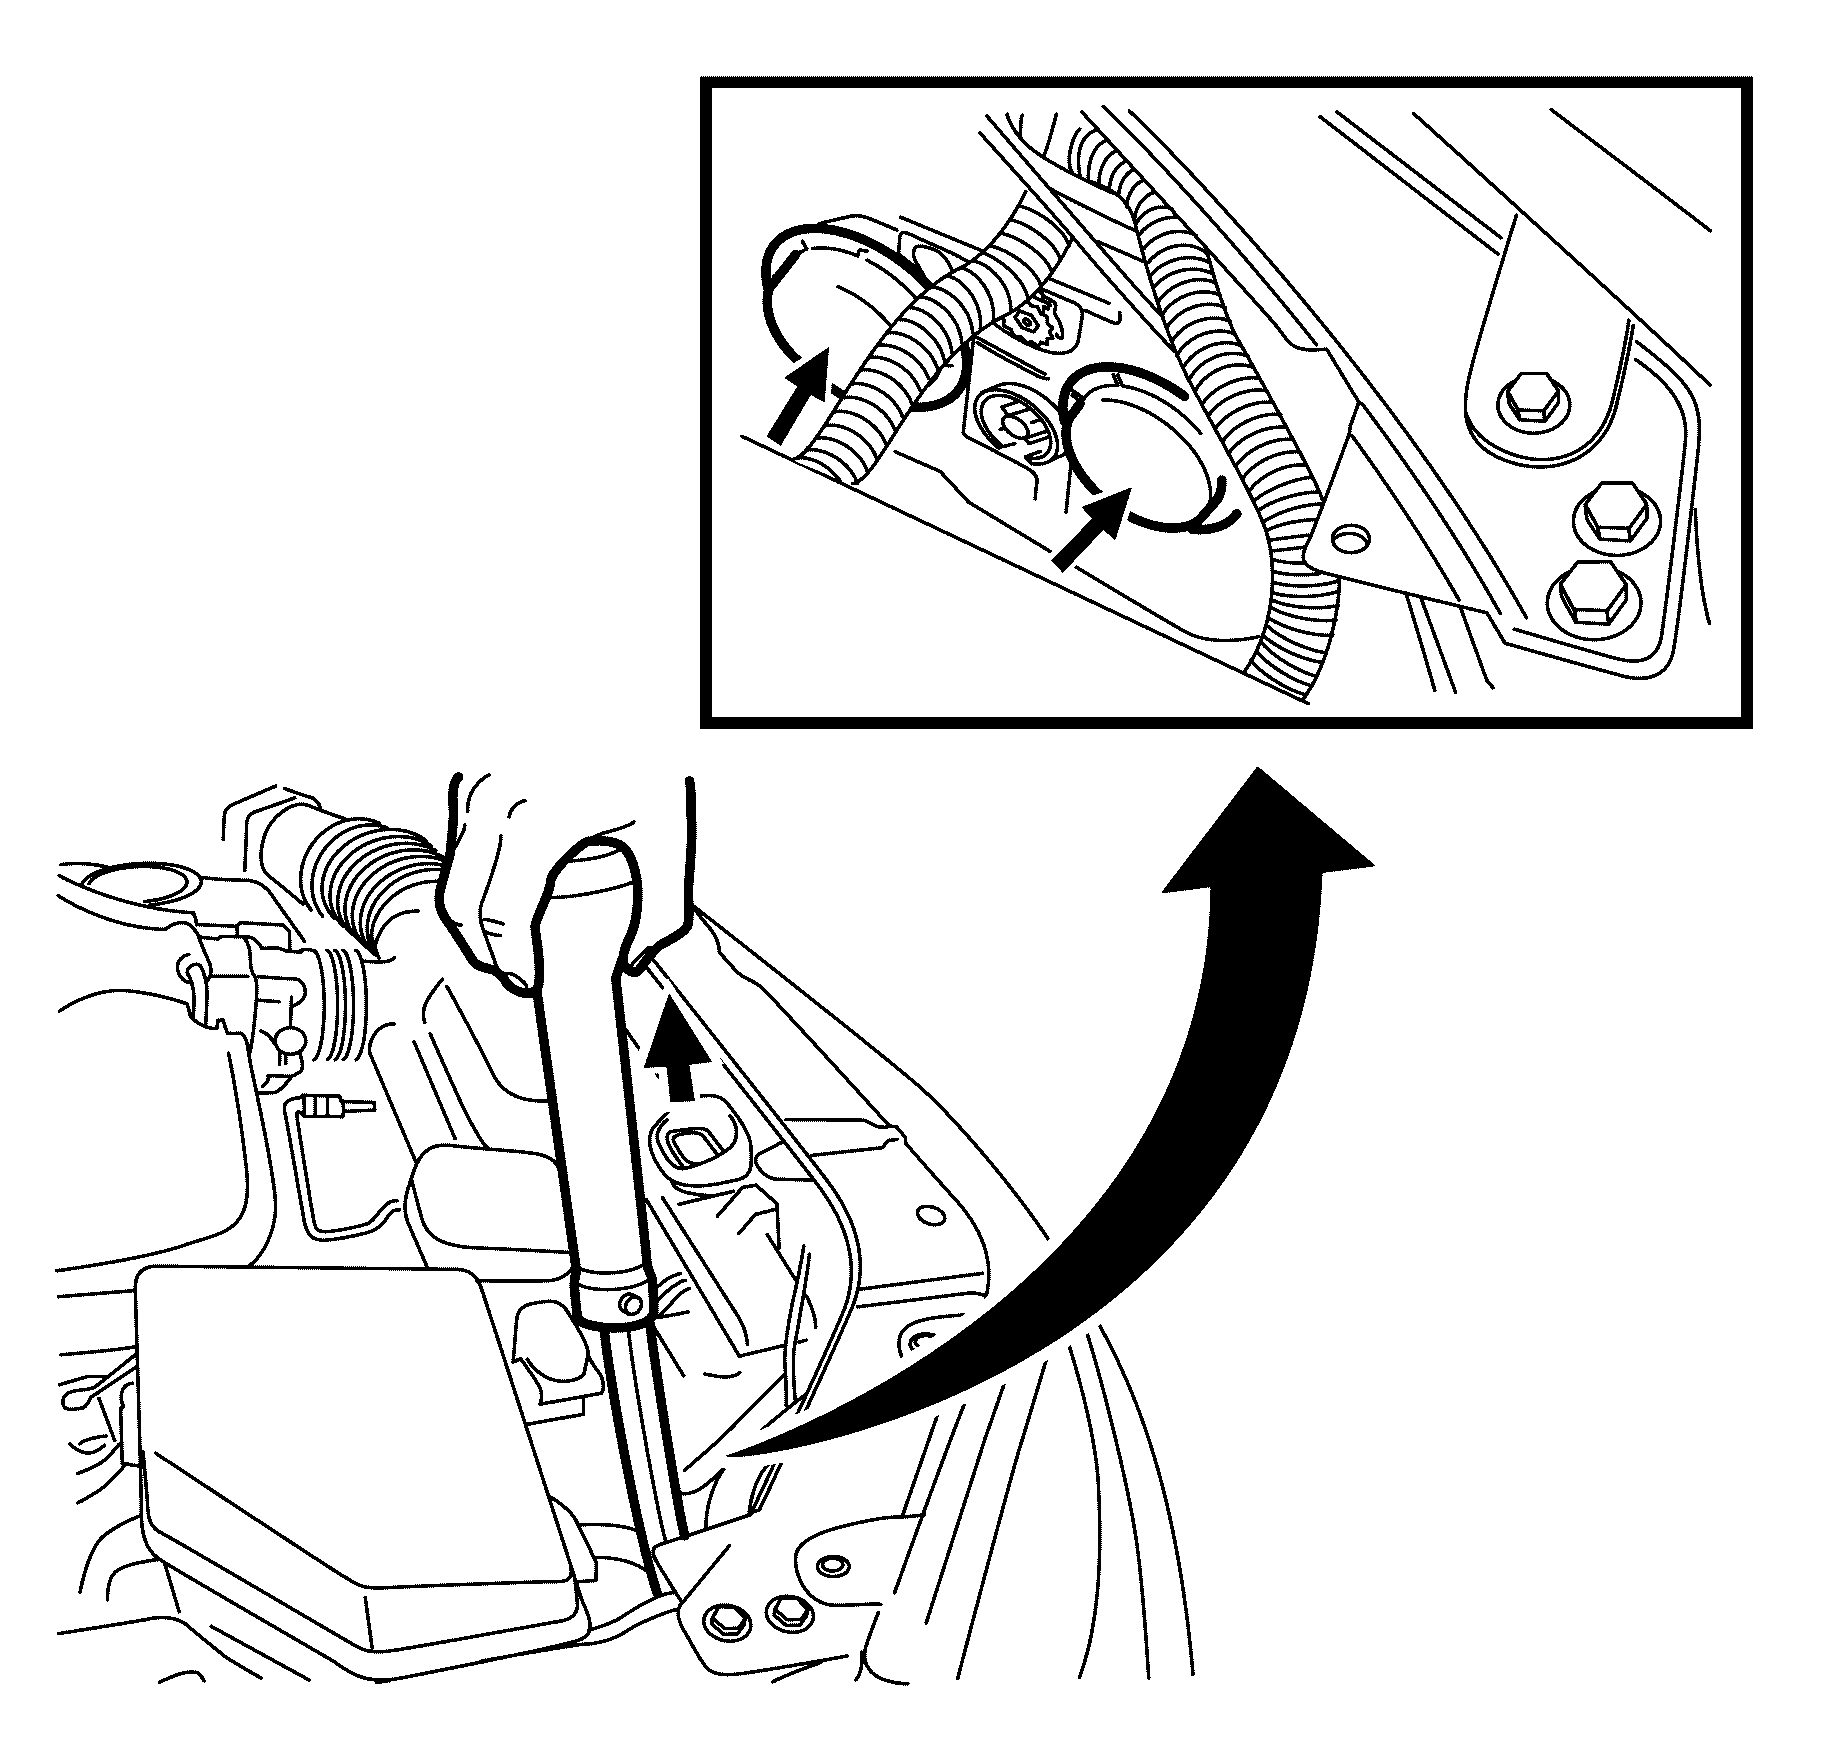
- For access to the left-hand headlight, detach and move the airbox upper cover rearward. Go to step 4.
- For access to the right-hand headlight, remove the coolant reservoir fill neck by pulling up on the neck assembly and position aside. Note the orientation of the aligning tabs and keyway of the coolant reservoir fill neck for installation.
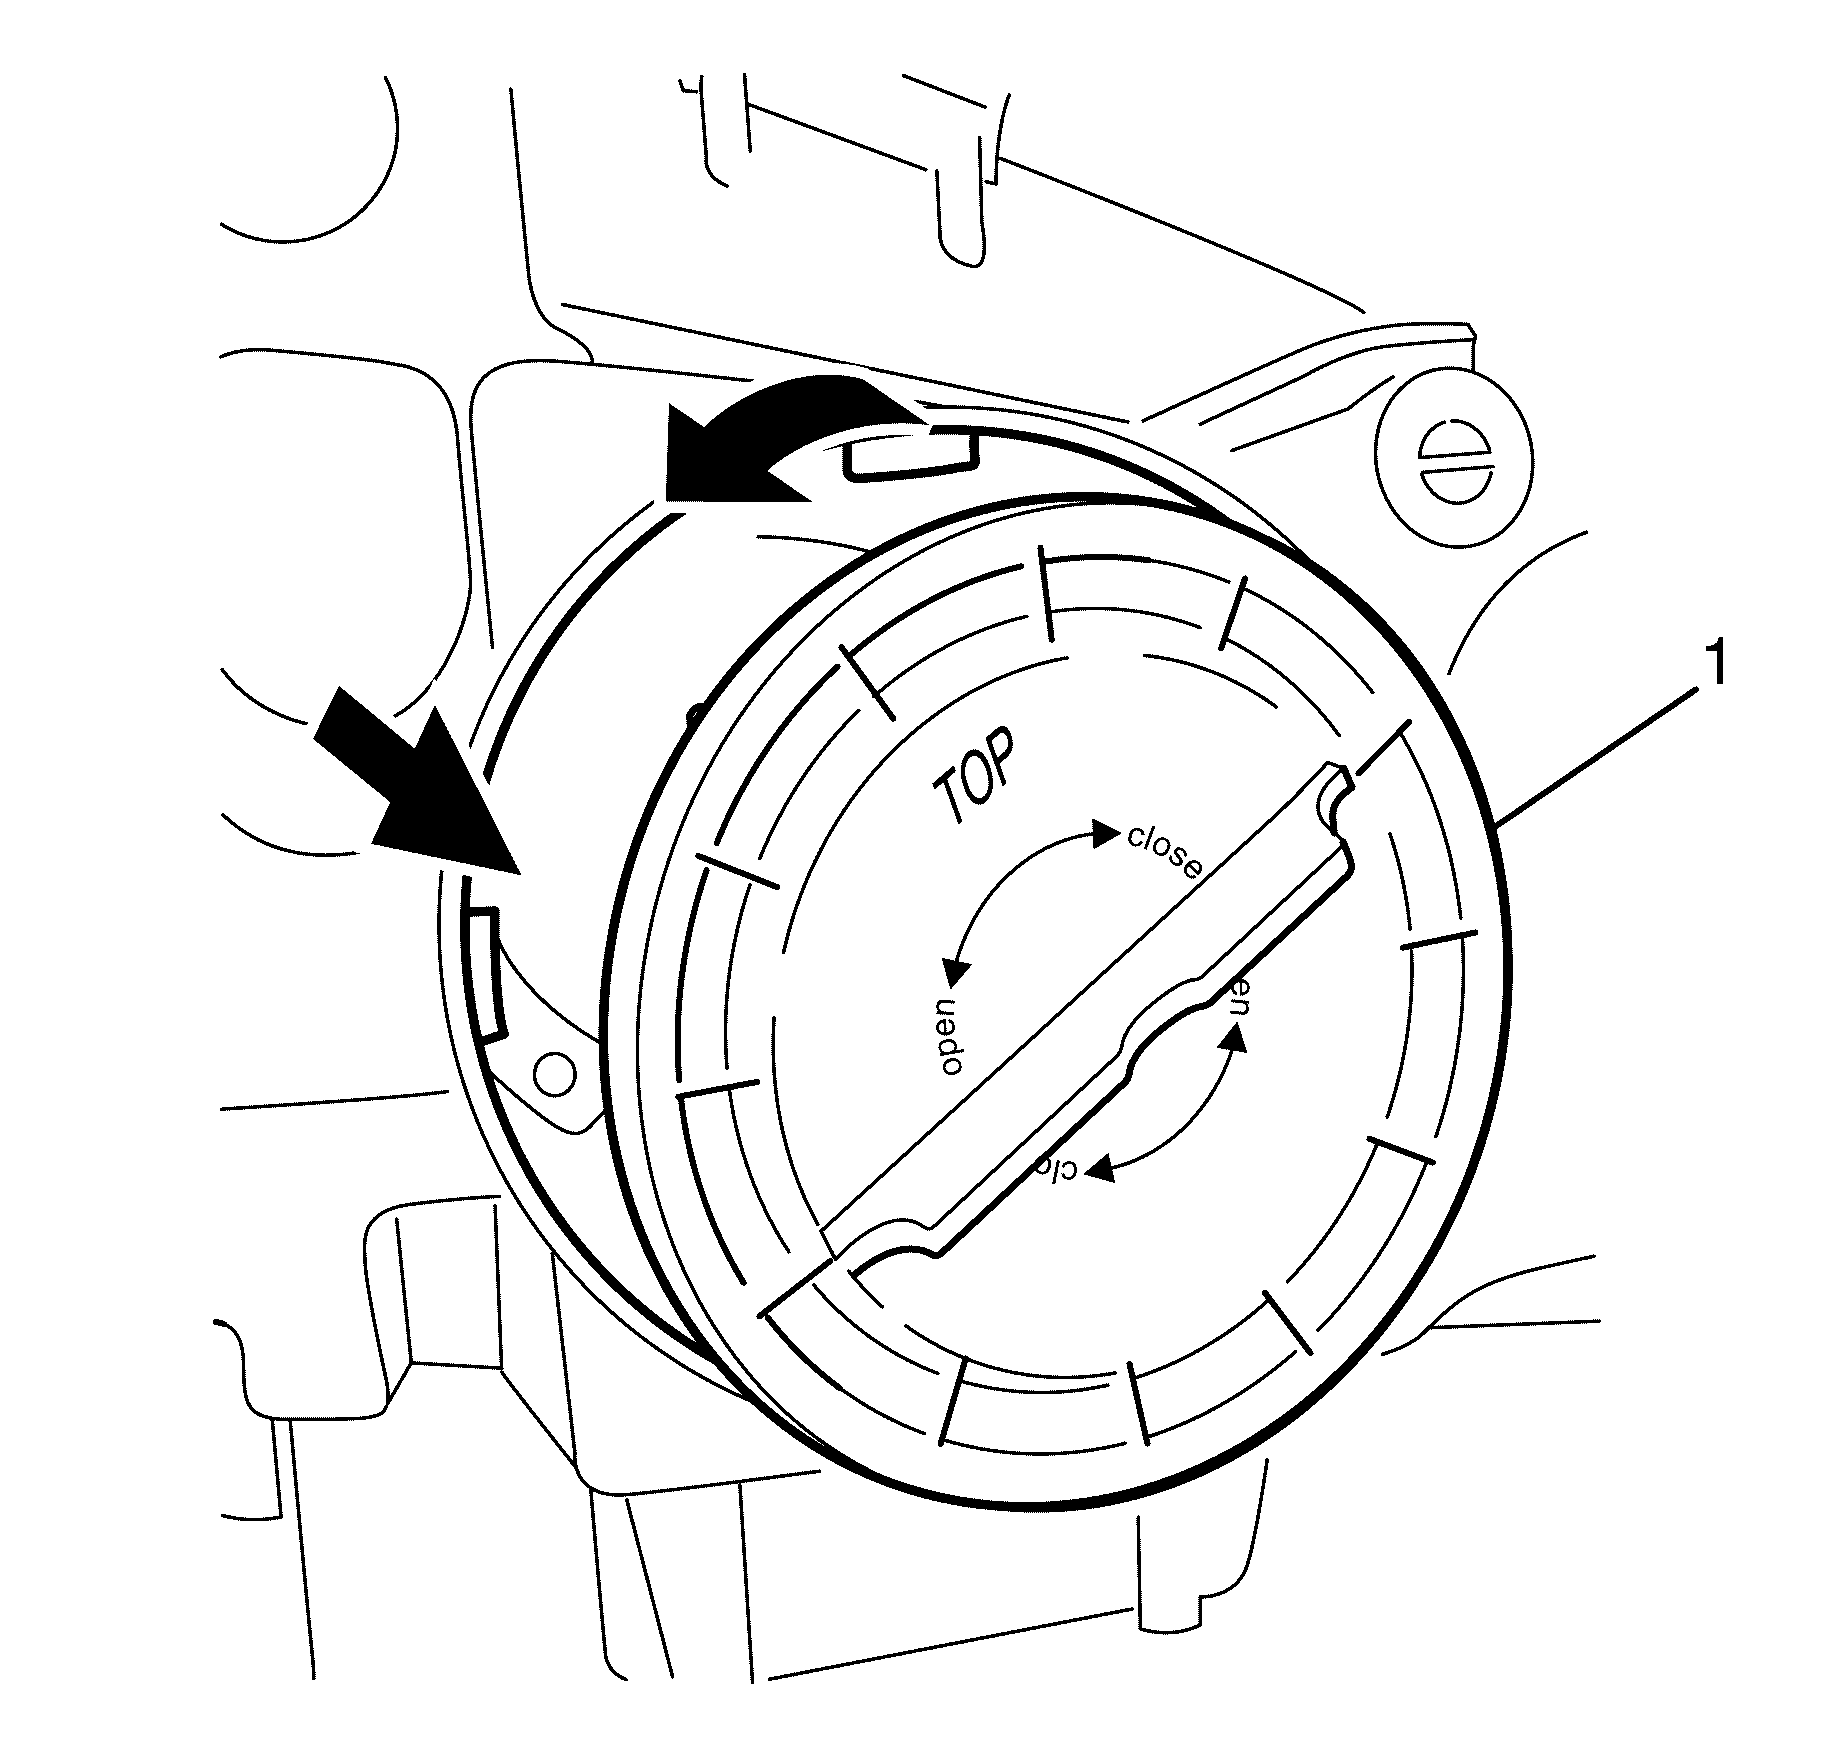
- Remove the low beam headlamp dust cap (1) from the rear of the headlamp assembly by rotating the dust cap counter-clockwise. Note the orientation of the dust cap and tabs for installation.
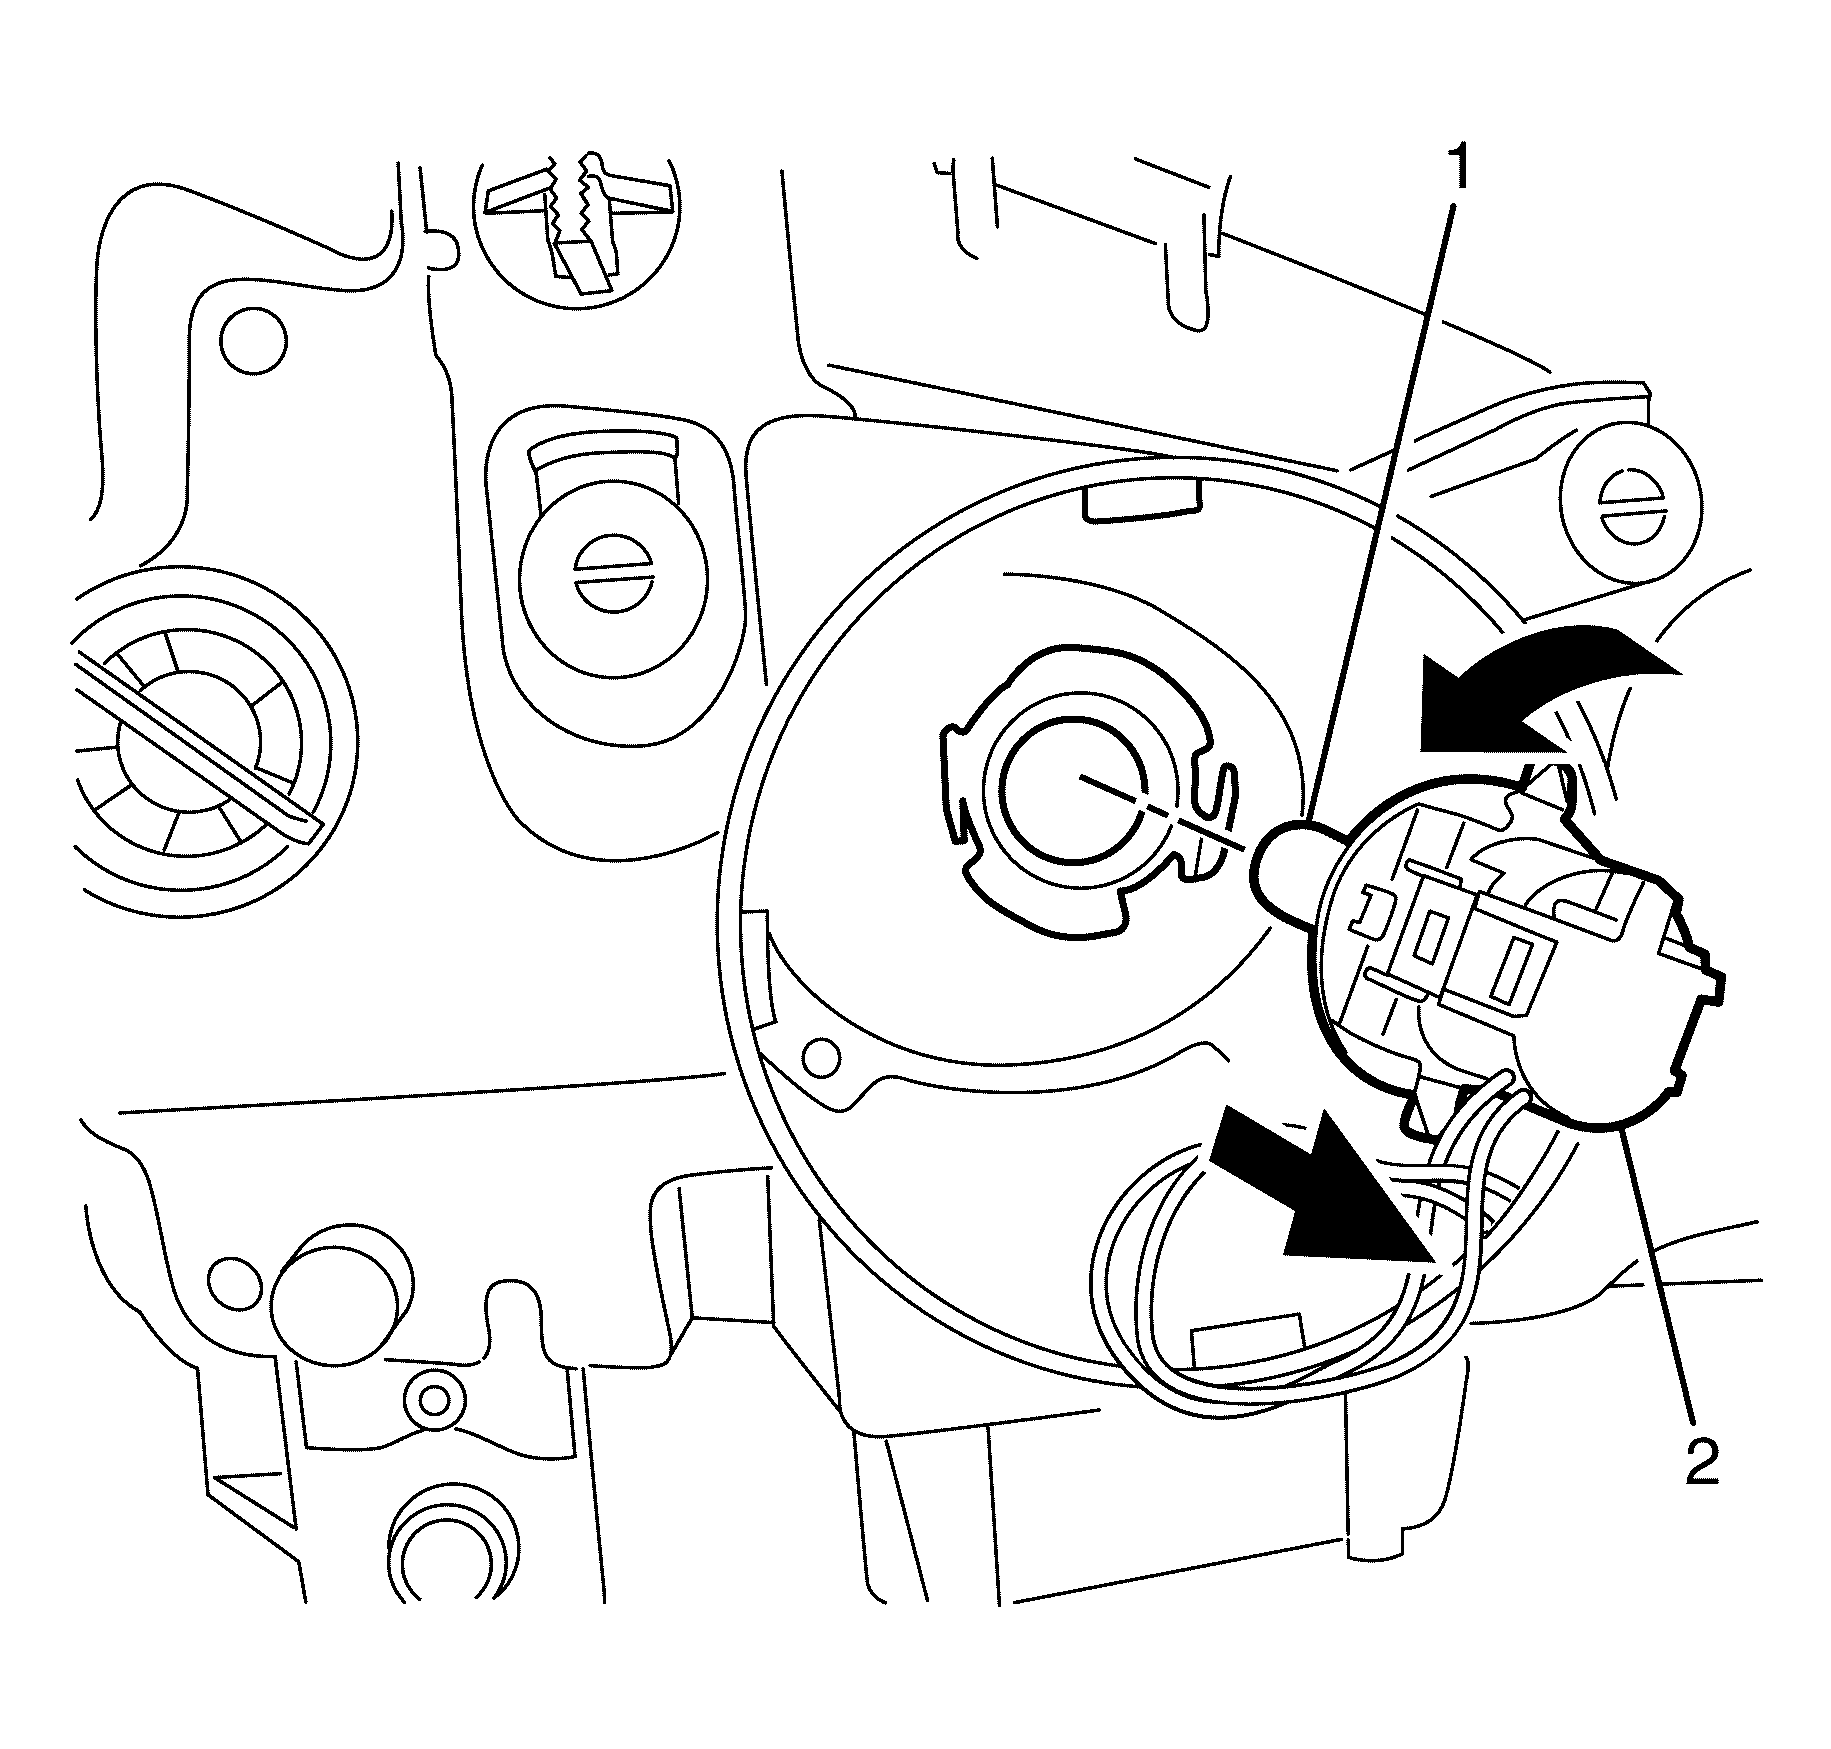
- Rotate the low beam headlight bulb socket assembly (2) counter-clockwise and remove the socket from the headlamp assembly.
- Remove the low beam bulb (1) from the socket.
Caution: Halogen bulbs contain gas under pressure. Handling a bulb improperly
could cause it to shatter into flying glass fragments. To help avoid personal
injury:
• Turn off the lamp switch and allow the bulb to cool before changing
the bulb. • Leave the lamp switch OFF until the bulb change is complete. • Always wear eye protection when changing a halogen bulb. • Handle the bulb only by its base. Avoid touching the glass. • Keep dirt and moisture off the bulb. • Properly dispose of the used bulb. • Keep halogen bulbs out of the reach of children.
Installation Procedure - Low Beam (Type C)
- Install the new low beam bulb (1) into the low beam socket assembly (2).
- Install the low beam socket (2) into the headlamp assembly and lock the socket in place by rotating it clockwise.
- Inspect the low beam dust cap seal and replace if necessary.
- Install the low beam headlamp dust cap (1) to the rear of the headlamp assembly by aligning the tabs and rotating the dust cap clockwise to secure.
- For the left-hand headlamp assembly, replace and secure the airbox upper cover. Go to step 7.
- For the right-hand headlamp assembly, reinstall the coolant reservoir fill neck by aligning the tabs and keyway and pushing the neck into position.
- Install the radiator air baffle and deflector. Refer to Radiator Air Upper Baffle and Deflector Replacement.
Important: Do not handle the quartz envelope of the headlight bulb. Wipe the quartz envelope immediately with methylated spirits if it is touched accidentally or the performance of the bulb will deteriorate.
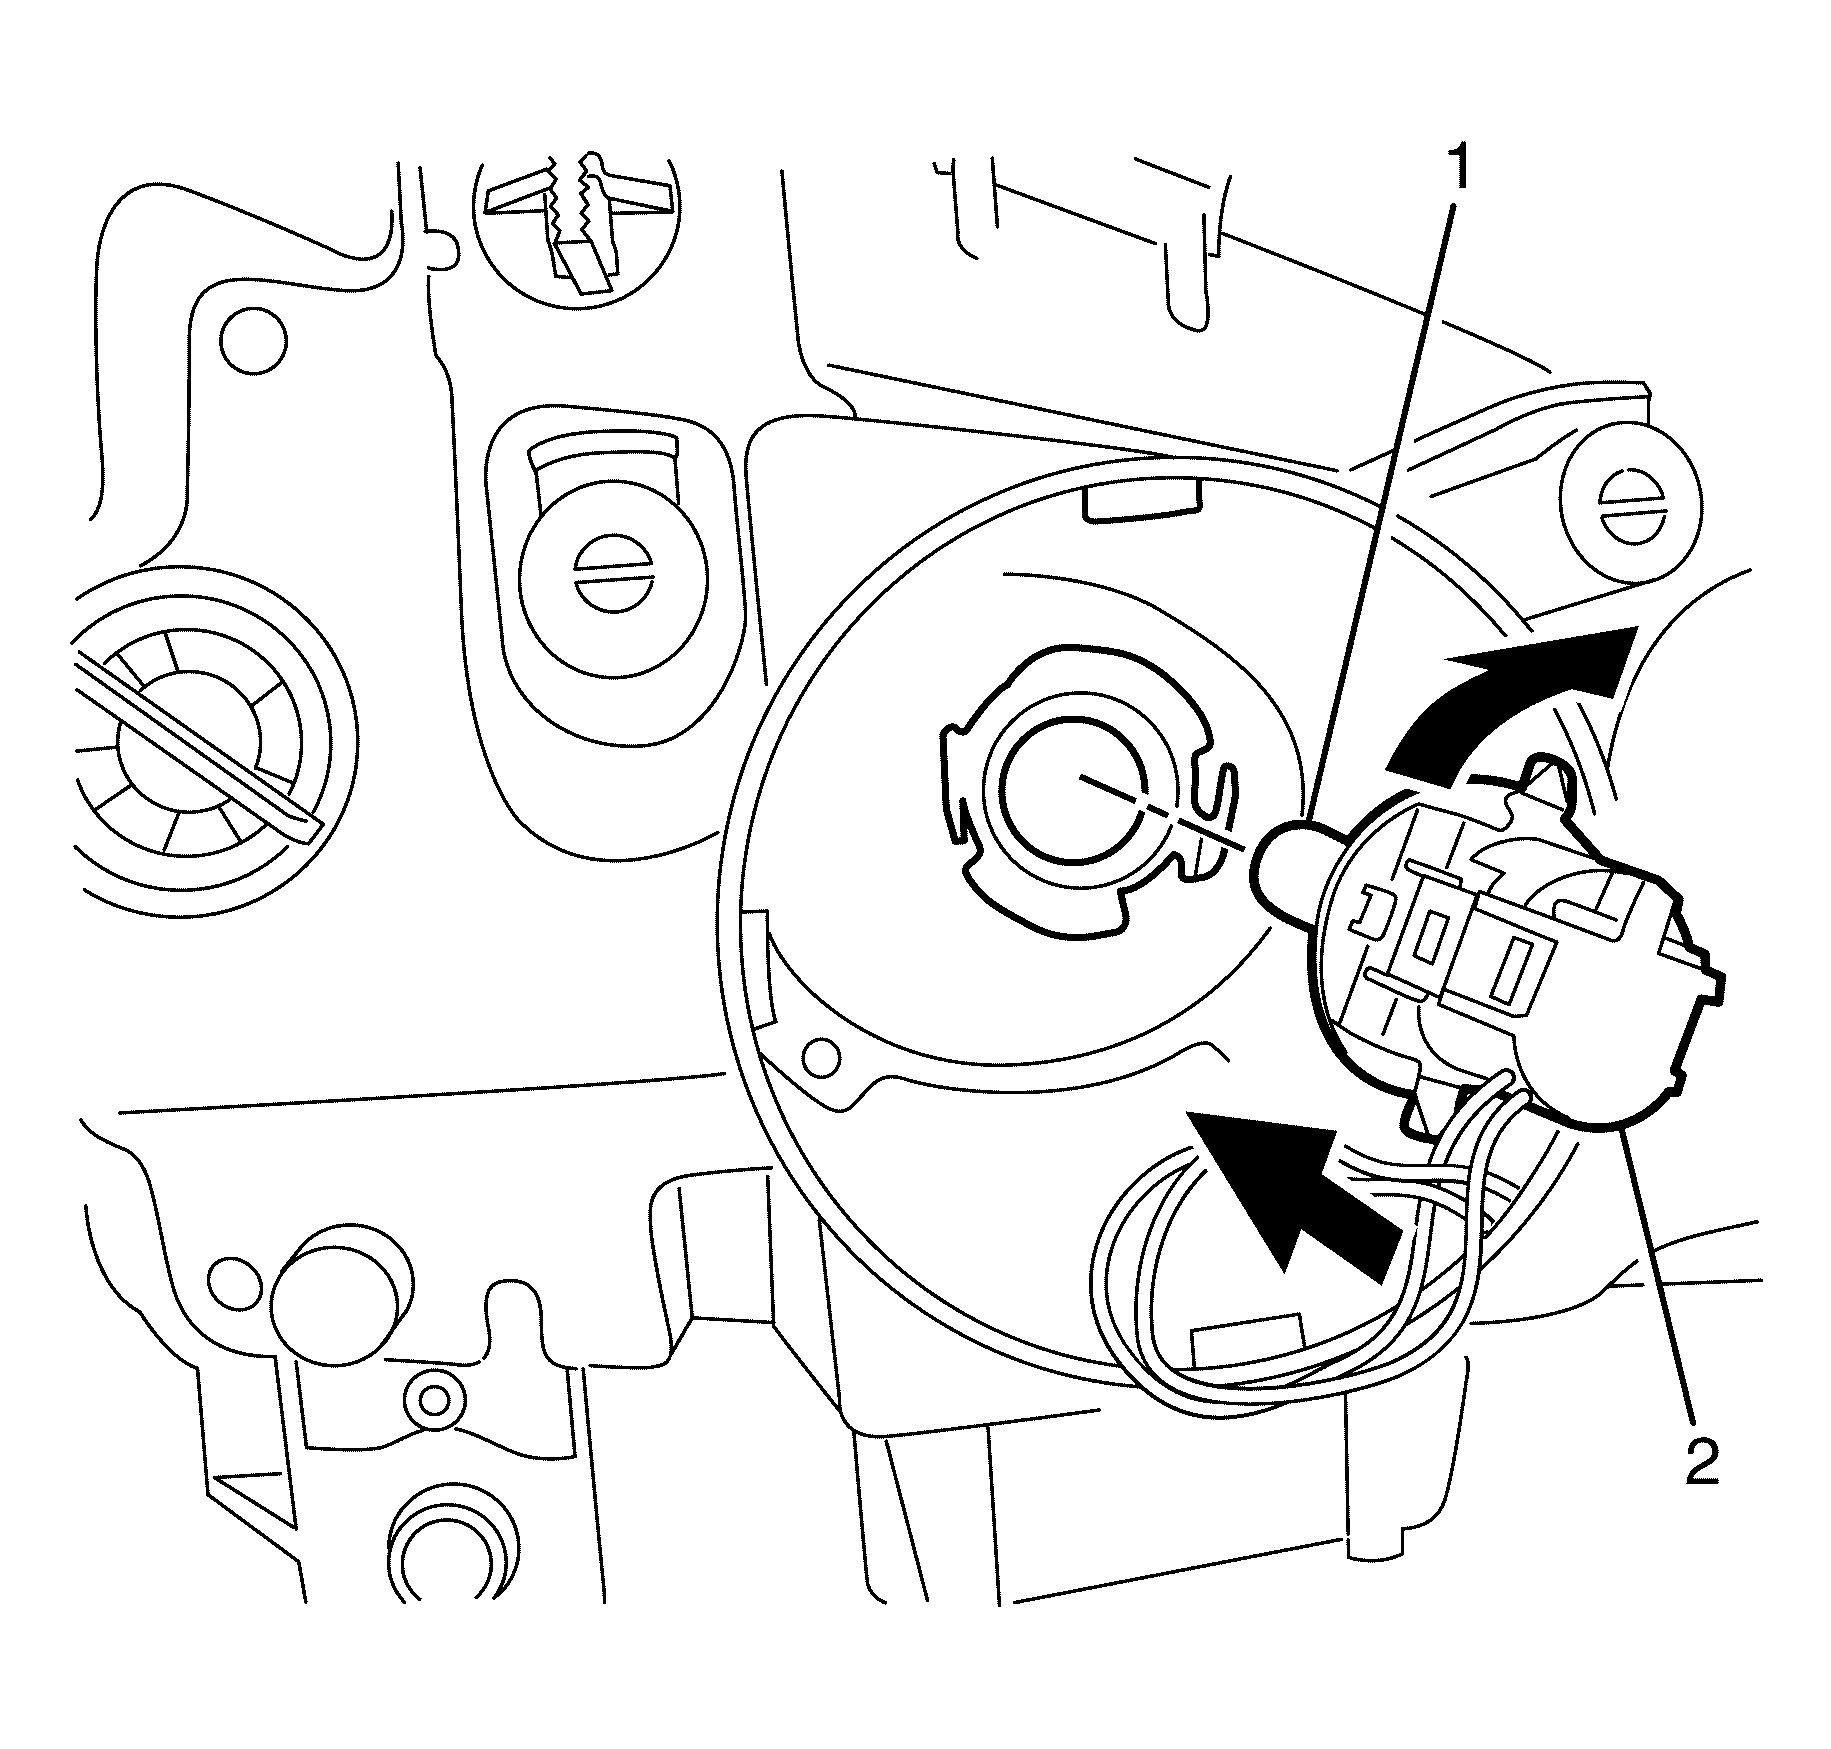
Important: The different-sized tabs on the bulb base and mating cut-outs in the headlamp assembly allow the bulb socket to seat correctly in one orientation position.
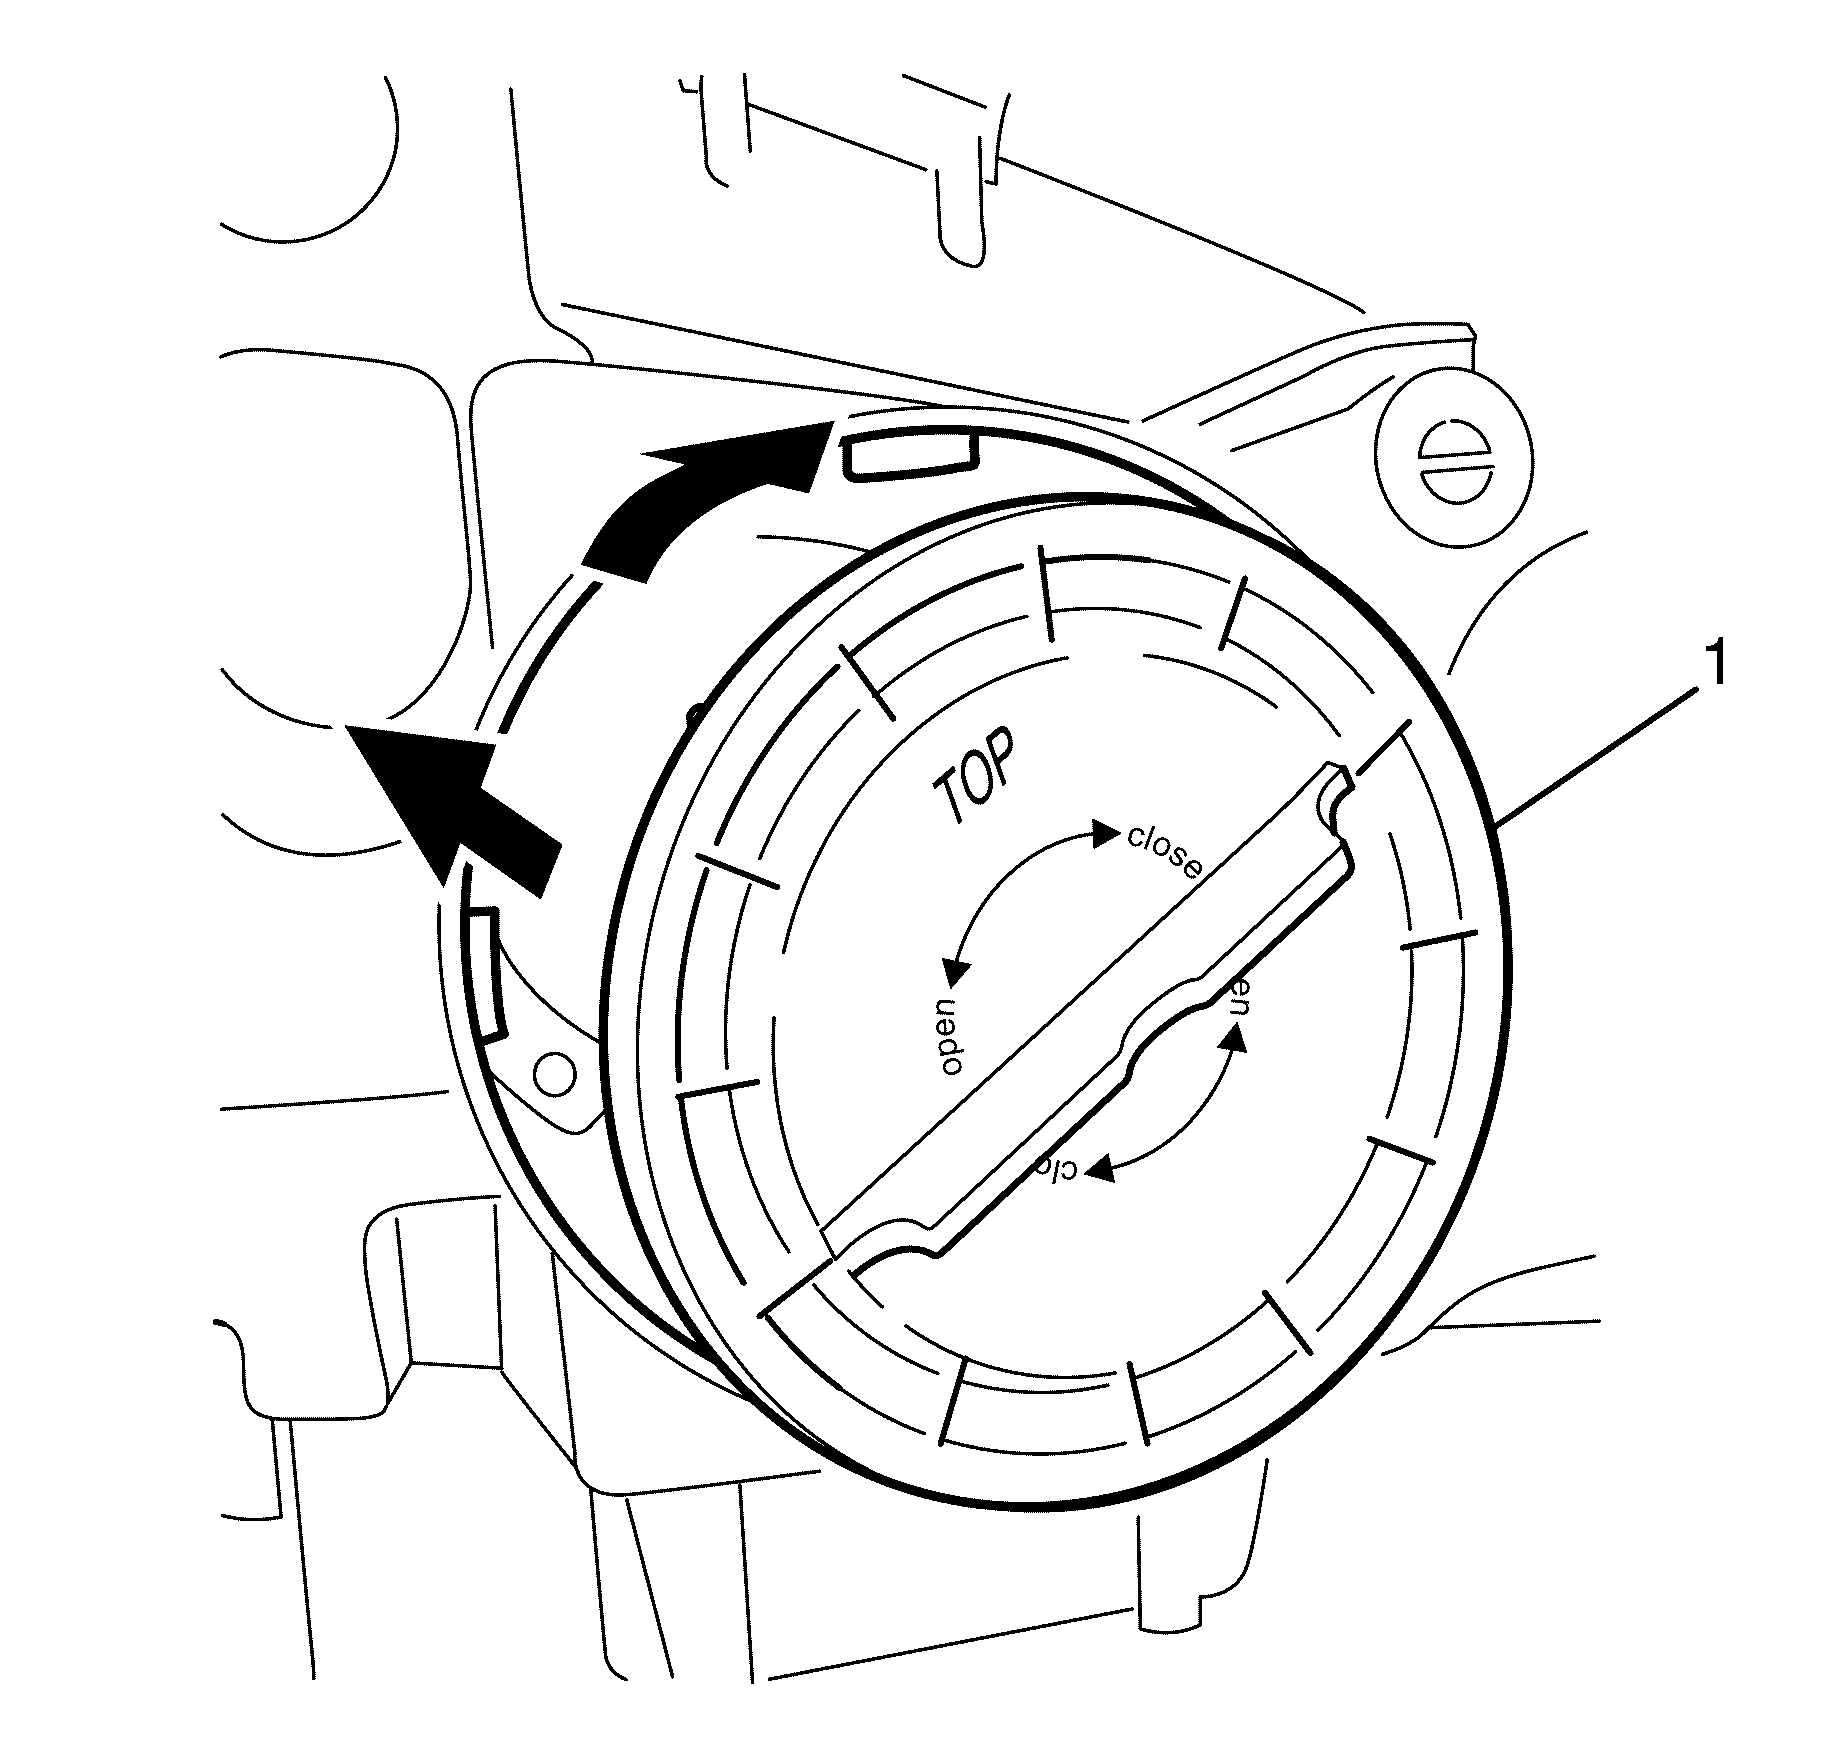
Important: For left-hand headlamp, go to step 5.
Important: For right-hand headlamp, go to step 6.
Removal Procedure - Low Beam (High Intensity Discharge Headlamp Starter/Arc Tube Replacement)
- Disconnect the battery ground cable. Refer to Battery Negative Cable Disconnection and Connection.
- Remove the radiator air baffle and deflector. Refer to Radiator Air Upper Baffle and Deflector Replacement.
- Remove the headlamp assembly. Refer to Headlamp Replacement.
- For access to the left-hand headlight, detach and move the airbox upper cover rearward. Go to step 4.
- For access to the right-hand headlight, remove the coolant reservoir fill neck by pulling up on the neck assembly and position aside. Note the orientation of the aligning tabs and keyway of the coolant reservoir fill neck for installation.
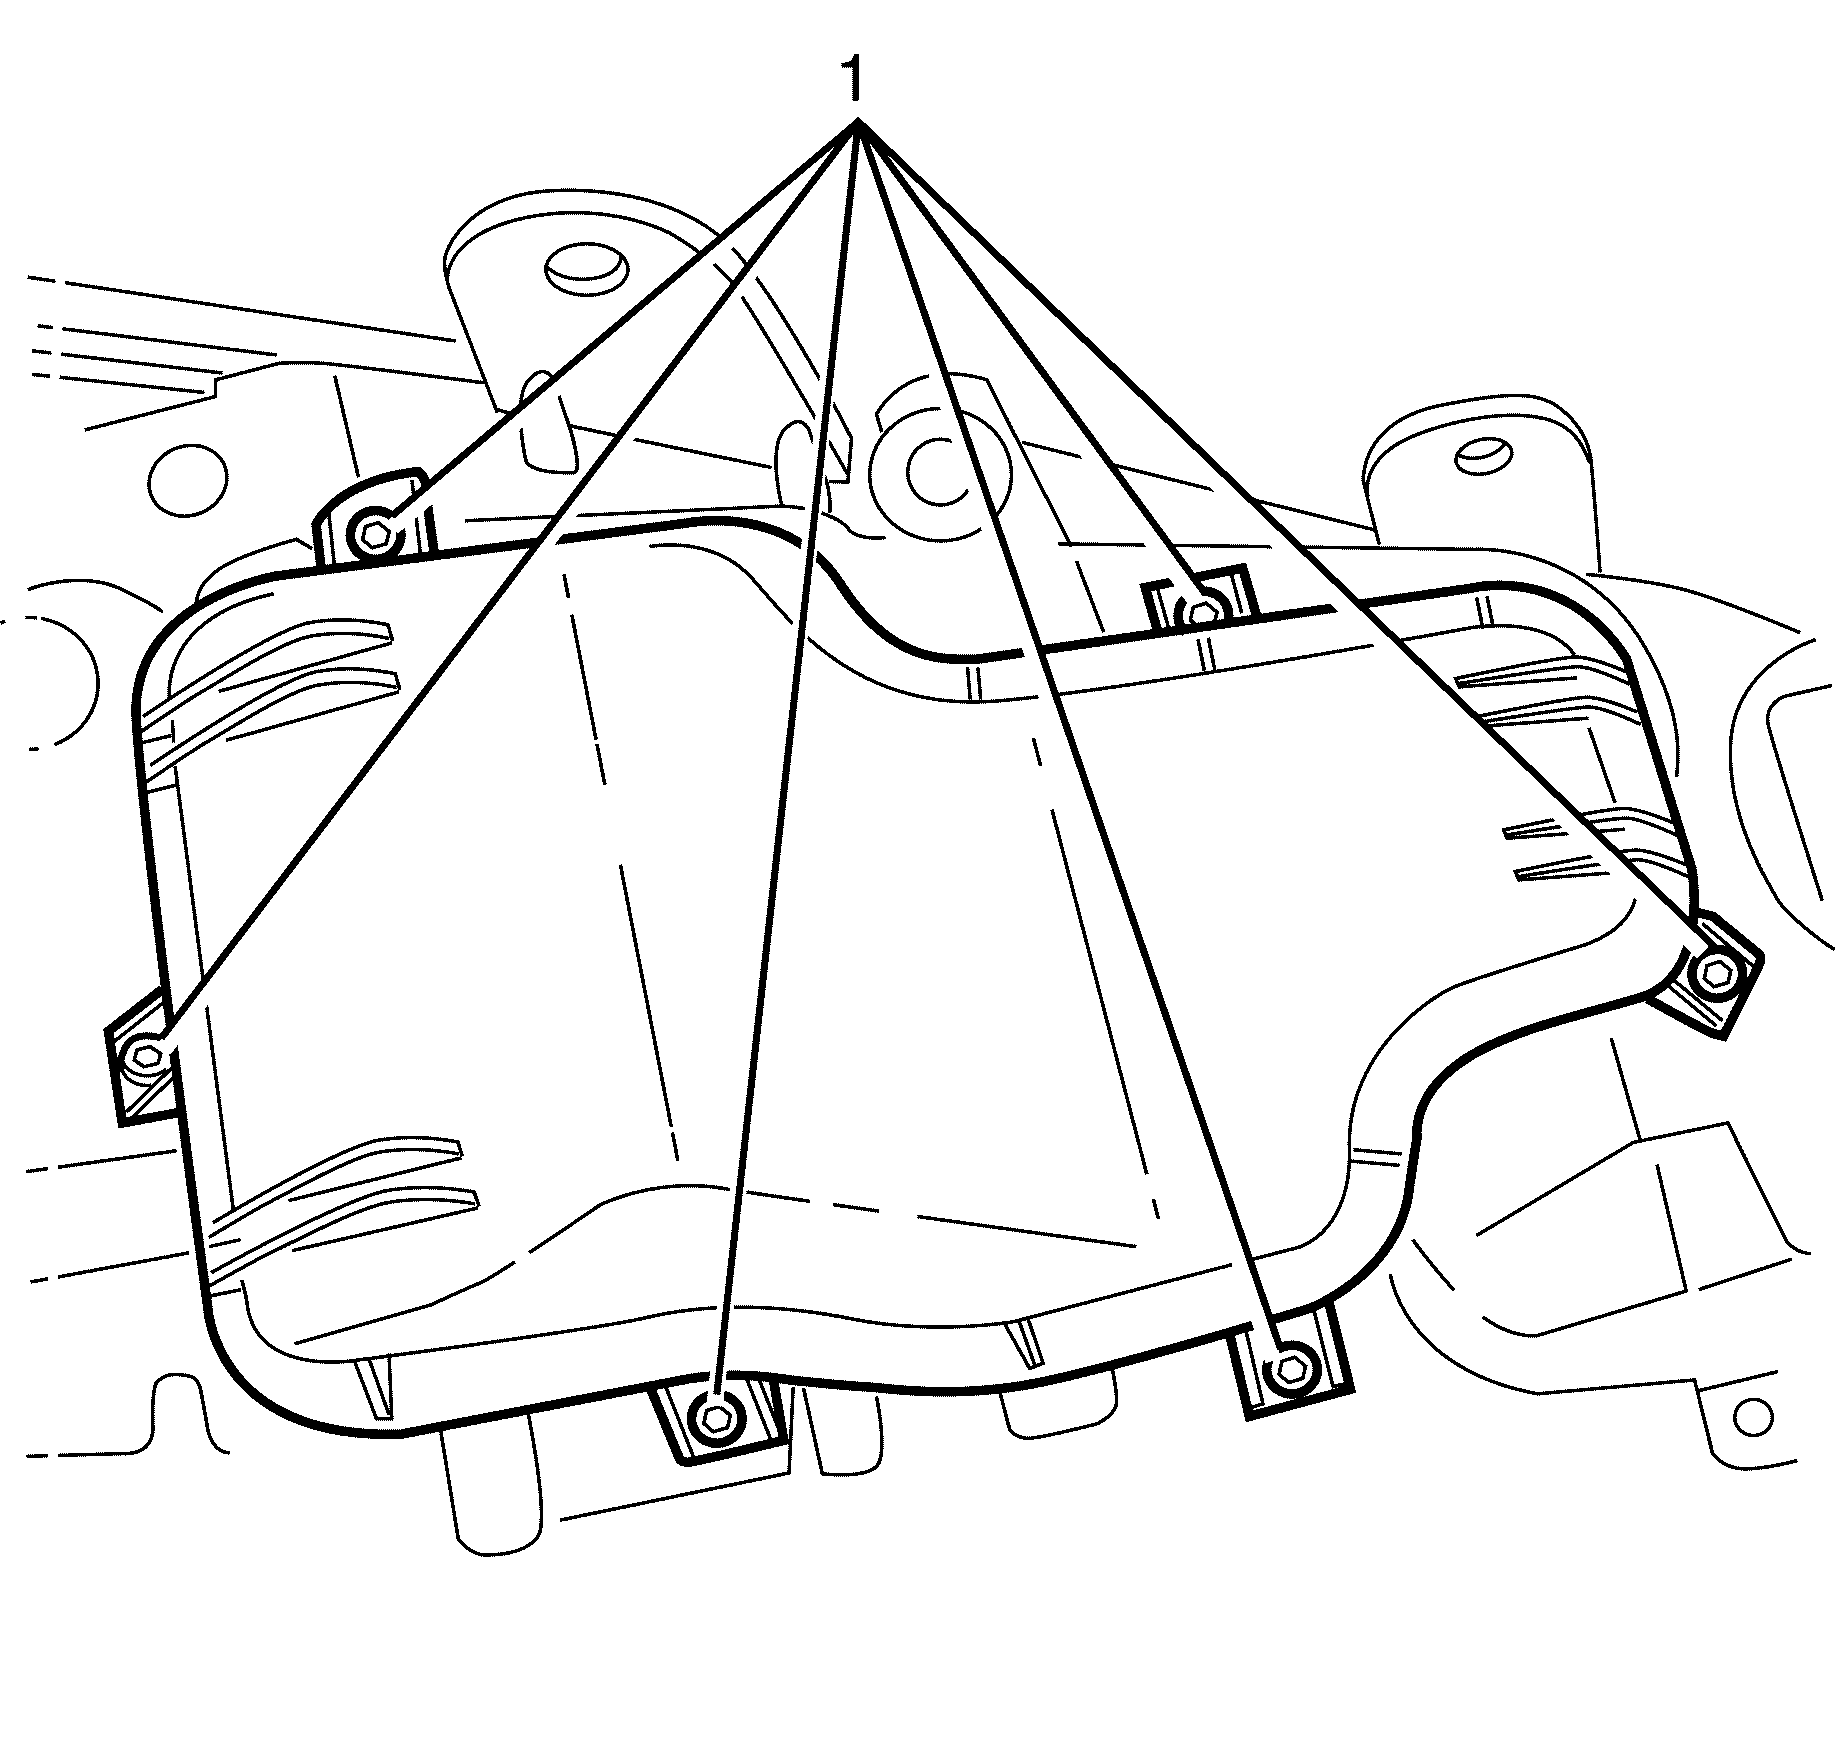
- Remove the low beam headlamp dust cap from the rear of the headlamp assembly by removing the six retaining torx screws (1).
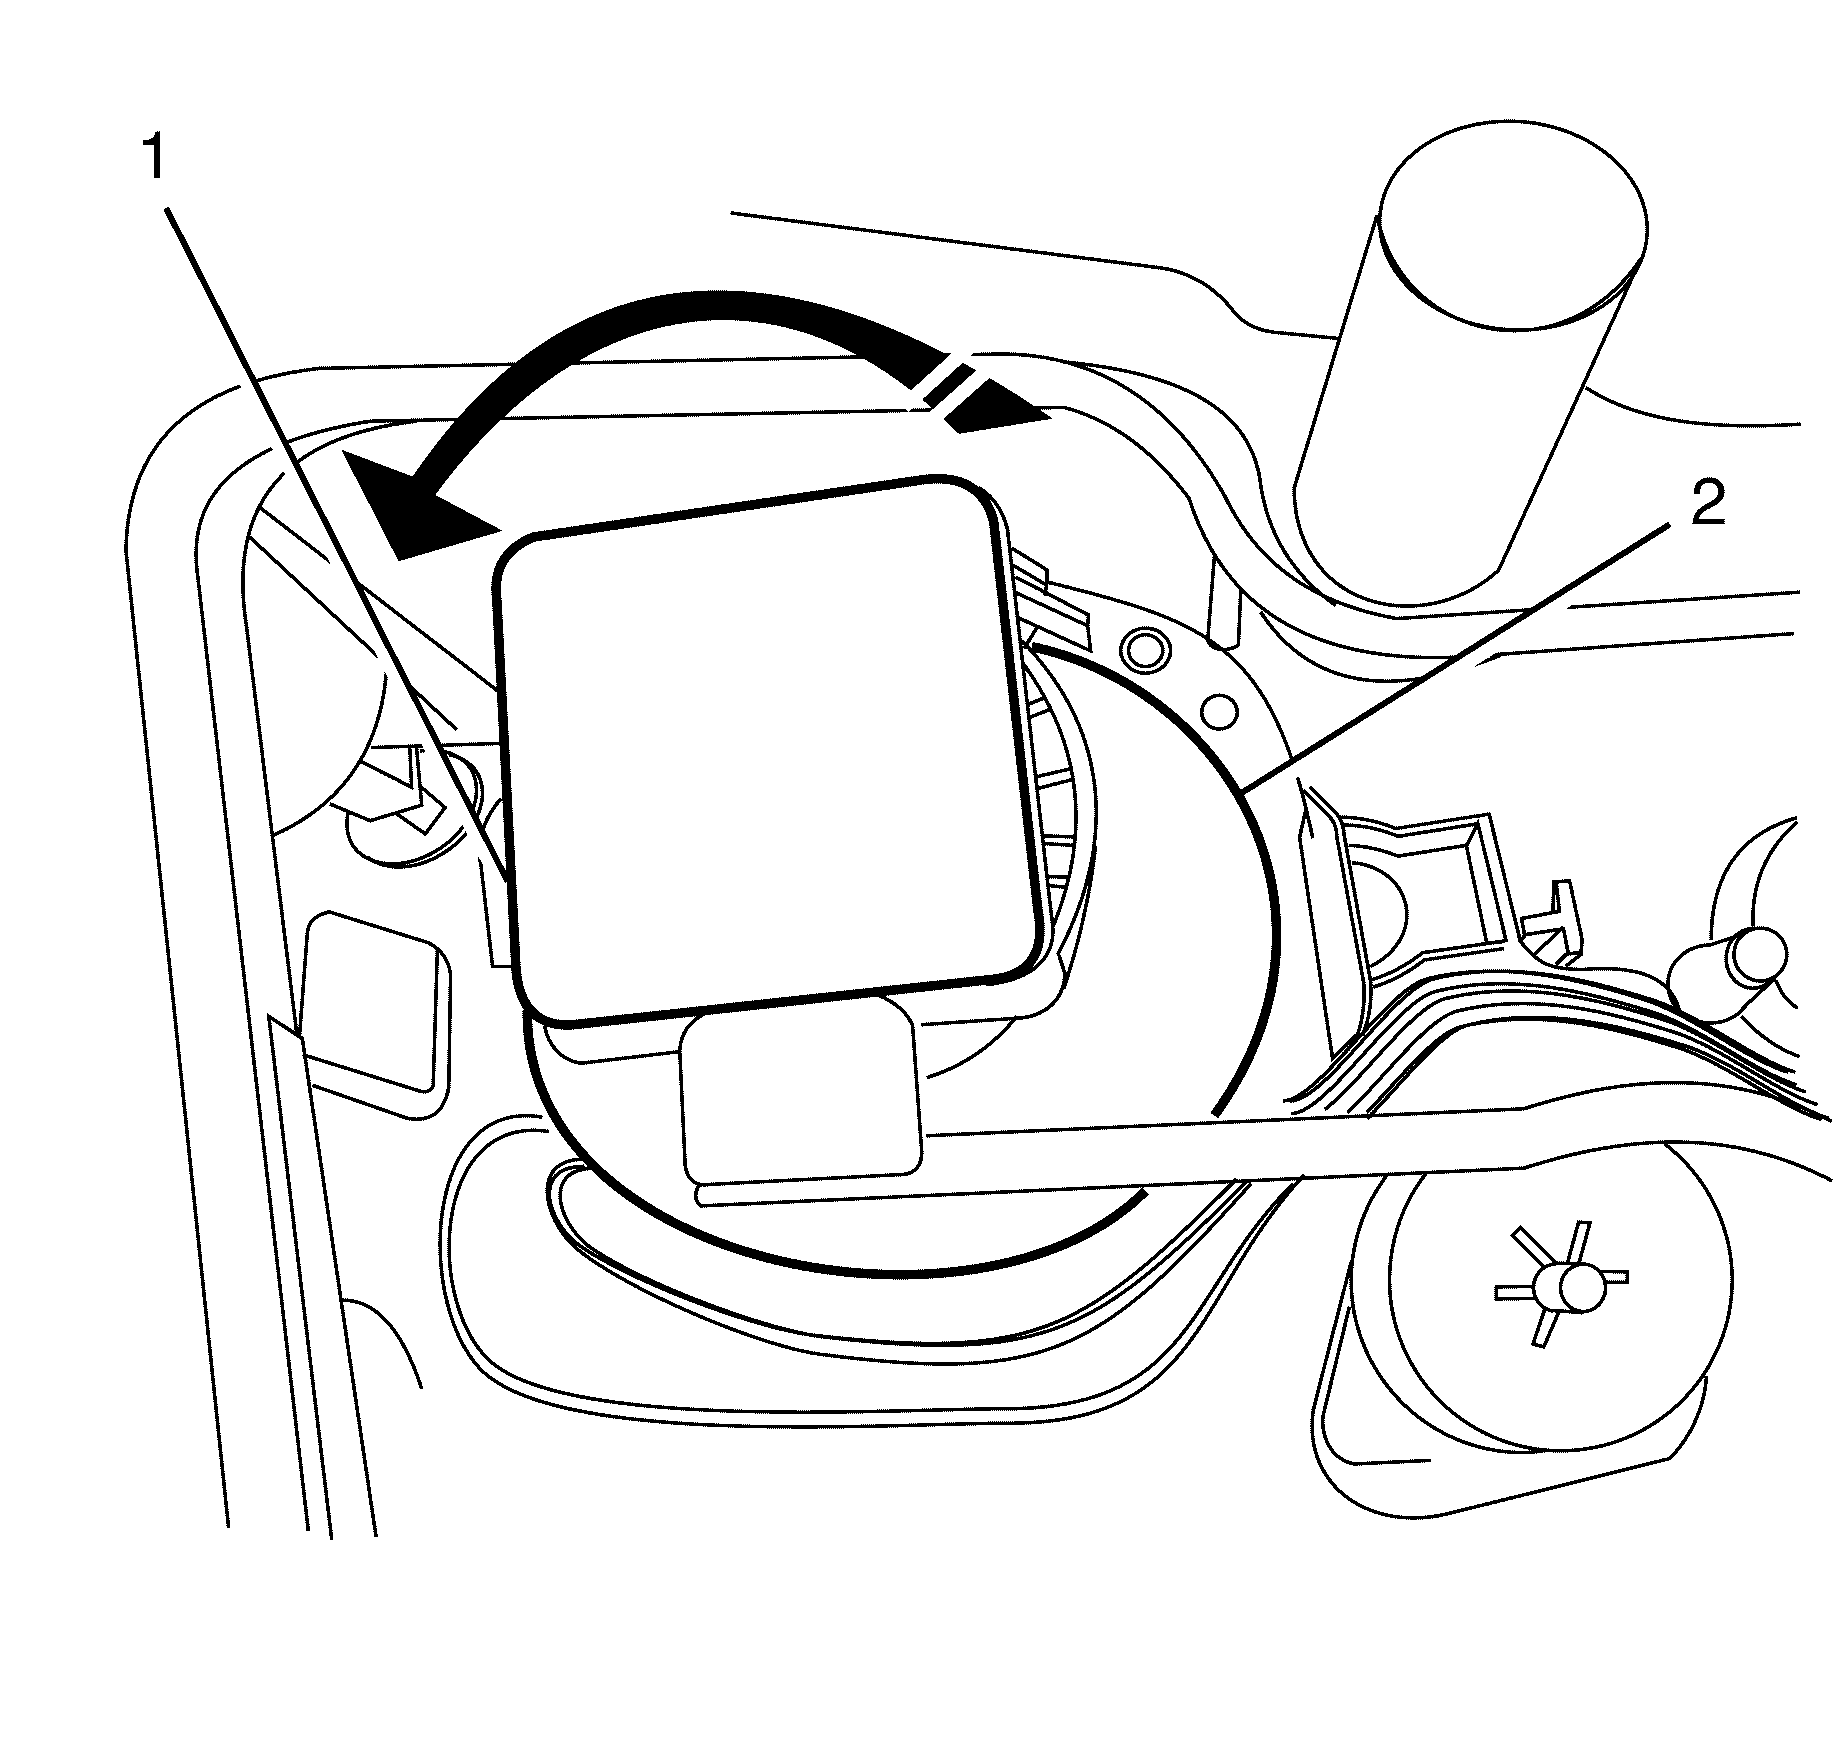
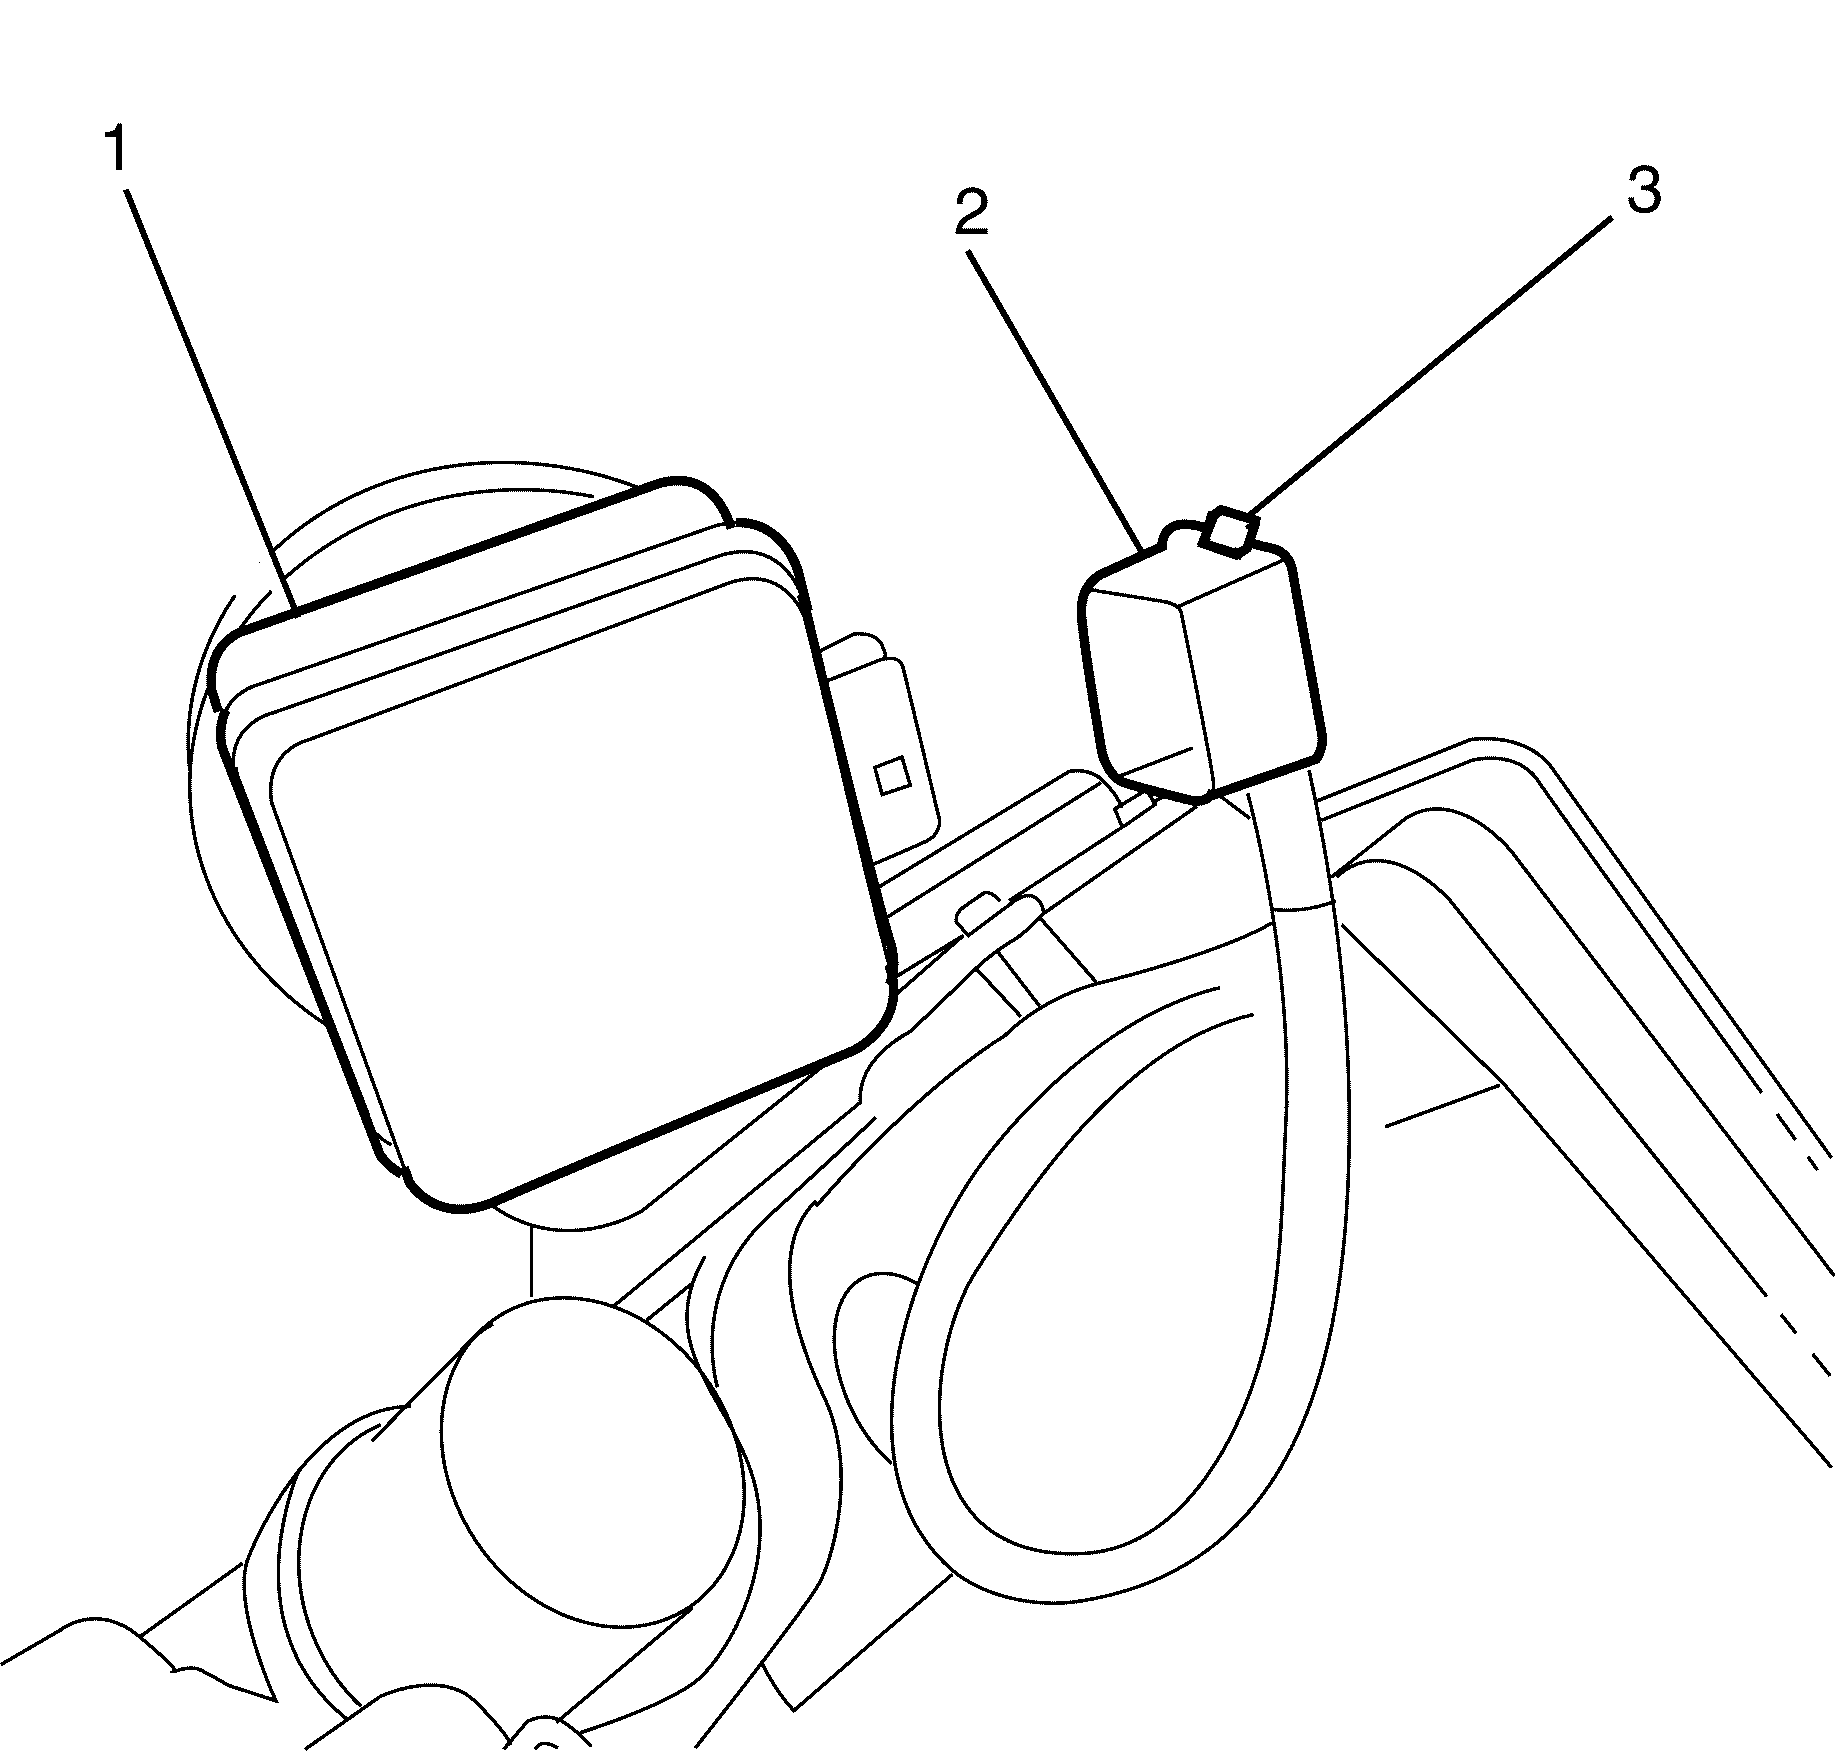
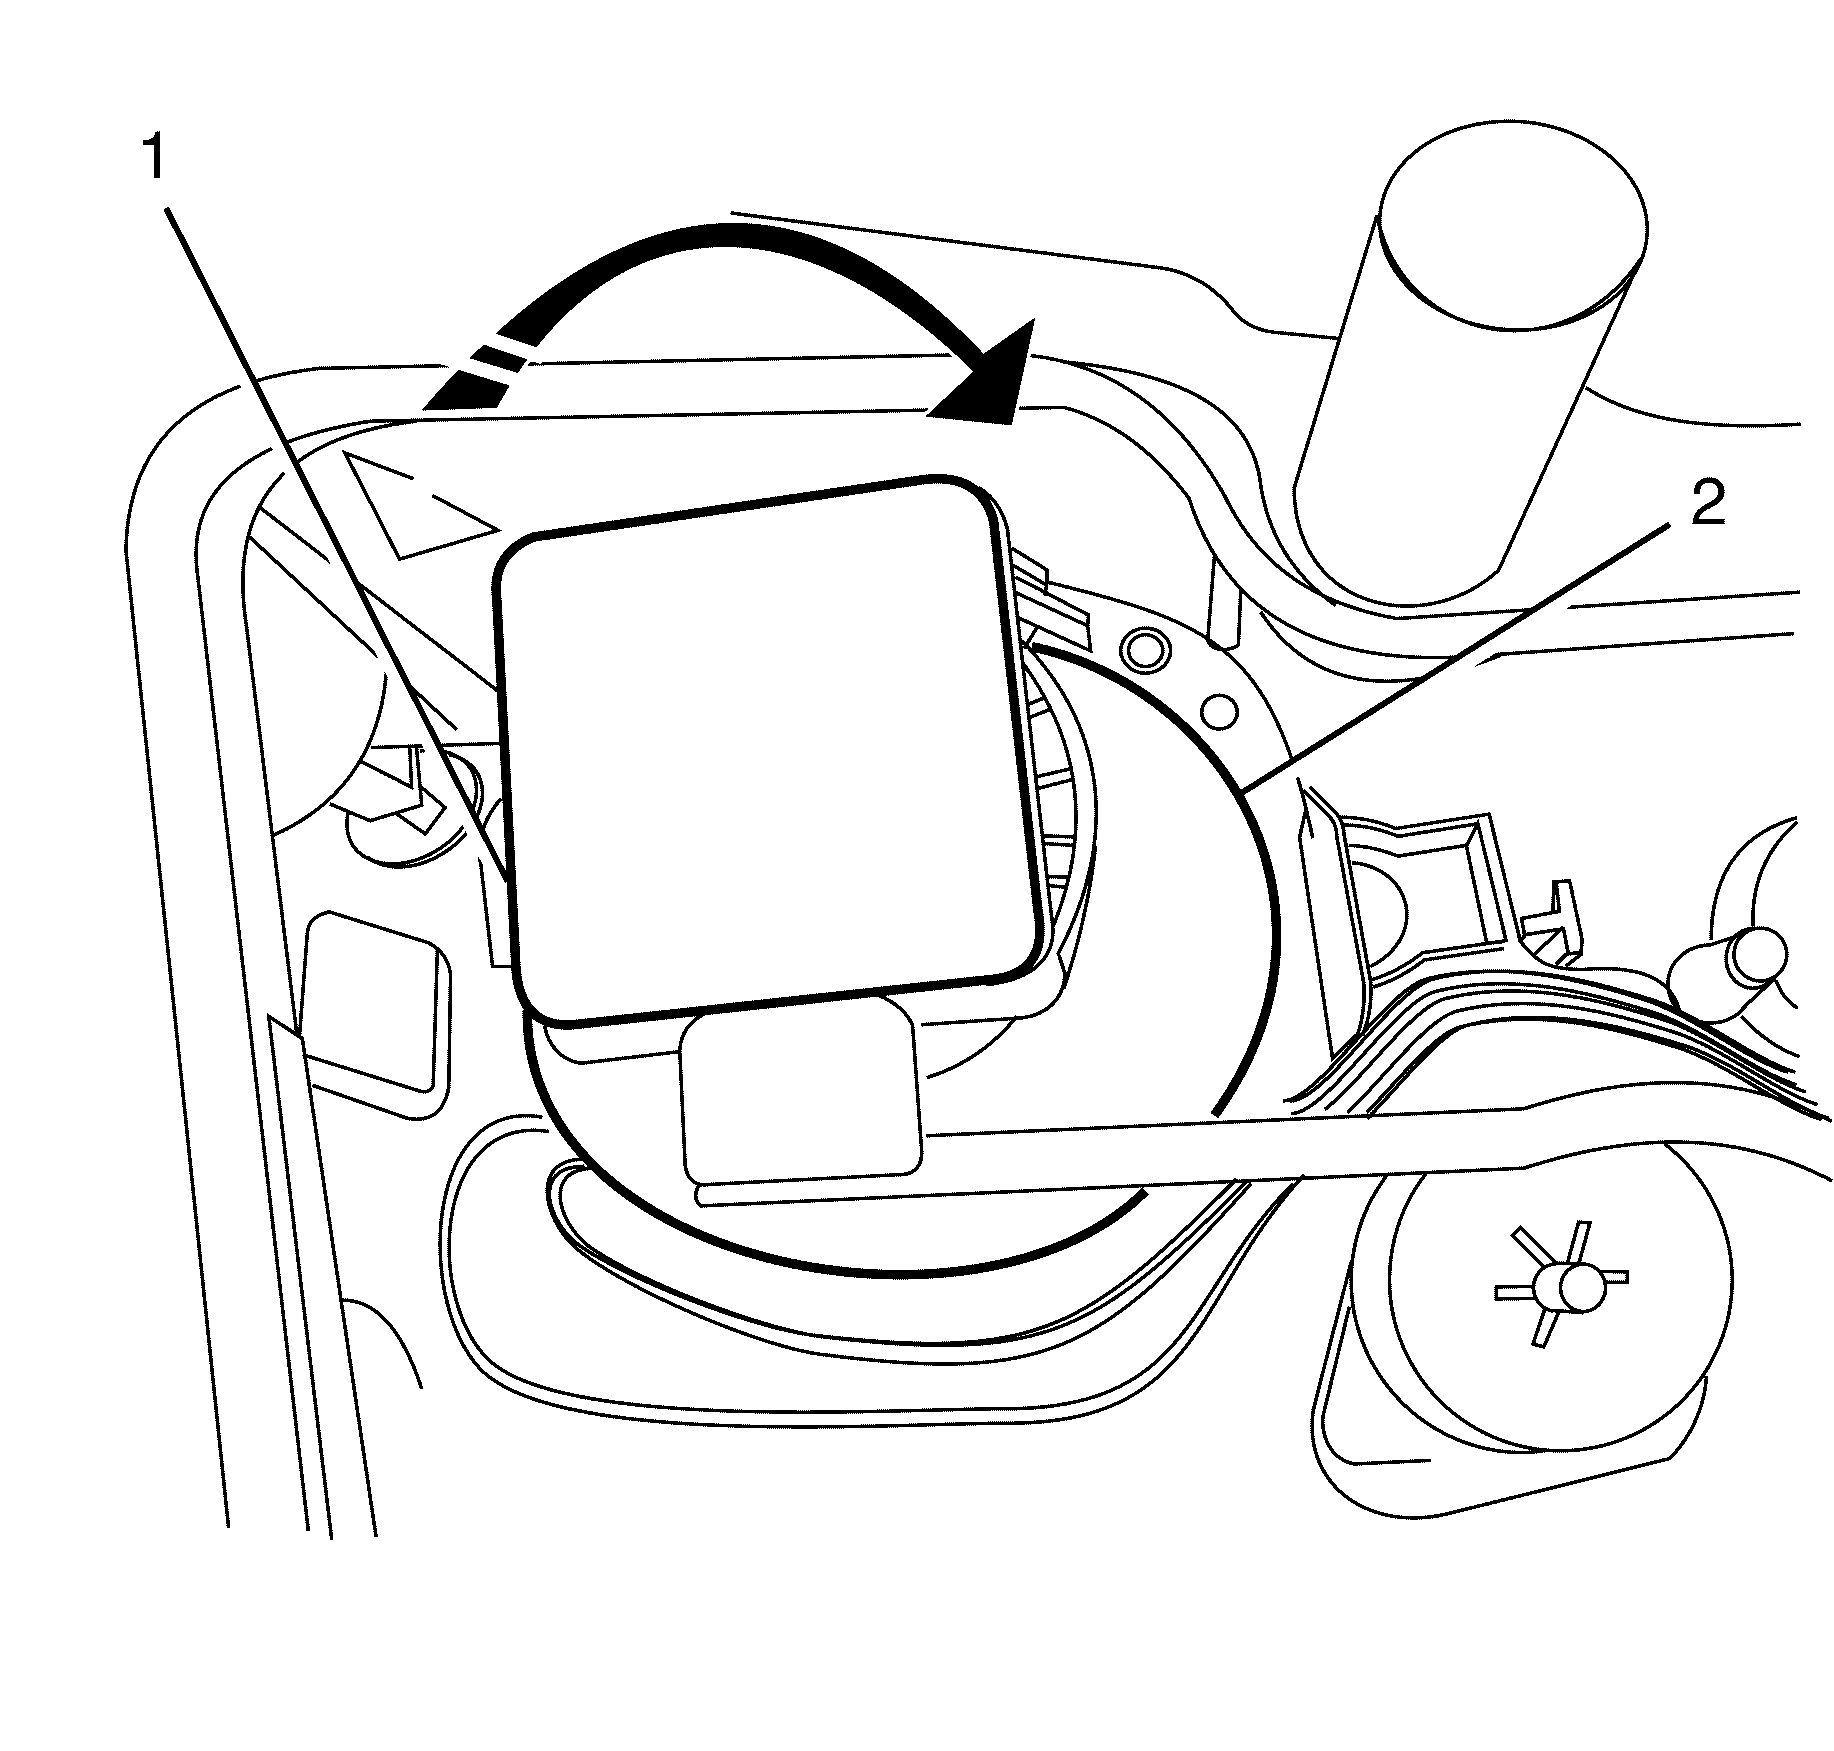
- Remove the high intensity discharge starter (1) from the headlamp assembly (2) by rotating it counter clockwise.
- Disconnect the high intensity discharge starter (1) electrical connector (2), by firmly pressing down on the retaining tang (3).
- Remove the high intensity discharge starter.
Caution: Refer to Battery Disconnect Caution in the Preface section.
Caution: Halogen bulbs contain gas under pressure. Handling a bulb improperly
could cause it to shatter into flying glass fragments. To help avoid personal
injury:
• Turn off the lamp switch and allow the bulb to cool before changing
the bulb. • Leave the lamp switch OFF until the bulb change is complete. • Always wear eye protection when changing a halogen bulb. • Handle the bulb only by its base. Avoid touching the glass. • Keep dirt and moisture off the bulb. • Properly dispose of the used bulb. • Keep halogen bulbs out of the reach of children.


Installation Procedure - Low Beam (Type D)
- Connect the high intensity discharge starter (1) electrical connector (2), listen for an audible click from the retaining tang (3) to confirm fitting.
- Install the high intensity discharge starter (1) and rotate it clockwise to secure it tot he headlamp assembly (2).
- Install the headlamp dust cap from to the rear of the headlamp assembly.
- Install the six retaining torx screws.
- Install the headlamp assembly. Refer to Headlamp Replacement.
- Connect the battery ground cable. Refer to Battery Negative Cable Disconnection and Connection.
- Test headlamp for the correct operation.
- For the left-hand headlamp assembly, replace and secure the airbox upper cover. Go to step 7.
- For the right-hand headlamp assembly, reinstall the coolant reservoir fill neck by aligning the tabs and keyway and pushing the neck into position.
- Install the radiator air baffle and deflector. Refer to Radiator Air Upper Baffle and Deflector Replacement.


Notice: Refer to Fastener Notice in the Preface section.
Tighten
Tighten the torx screws to 1.0 N·m
(9.0 lb in).
Removal Procedure - High Beam (Type C)
- Remove the radiator air baffle and deflector. Refer to Radiator Air Upper Baffle and Deflector Replacement.
- Remove the Headlamp assembly. Refer to Headlamp Replacement.
- For access to the left-hand headlight, detach and move the airbox upper cover rearward. Go to step 4.
- For access to the right-hand headlight, remove the coolant reservoir fill neck by pulling up on the neck assembly and position aside. Note the orientation of the aligning tabs and keyway of the coolant reservoir fill neck for installation.
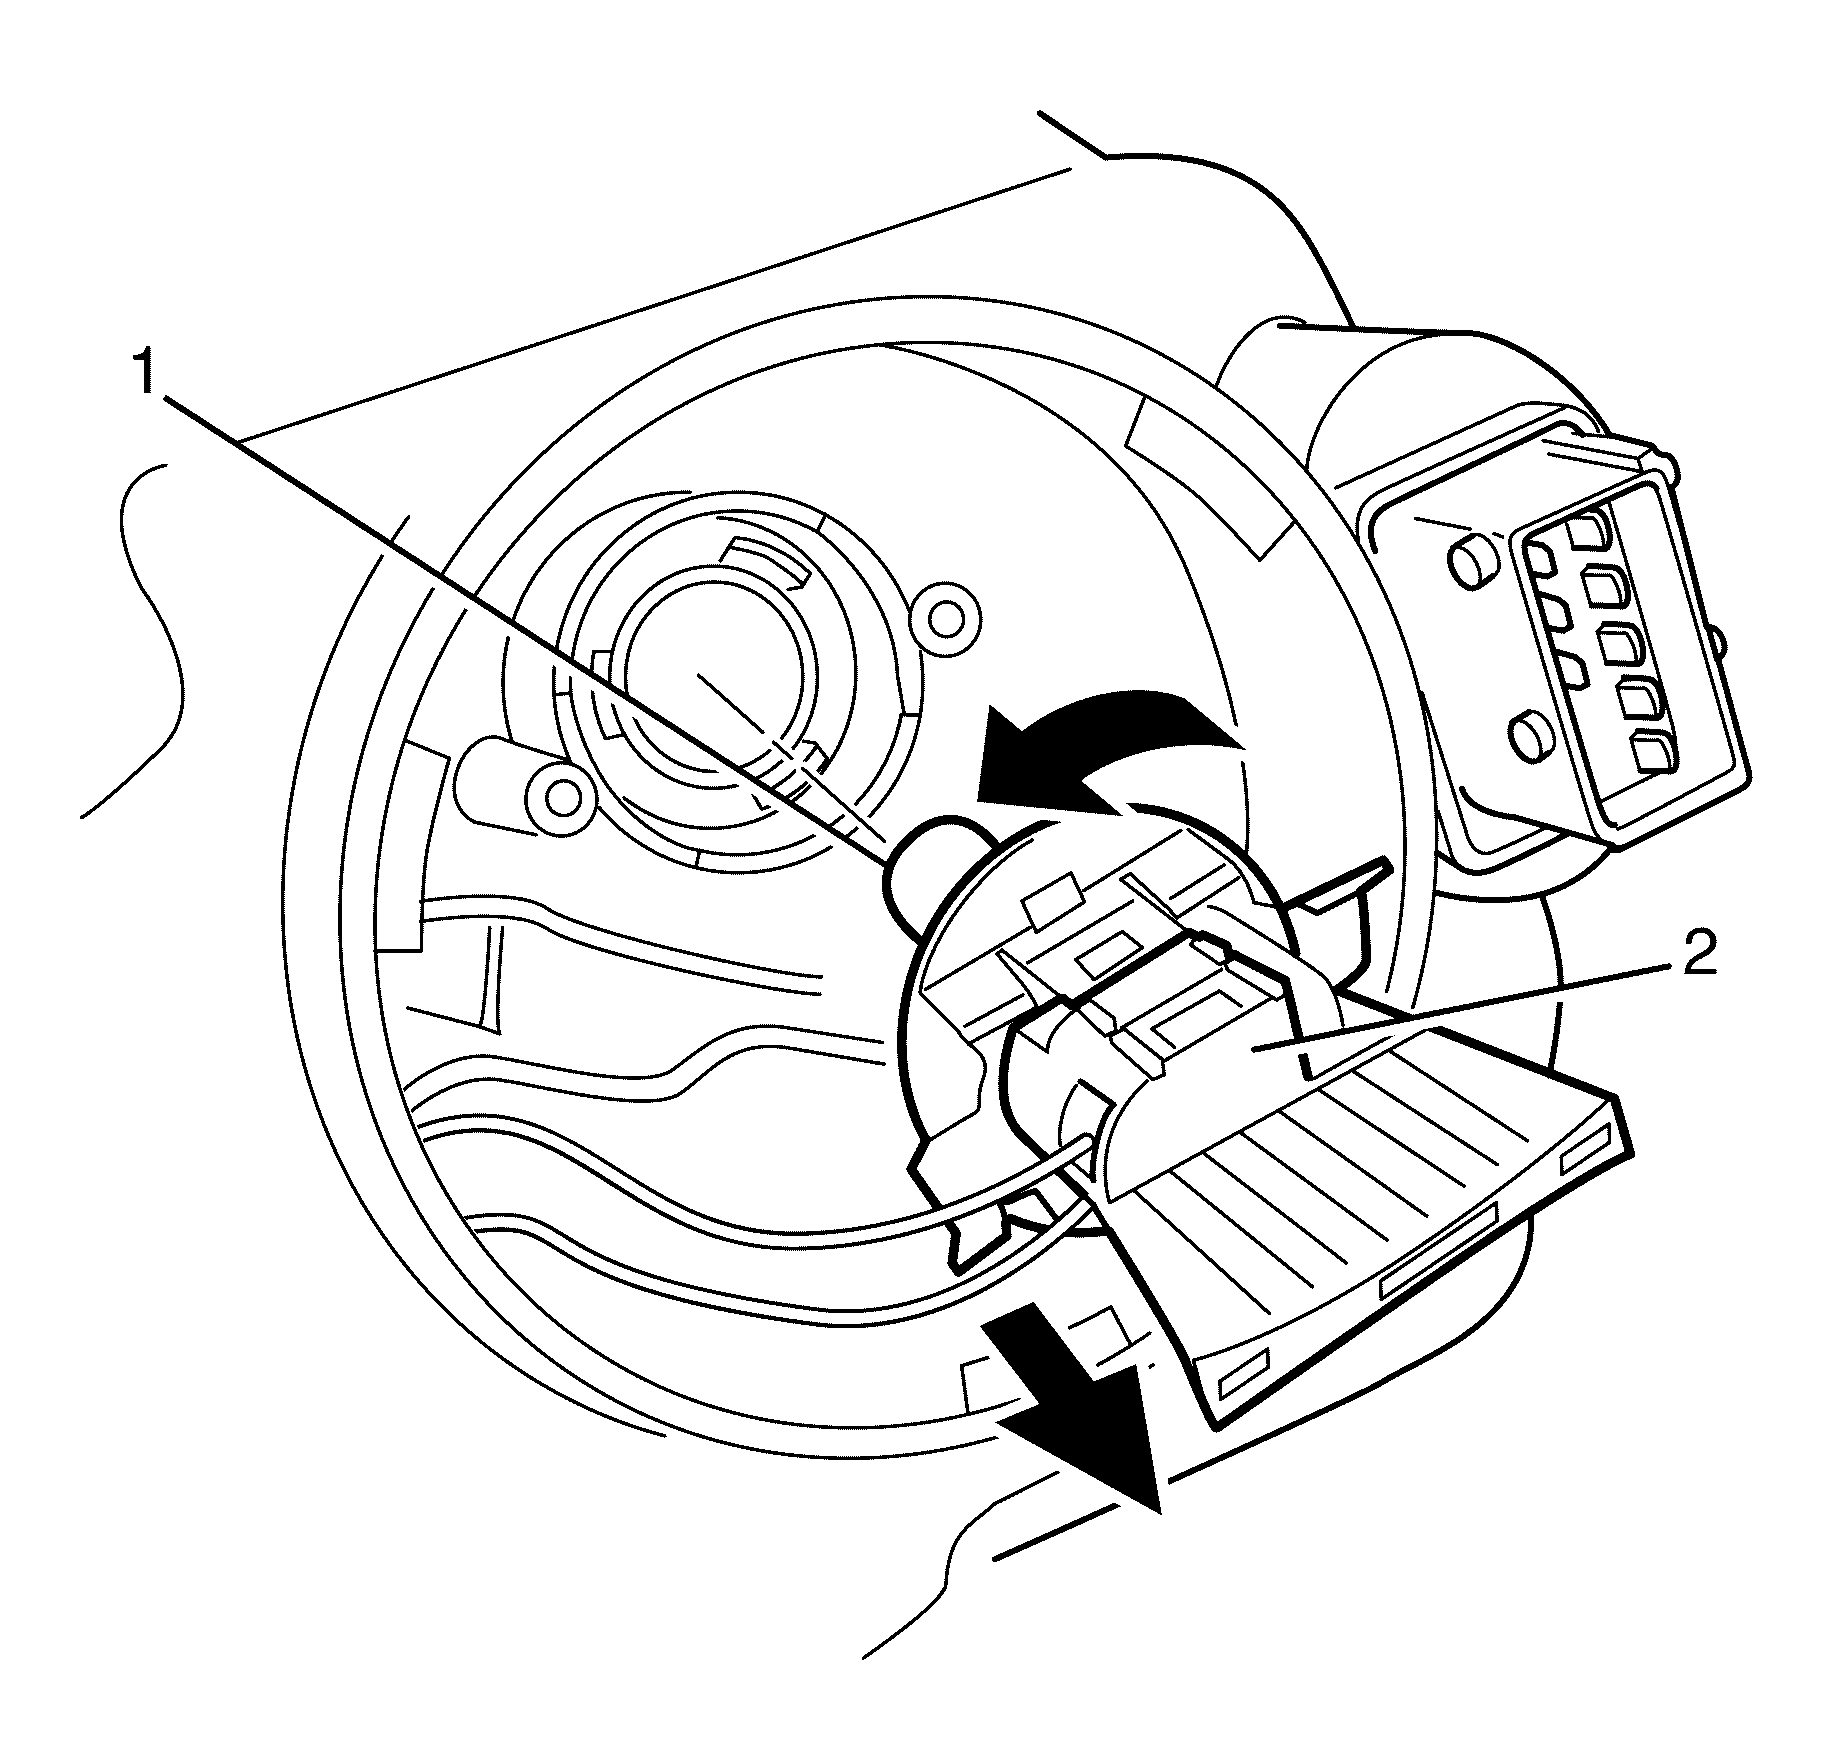
- Remove the high beam headlamp dust cap (1) from the rear of the headlamp assembly by rotating the dust cap counterclockwise. Note the orientation of the dust cap and tabs for installation.
- Rotate the high beam headlight bulb socket assembly (2) counterclockwise and remove the socket from the headlamp assembly.
- Remove the high beam bulb (1) from the socket.
Caution: Halogen bulbs contain gas under pressure. Handling a bulb improperly
could cause it to shatter into flying glass fragments. To help avoid personal
injury:
• Turn off the lamp switch and allow the bulb to cool before changing
the bulb. • Leave the lamp switch OFF until the bulb change is complete. • Always wear eye protection when changing a halogen bulb. • Handle the bulb only by its base. Avoid touching the glass. • Keep dirt and moisture off the bulb. • Properly dispose of the used bulb. • Keep halogen bulbs out of the reach of children.
Important: For left-hand headlamp access, go to step 2.
Important: For right-hand headlamp access, go to step 3.


Installation Procedure - High Beam (Type C)
- Install the new high beam bulb into the high beam socket assembly.
- Install the high beam socket (2) into the headlamp assembly and lock the bulb in place by rotating it clockwise.
- Install the headlamp dust cap (1) to the rear of the headlamp assembly by rotating clockwise.
- For the left-hand headlamp assembly, replace and secure the airbox upper cover. Go to step 7.
- For the right-hand headlamp assembly, reinstall the coolant reservoir fill neck by aligning the tabs and keyway and pushing the neck into position.
- Inspect the headlamp aim. Refer to Headlamp Aiming.
- Install the radiator air baffle and deflector. Refer to Radiator Air Upper Baffle and Deflector Replacement.
- Check all vehicle lights for correct operation.
Important: Do not handle the quartz envelope of the headlight bulb. Wipe the quartz envelope immediately with methylated spirits if it is touched accidentally or the performance of the bulb will deteriorate.
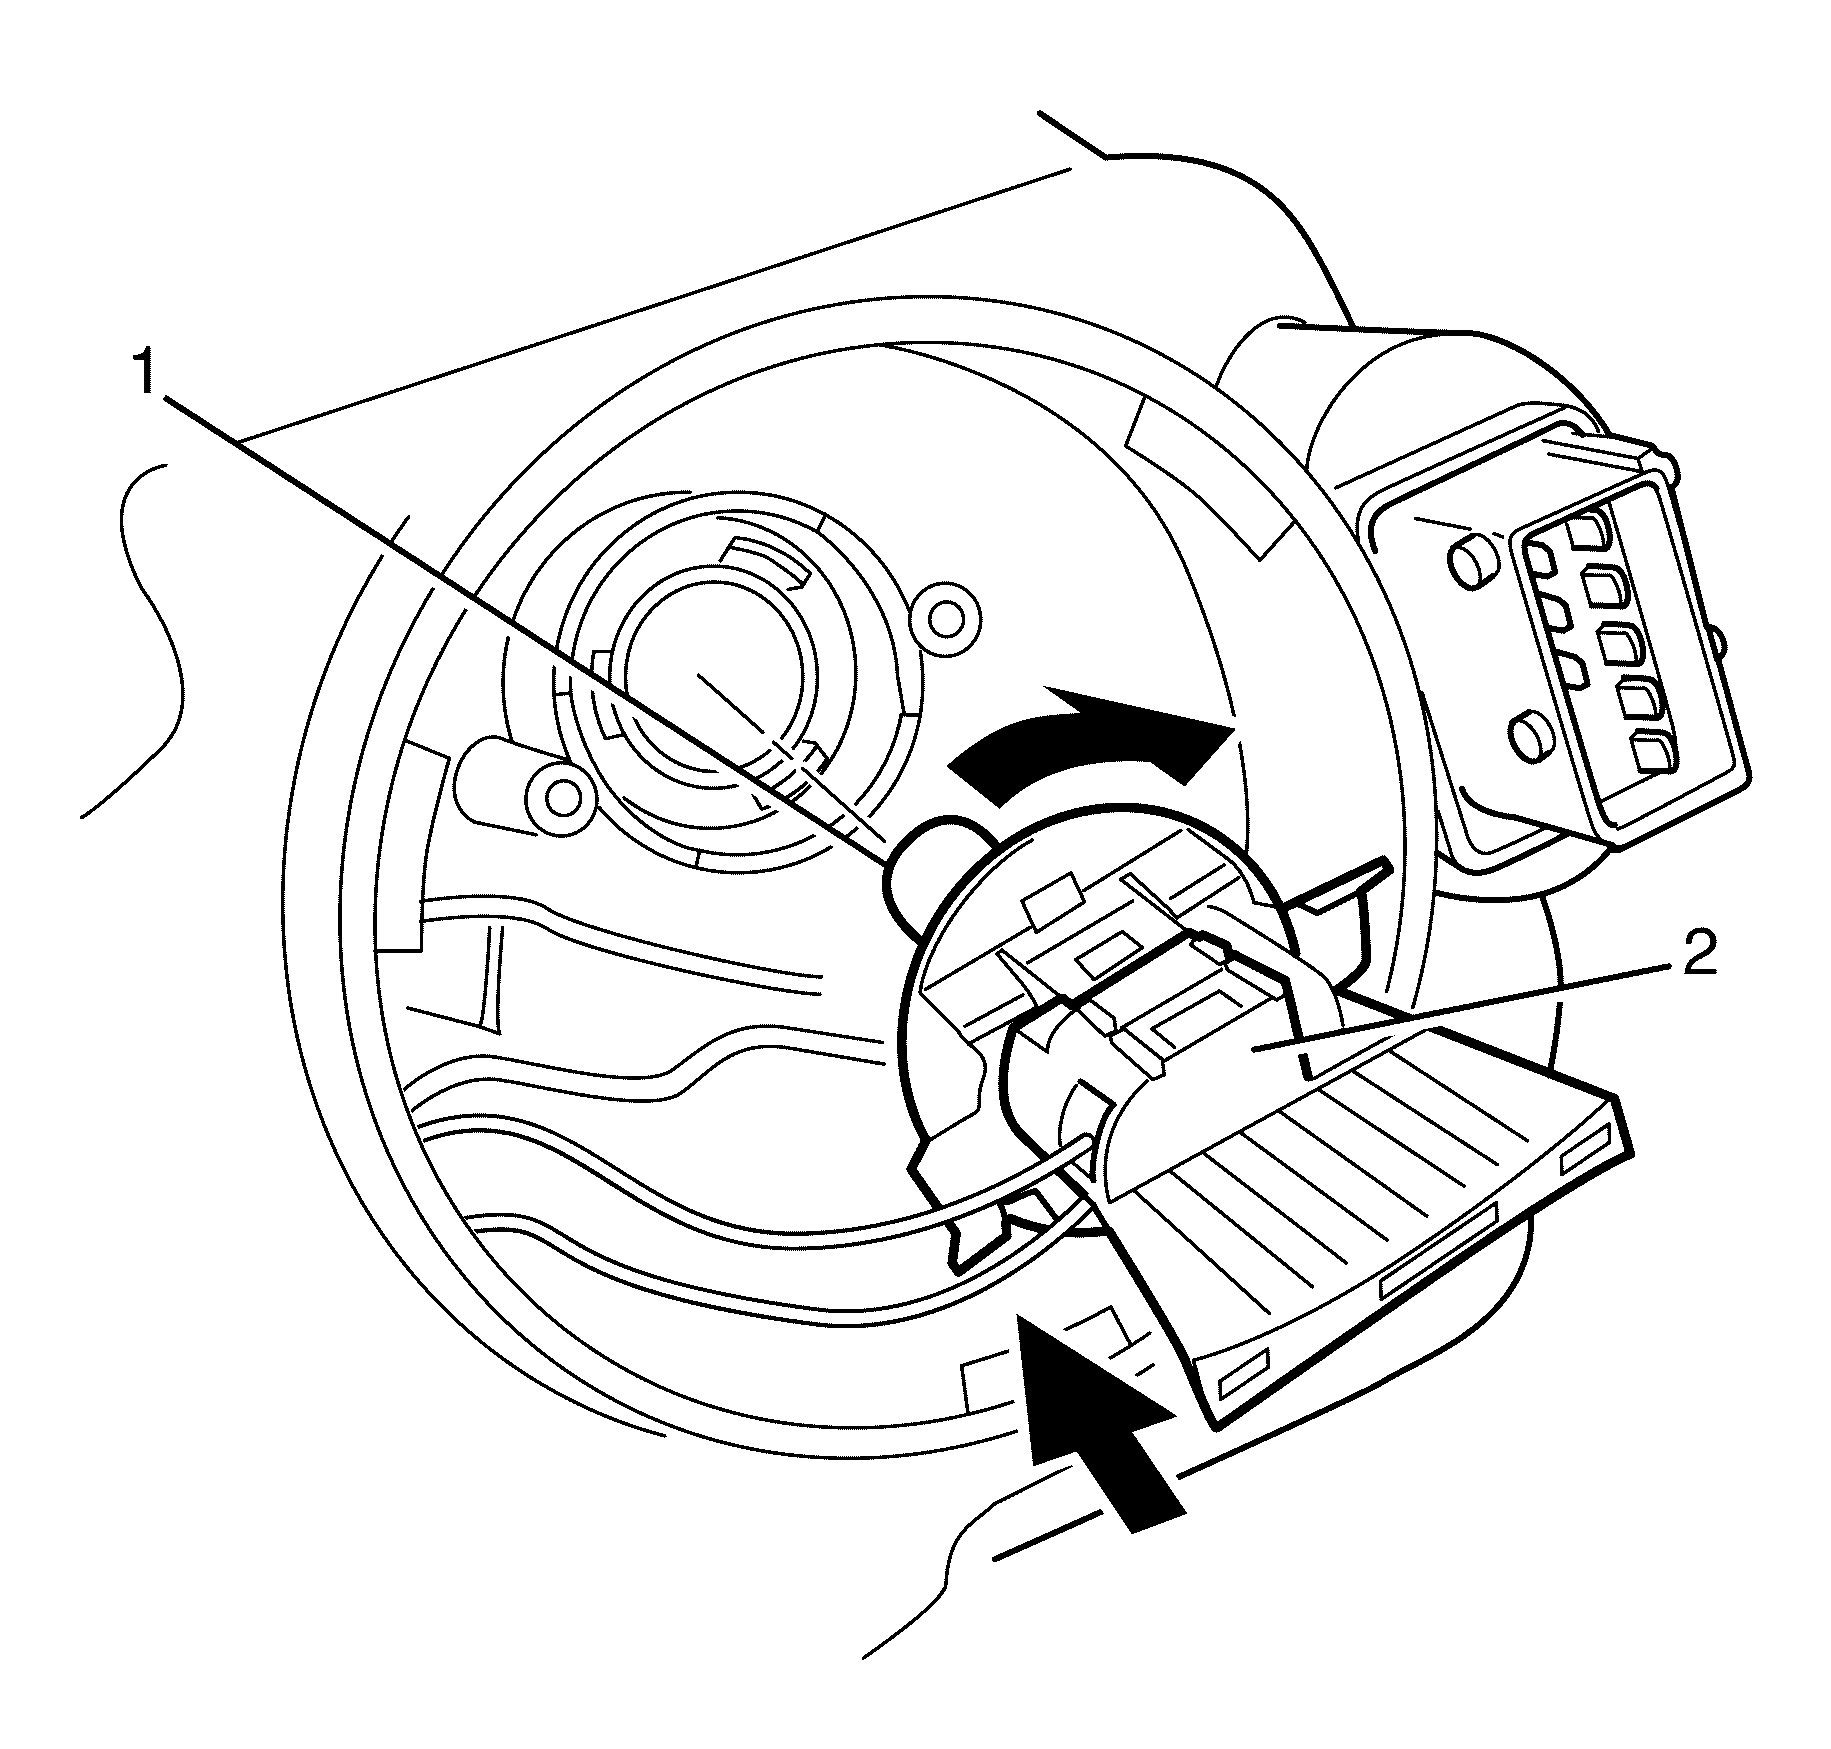
Important: The different-sized tabs on the bulb socket base and mating cut-outs in the headlamp assembly allow the bulb socket to seat correctly in one orientation position.

Important: For left-hand headlamp, go to step 5.
Important: For right-hand headlamp, go to step 6.
Removal Procedure - High Beam (Type D)
- Disconnect the battery ground cable. Refer to Battery Negative Cable Disconnection and Connection.
- Remove the radiator air baffle and deflector. Refer to Radiator Air Upper Baffle and Deflector Replacement.
- Remove the Headlamp assembly. Refer to Headlamp Replacement.
- For access to the left-hand headlight, detach and move the airbox upper cover rearward. Go to step 4.
- For access to the right-hand headlight, remove the coolant reservoir fill neck by pulling up on the neck assembly and position aside. Note the orientation of the aligning tabs and keyway of the coolant reservoir fill neck for installation.
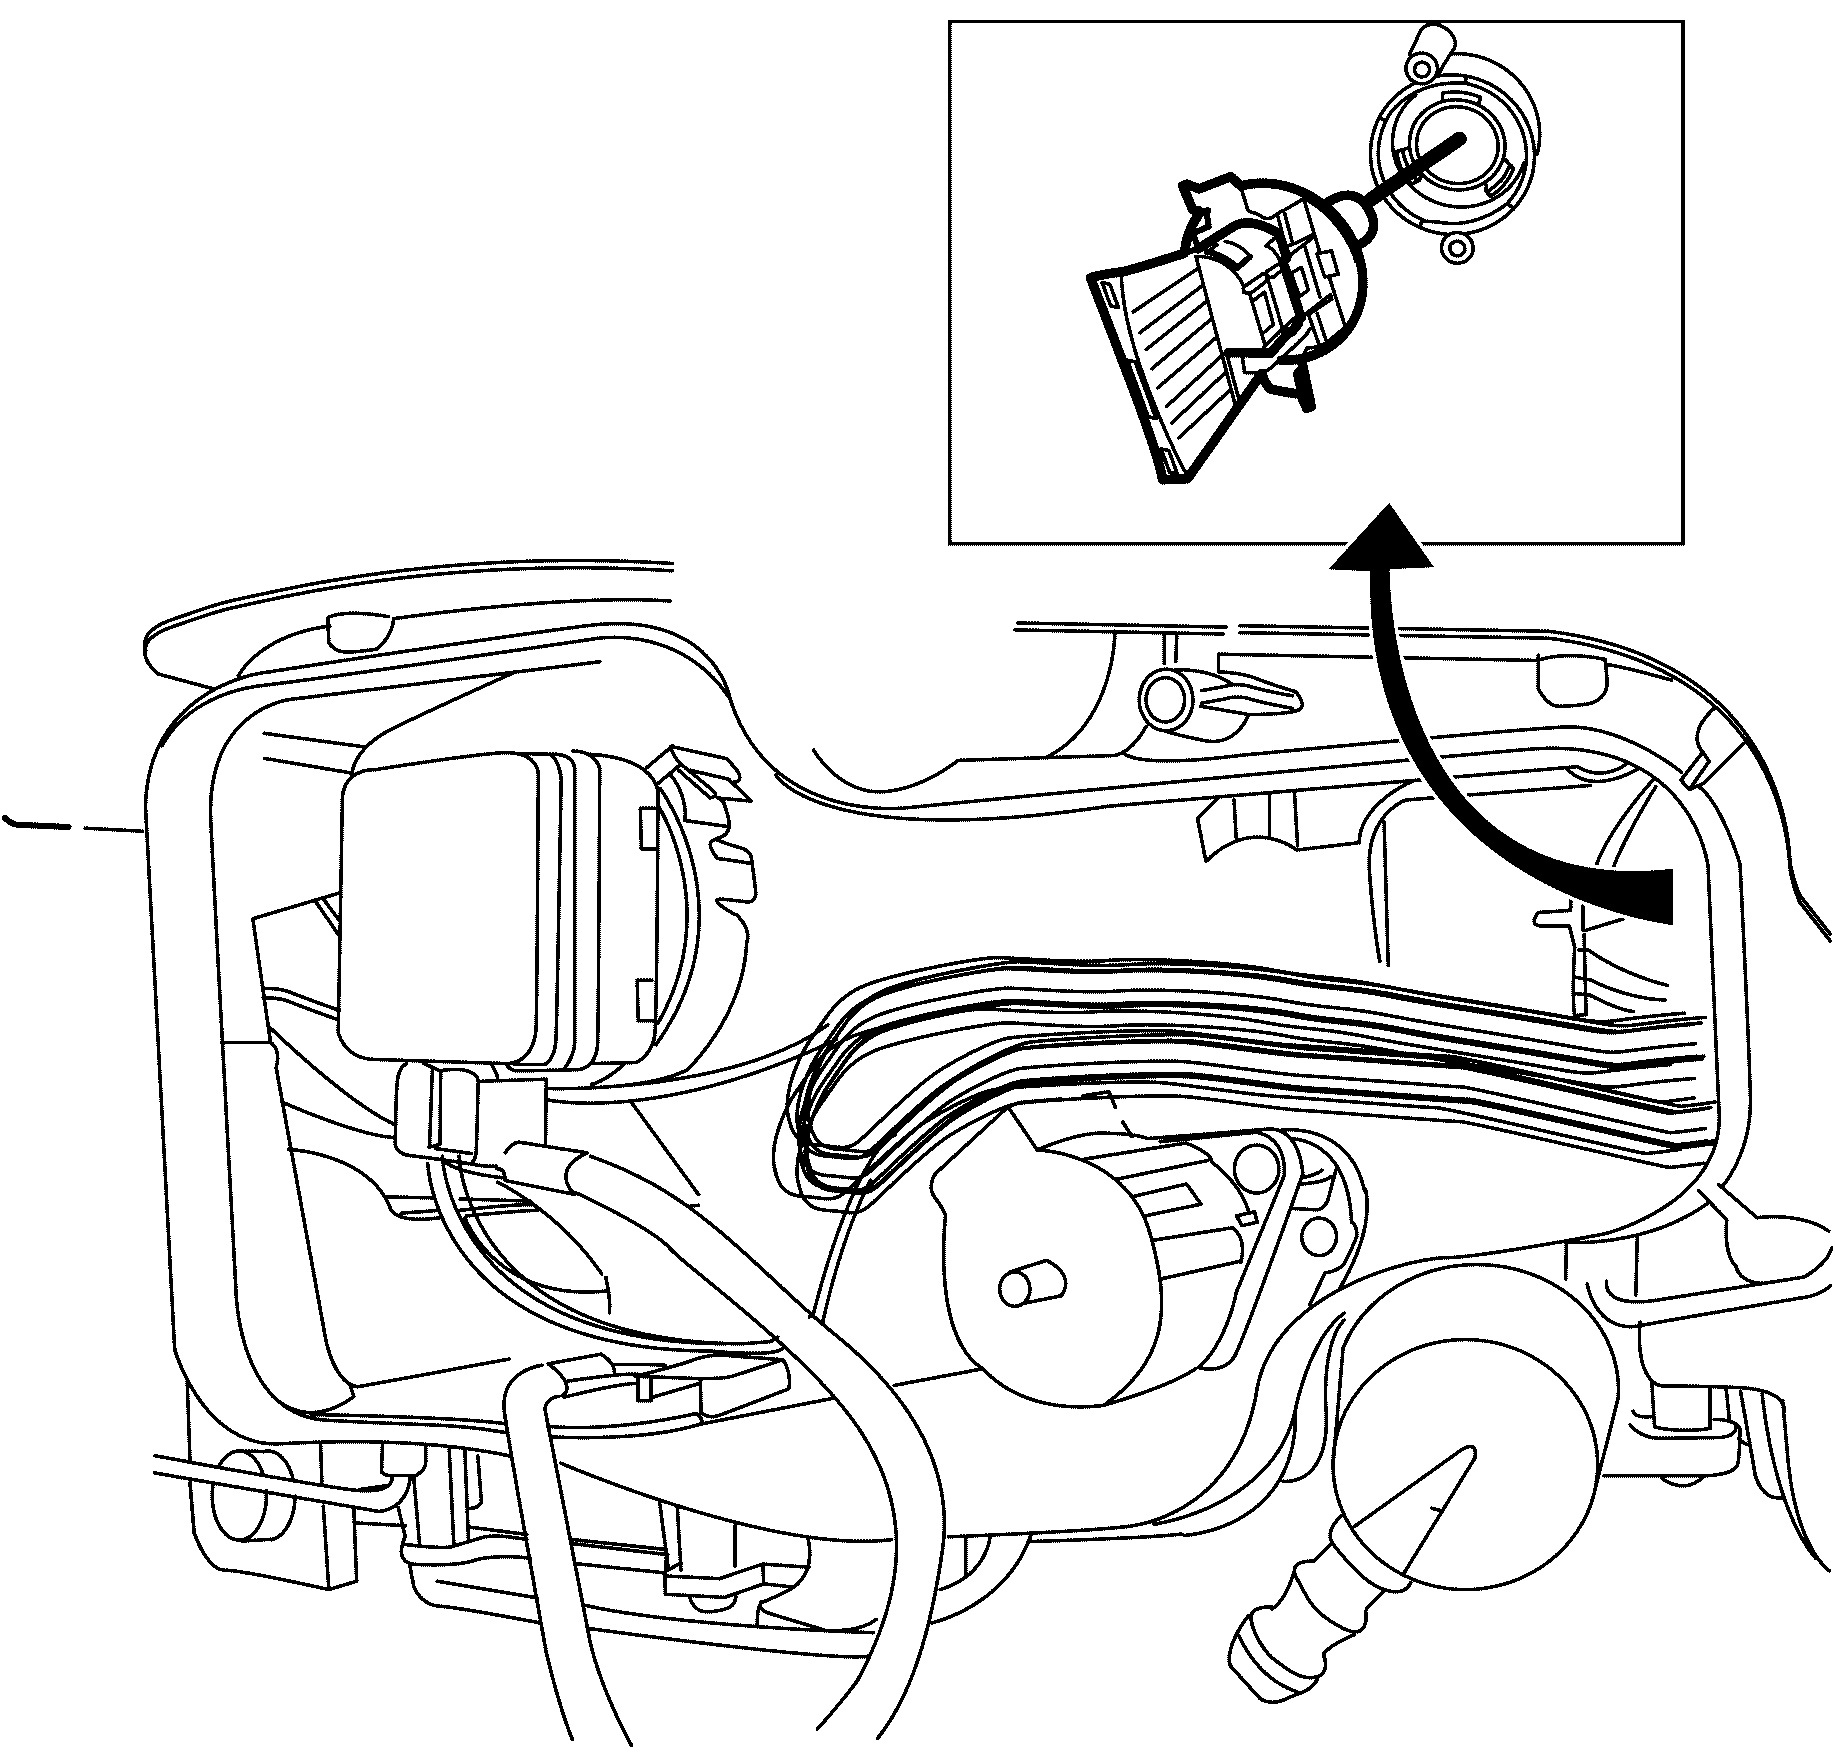
- Remove the high beam headlamp dust cap from the rear of the headlamp assembly by removing the six retaining torx screws (1).
- Rotate the high beam headlight bulb socket assembly (2) counter clockwise and remove the socket from the headlamp assembly.
- Remove the high beam bulb from the socket.
Caution: Refer to Battery Disconnect Caution in the Preface section.
Caution: Halogen bulbs contain gas under pressure. Handling a bulb improperly
could cause it to shatter into flying glass fragments. To help avoid personal
injury:
• Turn off the lamp switch and allow the bulb to cool before changing
the bulb. • Leave the lamp switch OFF until the bulb change is complete. • Always wear eye protection when changing a halogen bulb. • Handle the bulb only by its base. Avoid touching the glass. • Keep dirt and moisture off the bulb. • Properly dispose of the used bulb. • Keep halogen bulbs out of the reach of children.
Important: For left-hand headlamp access, go to step 2.
Important: For right-hand headlamp access, go to step 3.


Installation Procedure - High Beam (Type D)
- Install the high beam socket assembly (2) into the headlamp assembly and lock the bulb in place by rotating it clockwise.
- Install the headlamp dust cap (1) to the rear of the headlamp assembly by installing the six retaining torx screws.
- For the left-hand headlamp assembly, replace and secure the airbox upper cover. Go to step 7.
- For the right-hand headlamp assembly, reinstall the coolant reservoir fill neck by aligning the tabs and keyway and pushing the neck into position.
- Inspect the headlamp aim. Refer to Headlamp Aiming.
- Install the radiator air baffle and deflector. Refer to Radiator Air Upper Baffle and Deflector Replacement.
- Connect the battery ground cable. Refer to Battery Negative Cable Disconnection and Connection.
- Check all vehicle lights for correct operation.

Important: Do not handle the quartz envelope of the headlight bulb. Wipe the quartz envelope immediately with methylated spirits if it is touched accidentally or the performance of the bulb will deteriorate.
Notice: Refer to Fastener Notice in the Preface section.

Tighten
Tighten the screws (1) to 1.0 N·m
(9.0 lb in).
Important: For left-hand headlamp, go to step 5.
Important: For right-hand headlamp, go to step 6.
Removal Procedure - Front Park (Type C and D)
- Disconnect the battery ground cable. Refer to Battery Negative Cable Disconnection and Connection.
- Remove the radiator air baffle and deflector. Refer to Radiator Air Upper Baffle and Deflector Replacement.
- For access to the left-hand headlight, detach and move the airbox upper cover rearward. Go to step 4.
- For access to the right-hand headlight, remove the coolant reservoir fill neck by pulling up on the neck assembly and position aside. Note the orientation of the aligning tabs and keyway of the coolant reservoir fill neck for installation.
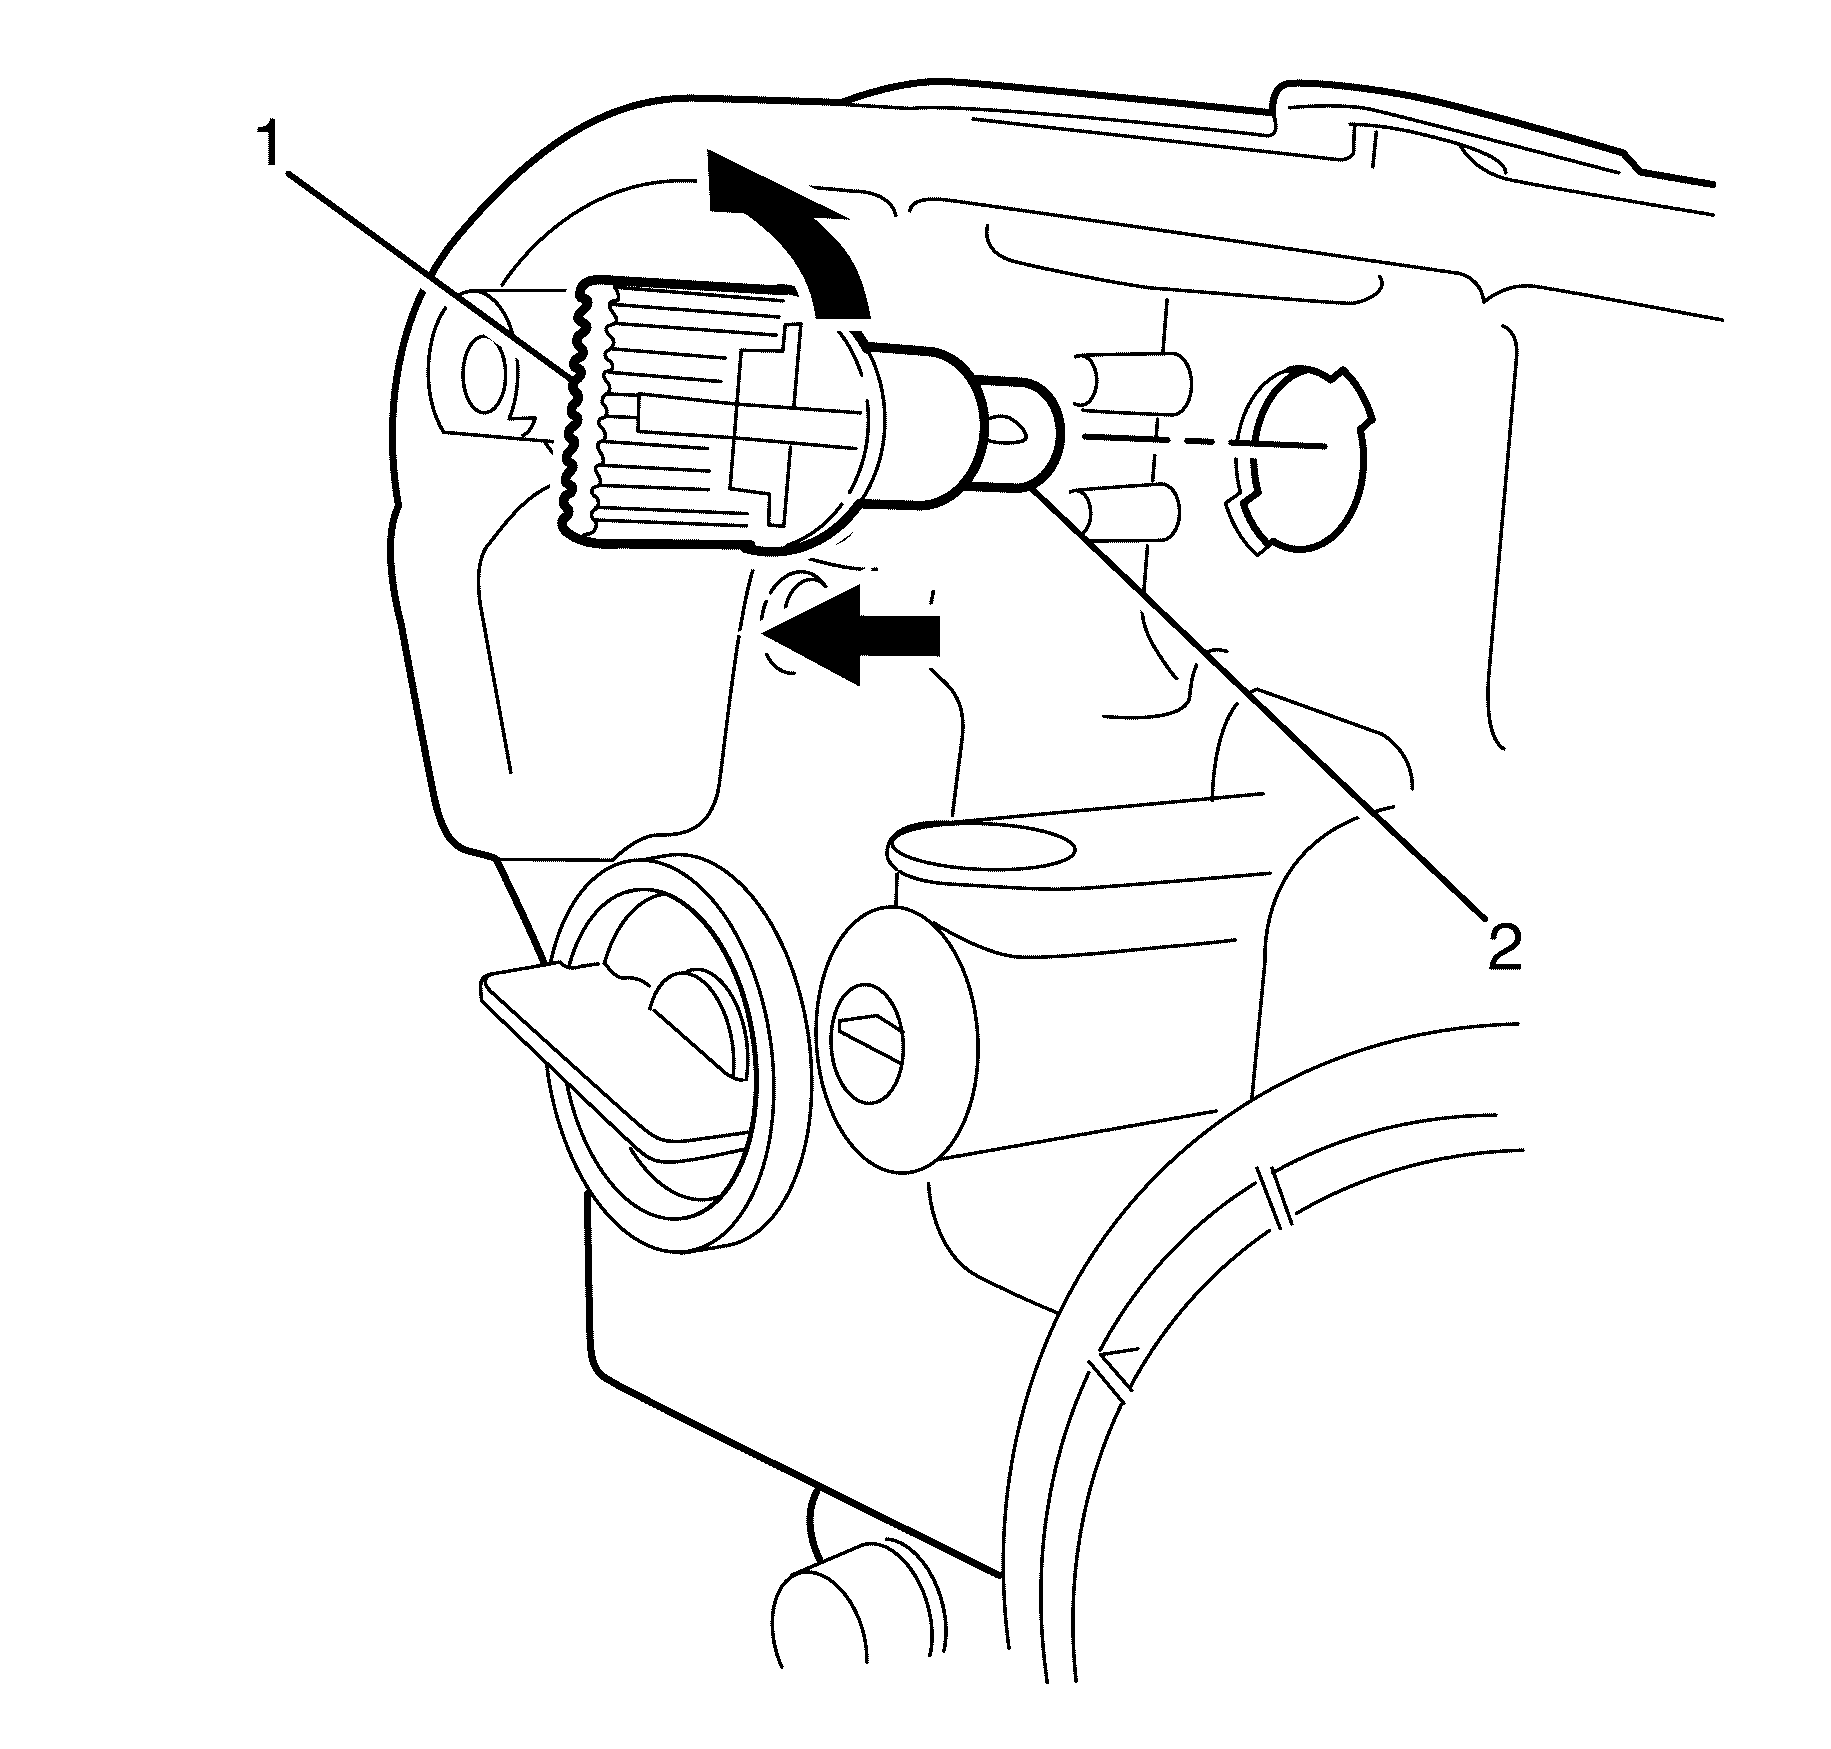
- Rotate the front park bulb and socket (1) counter clockwise and remove the bulb and socket from the headlamp assembly.
- Remove the front park bulb (2) from socket.
Caution: Refer to Battery Disconnect Caution in the Preface section.
Important: For left-hand headlamp access, go to step 2.
Important: For right-hand headlamp access, go to step 3.


Installation Procedure - Front Park (Type C)
- Insert a new front park bulb (2) into the front park bulb socket.
- Install the front park bulb and socket (1) into the headlight assembly and rotate clockwise to secure.
- For the left-hand headlamp assembly, replace and secure the airbox upper cover. Go to step 5.
- For the right-hand headlamp assembly, reinstall the coolant reservoir fill neck by aligning the tabs and keyway and pushing the neck into position.
- Install the radiator air baffle and deflector. Refer to Radiator Air Upper Baffle and Deflector Replacement.
- Connect the battery ground cable. Refer to Battery Negative Cable Disconnection and Connection.
- Check all vehicle lights for correct operation.
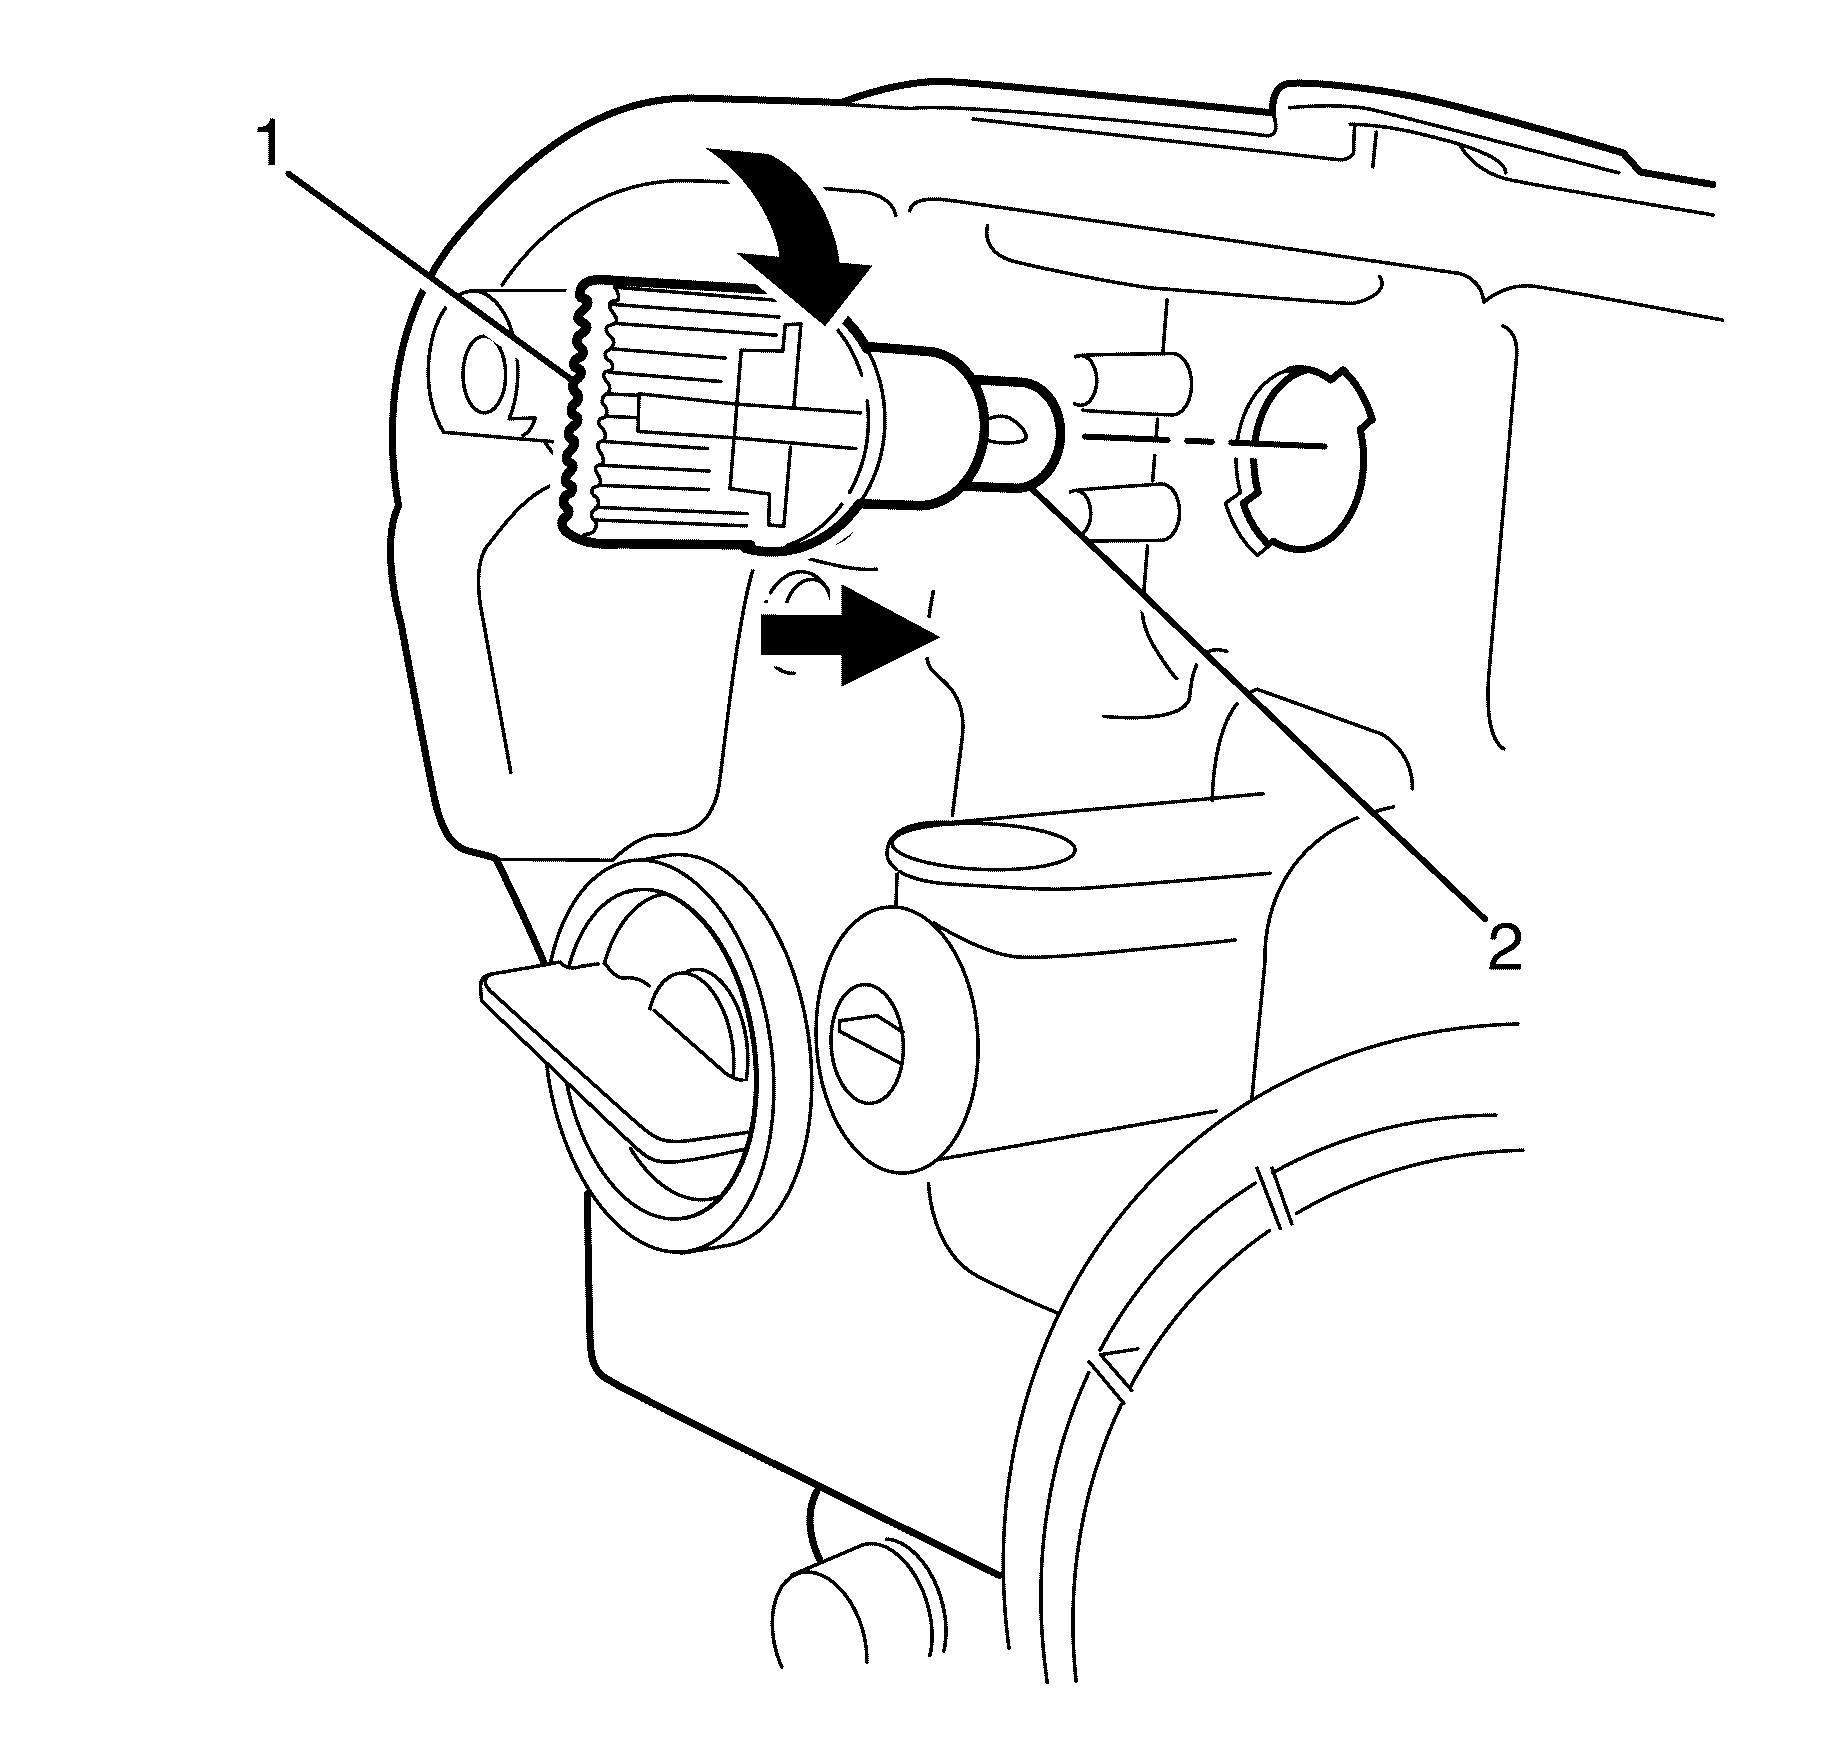
Important: There are tabs on the bulb base and mating cut-outs in the headlamp assembly allow the bulb to seat correctly.
Important: For left-hand headlamp, go to step 3.
Important: For right-hand headlamp, go to step 4.
Caution: Refer to Battery Disconnect Caution in the Preface section.
Headlamp Bulb Replacement SWB
Removal Procedure - Low Beam (Type A and Type B)
- Disconnect the battery ground cable. Refer to Battery Negative Cable Disconnection and Connection.
- Remove the radiator air baffle and deflector. Refer to Radiator Air Upper Baffle and Deflector Replacement
- For access to the left-hand headlight, detach and move the airbox upper cover rearward. Go to step 4.
- For access to the right-hand headlight, remove the coolant reservoir fill neck by pulling up on the neck assembly and position aside. Note the orientation of the aligning tabs and keyway of the coolant reservoir fill neck for installation.
- Remove the low beam headlamp dust cap from the rear of the headlamp assembly by rotating the dust cap counter clockwise. Note orientation of the dust cap and tabs for installation.
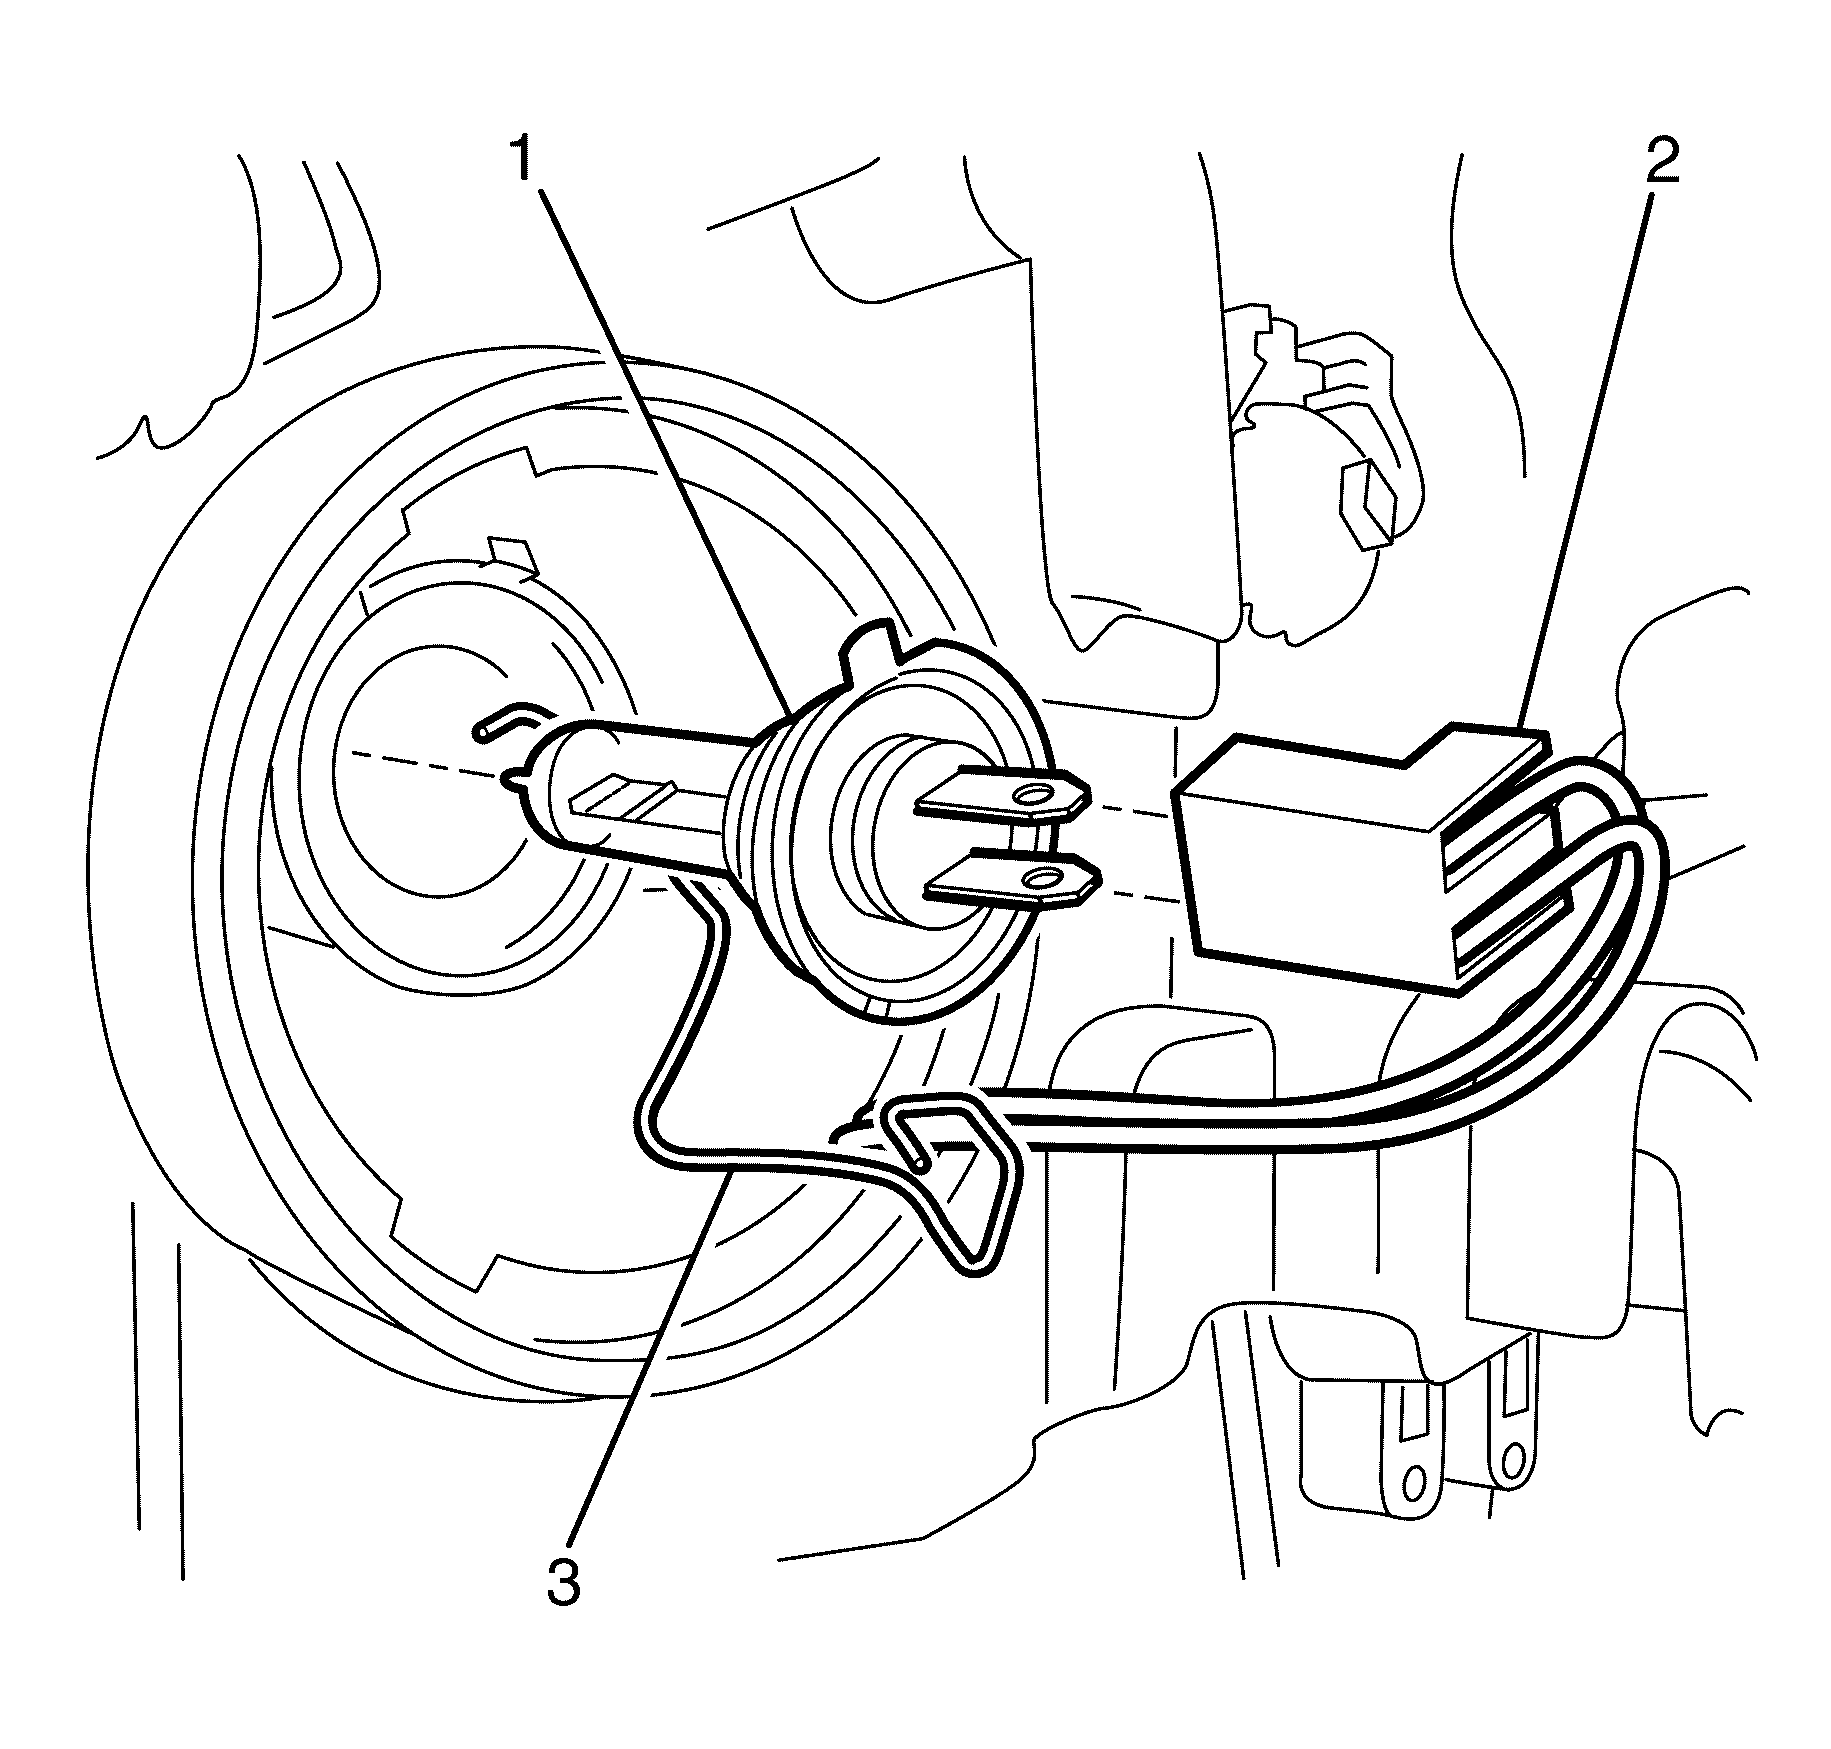
- Disconnect the electrical connector (2) from the low beam headlight bulb (1).
- Press and unclip the low beam headlight bulb spring retainer (3) and pivot the retainer clear from the bulb (1). Remove the bulb from the headlamp assembly.
Caution: Refer to Battery Disconnect Caution in the Preface section.
Caution: Halogen bulbs contain gas under pressure. Handling a bulb improperly
could cause it to shatter into flying glass fragments. To help avoid personal
injury:
• Turn off the lamp switch and allow the bulb to cool before changing
the bulb. • Leave the lamp switch OFF until the bulb change is complete. • Always wear eye protection when changing a halogen bulb. • Handle the bulb only by its base. Avoid touching the glass. • Keep dirt and moisture off the bulb. • Properly dispose of the used bulb. • Keep halogen bulbs out of the reach of children.
Important: For left-hand headlamp access, go to step 3.
Important: For right-hand headlamp access, go to step 4.


Installation Procedure - Low Beam (Type A and Type B)
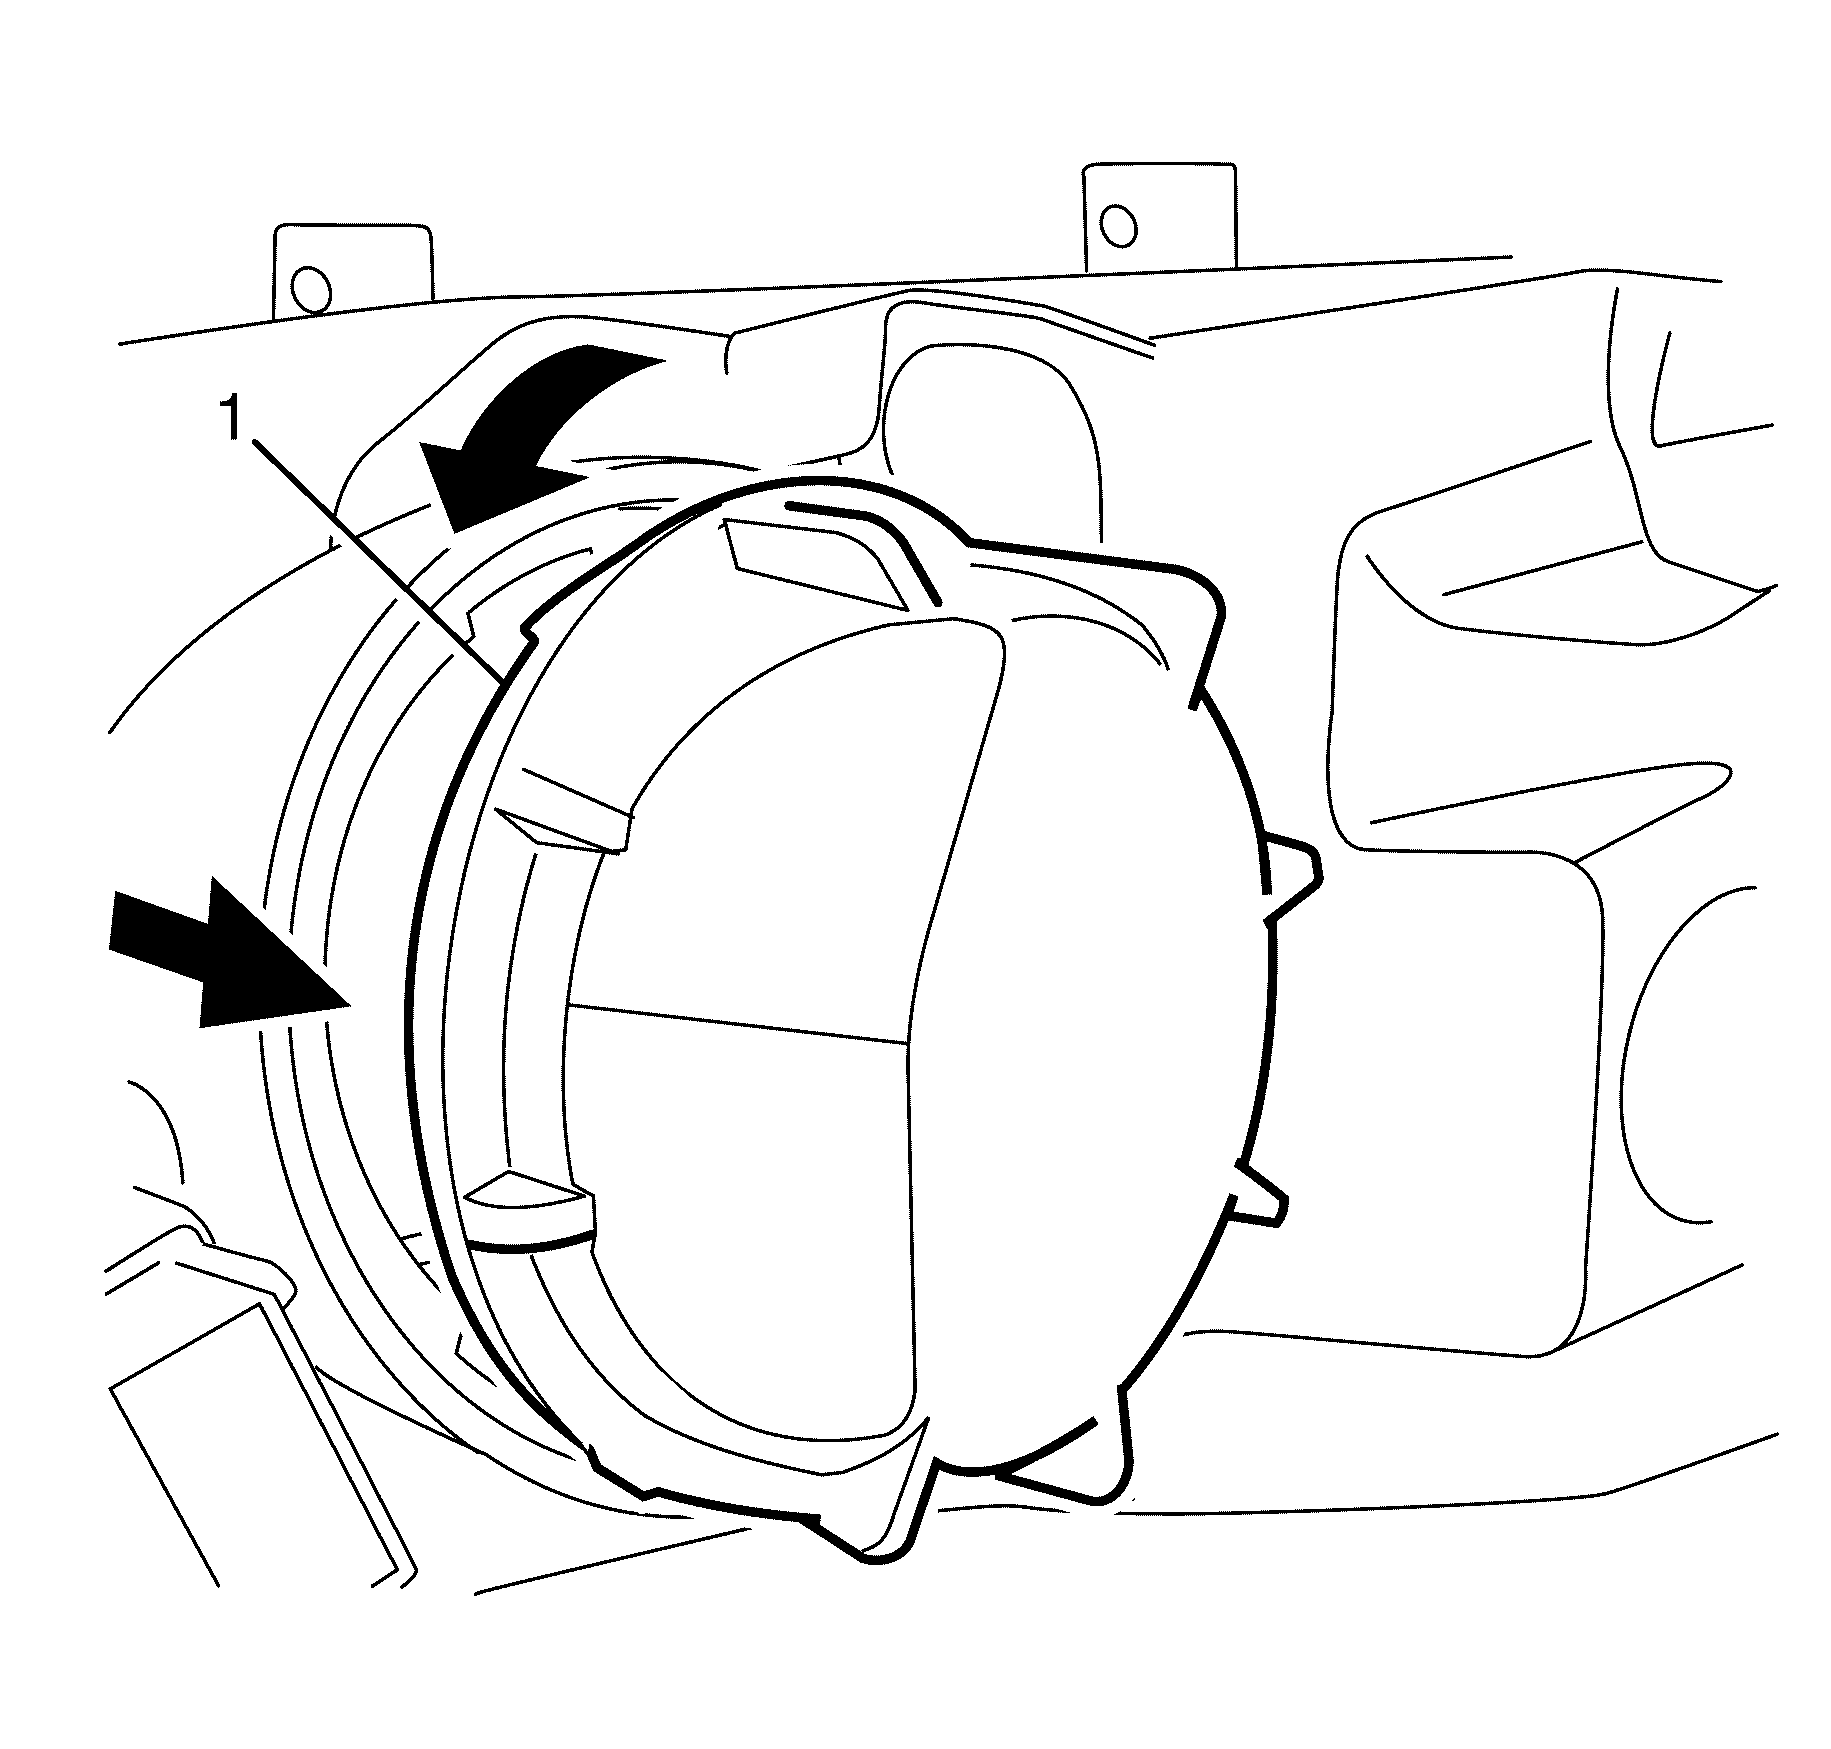
- Install the new bulb (1) into the headlamp assembly, ensuring the locating tangs on the bulb mate correctly with the cut-outs in the headlamp.
- Clip the bulb spring retainer (3) and secure.
- Connect the wiring harness connector (2) to the bulb (1).
- Inspect the low beam dust cap seal and replace if necessary.
- Install the low beam headlamp dust cap (1) to the rear of the headlamp assembly by rotating clockwise to secure.
- For the left-hand headlamp assembly, replace and secure the airbox upper cover. Go to step 8.
- For the right-hand headlamp assembly, reinstall the coolant reservoir fill neck by aligning the tabs and keyway and pushing the neck into position.
- Install the radiator air baffle and deflector. Refer to Radiator Air Upper Baffle and Deflector Replacement
- Connect the battery ground cable. Refer to Battery Negative Cable Disconnection and Connection.
- Check all vehicle lights for correct operation.
Important: Do not handle the quartz envelope of the headlight bulb. Wipe the quartz envelope immediately with methylated spirits if it is touched accidentally or the performance of the bulb will deteriorate.
Important: The different-sized tabs on the bulb base and mating cut-outs in the headlamp assembly allow the bulb to seat correctly in one orientation position.

Removal Procedure - High Beam (Type A and Type B)
- Disconnect the battery ground cable. Refer to Battery Negative Cable Disconnection and Connection.
- Remove the radiator air baffle and deflector. Refer to Radiator Air Upper Baffle and Deflector Replacement
- For access to the left-hand headlight assembly, detach and move the airbox upper cover rearward. Go to step 5.
- For access to the right-hand headlight, remove the coolant reservoir fill neck by pulling up on the neck assembly and position aside. Note the orientation of the aligning tabs and keyway of the coolant reservoir fill neck for installation.
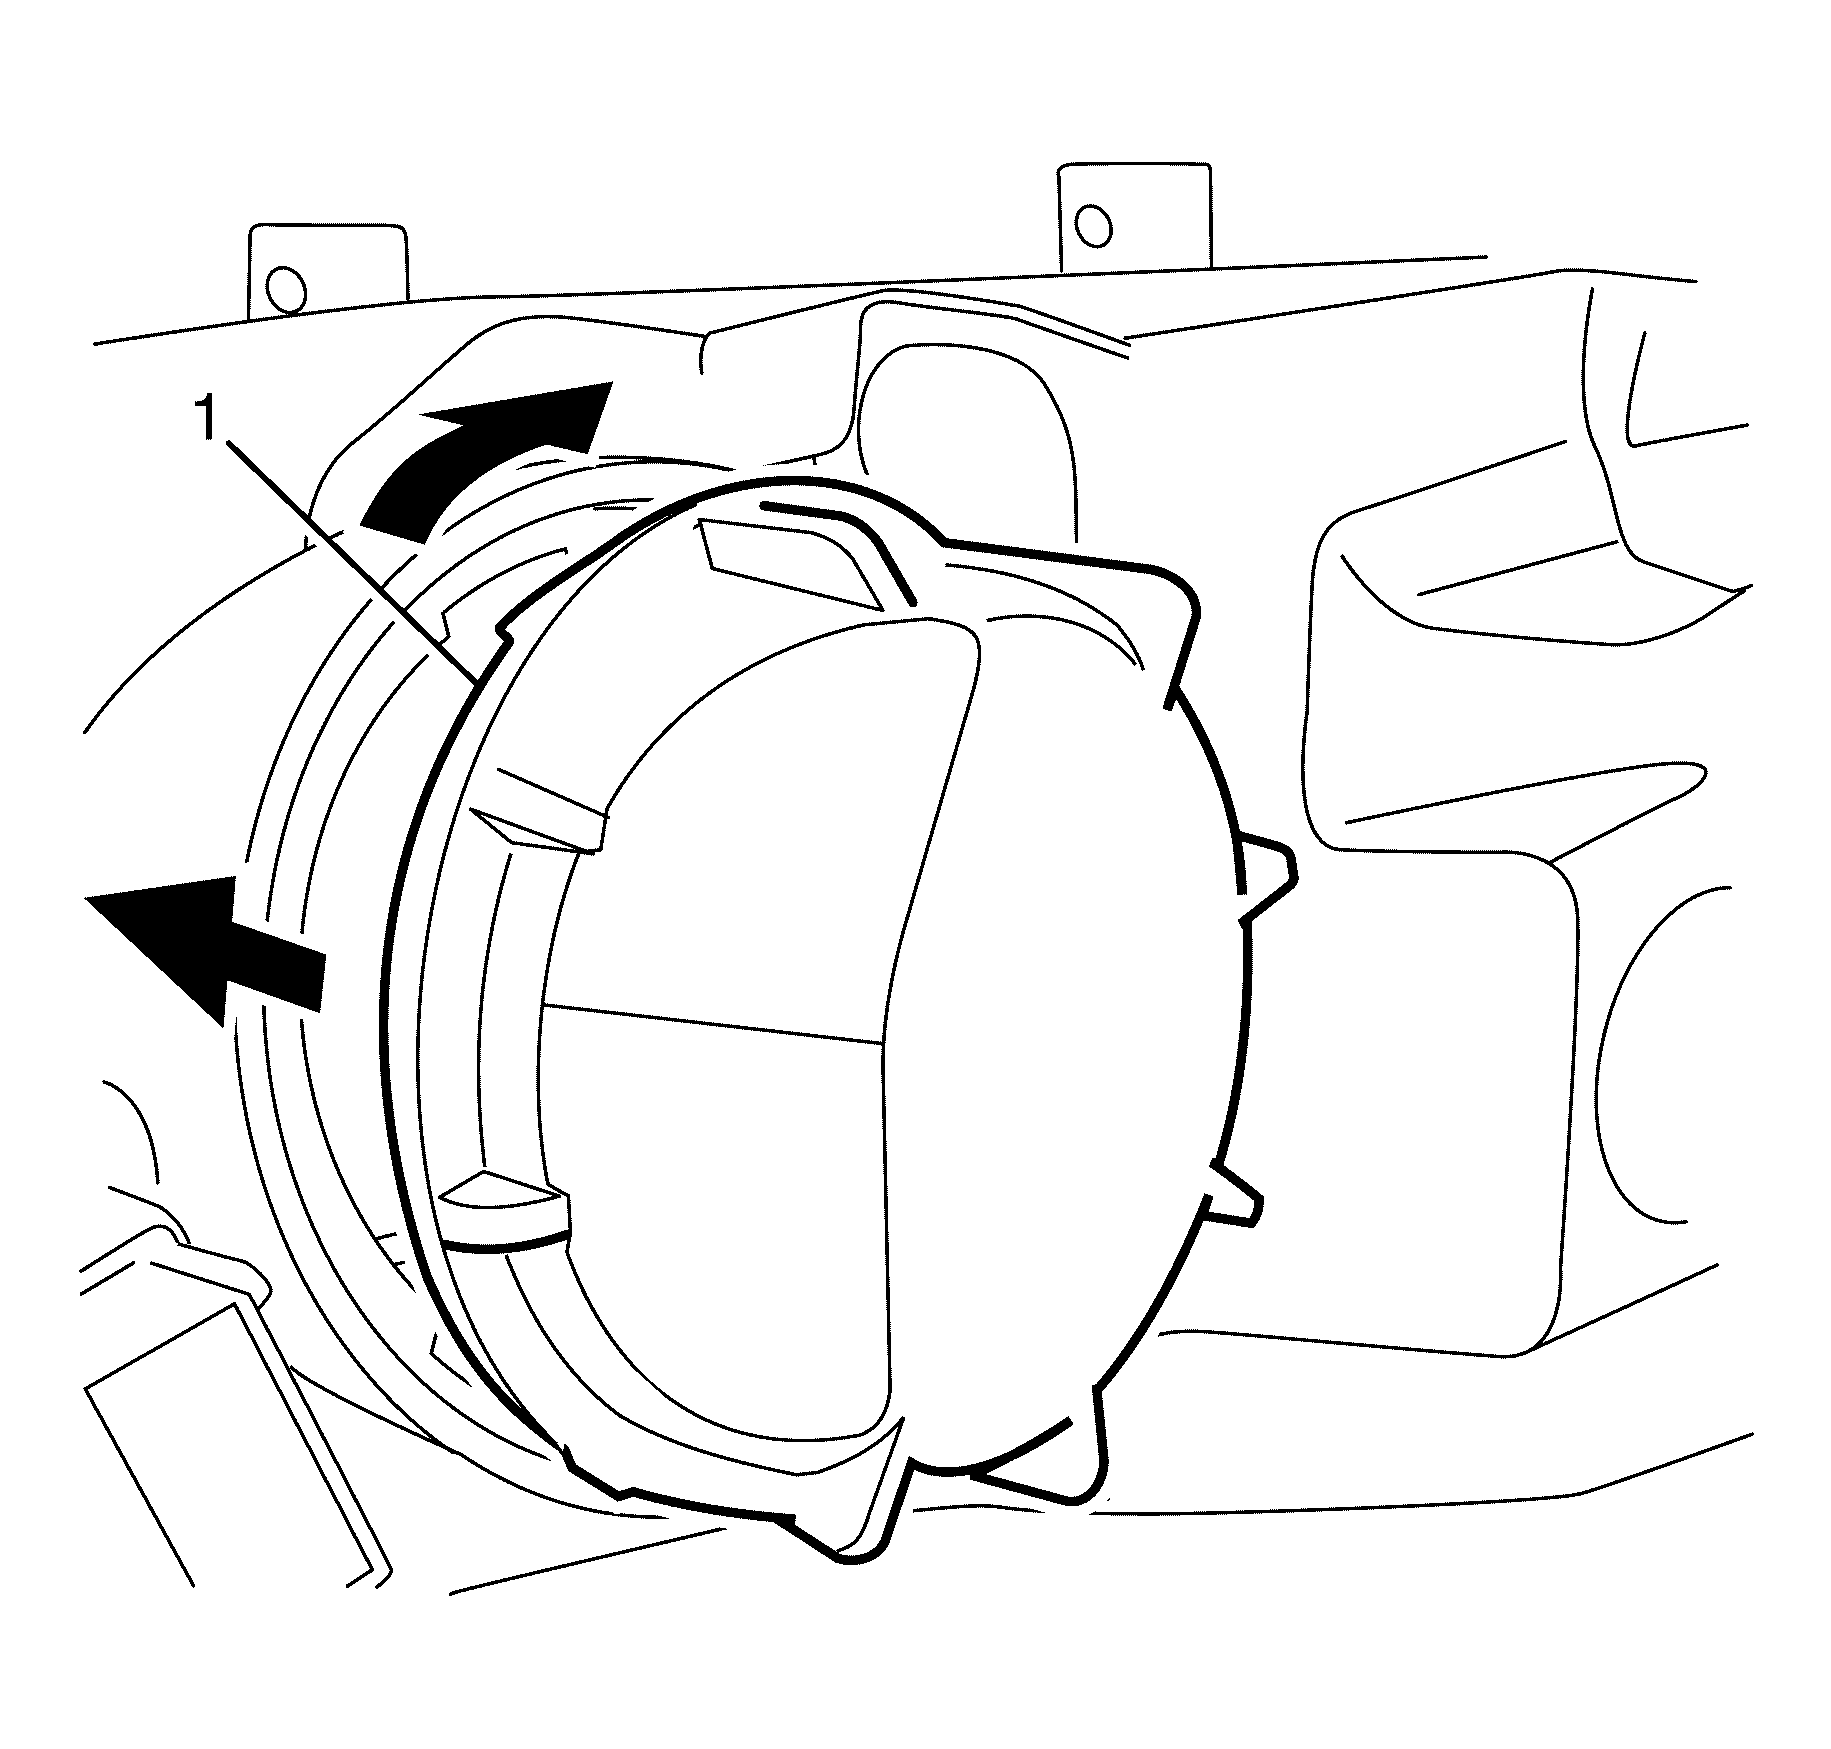
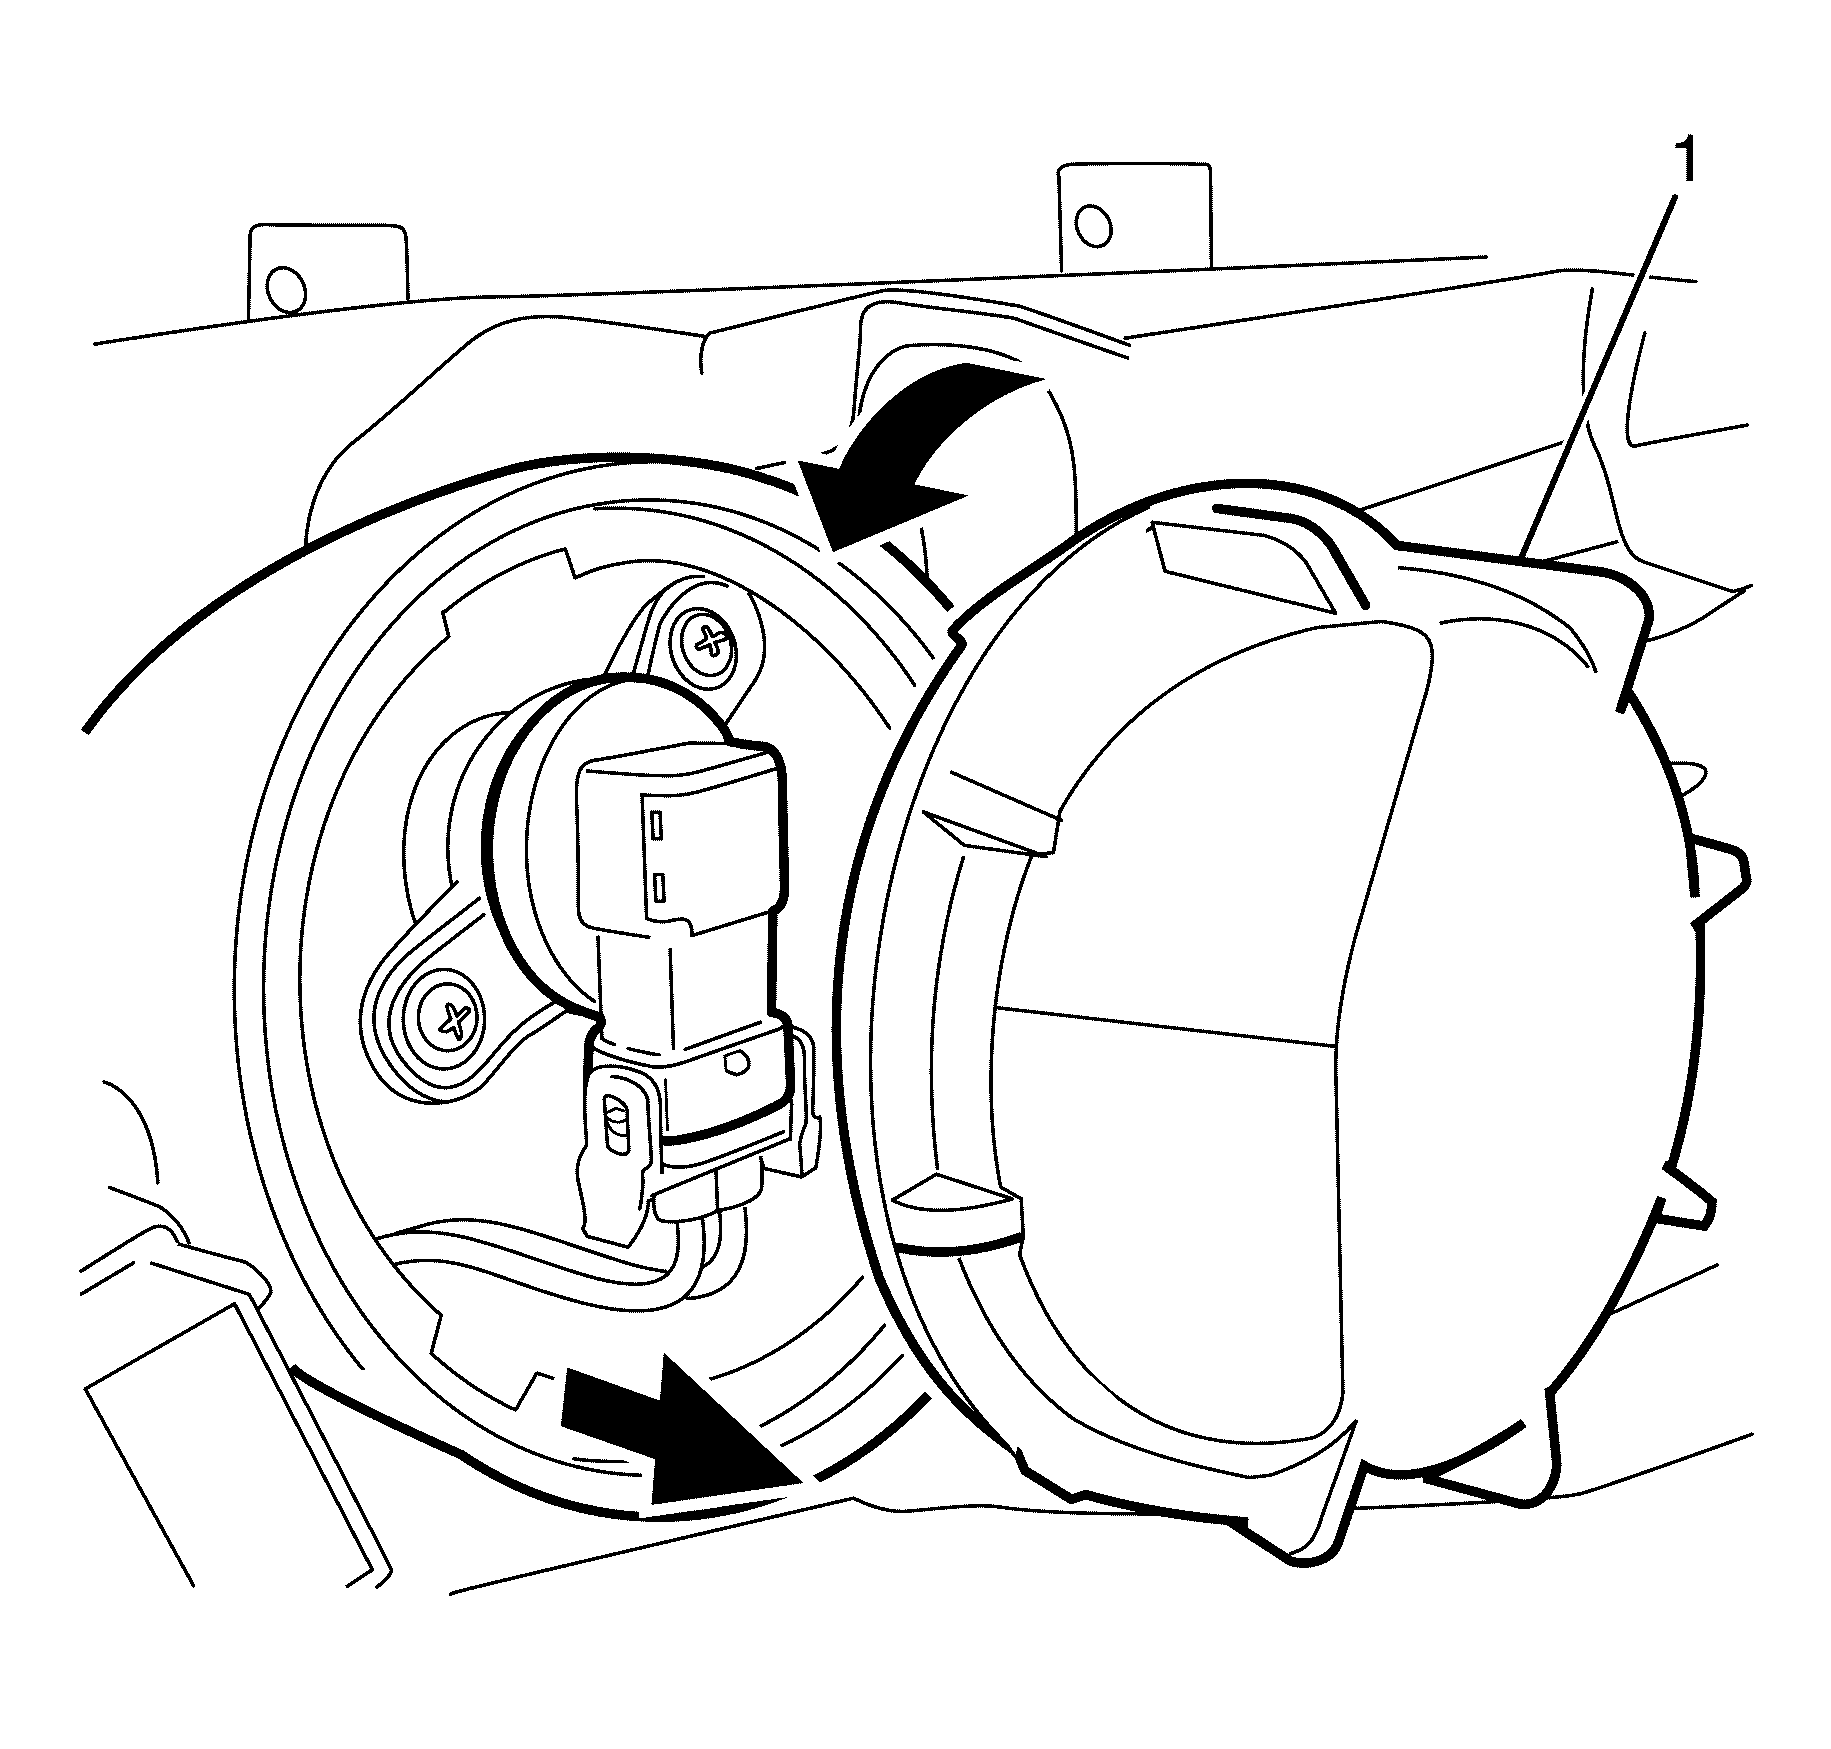
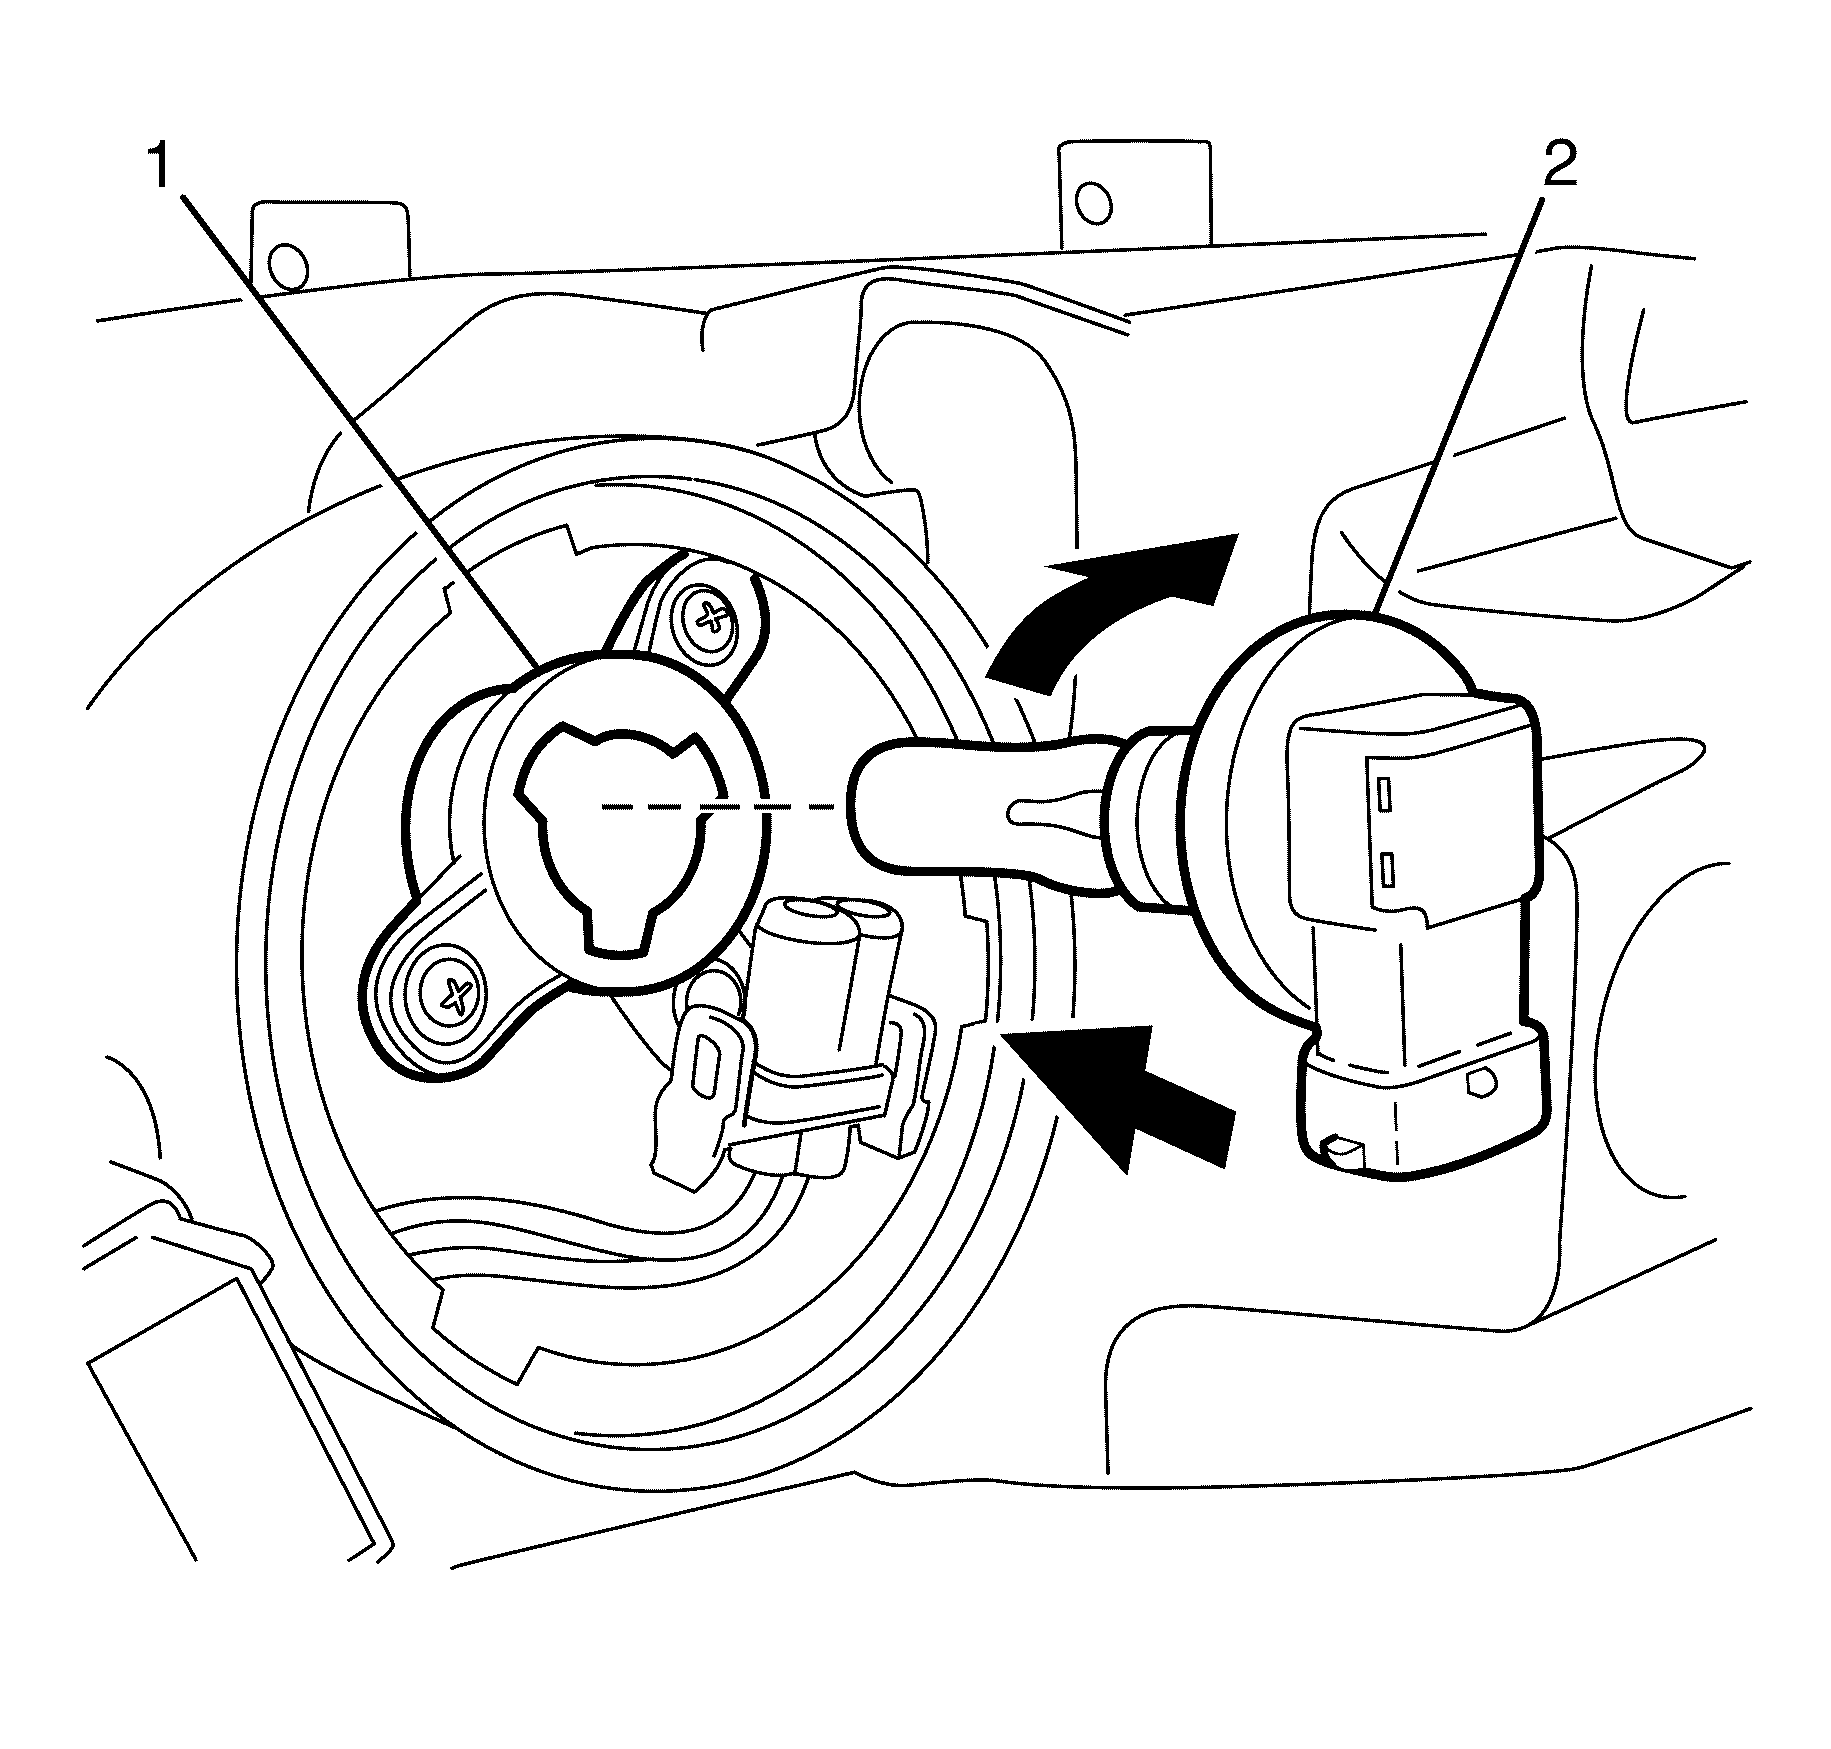
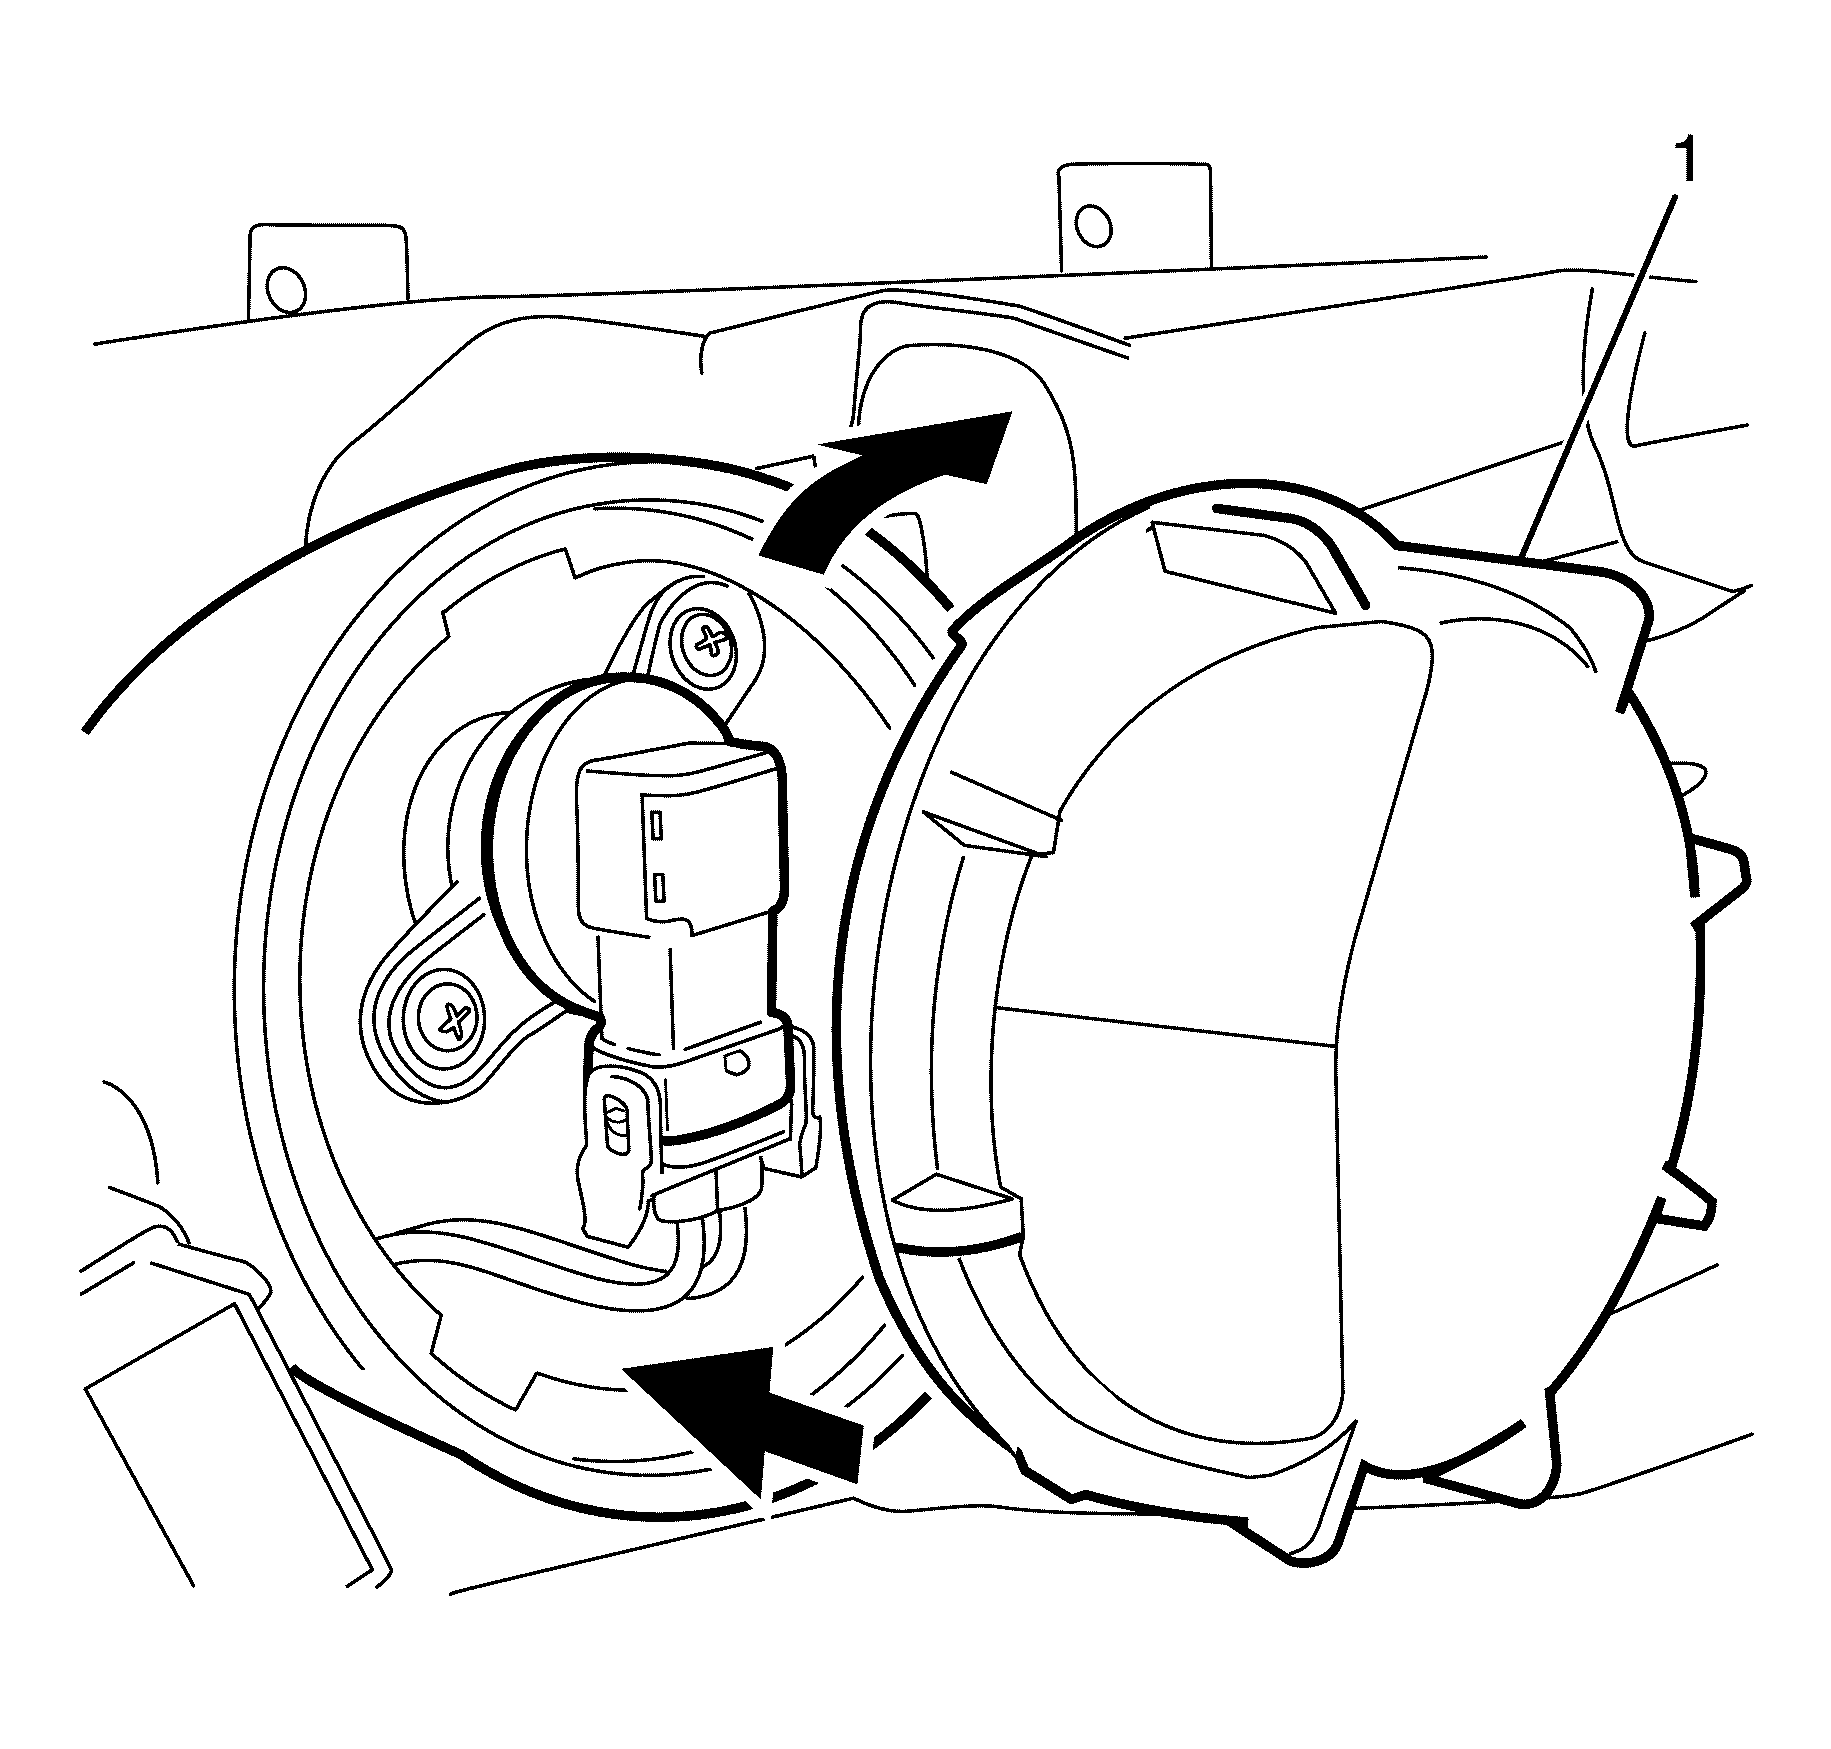
- Remove the high beam headlamp dust cap (1) from the rear of the headlamp assembly by rotating the dust cap counter clockwise. Note the orientation of the dust cap and tabs for installation.
- Disconnect the electrical connector from the high beam headlight bulb.
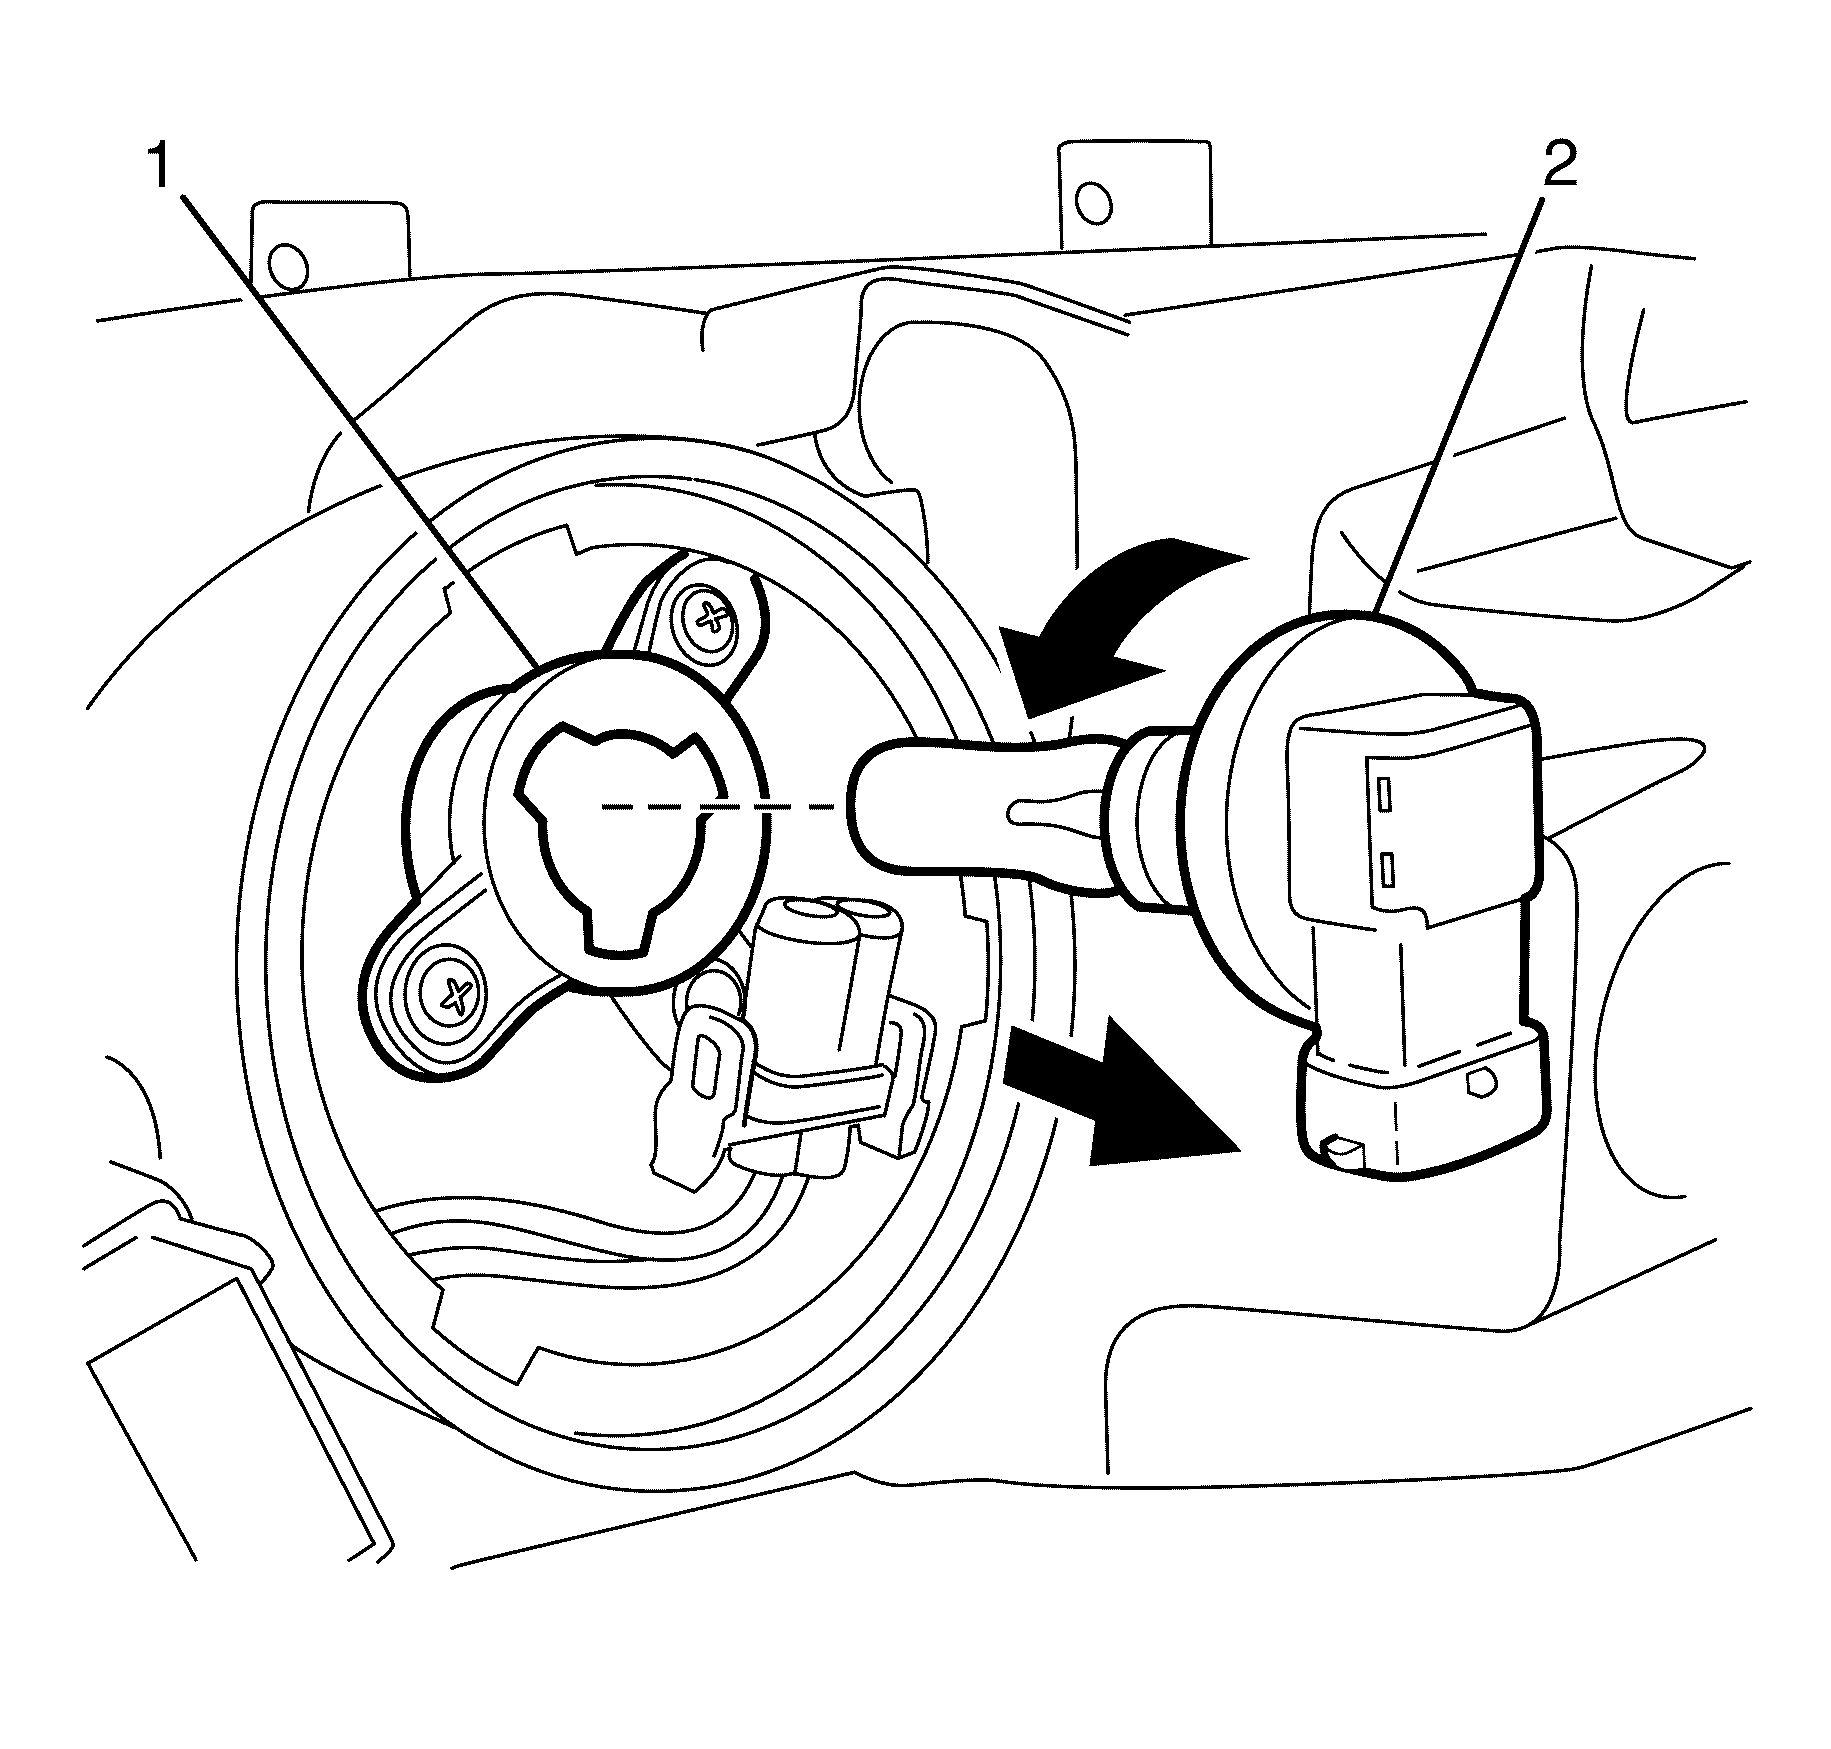
- Rotate the high beam headlight bulb (2) counter clockwise and remove the bulb from the headlamp assembly (1).
Caution: Refer to Battery Disconnect Caution in the Preface section.
Caution: Halogen bulbs contain gas under pressure. Handling a bulb improperly
could cause it to shatter into flying glass fragments. To help avoid personal
injury:
• Turn off the lamp switch and allow the bulb to cool before changing
the bulb. • Leave the lamp switch OFF until the bulb change is complete. • Always wear eye protection when changing a halogen bulb. • Handle the bulb only by its base. Avoid touching the glass. • Keep dirt and moisture off the bulb. • Properly dispose of the used bulb. • Keep halogen bulbs out of the reach of children.


Installation Procedure - High Beam (Type A and Type B)
- Install the new high beam bulb (2) into the headlamp assembly (1) and lock the bulb in place by rotating it clockwise.
- Connect the high beam bulb connector to the bulb and push the connector until the tangs of the connector engage.
- Inspect the high beam dust cap seal and replace if necessary.
- Install the high beam headlamp dust cap (1) to the rear of the headlamp assembly by aligning the tabs and rotating the dust cap clockwise to secure.
- For the left-hand headlamp assembly, replace and secure the airbox upper cover. Go to step 7.
- For the right-hand headlamp assembly, reinstall the coolant reservoir fill neck by aligning the tabs and keyway and pushing the neck into position.
- Install the radiator air baffle and deflector. Refer to Radiator Air Upper Baffle and Deflector Replacement
- Connect the battery ground cable. Refer to Battery Negative Cable Disconnection and Connection.
- Check all vehicle lights for correct operation.
Important: Do not handle the quartz envelope of the headlight bulb. Wipe the quartz envelope immediately with methylated spirits if it is touched accidentally or the performance of the bulb will deteriorate.
Important: The different-sized tabs on the bulb base and mating cut-outs in the headlamp assembly allow the bulb to seat correctly in one orientation position.
Important: For left-hand headlamp, go to step 5.
Important: For right-hand headlamp, go to step 6.
Caution: Refer to Battery Disconnect Caution in the Preface section.
Removal Procedure - Front Park (Type A)
- Remove the radiator air baffle and deflector. Refer to Radiator Air Upper Baffle and Deflector Replacement
- For access to the left-hand headlight, detach and move the airbox upper cover rearward. Go to step 4.
- For access to the right-hand headlight, remove the coolant reservoir fill neck by pulling up on the neck assembly and position aside. Note the orientation of the aligning tabs and keyway of the coolant reservoir fill neck for installation.
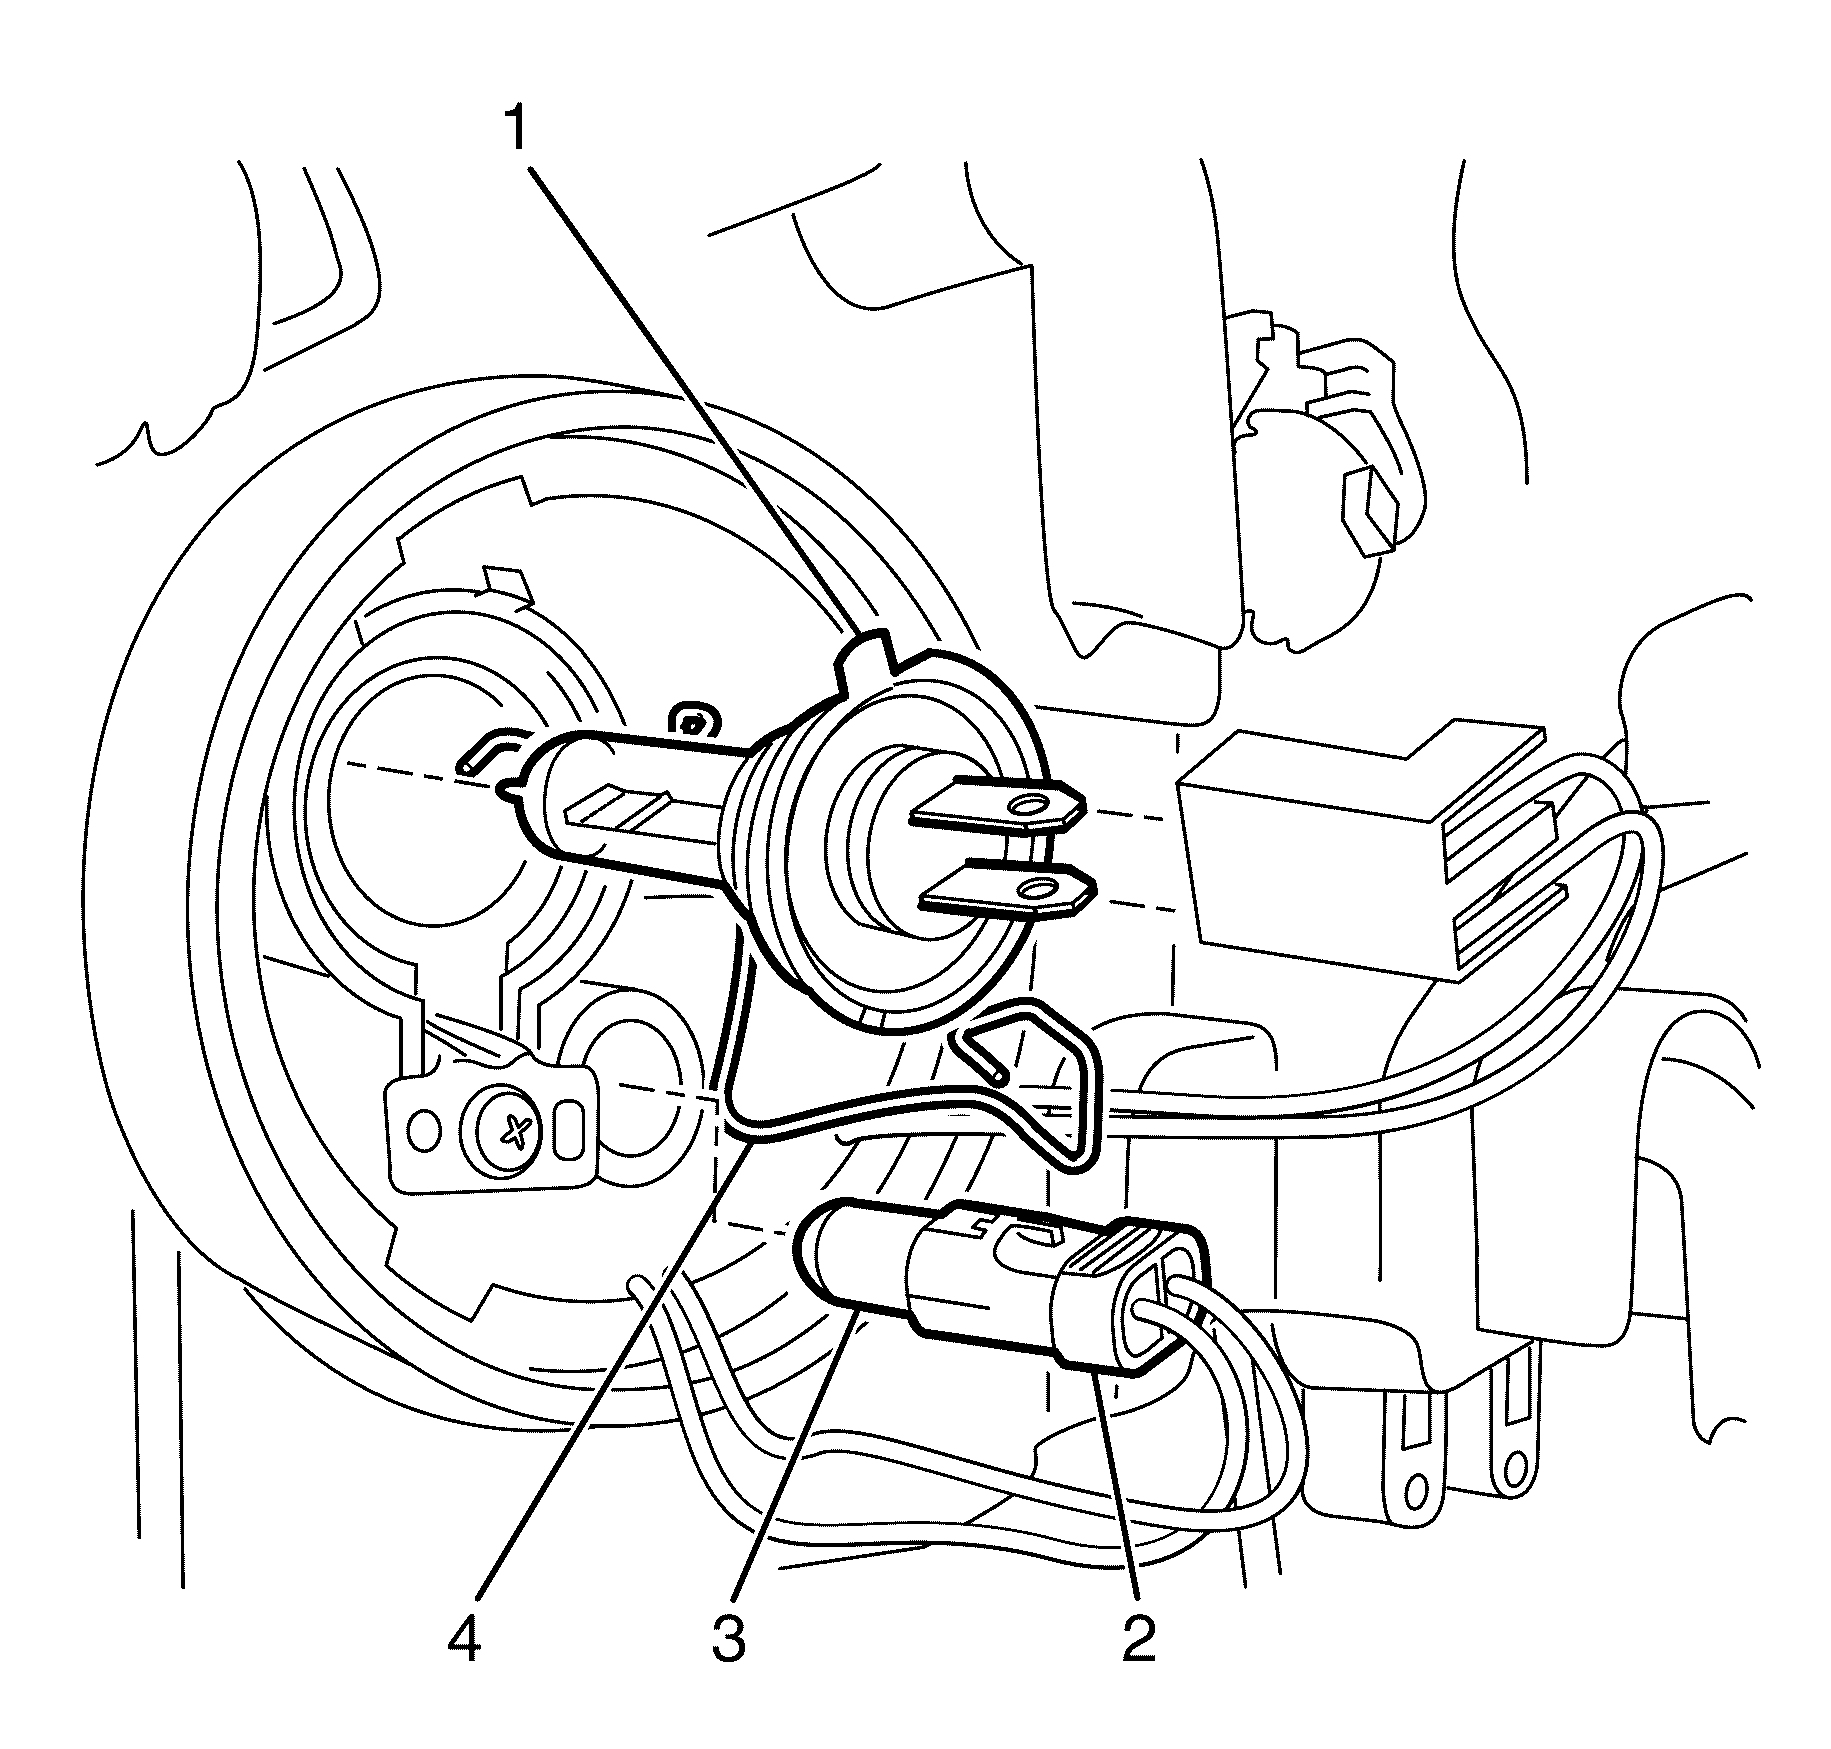
- Remove the low beam headlamp dust cap (1) from the rear of the headlamp assembly by rotating the dust cap counter clockwise. Note the orientation of the dust cap and tabs for installation.
- Disconnect the electrical connector from the low beam headlight bulb.
- Press and unclip the low beam headlight bulb spring retainer (4) and pivot the retainer clear from the bulb (1). Remove the bulb from the headlamp assembly.
- Using long nose pliers, pull the front park bulb socket (2) from the headlamp assembly.
- Remove the front park bulb (3) from the socket.
Caution: Halogen bulbs contain gas under pressure. Handling a bulb improperly
could cause it to shatter into flying glass fragments. To help avoid personal
injury:
• Turn off the lamp switch and allow the bulb to cool before changing
the bulb. • Leave the lamp switch OFF until the bulb change is complete. • Always wear eye protection when changing a halogen bulb. • Handle the bulb only by its base. Avoid touching the glass. • Keep dirt and moisture off the bulb. • Properly dispose of the used bulb. • Keep halogen bulbs out of the reach of children.
Important: For left-hand headlamp access, go to step 3.
Important: For right-hand headlamp access, go to step 4.


Installation Procedure - Front Park (Type A)
- Install a new bulb (3) to the front park bulb socket (2).
- Install the front park bulb socket to the headlamp assembly
- Install the low beam bulb (1) into the headlamp assembly, ensuring the locating tangs on the bulb mate correctly with the cut-outs in the headlamp.
- Clip the bulb spring retainer (4) and secure.
- Connect the electrical connector to the bulb.
- Inspect the low beam dust cap seal for damage and replace if necessary.
- Install the low beam headlamp dust cap (1) to the rear of the headlamp assembly by aligning the tabs and rotating the dust cap clockwise to secure.
- For the left-hand headlamp assembly, replace and secure the airbox upper cover. Go to step 9.
- For the right-hand headlamp assembly, reinstall the coolant reservoir fill neck by aligning the tabs and keyway and pushing the neck into position.
- Install the radiator air baffle and deflector. Refer to Radiator Air Upper Baffle and Deflector Replacement
- Connect the battery ground cable. Refer to Battery Negative Cable Disconnection and Connection.
- Check all vehicle lights for correct operation.
Important: Do not handle the quartz envelope of the headlamp bulb. Wipe the quartz envelope immediately with methylated spirits if it is touched accidentally or the performance of the bulb will deteriorate.
Important: The different-sized tabs on the bulb base and mating cut-outs in the headlamp assembly allow the bulb to seat correctly in one orientation position.


Removal Procedure - Front Park (Type B)
- Disconnect the battery ground cable. Refer to Battery Disconnect Caution.
- Remove the radiator air baffle. Refer to Radiator Air Upper Baffle and Deflector Replacement
- For access to the left-hand headlight, detach and move the airbox upper cover rearward. Go to step 4.
- For access to the right-hand headlight, remove the coolant reservoir fill neck by pulling up on the neck assembly and position aside. Note the orientation of the aligning tabs and keyway of the coolant reservoir fill neck for installation.
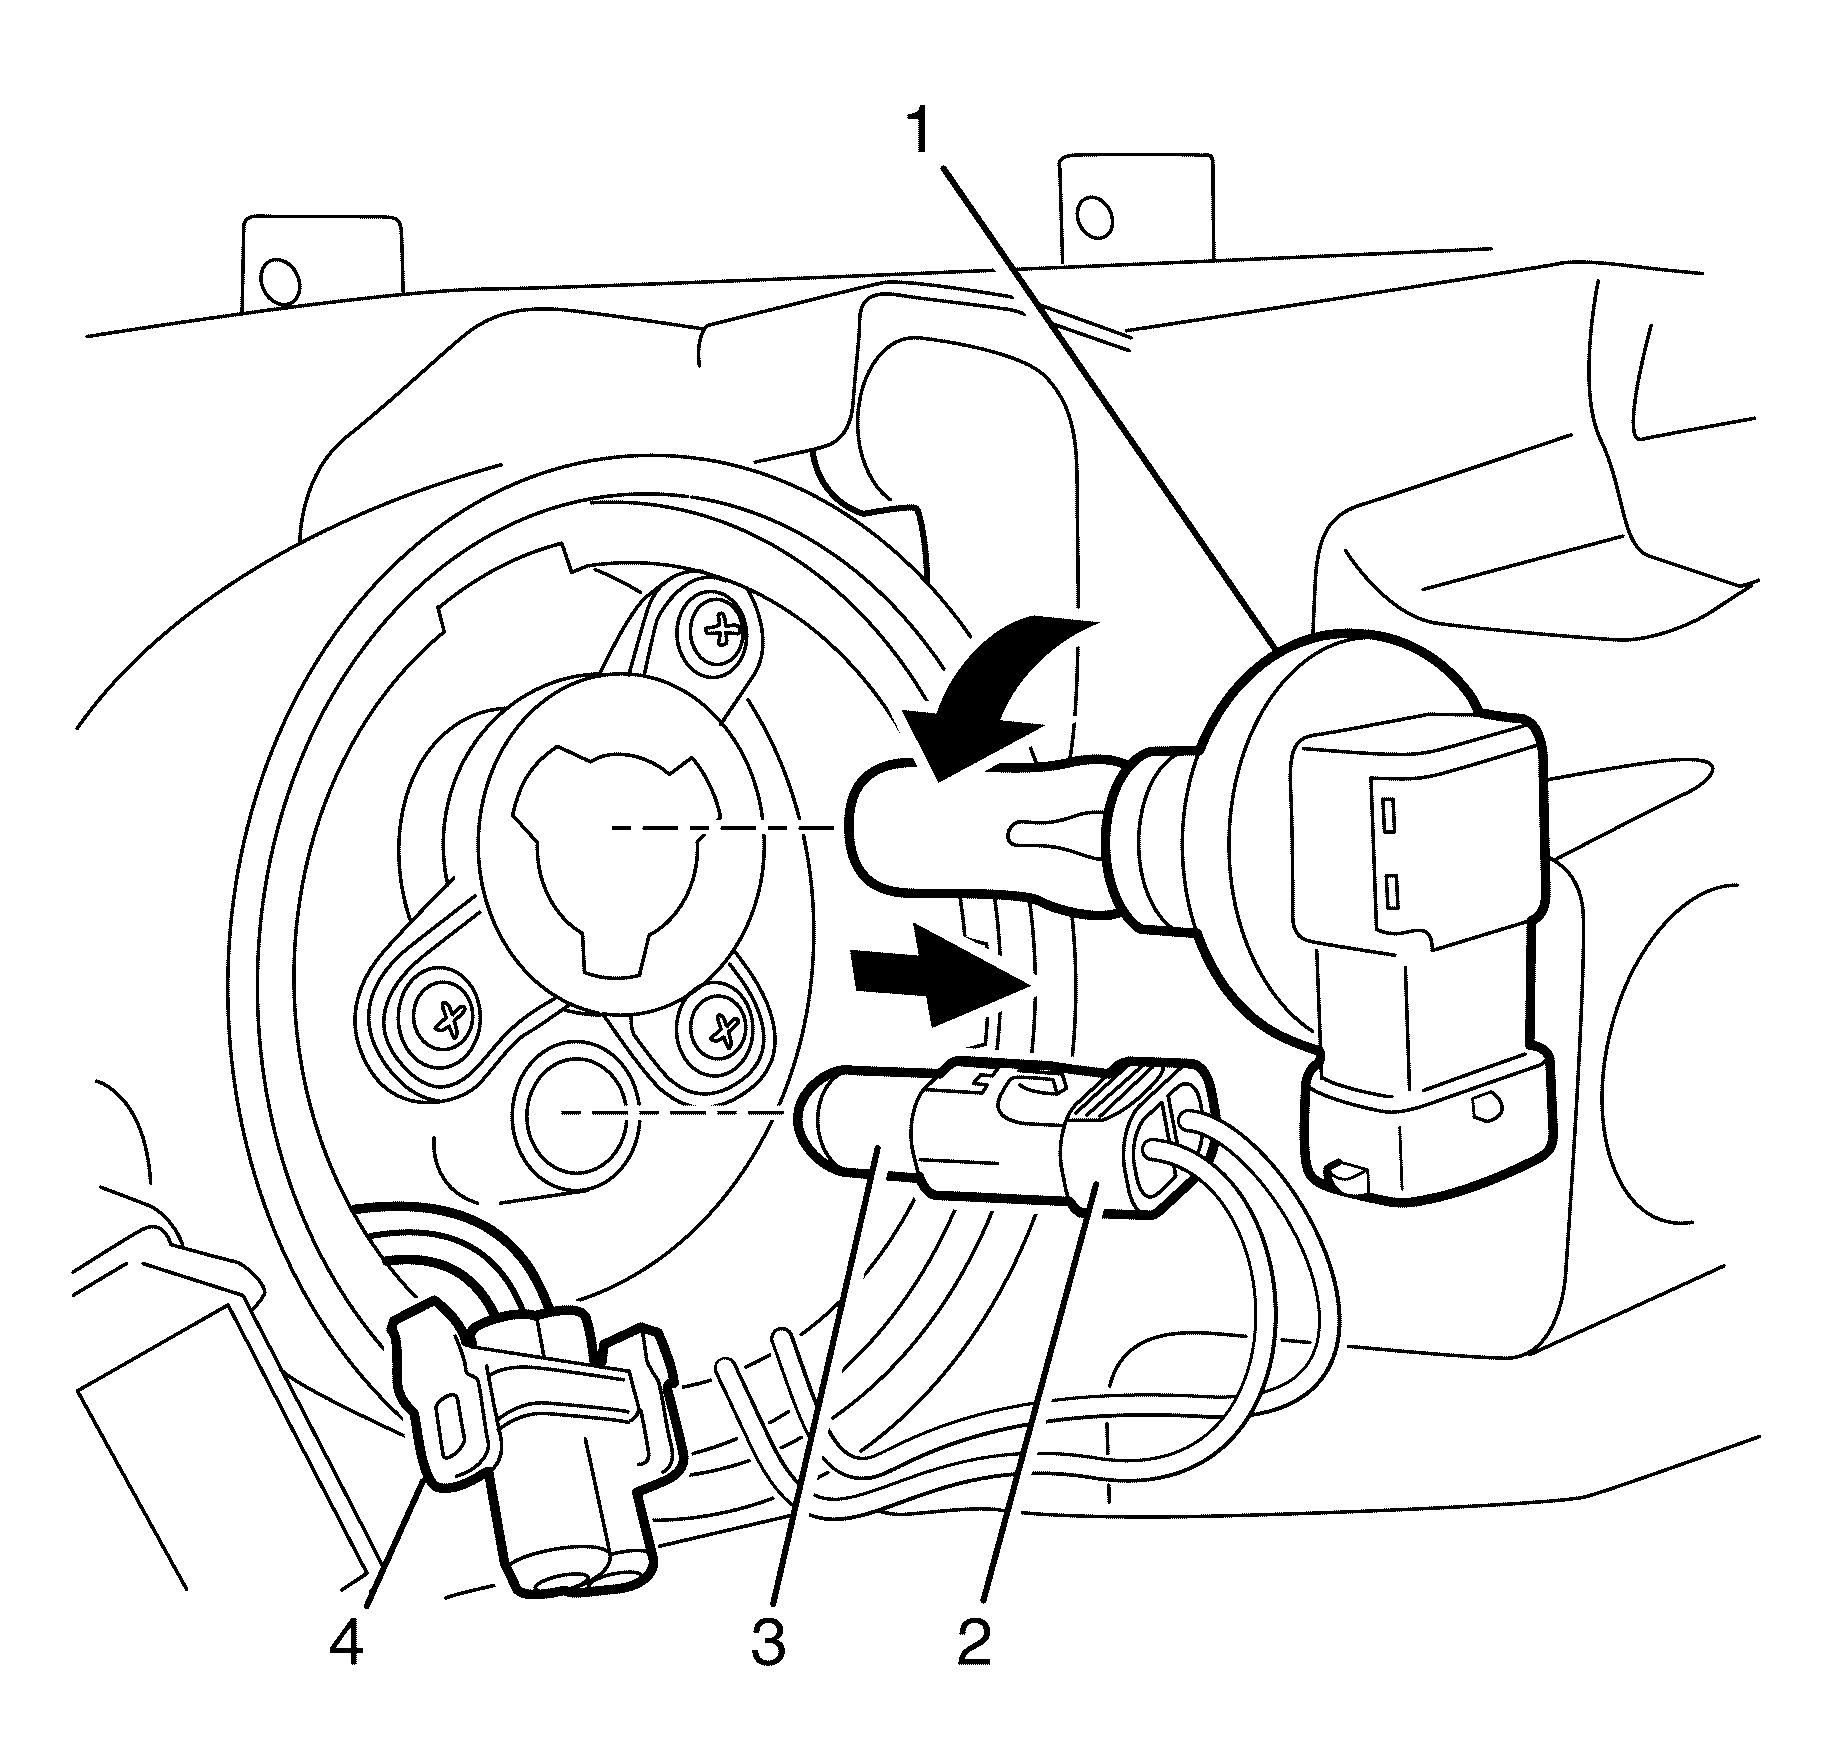
- Remove the high beam headlamp dust cap (1) from the rear of the headlamp assembly by rotating the dust cap counter clockwise. Note the orientation of the dust cap and tabs for installation.
- Disconnect the electrical connector (4) from the high beam headlight bulb (1).
- Rotate the high beam headlight bulb counter clockwise and remove the bulb from the headlamp assembly.
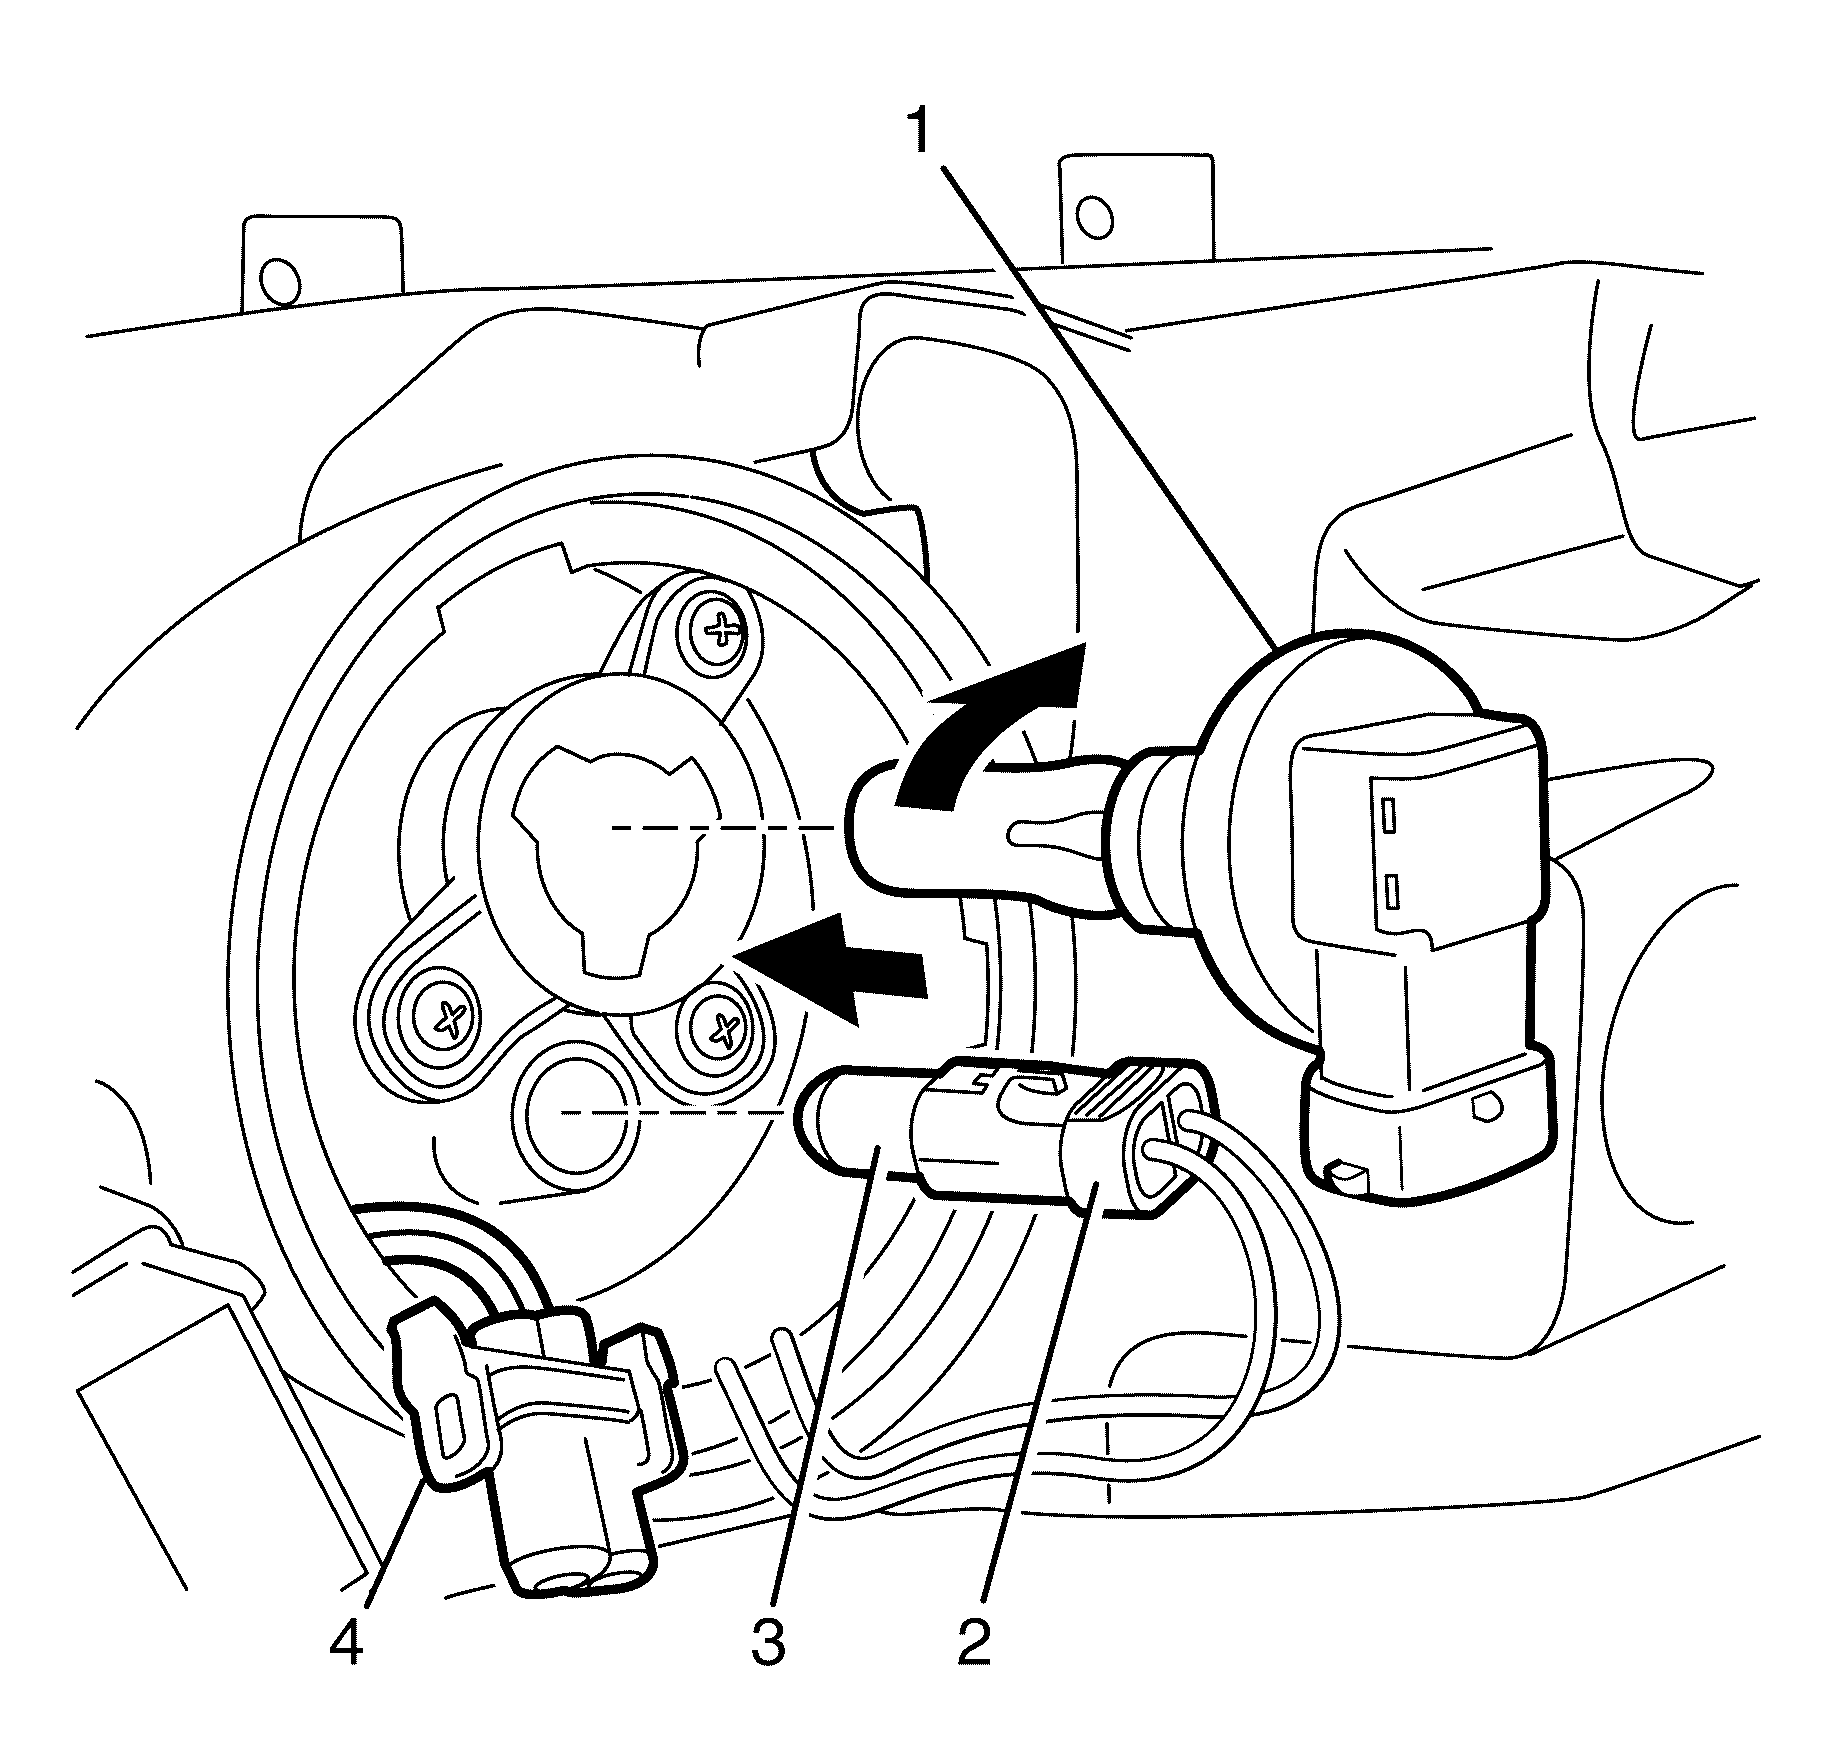
- Pull the front park bulb socket (2) from the headlamp assembly.
- Remove the front park bulb (3) from the socket (2).
Caution: Refer to Battery Disconnect Caution in the Preface section.
Caution: Halogen bulbs contain gas under pressure. Handling a bulb improperly
could cause it to shatter into flying glass fragments. To help avoid personal
injury:
• Turn off the lamp switch and allow the bulb to cool before changing
the bulb. • Leave the lamp switch OFF until the bulb change is complete. • Always wear eye protection when changing a halogen bulb. • Handle the bulb only by its base. Avoid touching the glass. • Keep dirt and moisture off the bulb. • Properly dispose of the used bulb. • Keep halogen bulbs out of the reach of children.
Important: For left-hand headlamp access, go to step 3.
Important: For right-hand headlamp access, go to step 4.


Notice: Refer to General Repair Instructions in the Preface section.
Installation Procedure - Front Park (Type B)
- Install a new bulb (3) to the front park bulb socket (2).
- Install the front park bulb (3) and socket (2) to the headlamp assembly.
- Install the high beam bulb (1) into the headlamp assembly and lock the bulb in place by rotating it clockwise.
- Connect the high beam bulb connector (4) to the bulb and push the connector until the tangs of the connector engage.
- Inspect the high beam dust cap seal and replace if necessary.
- Install the high beam headlamp dust cap (1) to the rear of the headlamp assembly by aligning the tabs and rotating the dust cap clockwise to secure.
- For the left-hand headlamp assembly, replace and secure the airbox upper cover. Go to step 9.
- For the right-hand headlamp assembly, reinstall the coolant reservoir fill neck by aligning the tabs and keyway and pushing the neck into position.
- Install the radiator air baffle. Refer to Radiator Air Upper Baffle and Deflector Replacement
- Connect the battery ground cable. Refer to Battery Negative Cable Disconnection and Connection.
- Check all vehicle lights for correct operation.
Important: Do not handle the quartz envelope of the headlight bulb. Wipe the quartz envelope immediately with methylated spirits if it is touched accidentally or the performance of the bulb will deteriorate.
Important: The different-sized tabs on the bulb base and mating cut-outs in the headlamp assembly allow the bulb to seat correctly in one orientation position.

Important: For left-hand headlamp, go to step 7.
Important: For right-hand headlamp, go to step 8.
