Windshield Washer Hose Replacement Sedan
Removal Procedure (Up to 01 Sept 2007)
- Remove the radiator assembly. Refer to Radiator Replacement .
- Use a suitable tool to separate the windshield washer hose (1) from the washer pump (2).
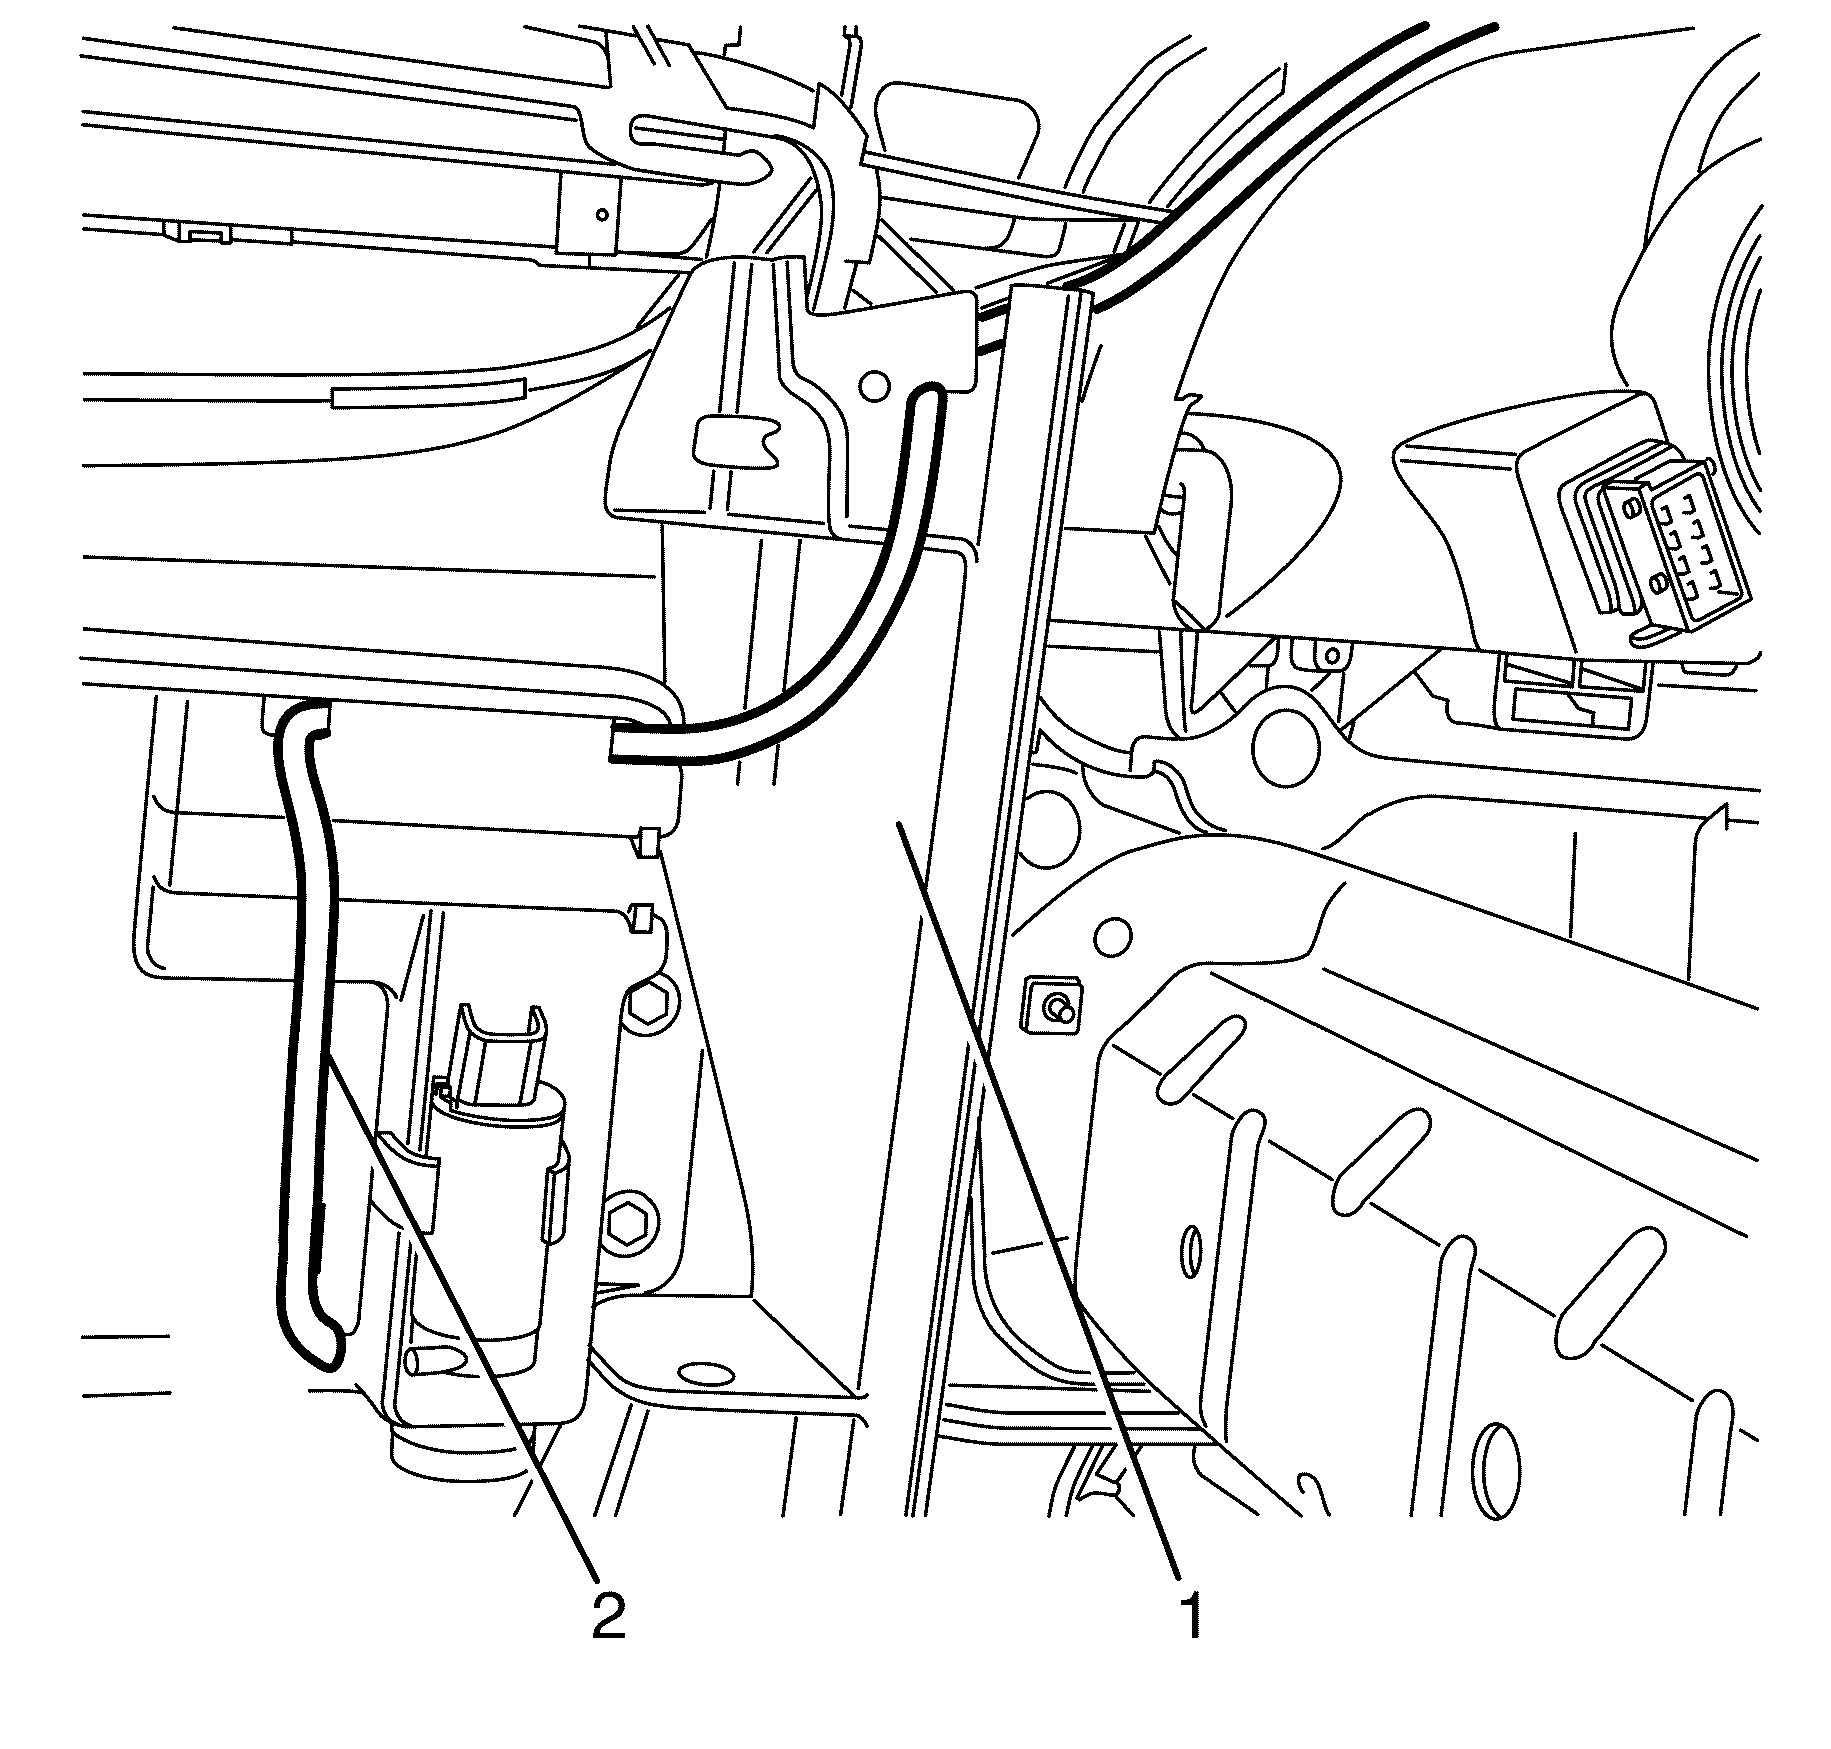
- Detach the washer hose (2) from the radiator air intake baffle (1).
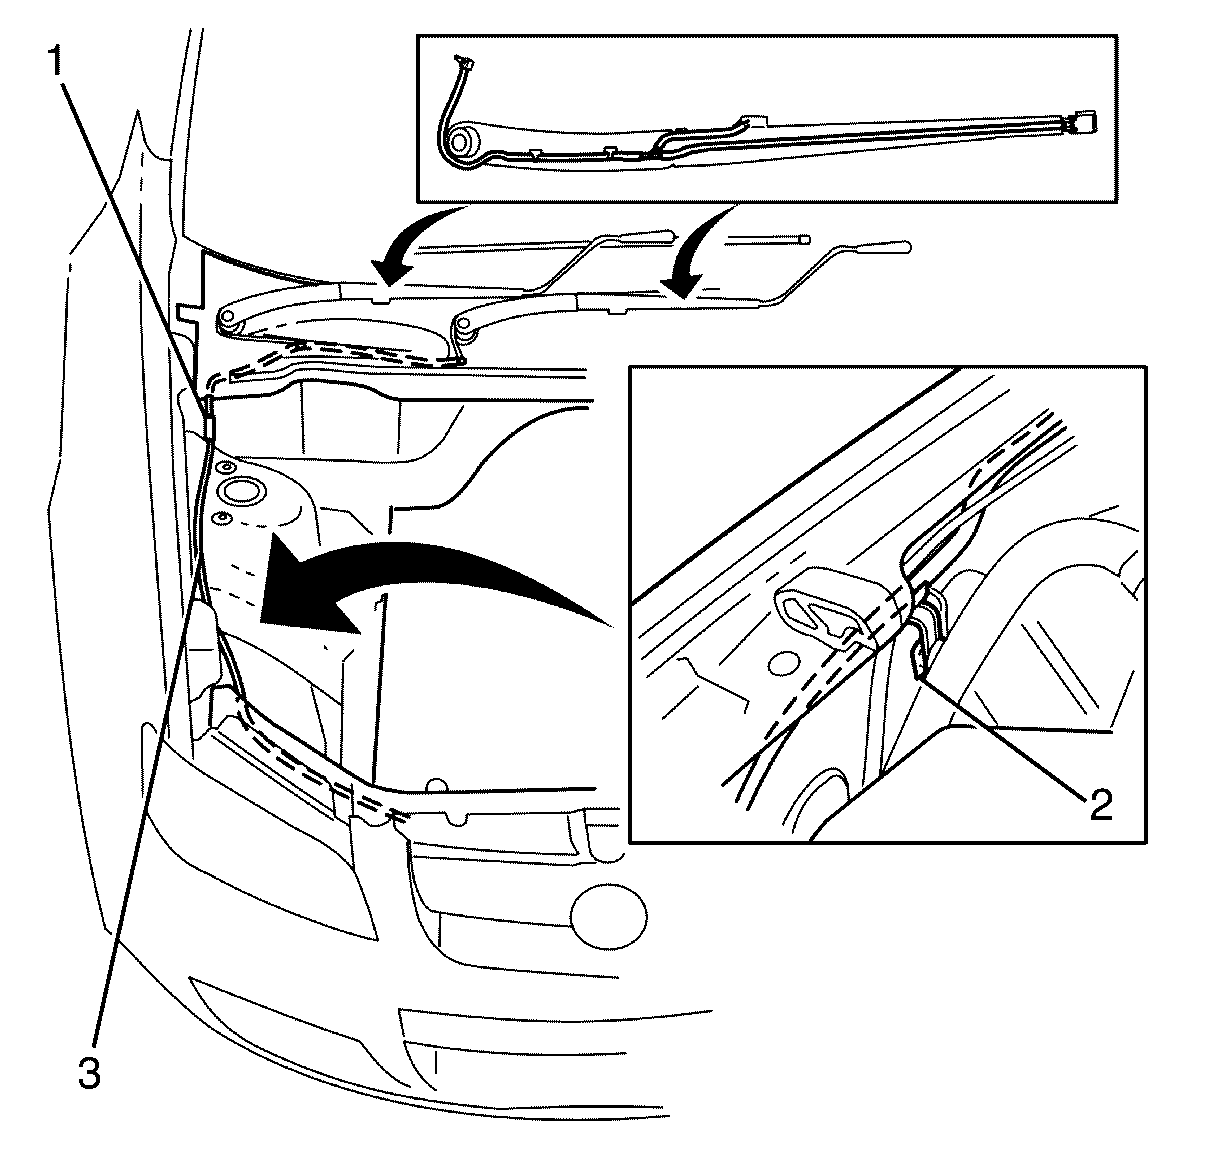
- Detach the washer hose (3) from the fender retaining clip (2).
- Disconnect the washer hose (3) from the washer hose connection (1).
- Remove the windshield washer hose (3).
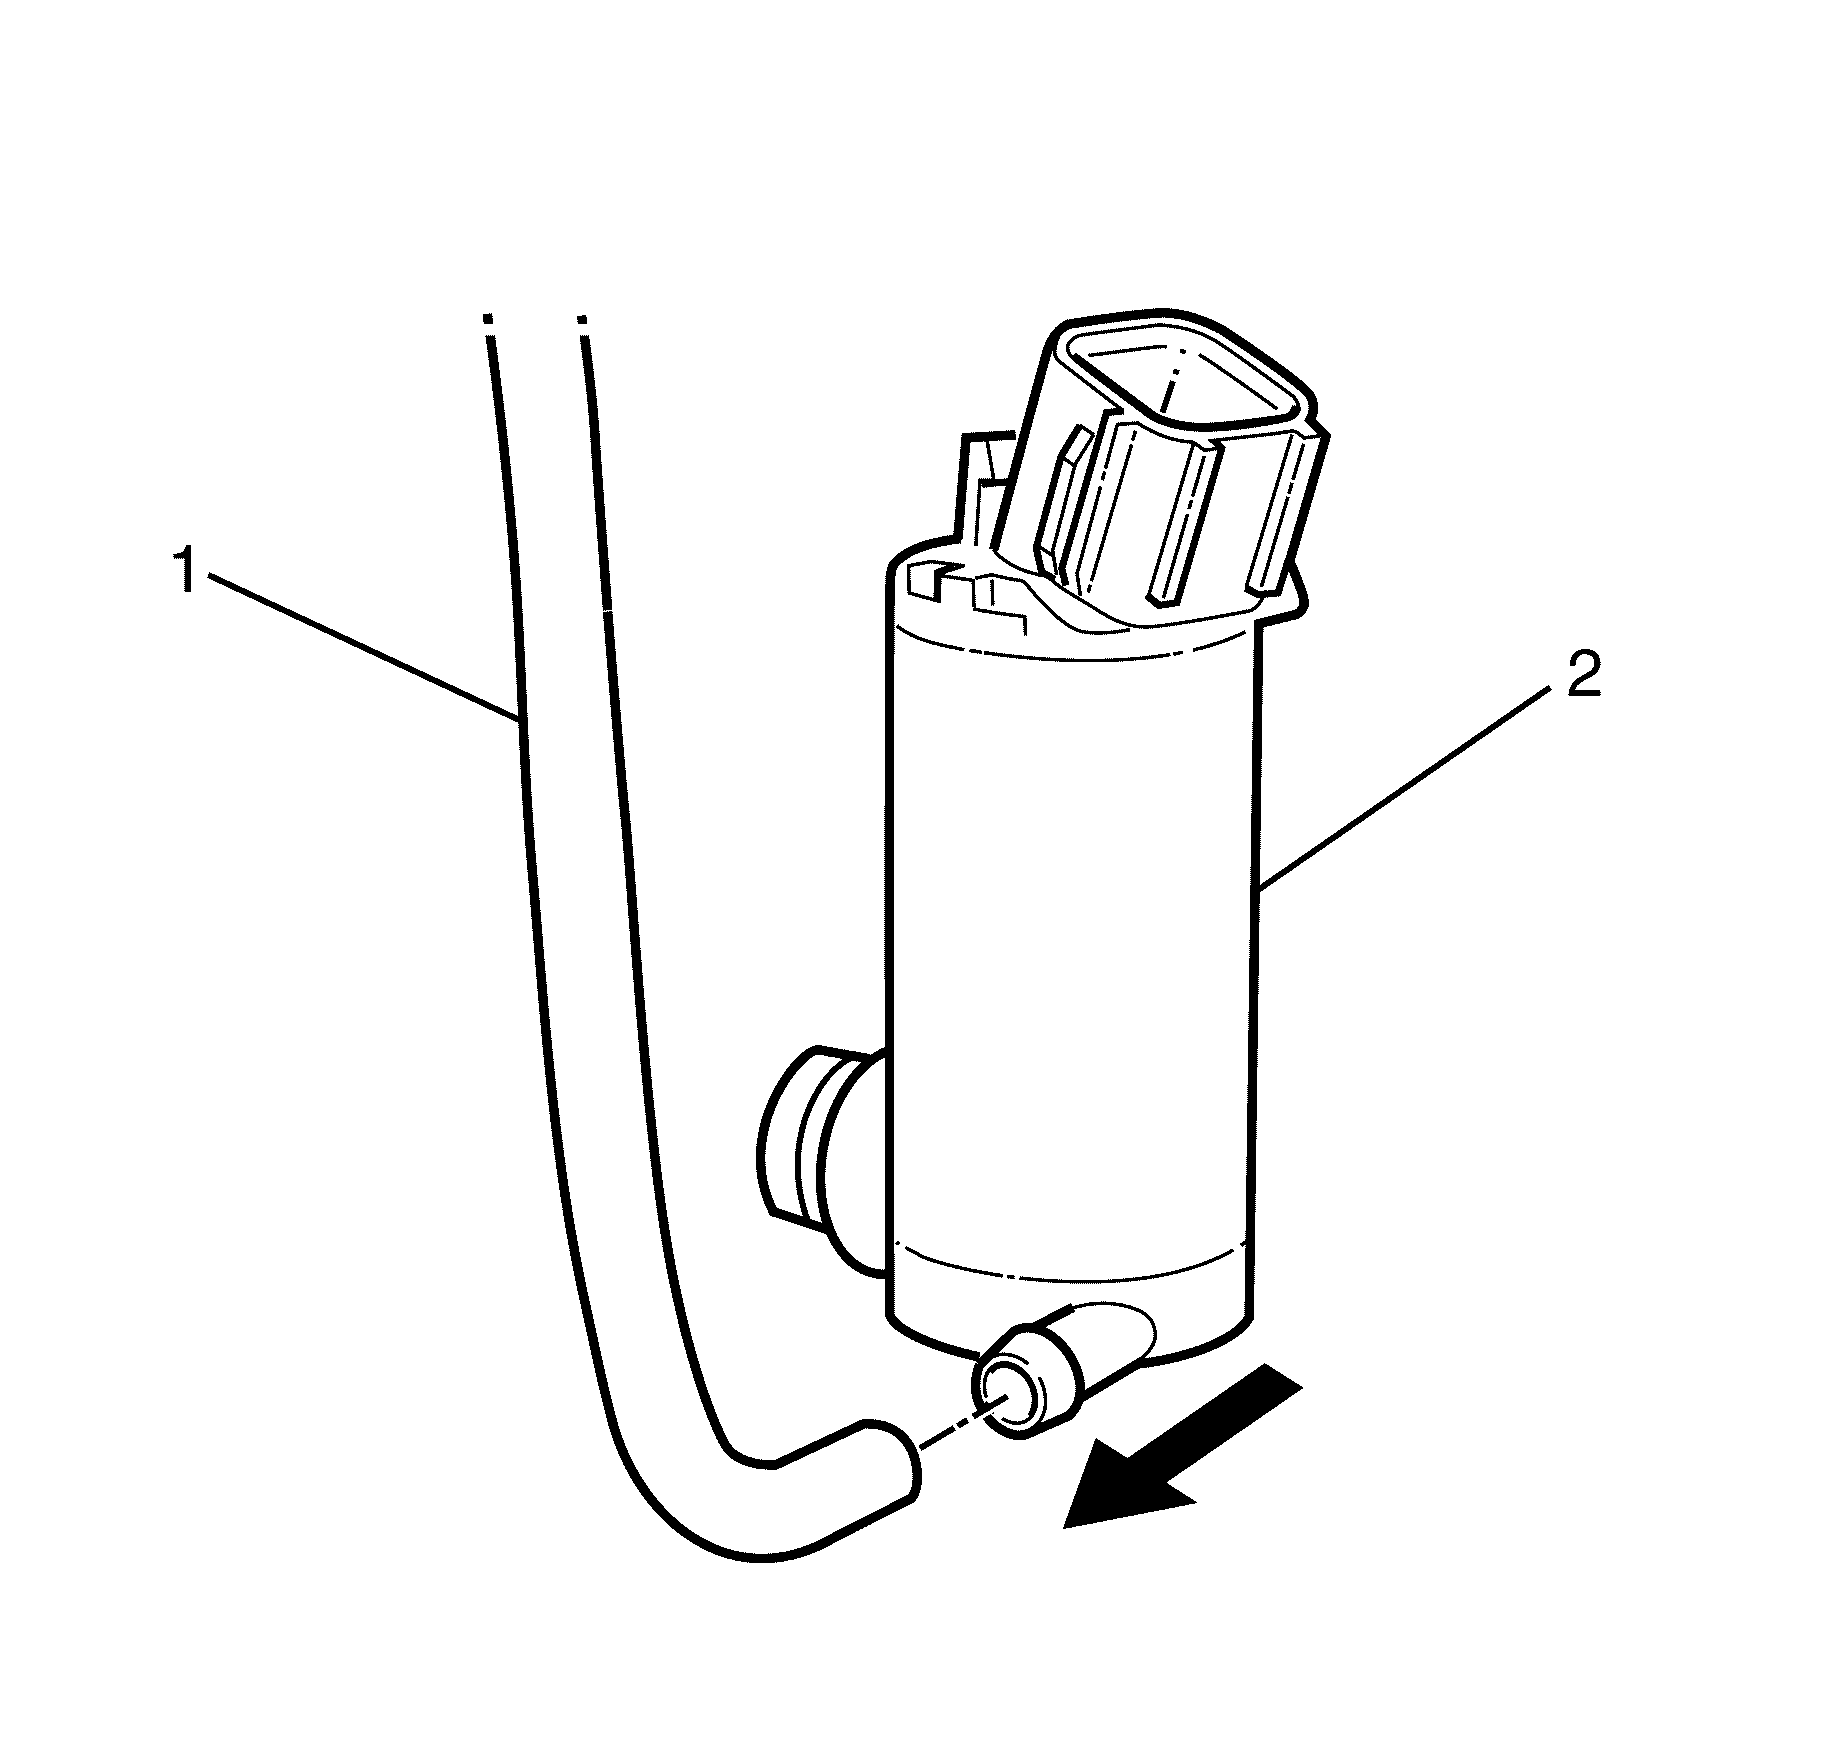
Important: Take care not to pierce the washer hose. Use a suitable cap to cap off the washer motor after removing the hose to prevent spillage.
Installation Procedure (Up to 01 Sept 2007)
- Attach the washer hose (3) to the washer hose connection (1).
- Attach the washer hose (3) to the fender clip (2).
- Route the washer hose (2) through the radiator air intake baffle (1).
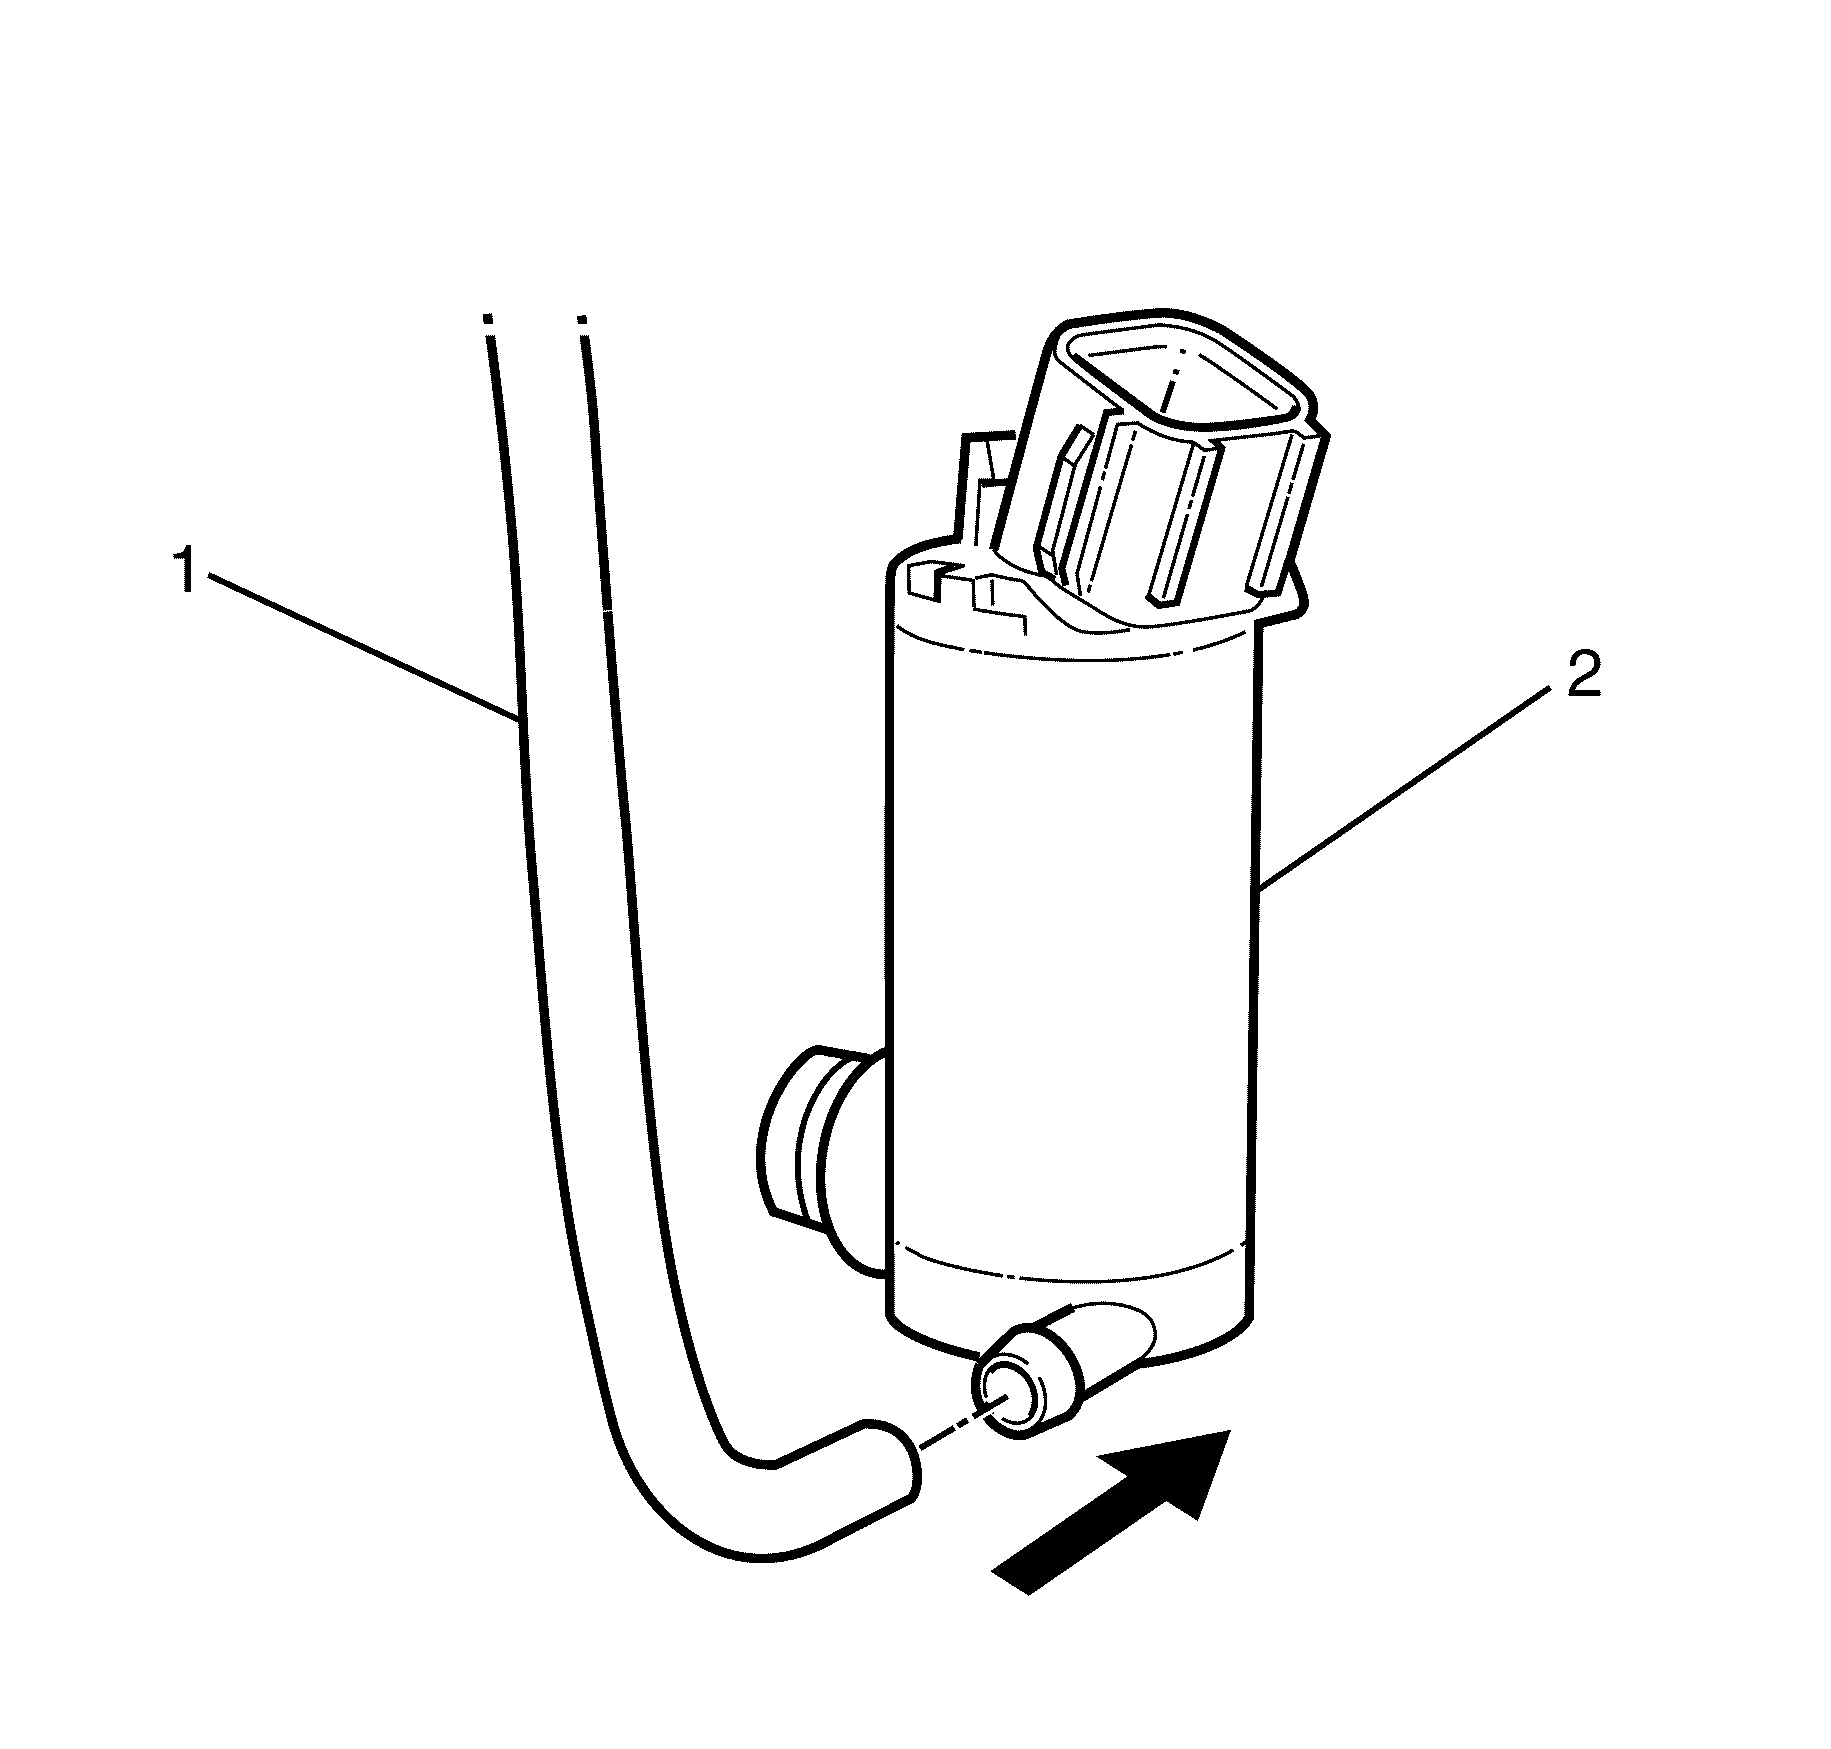
- Install the washer hose (1) onto the washer pump (2).
- Install the radiator assembly. Refer to Radiator Replacement .
- Test the washer pump for correct operation.


Removal Procedure (From 01 Sept 2007)
- Remove the radiator assembly. Refer to Radiator Replacement .
- Use a suitable tool to separate the windshield washer hose (1) from the washer pump (2).
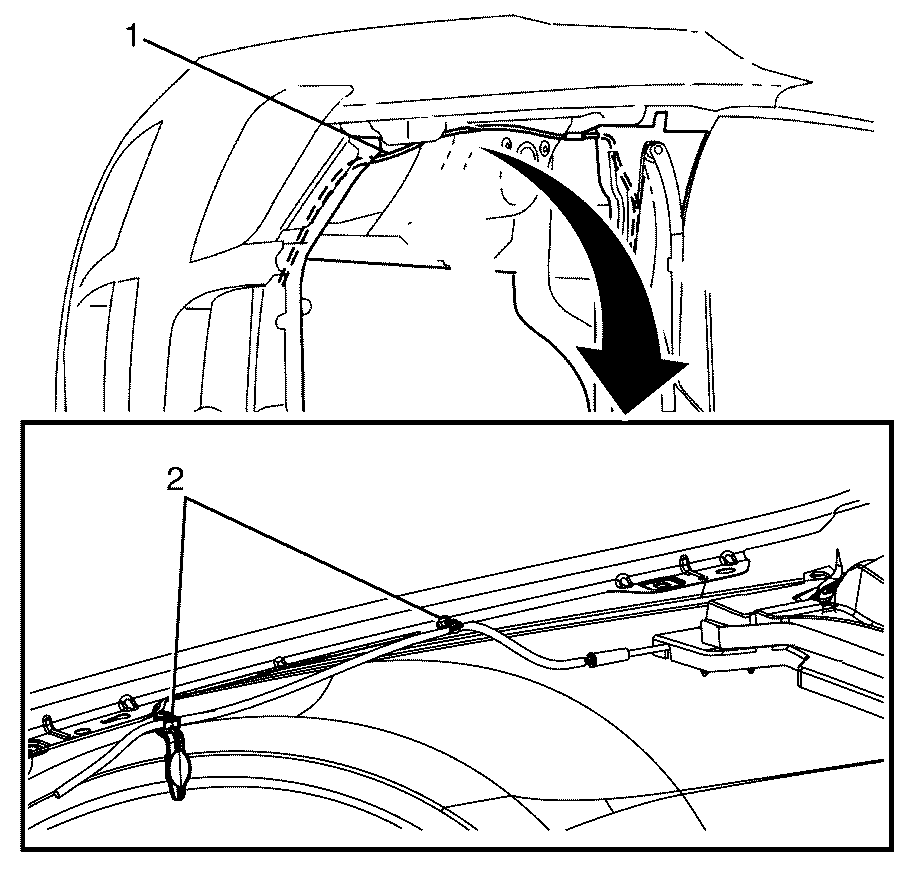
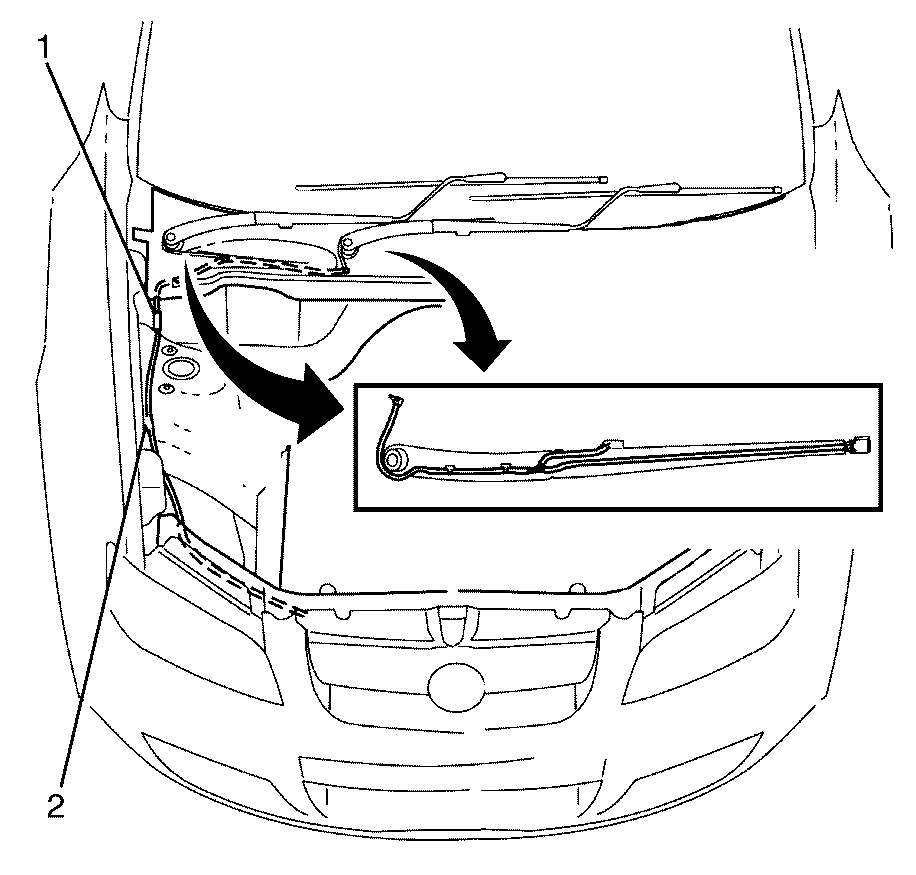
- Detach the washer hose (2) from the radiator air intake baffle (1).
- Detach the washer hose (1) from the fender retaining clips (2).
- Disconnect the washer hose (2) from the washer hose connection (1).
- Remove the windshield washer hose (2).

Important: Take care not to pierce the washer hose. Use a suitable cap to cap off the washer motor after removing the hose to prevent spillage.

Installation Procedure (From 01 Sept 2007)
- Attach the washer hose (2) to the washer hose connection (1).
- Attach the washer hose (1) to the fender retaining clips (2).
- Route the washer hose (2) through the radiator air intake baffle (1).
- Install the washer hose (1) onto the washer pump (2).
- Install the radiator assembly. Refer to Radiator Replacement .
- Test the washer pump for correct operation.


Removal Procedure (Air Inlet Grill Hose)
- Remove the wiper arms. Refer to Windshield Wiper Arm Replacement .
- Remove the air inlet grille. Refer to Air Inlet Grille Panel Replacement .
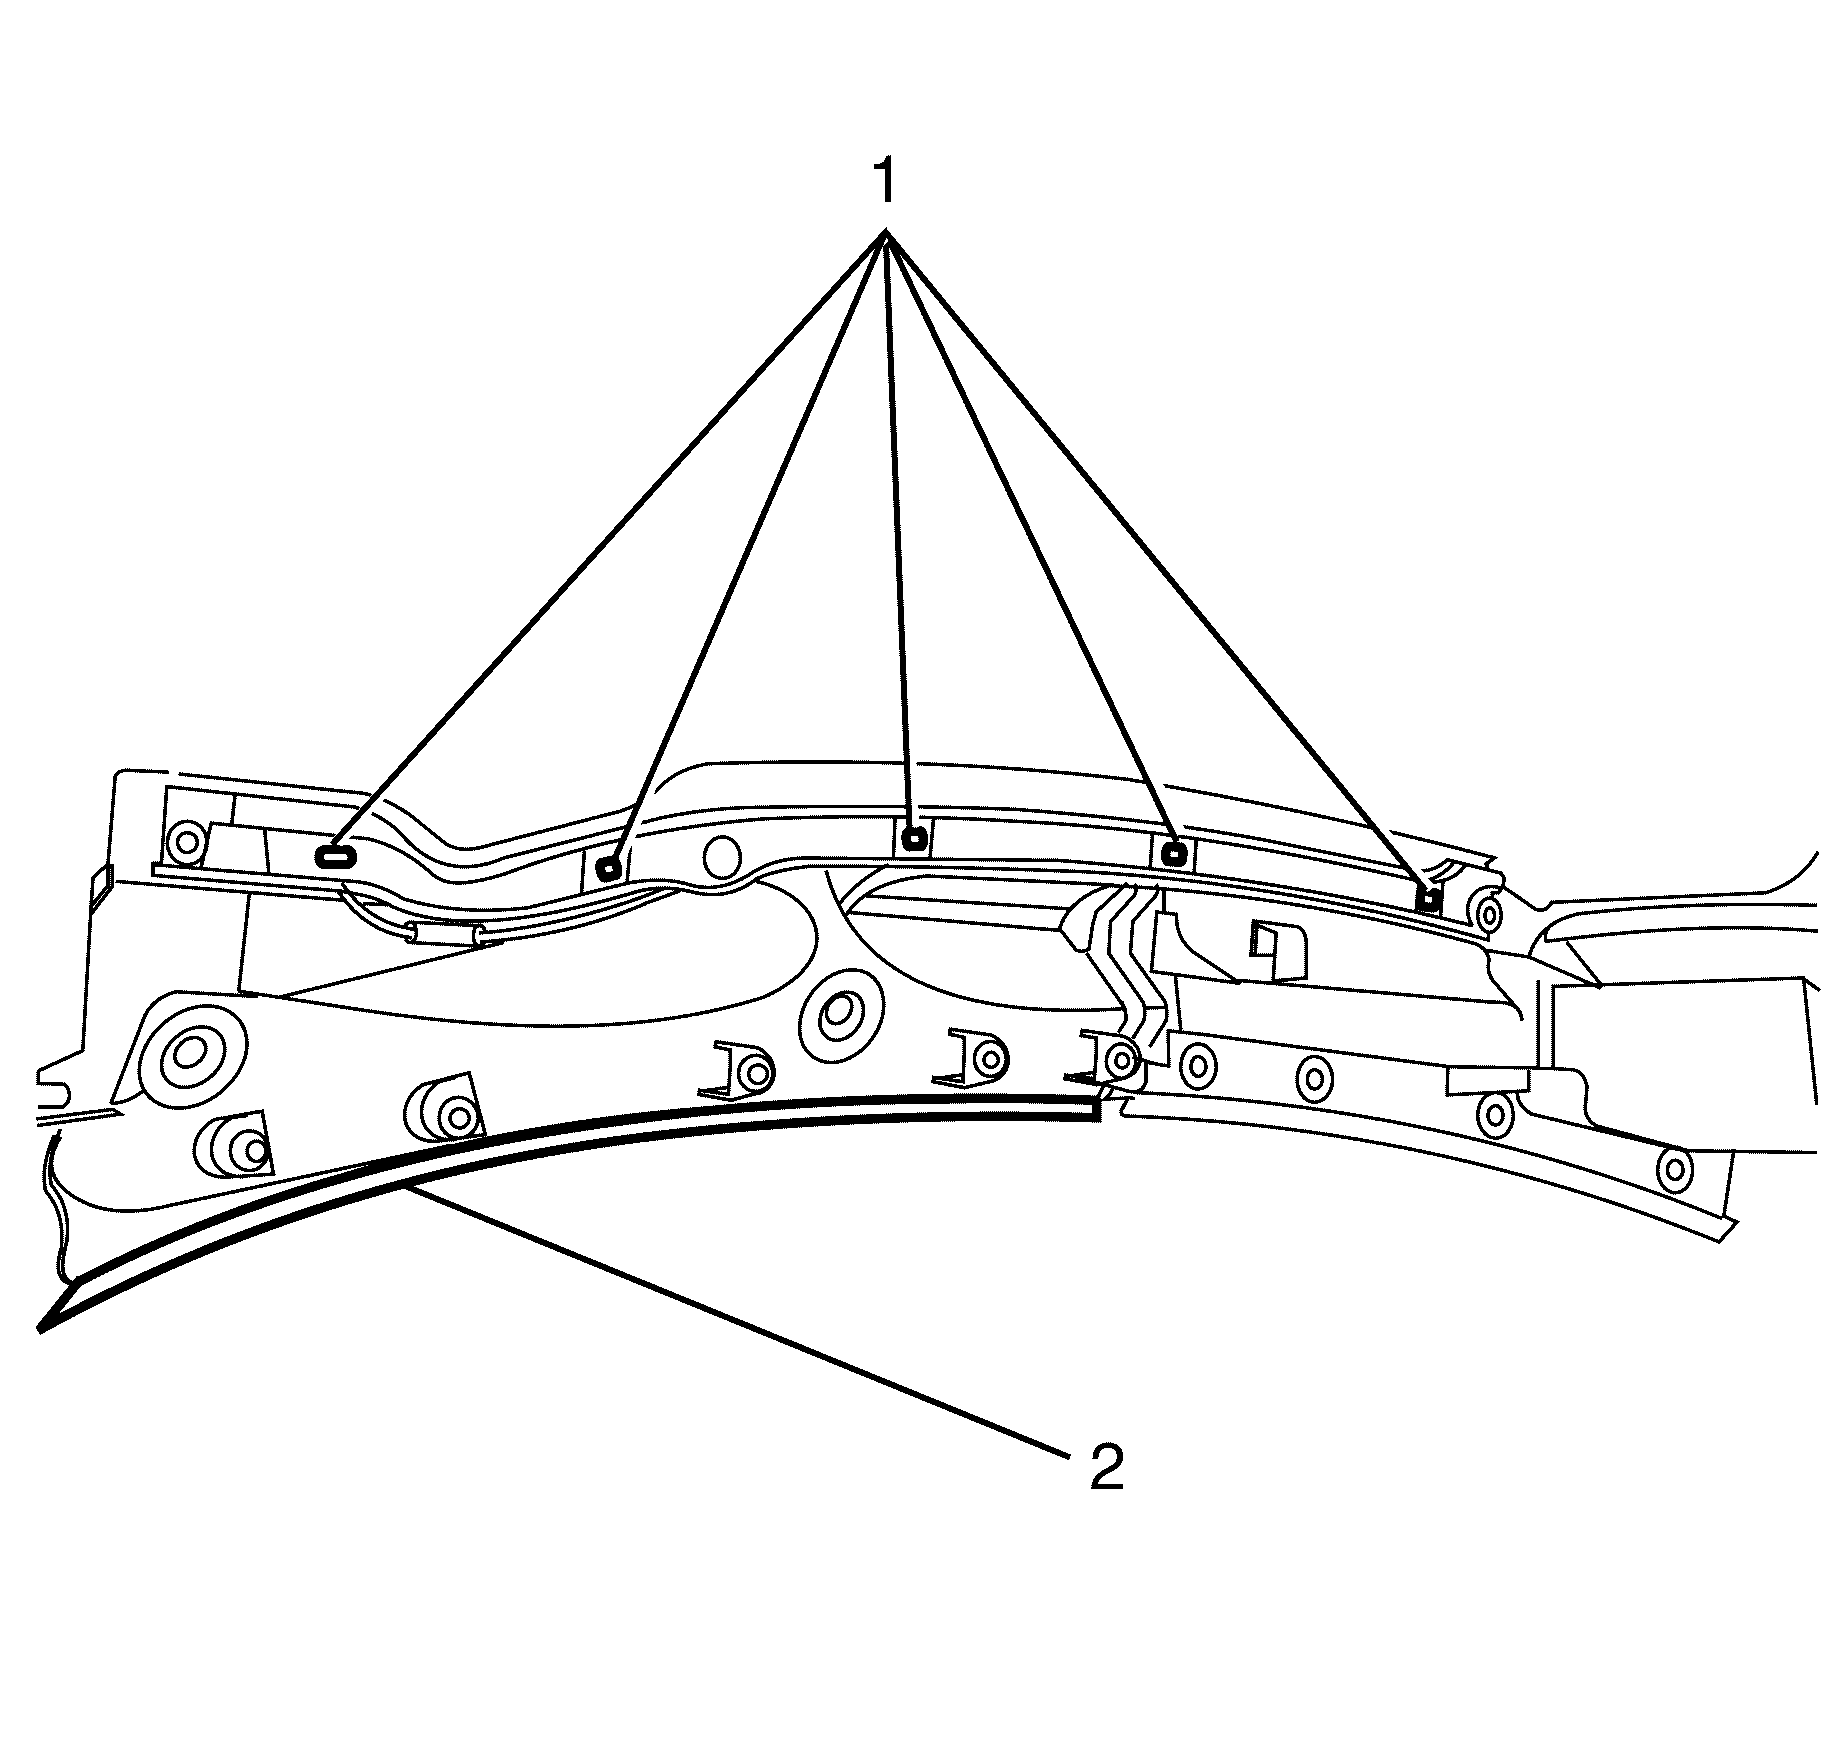
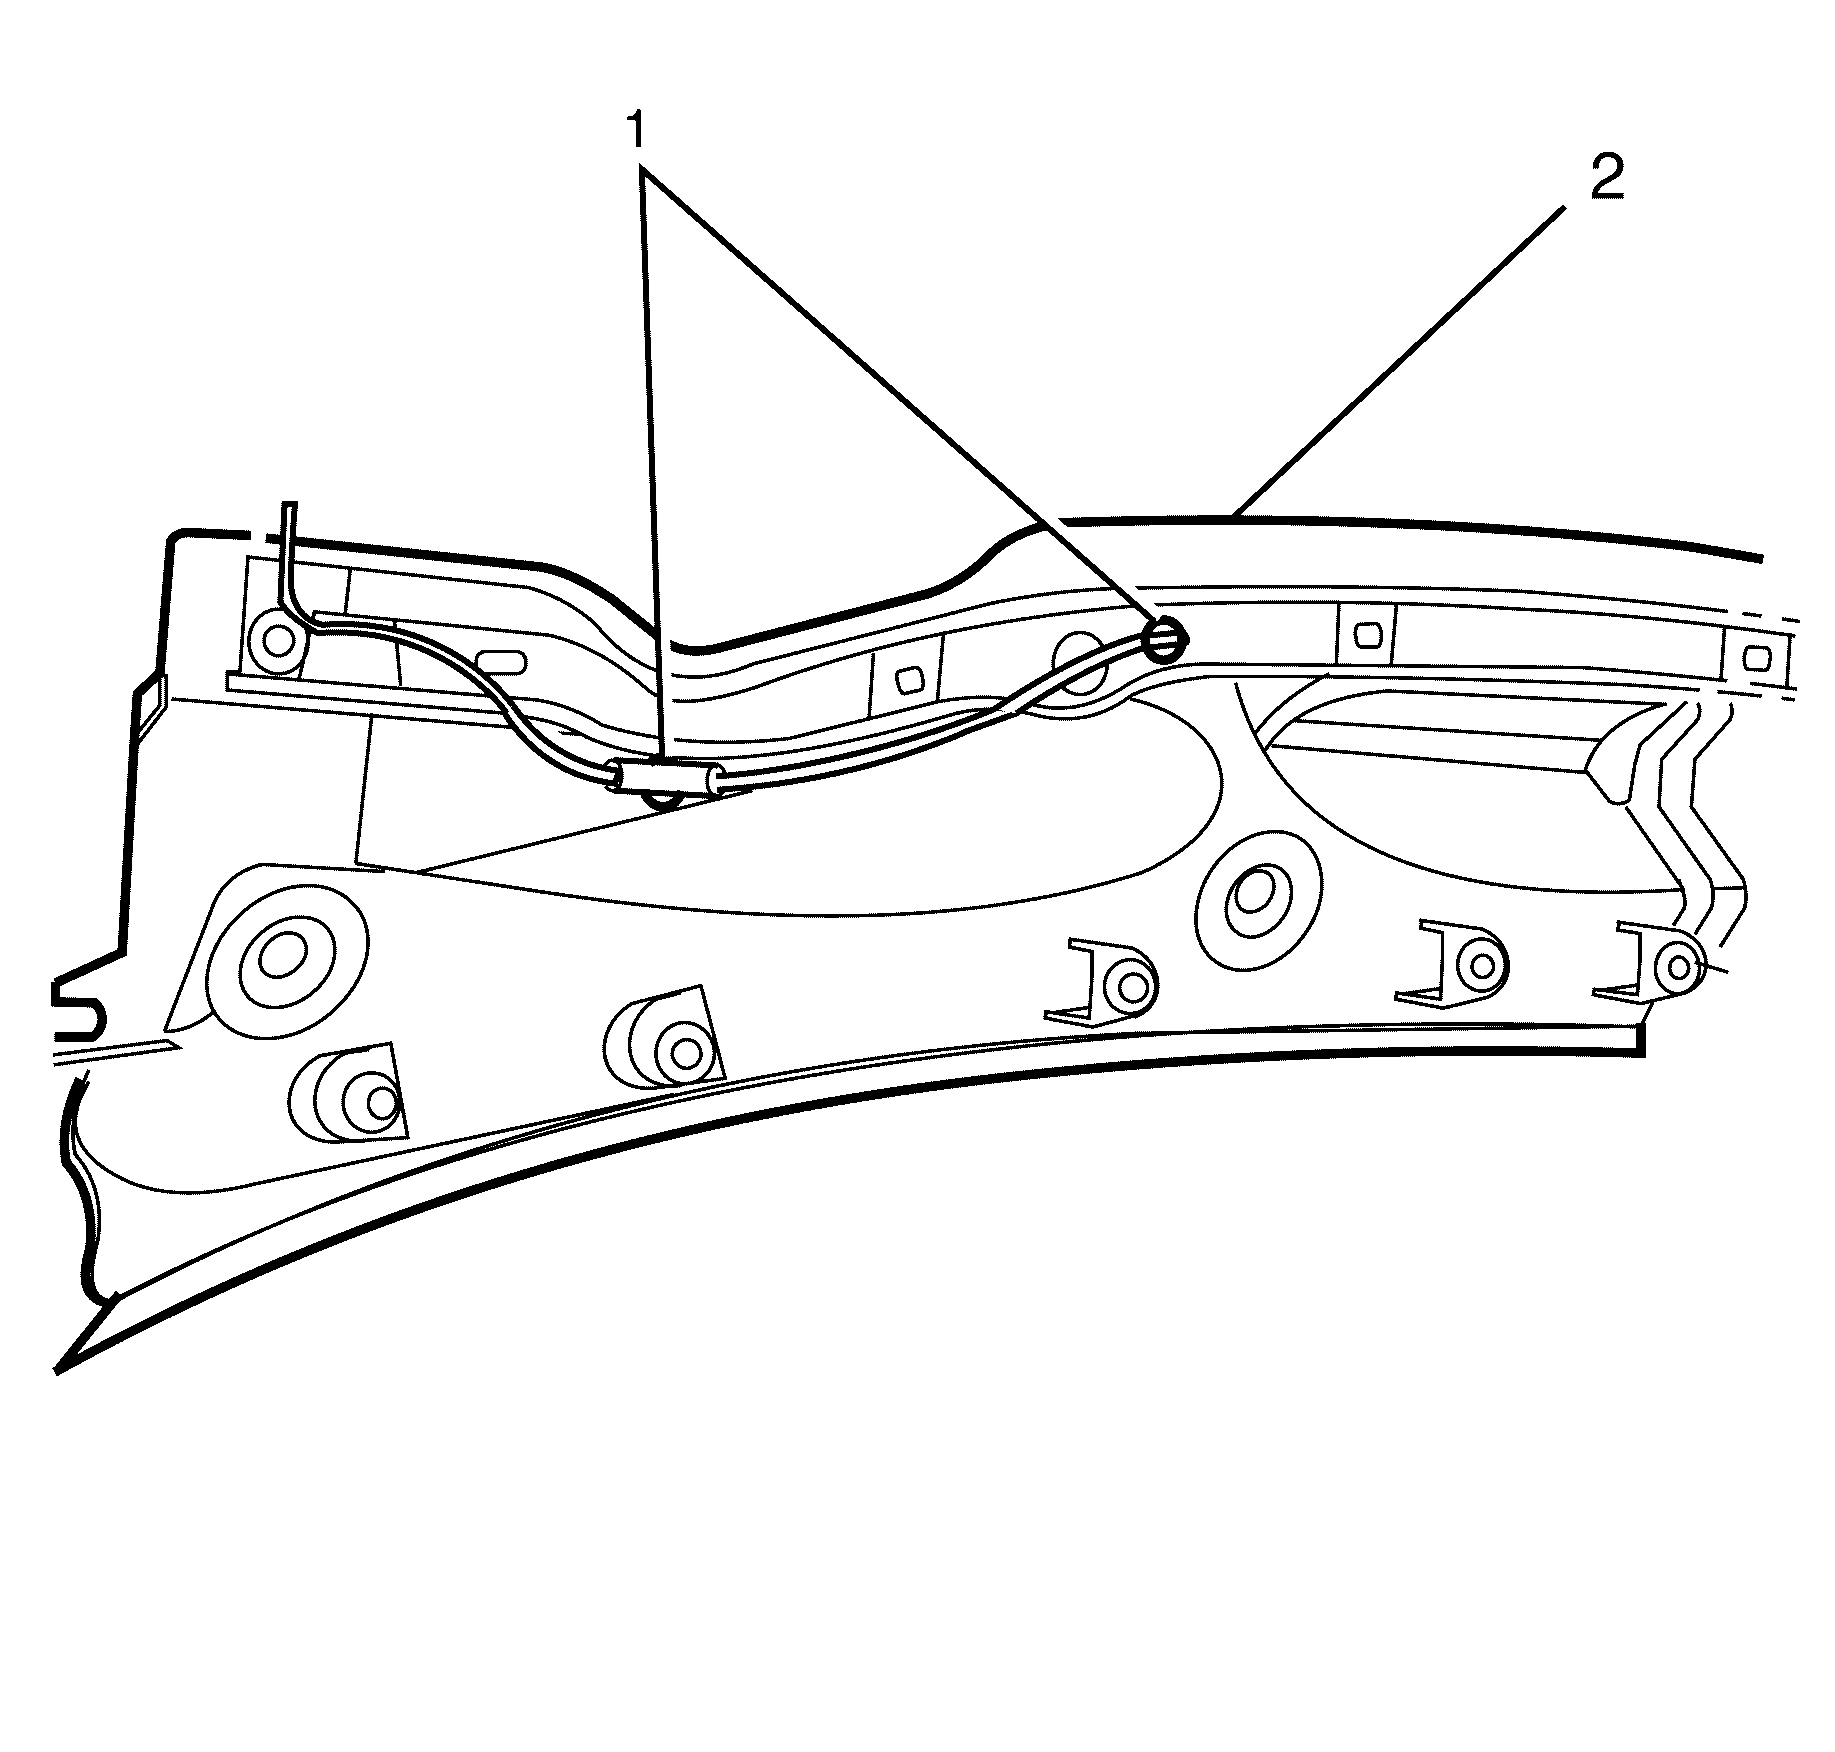
- Remove the retaining torx screws (1) from the air inlet grille brace.
- Remove the air inlet grille brace from the air inlet grille.
- Detach and remove the air inlet grille hose (1) from the air inlet grille (2).
Installation Procedure
- Attach the air inlet grille hose (1) to the air inlet grille (2).
- Install the air inlet grille brace (2) to the air inlet grille
- Install the air inlet grille brace (2) to the air inlet grille retaining torx screws (1).
- Install the air inlet grille. Refer to Air Inlet Grille Panel Replacement .
- Install the wiper arms. Refer to Windshield Wiper Arm Replacement .


Notice: Refer to Fastener Notice in the Preface section.
Tighten
Tighten the torx screws to (2.0 N·m
(18 lb in).
Windshield Washer Hose Replacement Sportwagon
Removal Procedure - Washer Pump to Front Fender Connector
- Remove the radiator grille. Refer to Radiator Grille Replacement.
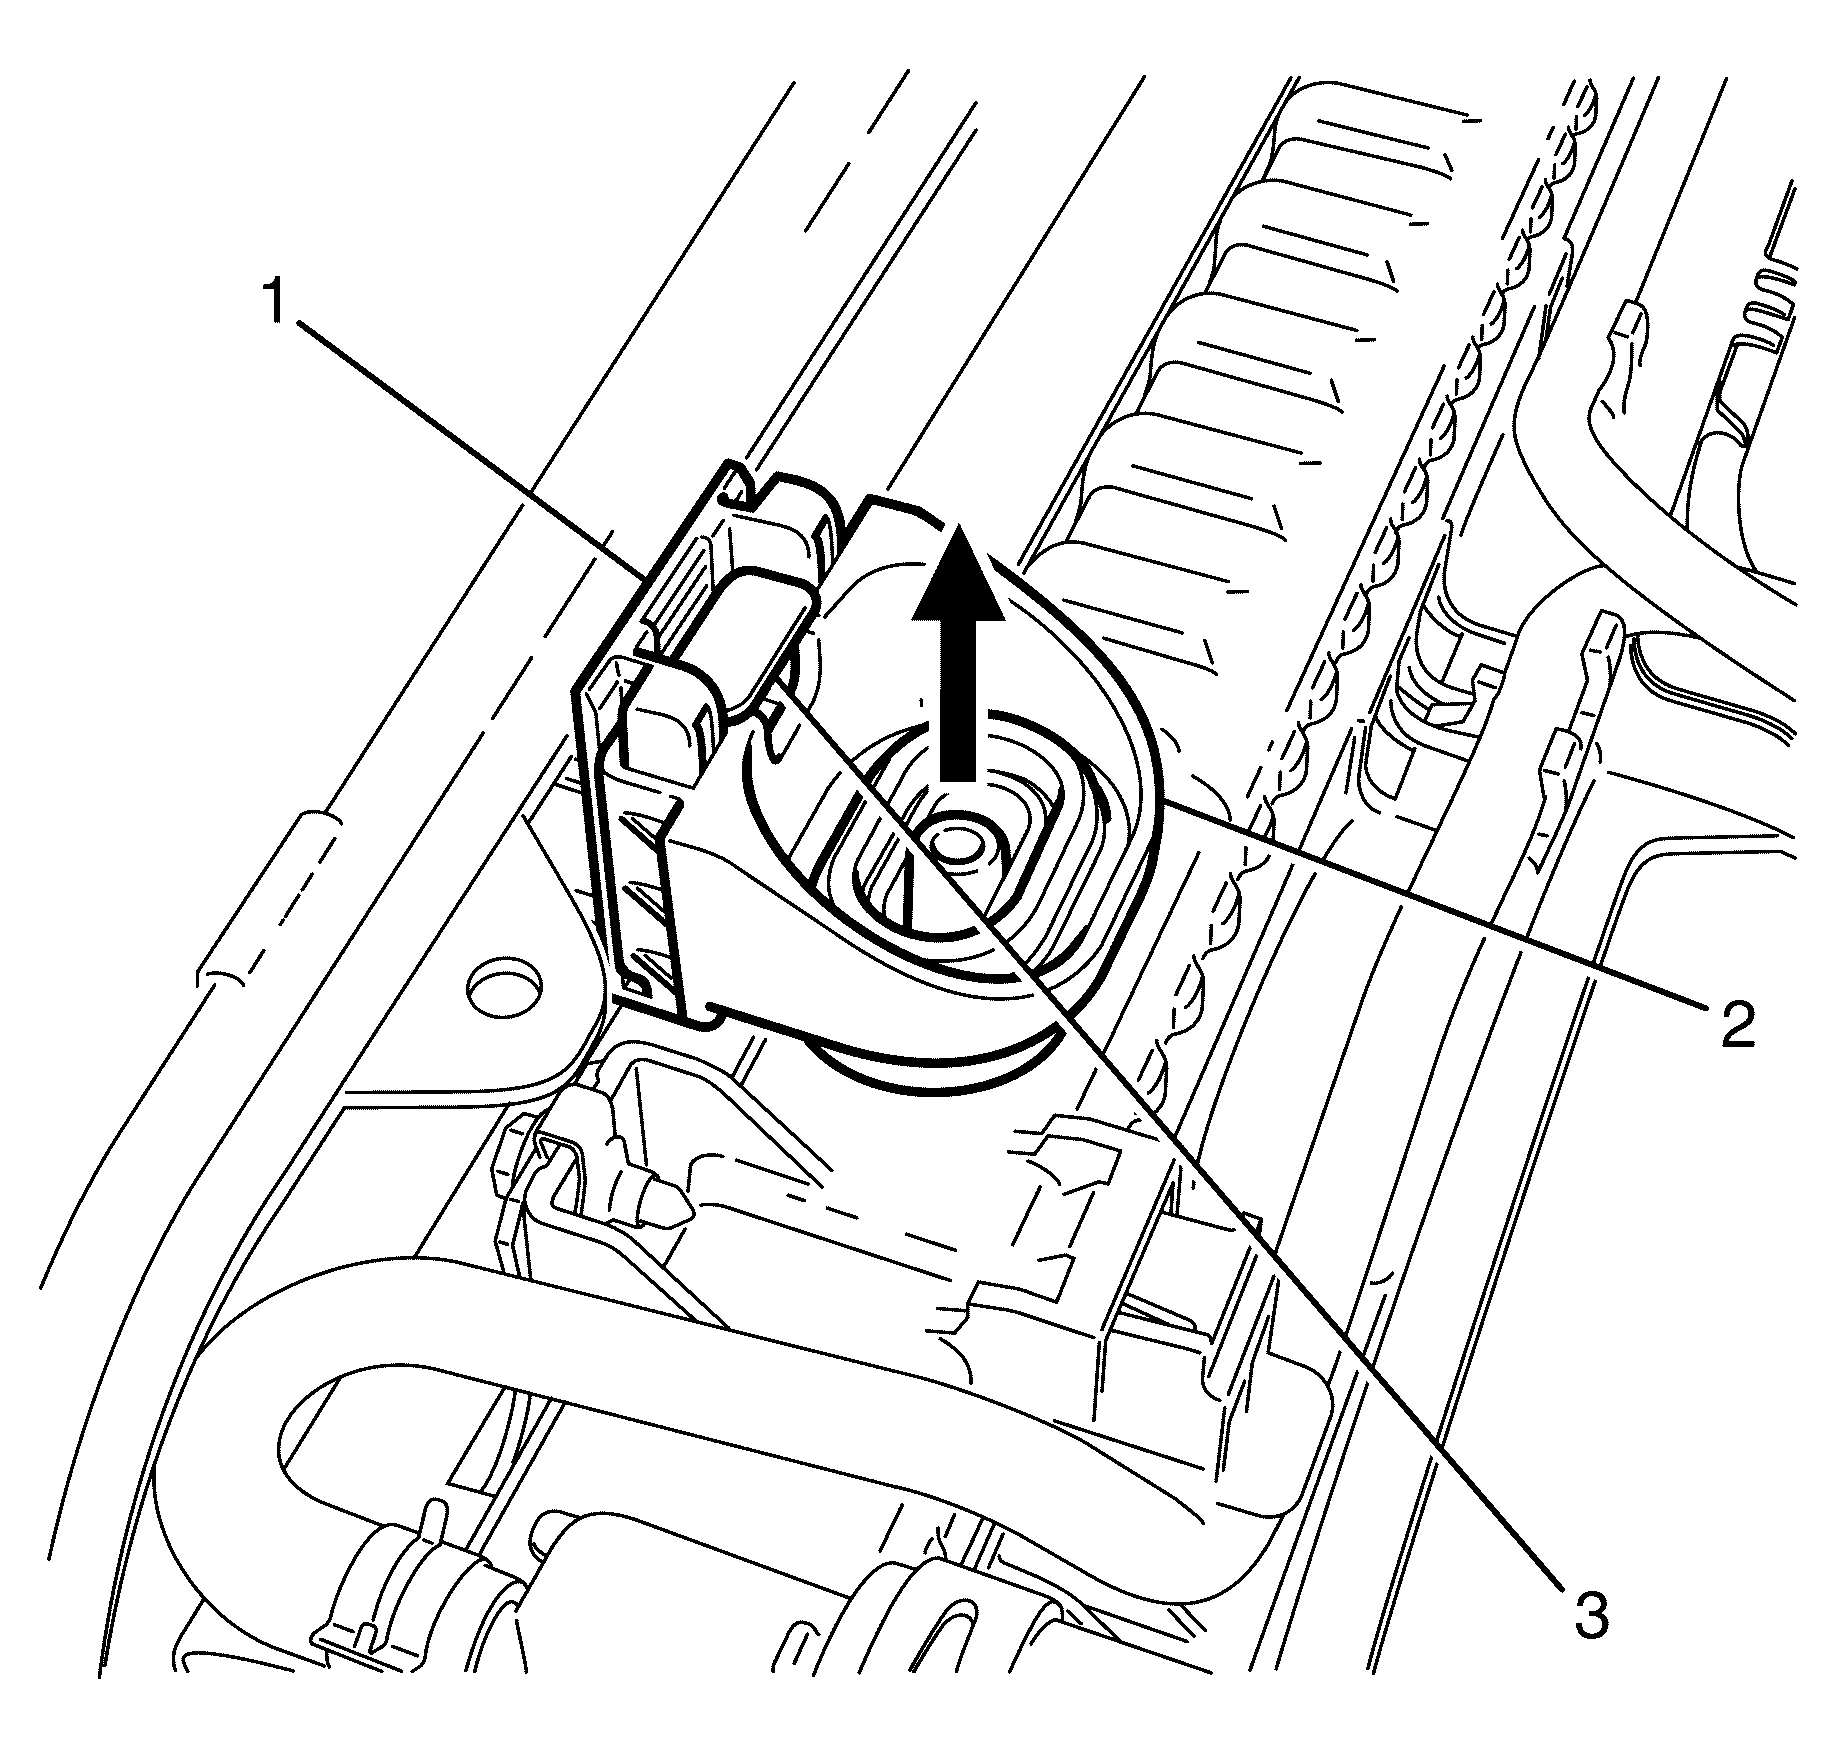
- Raise the securing lock (3) from the radiator support bracket (2) by 10 mm on both sides.
- Remove the radiator support bracket (2) from the radiator slide pin assembly (1) on both sides.
- Tilt the radiator assembly (2) away from the front end panel (1).
- Insert a suitable holding device between the front end panel (1) and the radiator assembly (2).
- Place a suitable container under the windshield washer pump (2).
- Disconnect the windshield washer hose (1) from the windshield washer pump (3).
- Detach the windshield washer hose (1) from the solvent container (2).
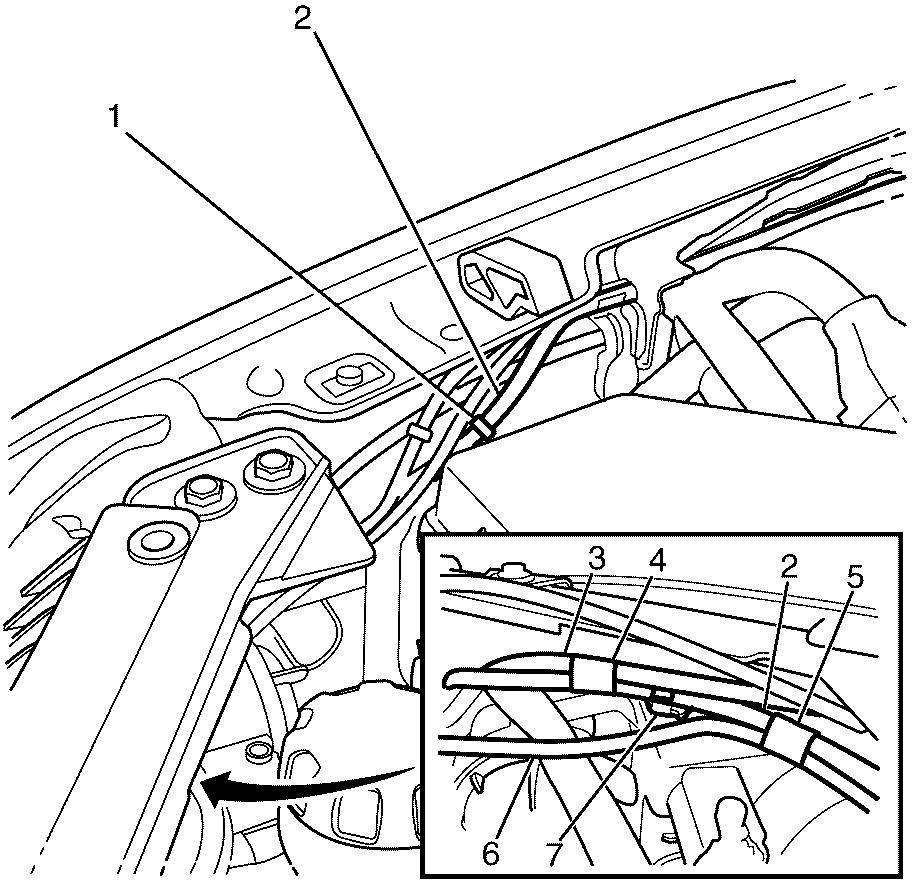
- Mark the location of the windshield washer hose to solvent container overflow hose retaining tape (4) to the solvent container overflow hose (3).
- Remove the windshield washer hose to solvent container overflow hose retaining tape (4).
- Mark the location of the rear window washer hose to windshield washer hose retaining tape (5) to the rear window washer hose (6).
- Remove the rear window washer hose to windshield washer hose retaining tape (5).
- Mark the location of the windshield washer hose retaining clip (7) to the windshield washer hose (2).
- Detach the windshield washer hose (2) from the windshield washer hose retaining clip (7).
- Disconnect the windshield washer hose (2) from the windshield washer hose front fender connector (1).
- Remove the windshield washer hose (2).
- Using the original windshield washer hose retaining clip reference mark as a guide, mark the position of the windshield washer hose retaining clip to the NEW windshield washer hose.
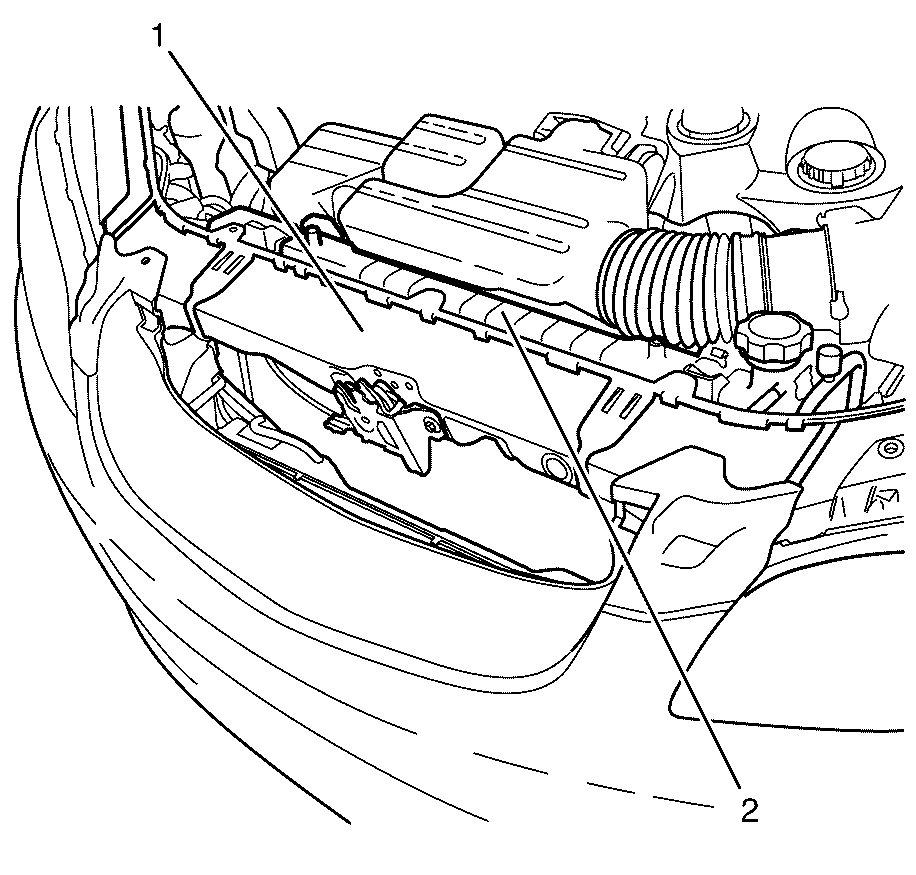
Important: Care must be taken when tilting the radiator assembly (2) away from the front end panel (1), as excessive force may damage the radiator assembly (2).
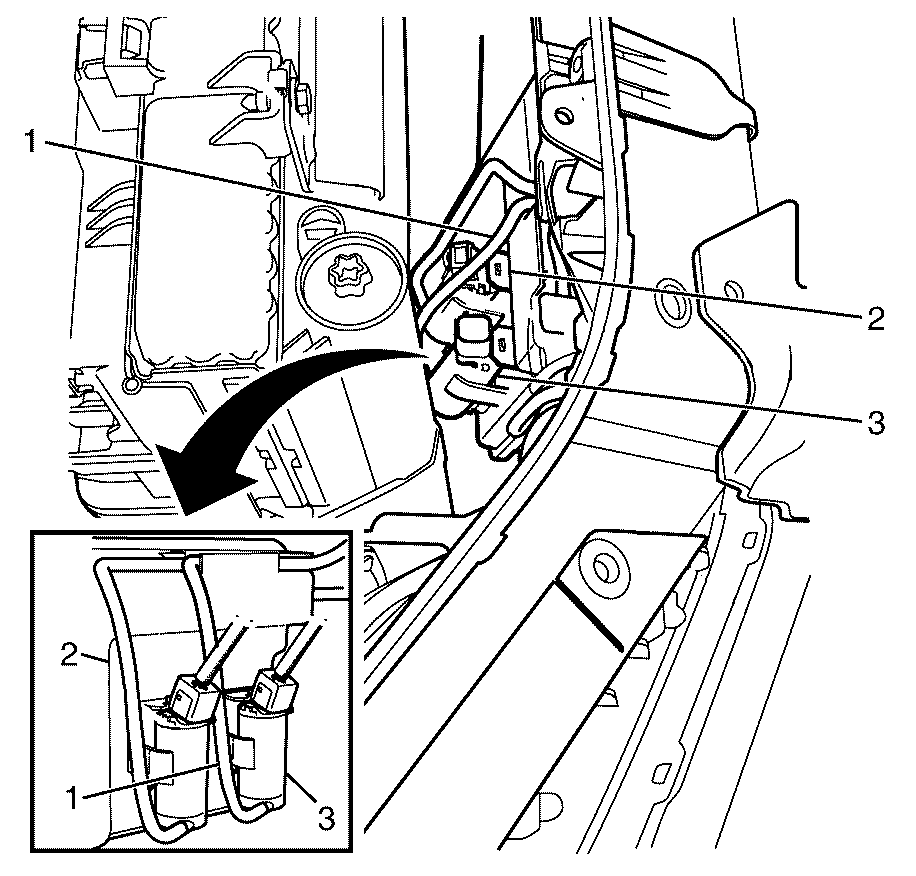
Important: Take care not to damage the condenser cooling fins when removing the windshield washer hose (1) from the windshield washer pump (3).
Installation Procedure - Washer Pump to Front Fender Connector
- Connect the windshield washer hose (2) to the windshield washer hose front fender connector (1).
- Attach the windshield washer hose (2) to the windshield washer hose retaining clip (7).
- Attach the rear window washer hose (6) to the marked location on the windshield washer hose (2) with adhesive tape (5).
- Attach the solvent container overflow hose (3) to the marked location on the windshield washer hose (2) with adhesive tape (4).
- Attach the windshield washer hose (1) to the solvent container (2).
- Connect the windshield washer hose (1) to the windshield washer pump (3).
- Remove the holding device between the radiator assembly (2) and front end panel (1).
- Position the radiator assembly (2) towards the front end panel (1) to its original position.
- Install the radiator support bracket (2) to the radiator slide pin assembly (1) on both sides.
- Push the securing lock (3) into the radiator support bracket (2) making sure it is correctly seated on both sides.
- Install the radiator grille. Refer to Radiator Grille Replacement.
- Fill the washer fluid container with solvent.
- Check the operation of the windshield washer and make sure there are no solvent leaks.
Important: When installing the windshield washer hose make sure it follows the original hose routing.


Important: Take care not to damage the condenser cooling fins when installing the rear window washer hose (1) to the rear window washer pump (2).

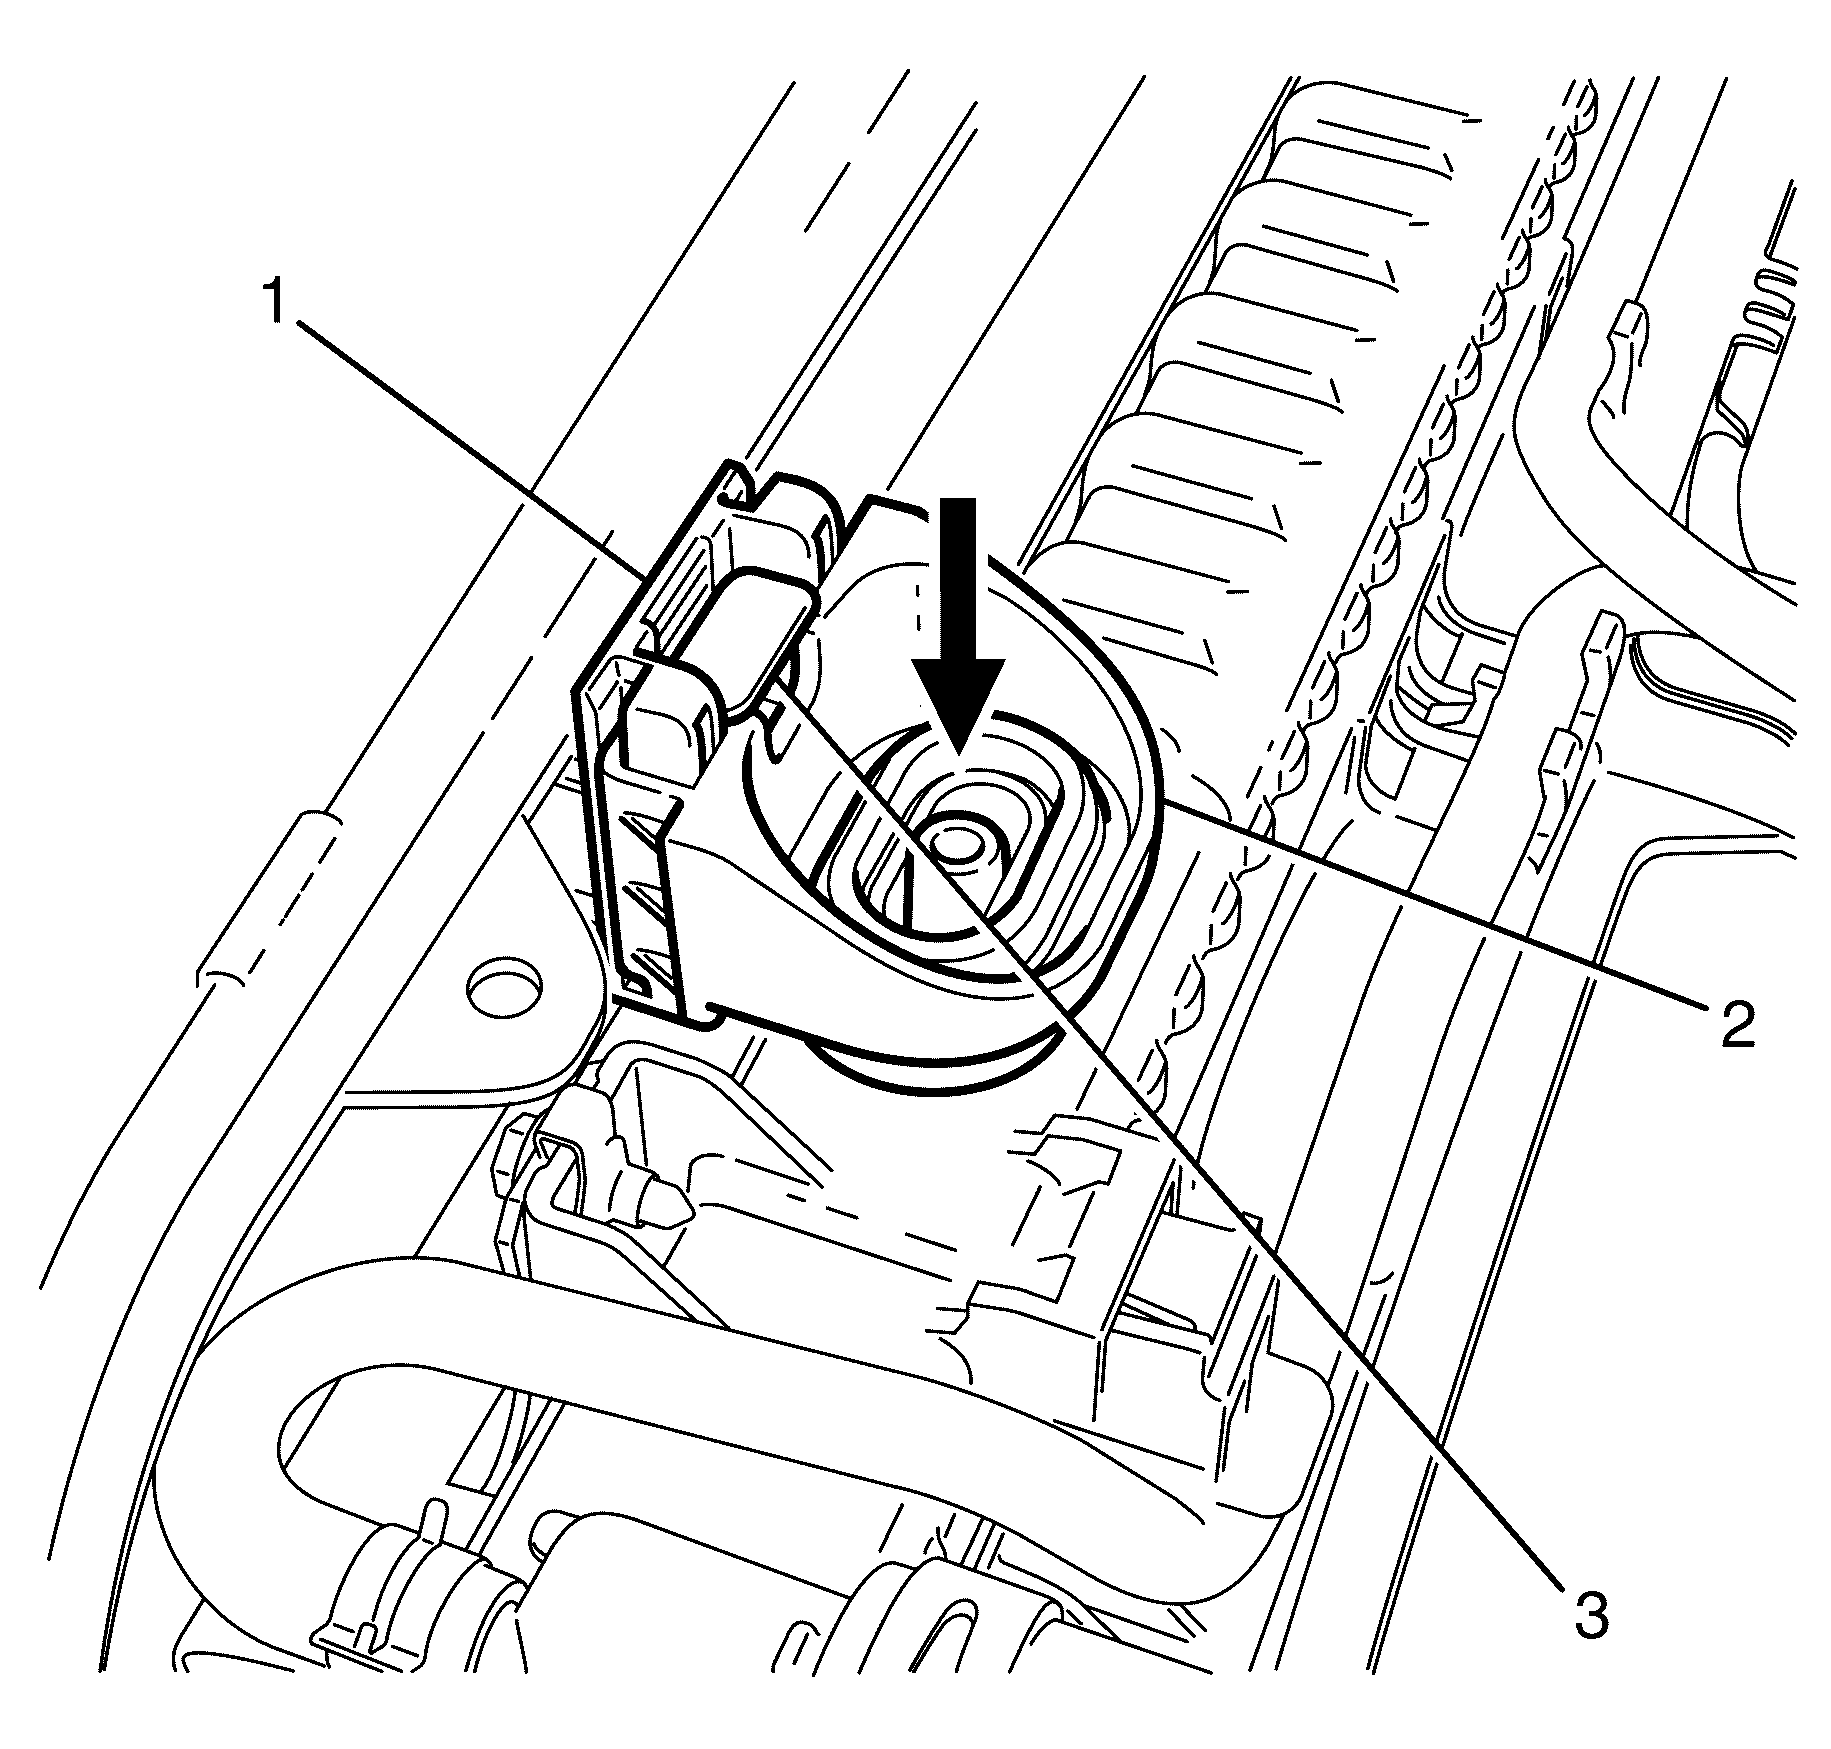
Removal Procedure - Front Fender Connector to Air Inlet Grill Connector
- Detach the windshield washer hose (3) from the front fender retaining clips (2).
- Disconnect the windshield washer hose (3) from the windshield washer hose front fender connector (1).
- Disconnect the windshield washer hose (3) from the windshield washer hose air inlet grill hose connector (4).
- Remove the windshield washer hose (3).
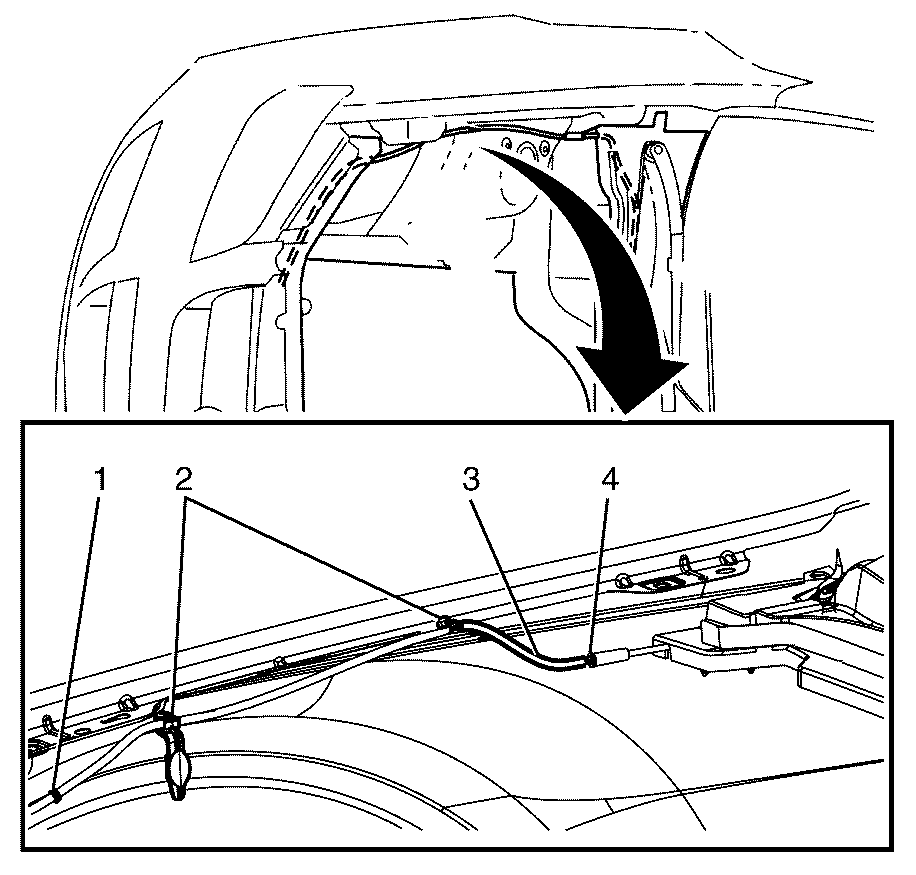
Installation Procedure - Front Fender Connector to Air Inlet Grill Connector
- Connect the windshield washer hose (3) to the windshield washer hose air inlet grill hose connector (4).
- Connect the windshield washer hose (3) to the windshield washer hose front fender connector (1).
- Attach the windshield washer hose (3) to the fender retaining clips (2).
- Check the operation of the windshield washers and make sure there are no solvent leaks.

Removal Procedure - Air Inlet Grill Hose
- Remove the windshield wiper arms. Refer to Windshield Wiper Arm Replacement.
- Remove the air inlet grille. Refer to Air Inlet Grille Panel Replacement.
- Remove the air inlet grille brace retaining screws (1) from air inlet grille brace (3).
- Remove the air inlet grille brace (3) from the air inlet grille (2).
- Disconnect the windshield washer hose (3) from the windshield washer hose air inlet grille to wiper arm hose connectors (1).
- Remove the windshield washer hose (3).
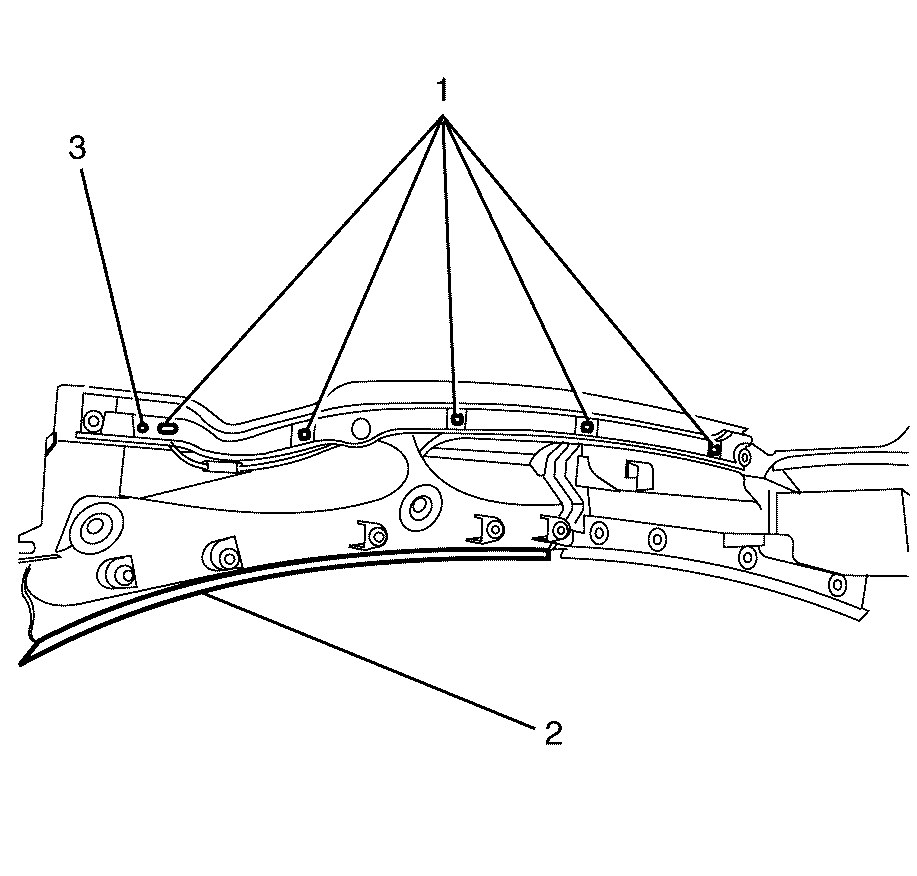
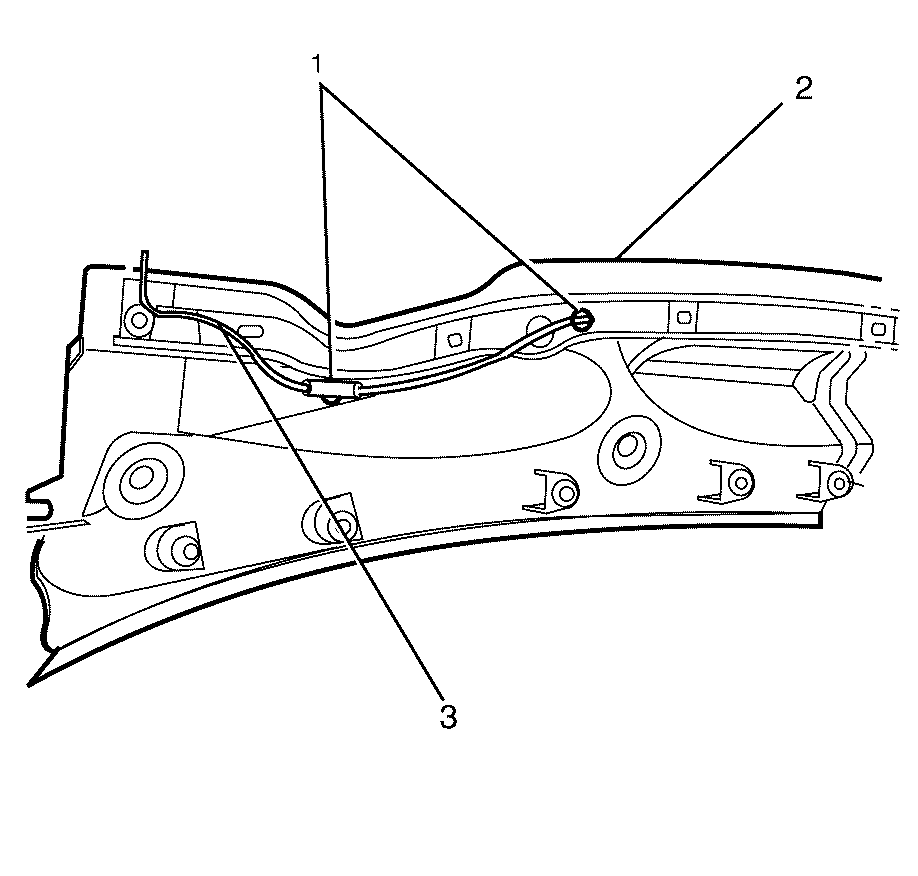
Installation Procedure - Air Inlet Grill Hose
- Connect the windshield washer hose (3) to the windshield washer hose air inlet grille to wiper arm hose connectors (1).
- Install the air inlet grille brace (3) to the air inlet grille (2).
- Install the air inlet grille brace retaining screws (1) to the air inlet grille brace (3).
- Install the air inlet grille. Refer to Air Inlet Grille Panel Replacement.
- Install the wiper arms. Refer to Windshield Wiper Arm Replacement
- Check the operation of the windshield washers and make sure there are no solvent leaks.


Notice: Refer to Fastener Notice in the Preface section.
Tighten
Tighten the screws to 2 N·m (18 lb in).
Removal Procedure - Windshield Wiper Arm Hoses
- Remove the windshield wiper arm. Refer to Windshield Wiper Arm Replacement.
- Detach the primary windshield washer hose (8) from the primary windshield washer hoses retaining clips (1).
- Disconnect and remove the primary windshield washer hose (8) from the primary windshield washer hoses to right and left washer nozzle hose connector (2).
- Disconnect the right windshield washer nozzle hose (3) from the primary windshield washer hoses to right and left washer nozzle hose connector (2).
- Disconnect and remove the right windshield washer nozzle hose (3) from the right windshield washer nozzle (4).
- Disconnect and remove the primary windshield washer hoses to right and left washer nozzle hose connector (2) from the left windshield washer nozzle hose (6).
- Disconnect the left windshield washer nozzle hose (6) from the left windshield washer nozzle (5).
- Thread and remove the left windshield washer nozzle hose (6) out of the windshield wiper arm tension spring (7).
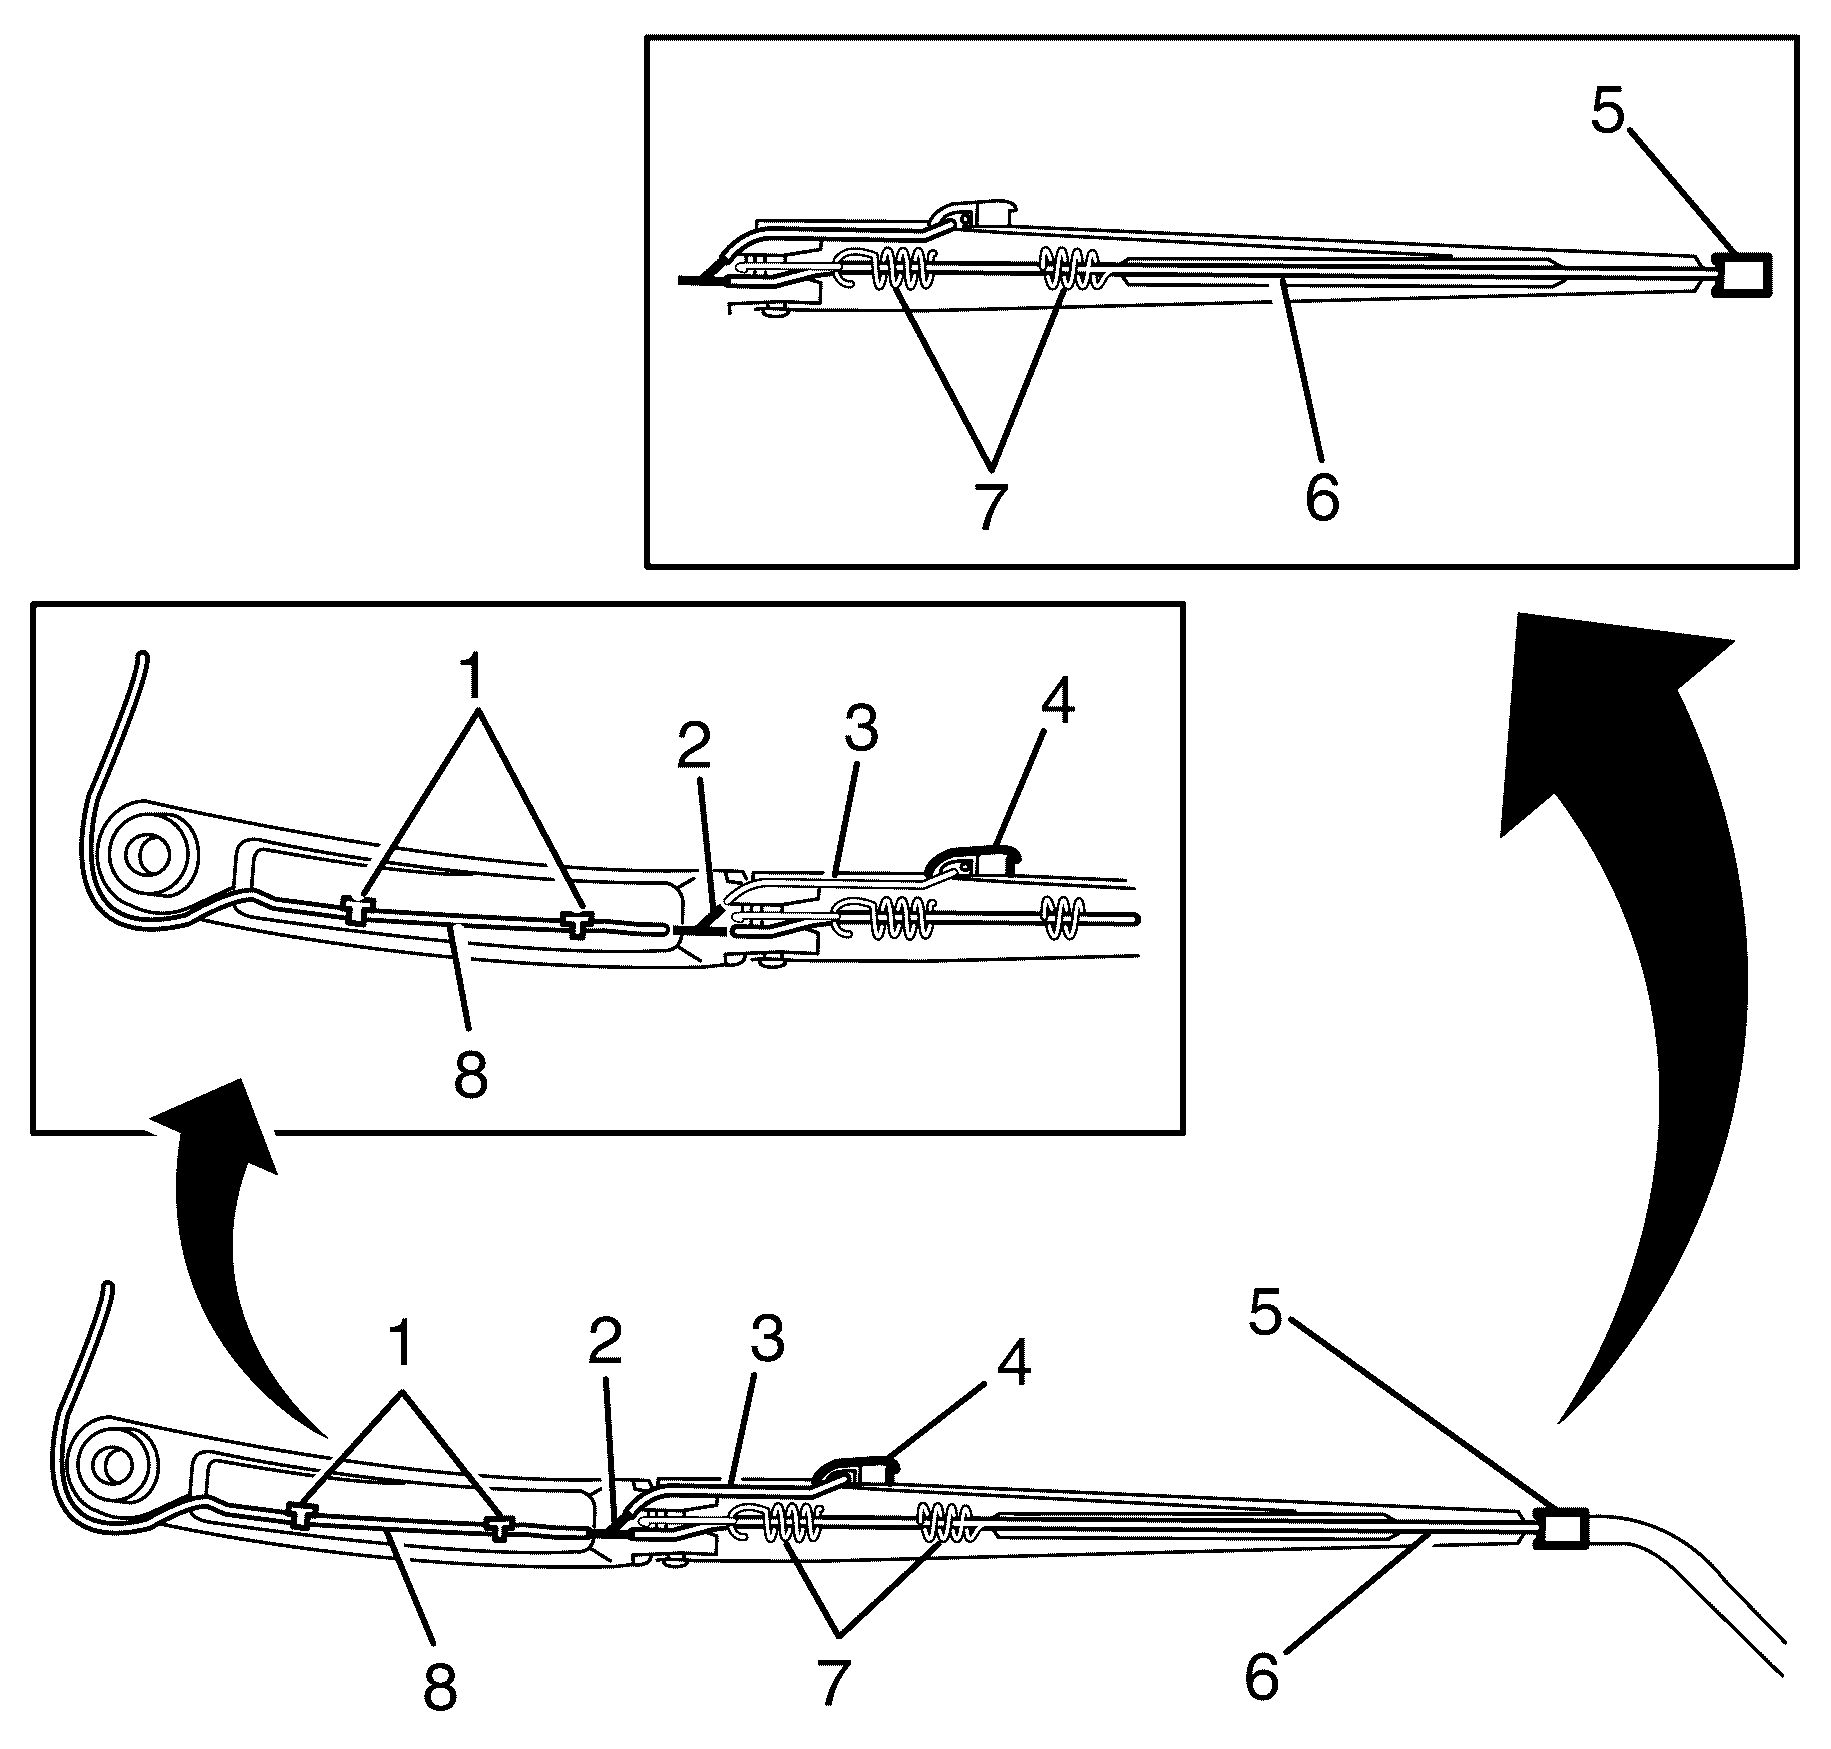
Installation Procedure - Windshield Wiper Arm Hoses
- Thread the left windshield washer nozzle hose (6) through the windshield wiper arm tension spring (7) to the left windshield washer nozzle (5).
- Connect the left windshield washer nozzle hose (6) to the left windshield washer nozzle (5).
- Connect the primary windshield washer hoses to right and left washer nozzle hose connector (2) to the left windshield washer nozzle hose (6).
- Connect the right windshield washer nozzle hose (3) to the right windshield washer nozzle (4).
- Connect the right windshield washer nozzle hose (3) to the primary windshield washer hoses to right and left washer nozzle hose connector (2).
- Connect the primary windshield washer hose (8) to the primary windshield washer hoses to right and left washer nozzle hose connector (2).
- Attach the primary windshield washer hose (8) to the primary windshield washer hoses retaining clips (1).
- Install the wiper arm. Refer to Windshield Wiper Arm Replacement
- Check the operation of the windshield washers and make sure there are no solvent leaks.

