Removal Procedure - Washer Pump to Front Fender Connector
- Remove the radiator grille. Refer to Radiator Grille Replacement.
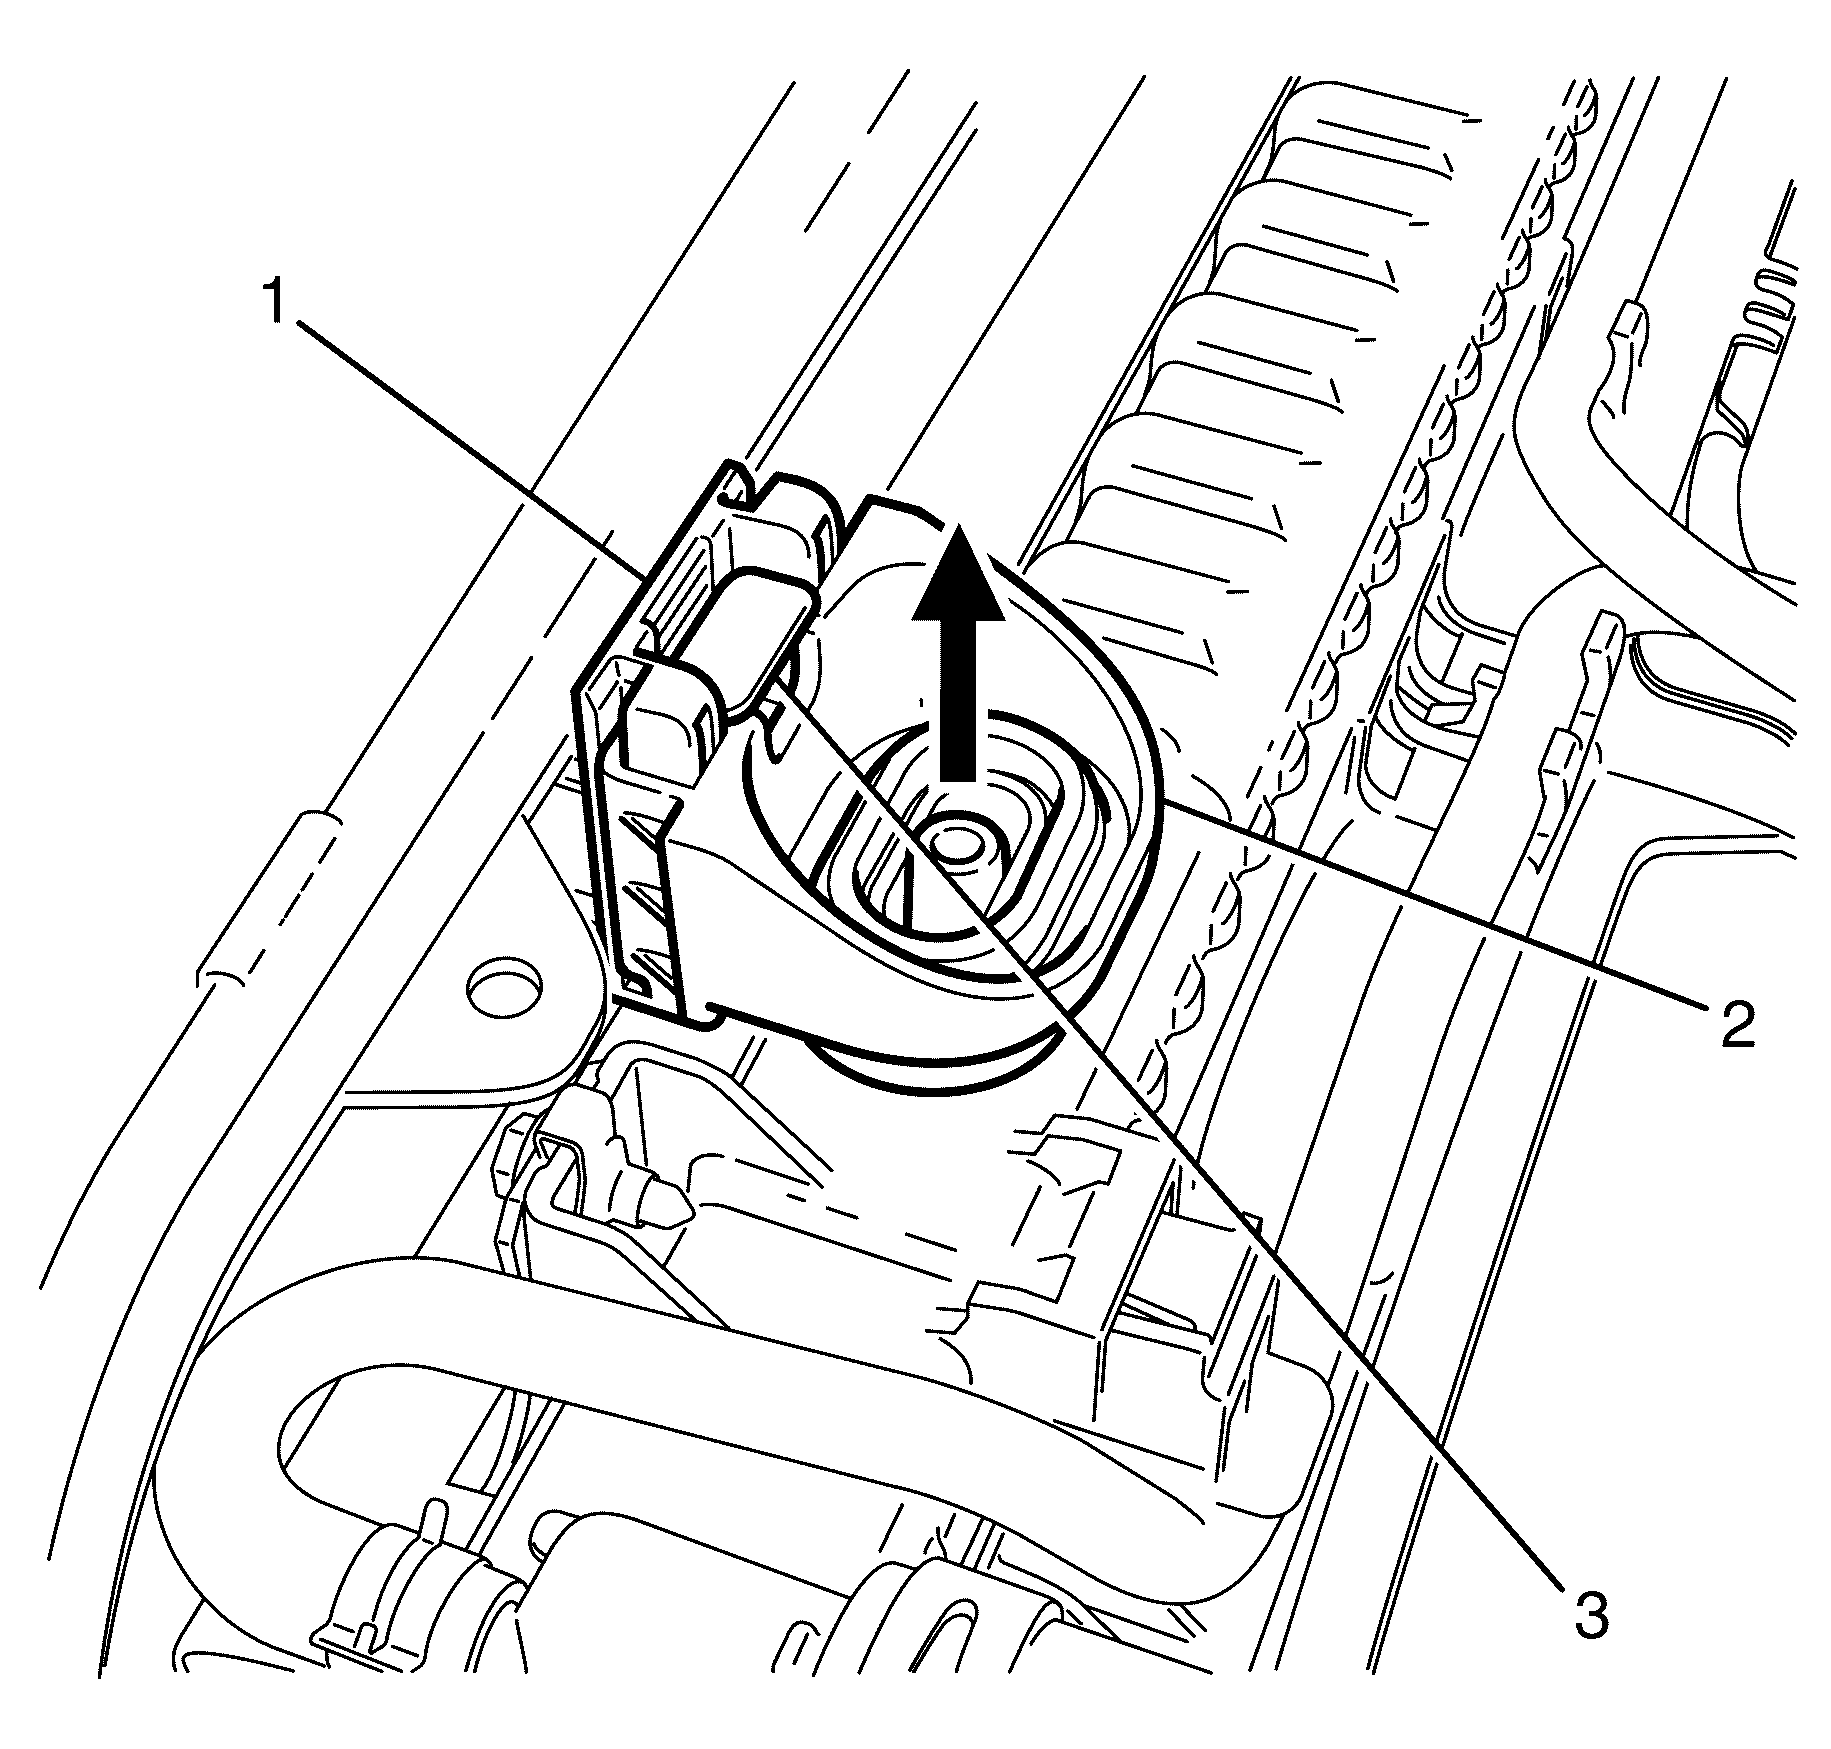
- Raise the securing lock (3) from the radiator support bracket (2) by 10 mm on both sides.
- Remove the radiator support bracket (2) from the radiator slide pin assembly (1) on both sides.
- Tilt the radiator assembly (2) away from the front end panel (1).
- Insert a suitable holding device between the front end panel (1) and the radiator assembly (2).
- Place a suitable container under the rear window washer pump (3).
- Disconnect the rear window washer hose (1) from the rear window washer pump (3).
- Detach the rear window washer hose (1) from the solvent container (2).
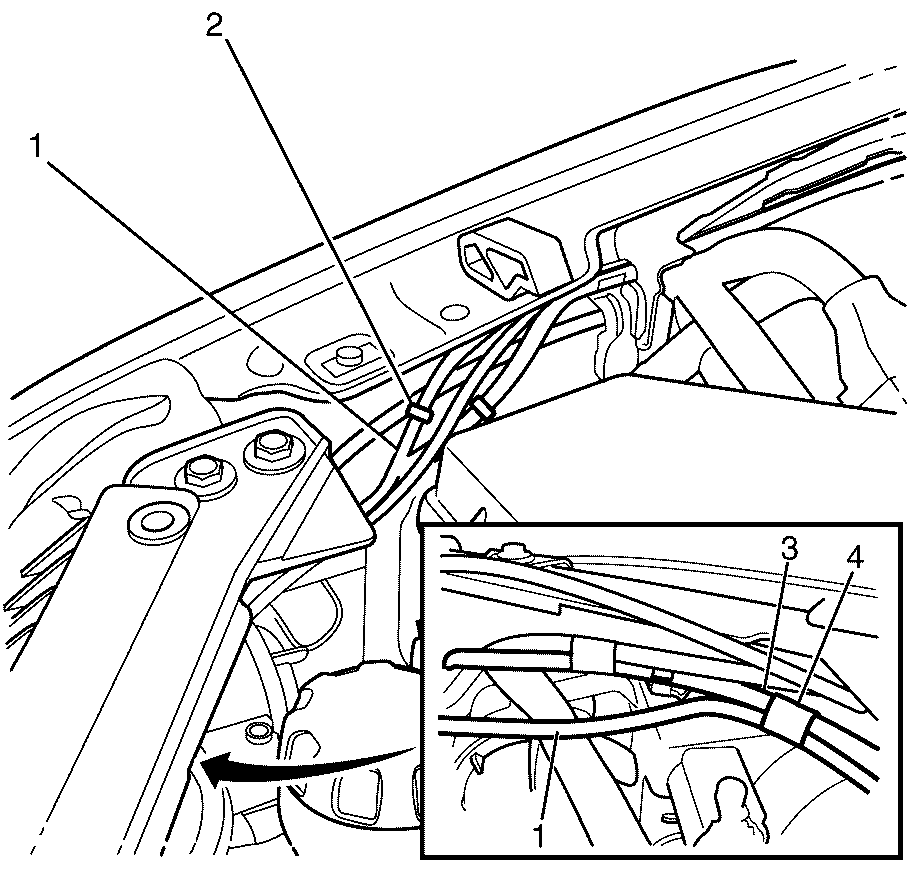
- Mark the windshield washer hose (3) at the location of the rear window washer hose to windshield washer hose retaining tape (4).
- Remove the rear window washer hose to windshield washer hose retaining tape (4).
- Disconnect the rear window washer hose (1) from the rear window washer hose front fender connector (2).
- Remove the rear window washer hose (1).
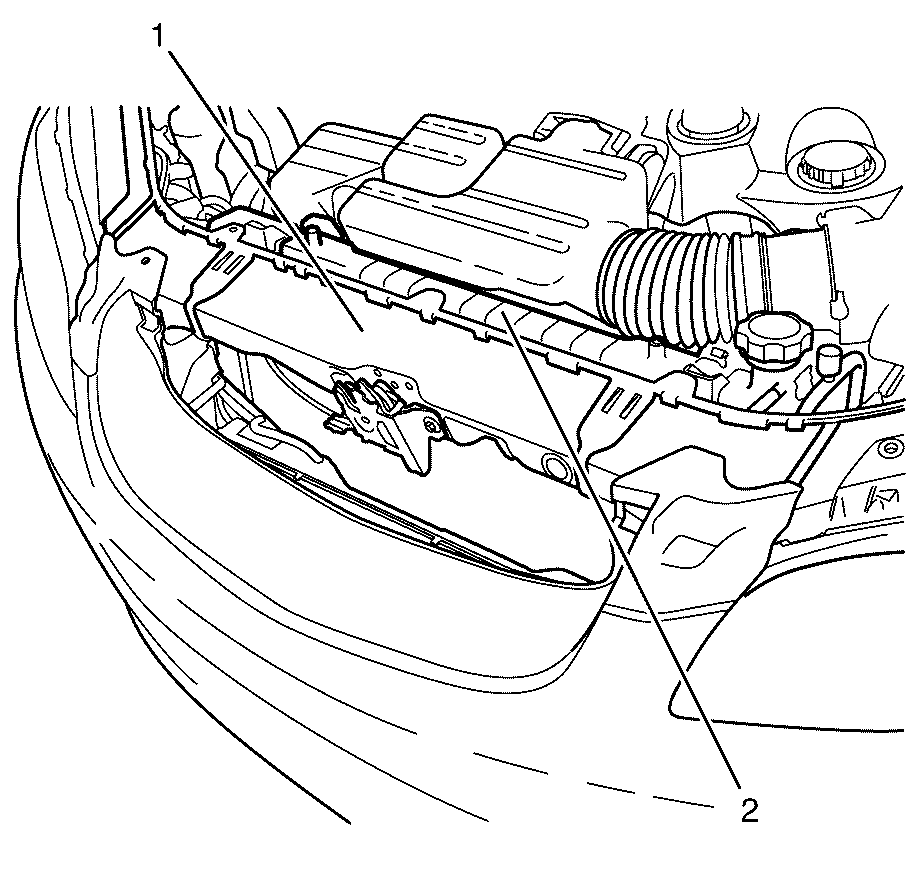
Important: Care must be taken when tilting the radiator assembly (2) away from the front end panel (1) as excessive force may damage the radiator assembly (2).
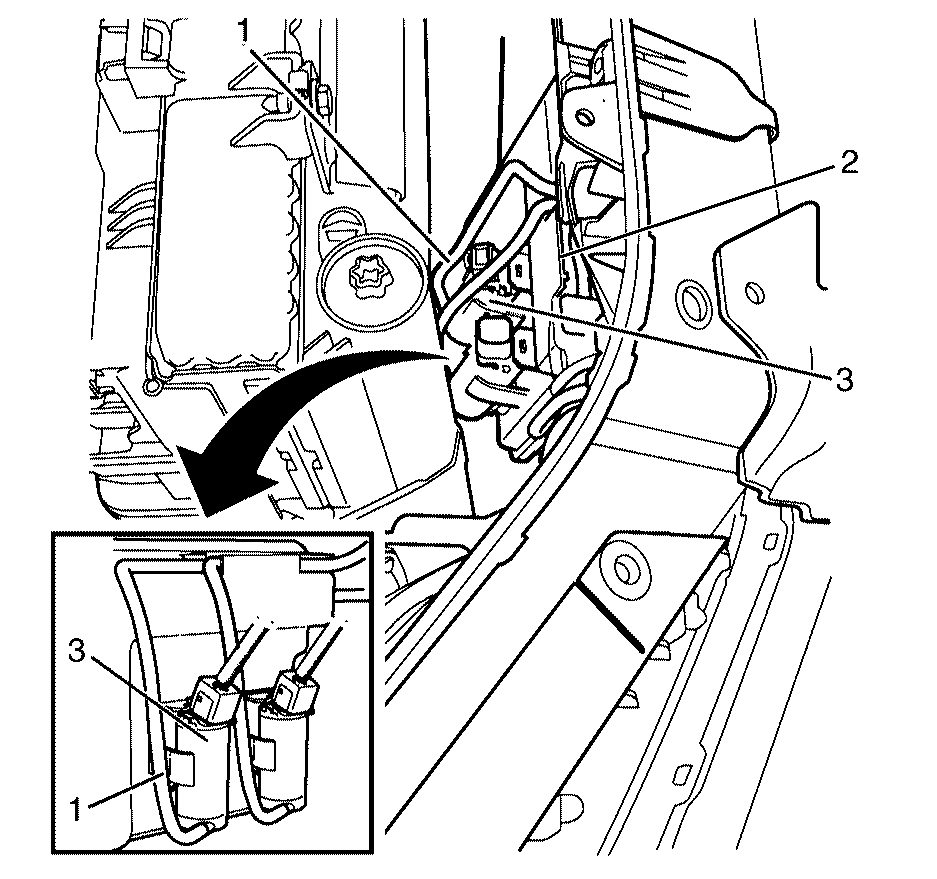
Important: Take care not to damage the condenser cooling fins when removing the rear window washer hose (1) from the rear window washer pump (3).
Installation Procedure - Washer Pump to Front Fender Connector
- Connect the rear window washer hose (1) to the rear window washer hose front fender connector (2).
- Attach the rear window washer hose (1) to the marked location on the windshield washer hose (3) with adhesive tape (4).
- Attach the rear window washer hose (1) to the solvent container (2).
- Connect the rear window washer hose (1) to the rear window washer pump (3).
- Remove the holding device between the radiator assembly (1) and front end panel (2).
- Position the radiator assembly (2) to its original position, towards the front end panel (1).
- Install the radiator support bracket (2) to the radiator slide pin assembly (1) on both sides.
- Push the securing lock (3) into the radiator support bracket (2) making sure it is correctly seated on both sides.
- Install the radiator grille. Refer to Radiator Grille Replacement.
- Fill the washer fluid container with solvent.
- Check the operation of the rear window washer and make sure there are no solvent leaks.

Important: When installing the rear window washer hose make sure it follows the original hose routing.

Important: Take care not to damage the condenser cooling fins when installing the rear window washer hose (1) to the rear window washer pump (3).

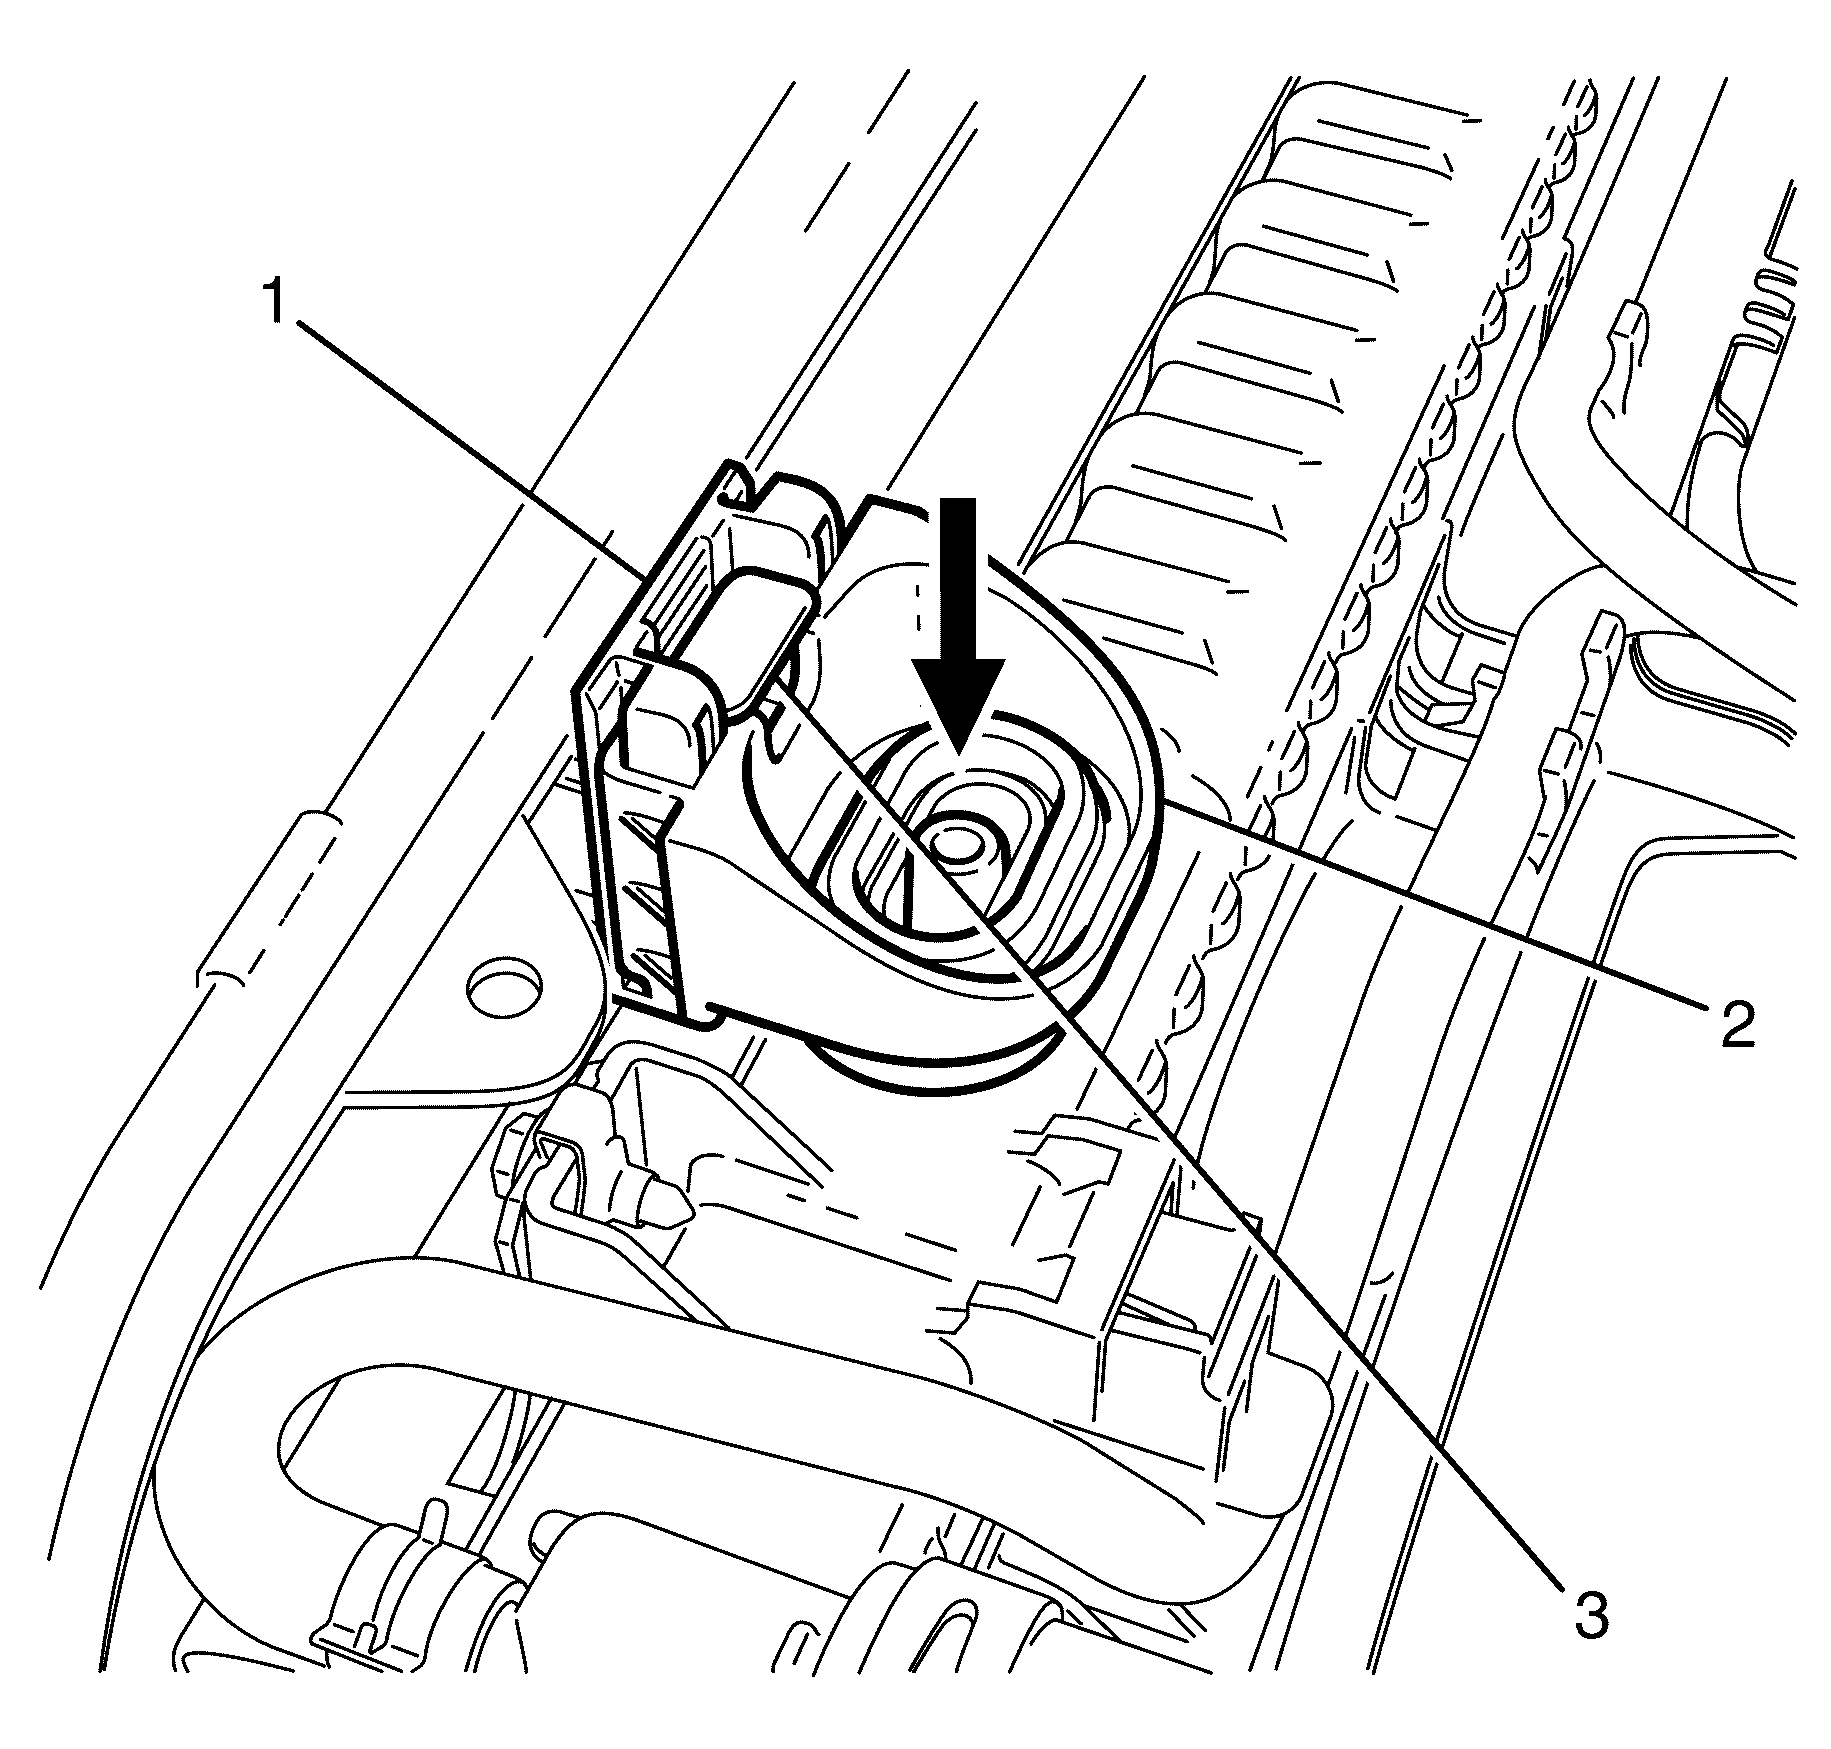
Removal Procedure - Front Fender Connector to A Pillar
- Disconnect the rear window washer hose (2) from the rear window washer hose front fender connector (1).
- Detach the rear window washer hose (2) from the rear window washer hose front fender retaining clip (3).
- Attach a guide rope/wire to the rear window washer hose (2).
- Remove the theft deterrent alarm. Refer to Theft Deterrent Alarm Replacement.
- Remove the right windshield garnish molding. Refer to Windshield Garnish Molding Replacement.
- Remove the right body hinge pillar trim panel. Refer to Body Hinge Pillar Trim Panel Replacement.
- Remove the knee bolster. Refer to Knee Bolster Replacement.
- Remove the instrument panel retainer. Refer to Instrument Panel Retainer Replacement.
- Remove the accelerator pedal position sensor. Refer to Accelerator Pedal Position Sensor Replacement.
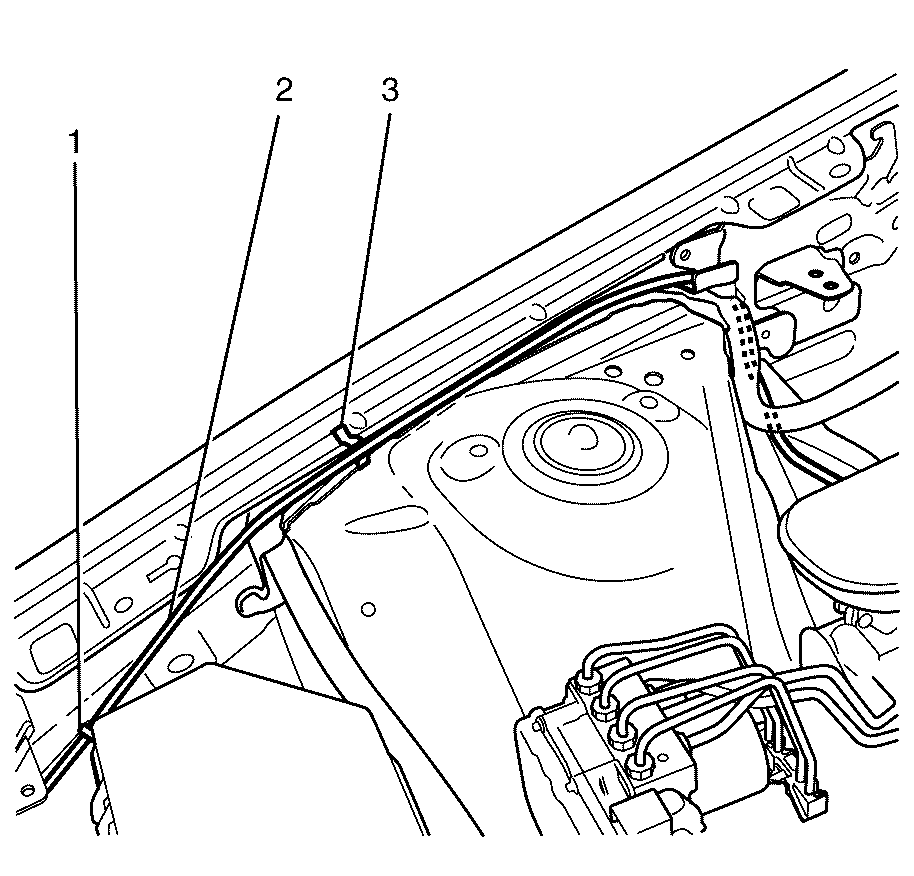
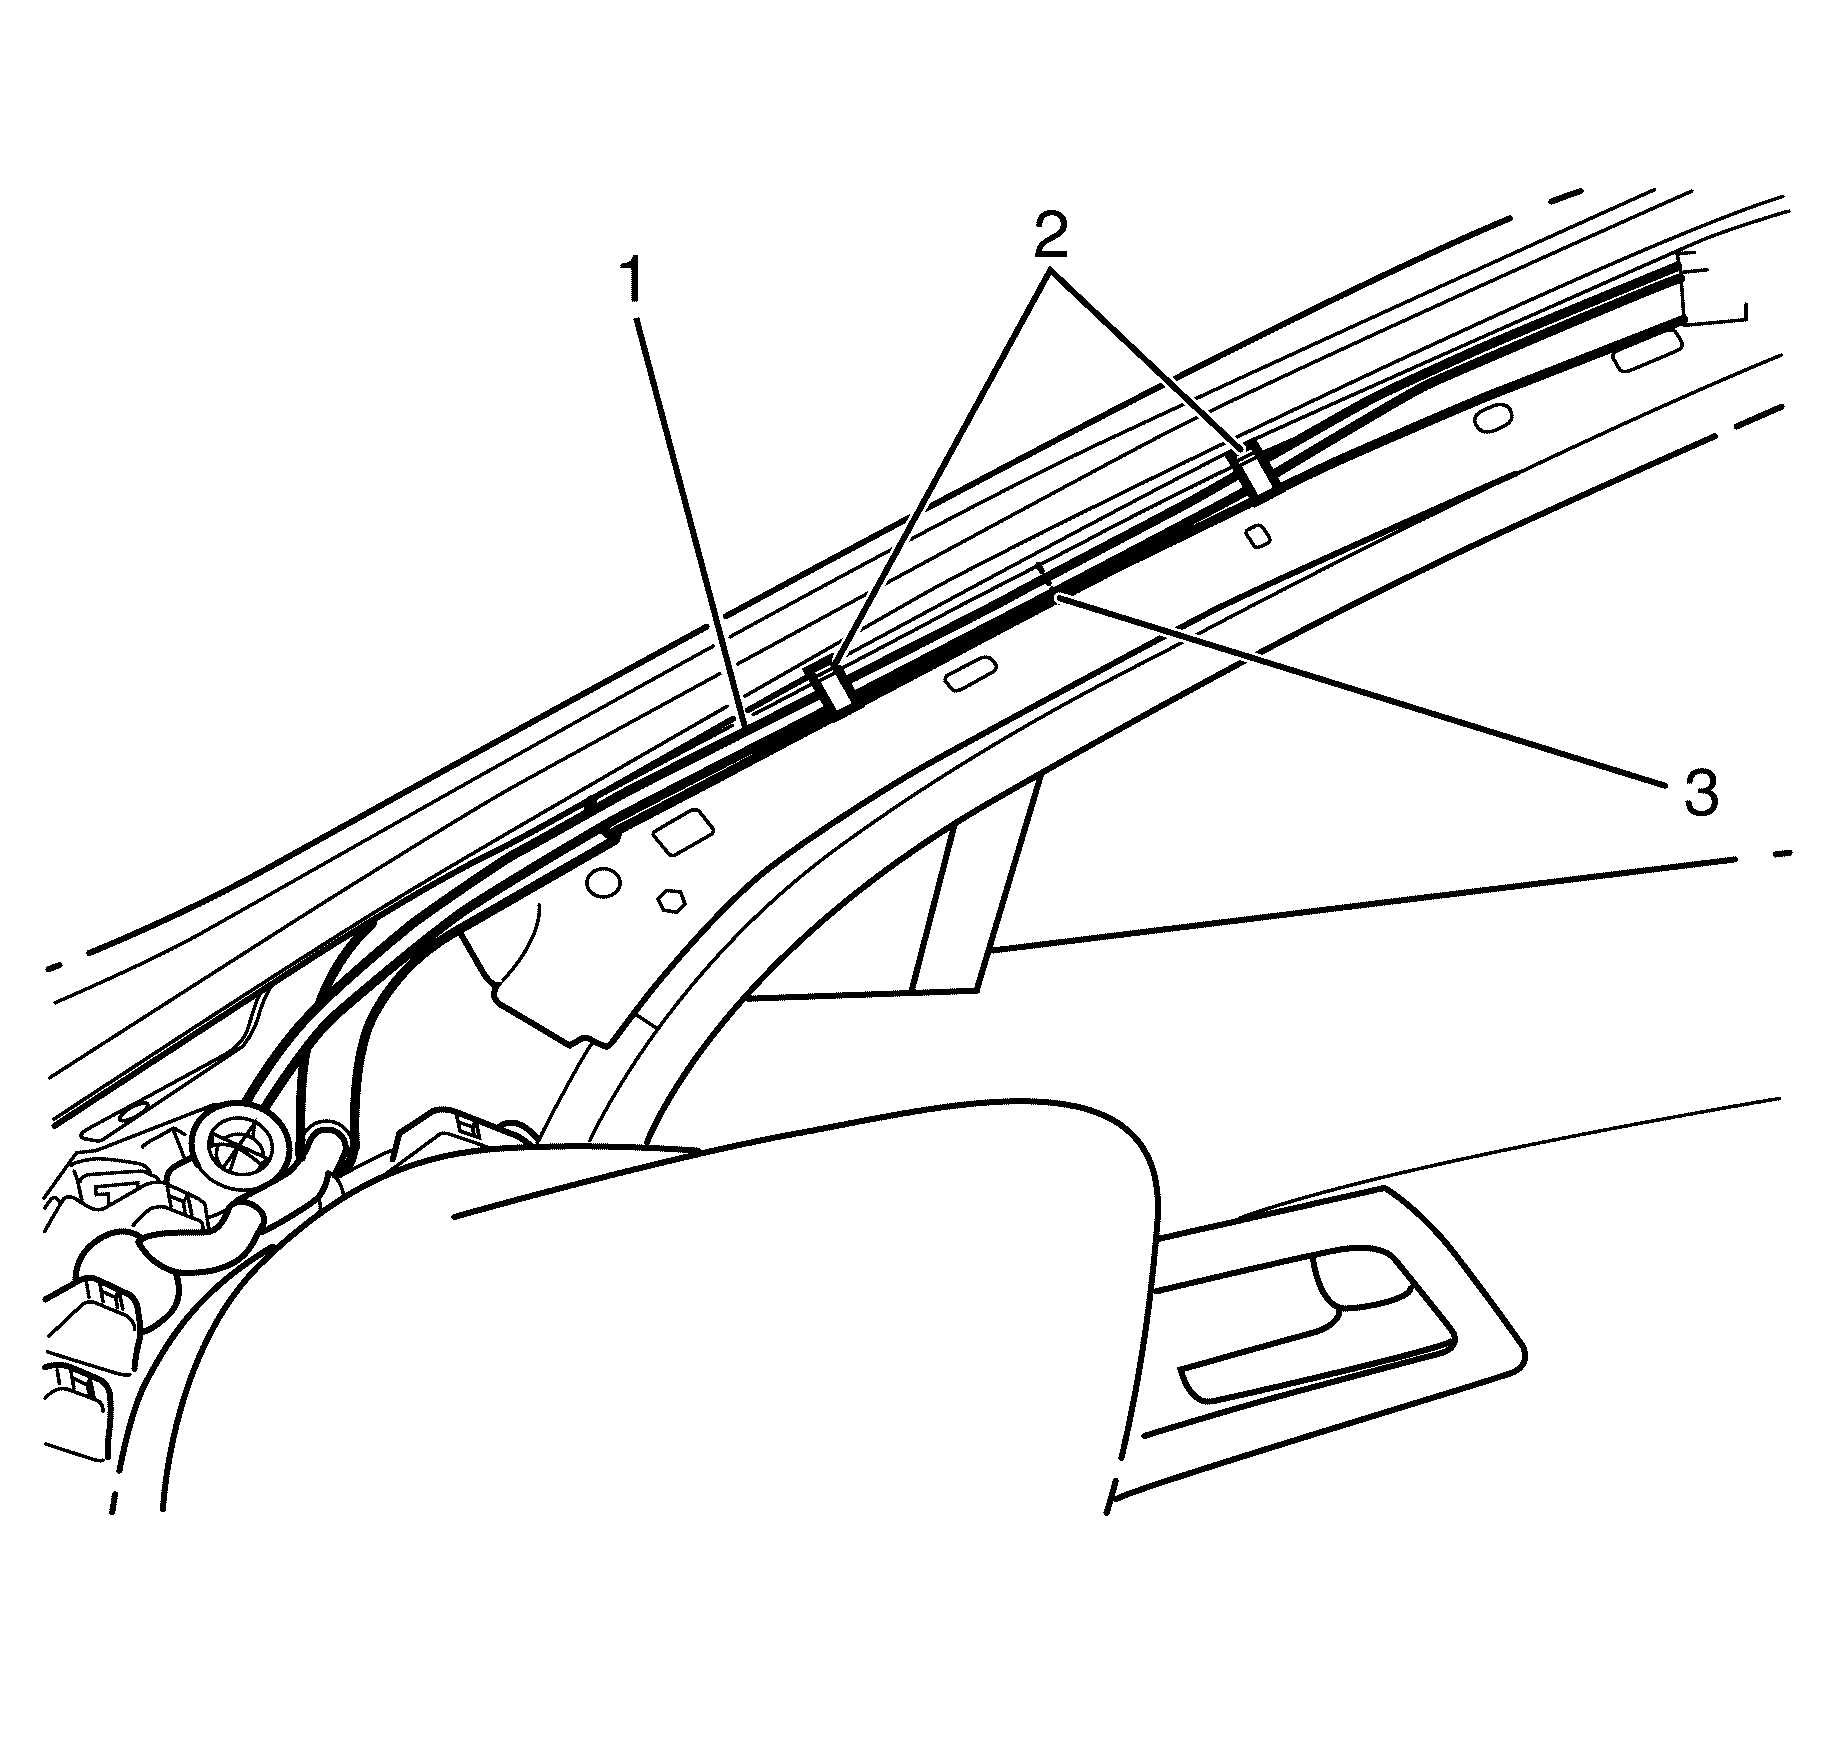
- Detach the rear window washer hose (1) from the headlining wiring harness/washer hose retaining clips (2).
- Cut the rear window washer hose (1) at position (3) between the headlining wiring harness/washer hose retaining clips (2).
- Attach a guide rope/wire to the instrument panel side of rear window washer hose (1).
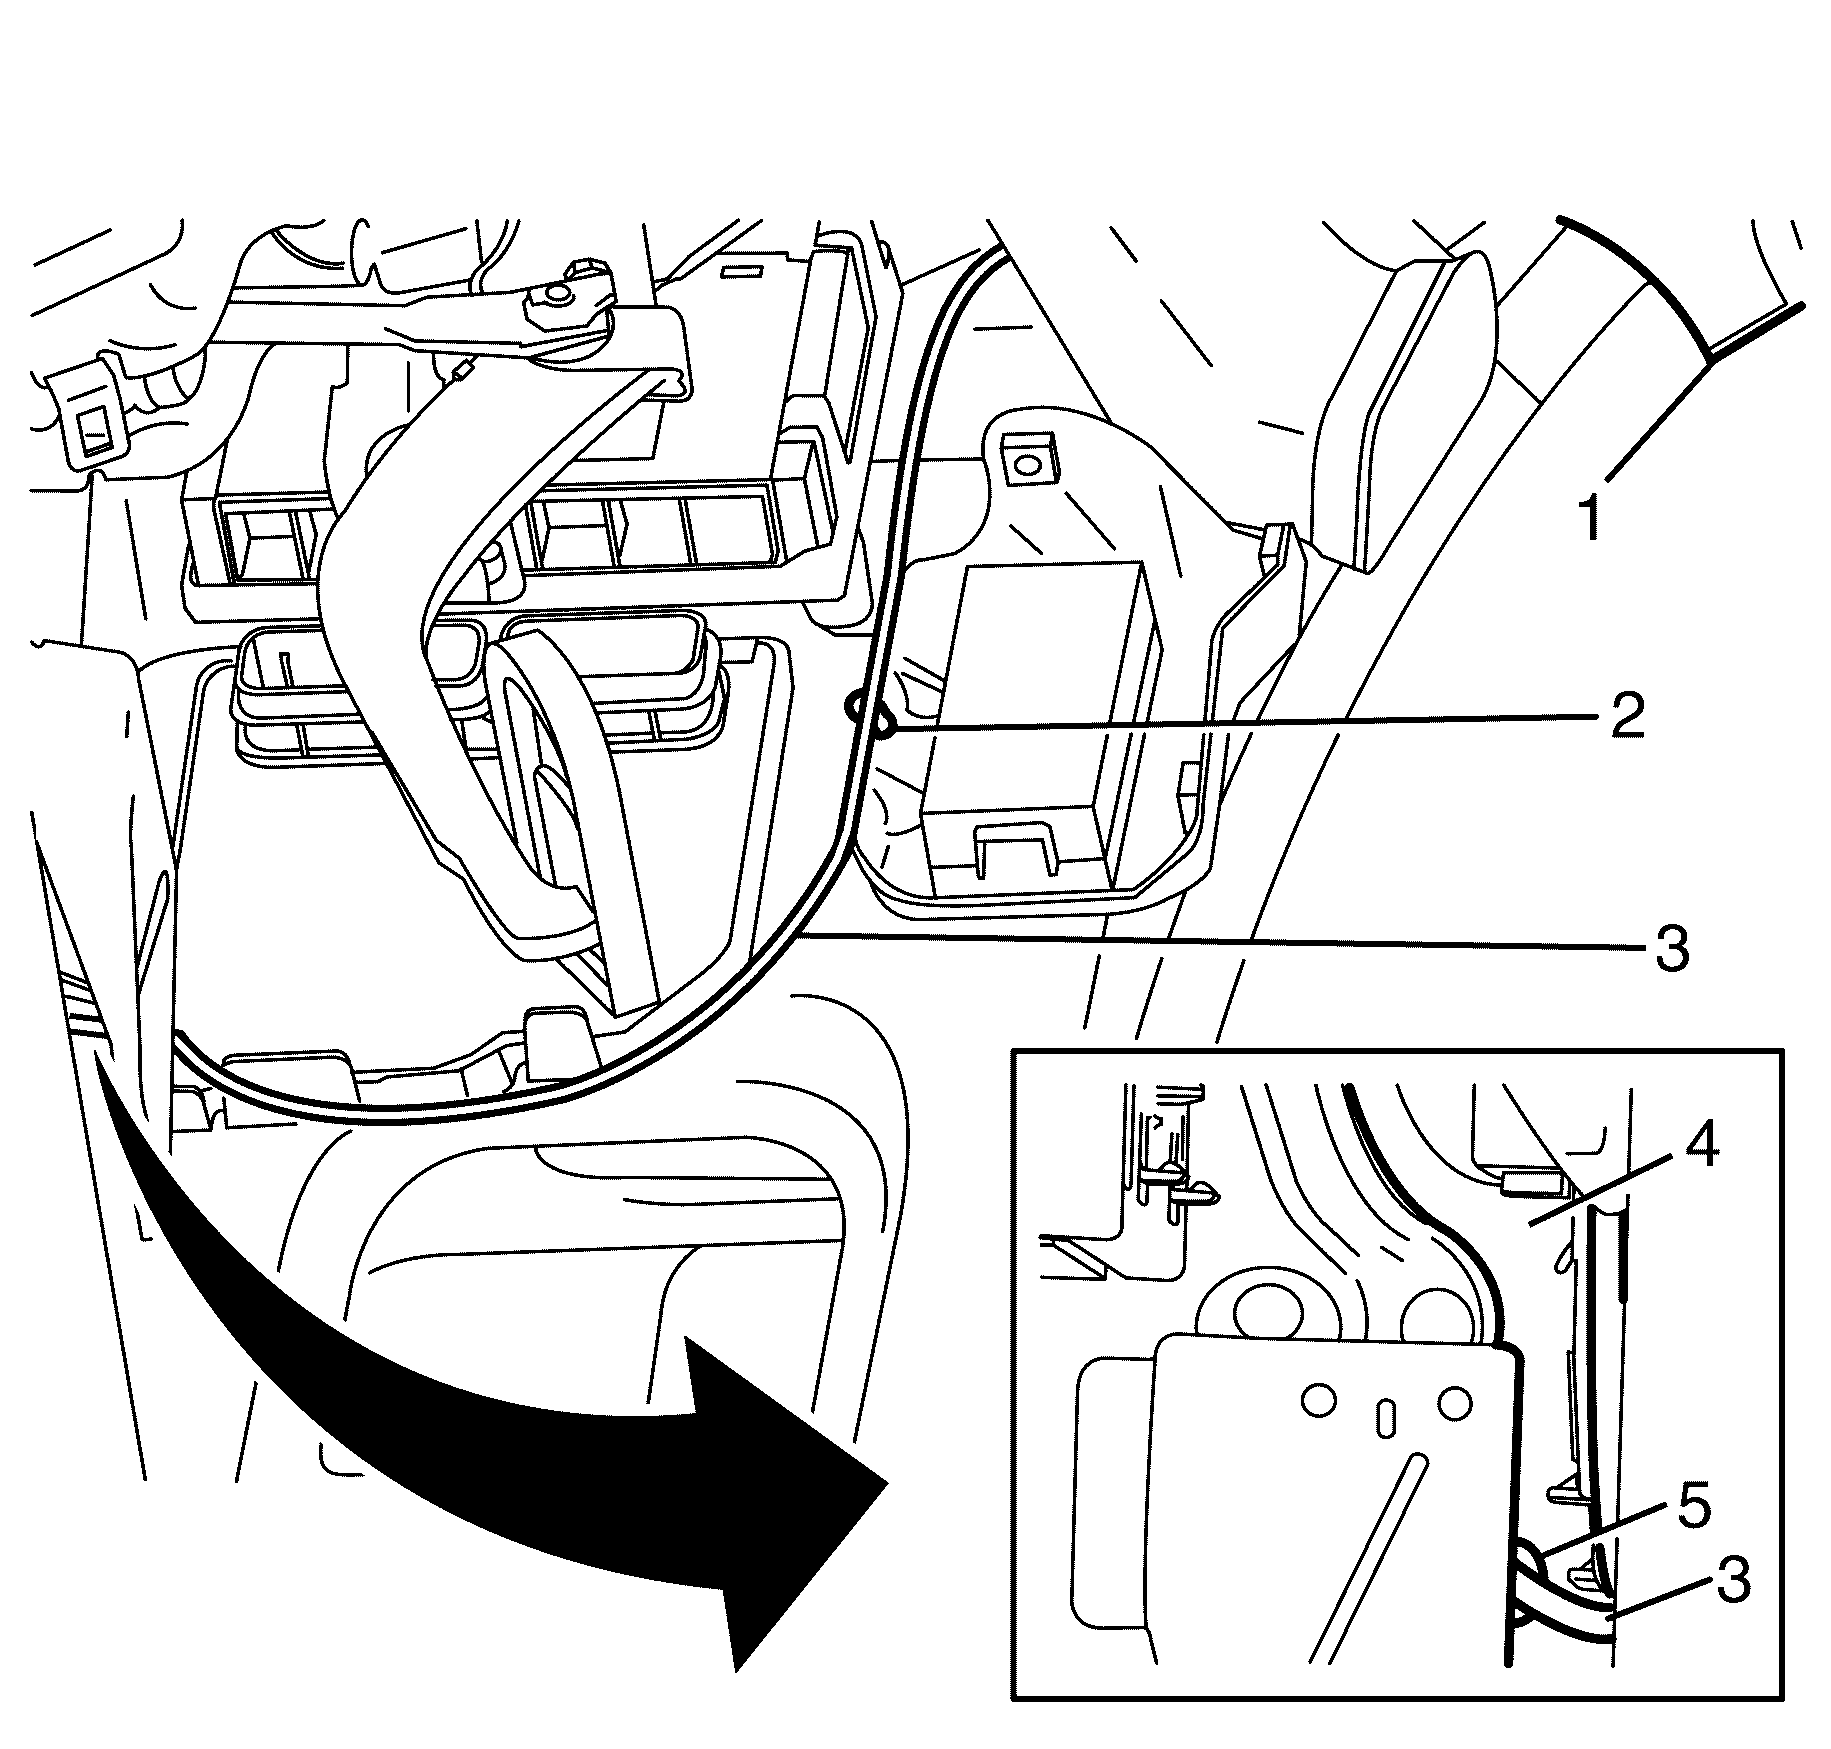
- Detach the rear window washer hose (3) from the rear window washer hose body hinge pillar retaining clip (2).
- Pull the rear window washer hose (3) down through the instrument panel assembly (1).
- Detach the rear window washer hose grommet (5) from the bulkhead (4).
- Pull the engine compartment section of the rear window washer hose (3) through the bulkhead (4) into the footwell.
- Remove the remaining guide rope/wire from the rear window washer hose (3).
- Remove the rear window washer hose (3).
- Measure and cut a hose of equal diameter and length to the rear window washer hose (3) which has been removed.
- Using the original rear window washer hose (3) as a guide, mark the position of the rear window washer hose grommet (6) and install it to the NEW rear window washer hose.
- Attach the guide ropes/wires to each end of the NEW rear window washer hose.
Installation Procedure - Front Fender Connector to A Pillar
- Gently pulling on the guide rope thread the engine compartment section of the rear window washer hose (3) through the bulkhead (4).
- Attach the rear window washer hose grommet (6) to the bulkhead (4).
- Attach the rear window washer hose (3) to the rear window washer hose body hinge pillar retaining clip (2).
- Gently pulling on the guide rope thread the rear window washer hose (3) through the instrument panel assembly (1) towards the A pillar.
- Remove the guide rope/wire from the rear window washer hose (3).
- Join the rear window washer hose ends (3) with in line hose joiner (2), GMH part number 92213809.
- Attach the rear window washer hose (3) to the headlining wiring harness/washer hose retaining clips (1).
- Install the accelerator pedal position sensor. Refer to Accelerator Pedal Position Sensor Replacement.
- Install the instrument panel retainer. Refer to Instrument Panel Retainer Replacement.
- Install the knee bolster. Refer to Knee Bolster Replacement.
- Install the body hinge pillar trim panel. Refer to Body Hinge Pillar Trim Panel Replacement.
- Install the windshield garnish molding. Refer to Windshield Garnish Molding Replacement.
- Attach the rear window washer hose (2) to the front fender hose retaining clip (3).
- Remove the guide rope/wire from the rear window washer hose (2).
- Connect the rear window washer hose (2) to the front fender hose connector (1).
- Check the operation of the rear window washer, and make sure there are no solvent leaks.

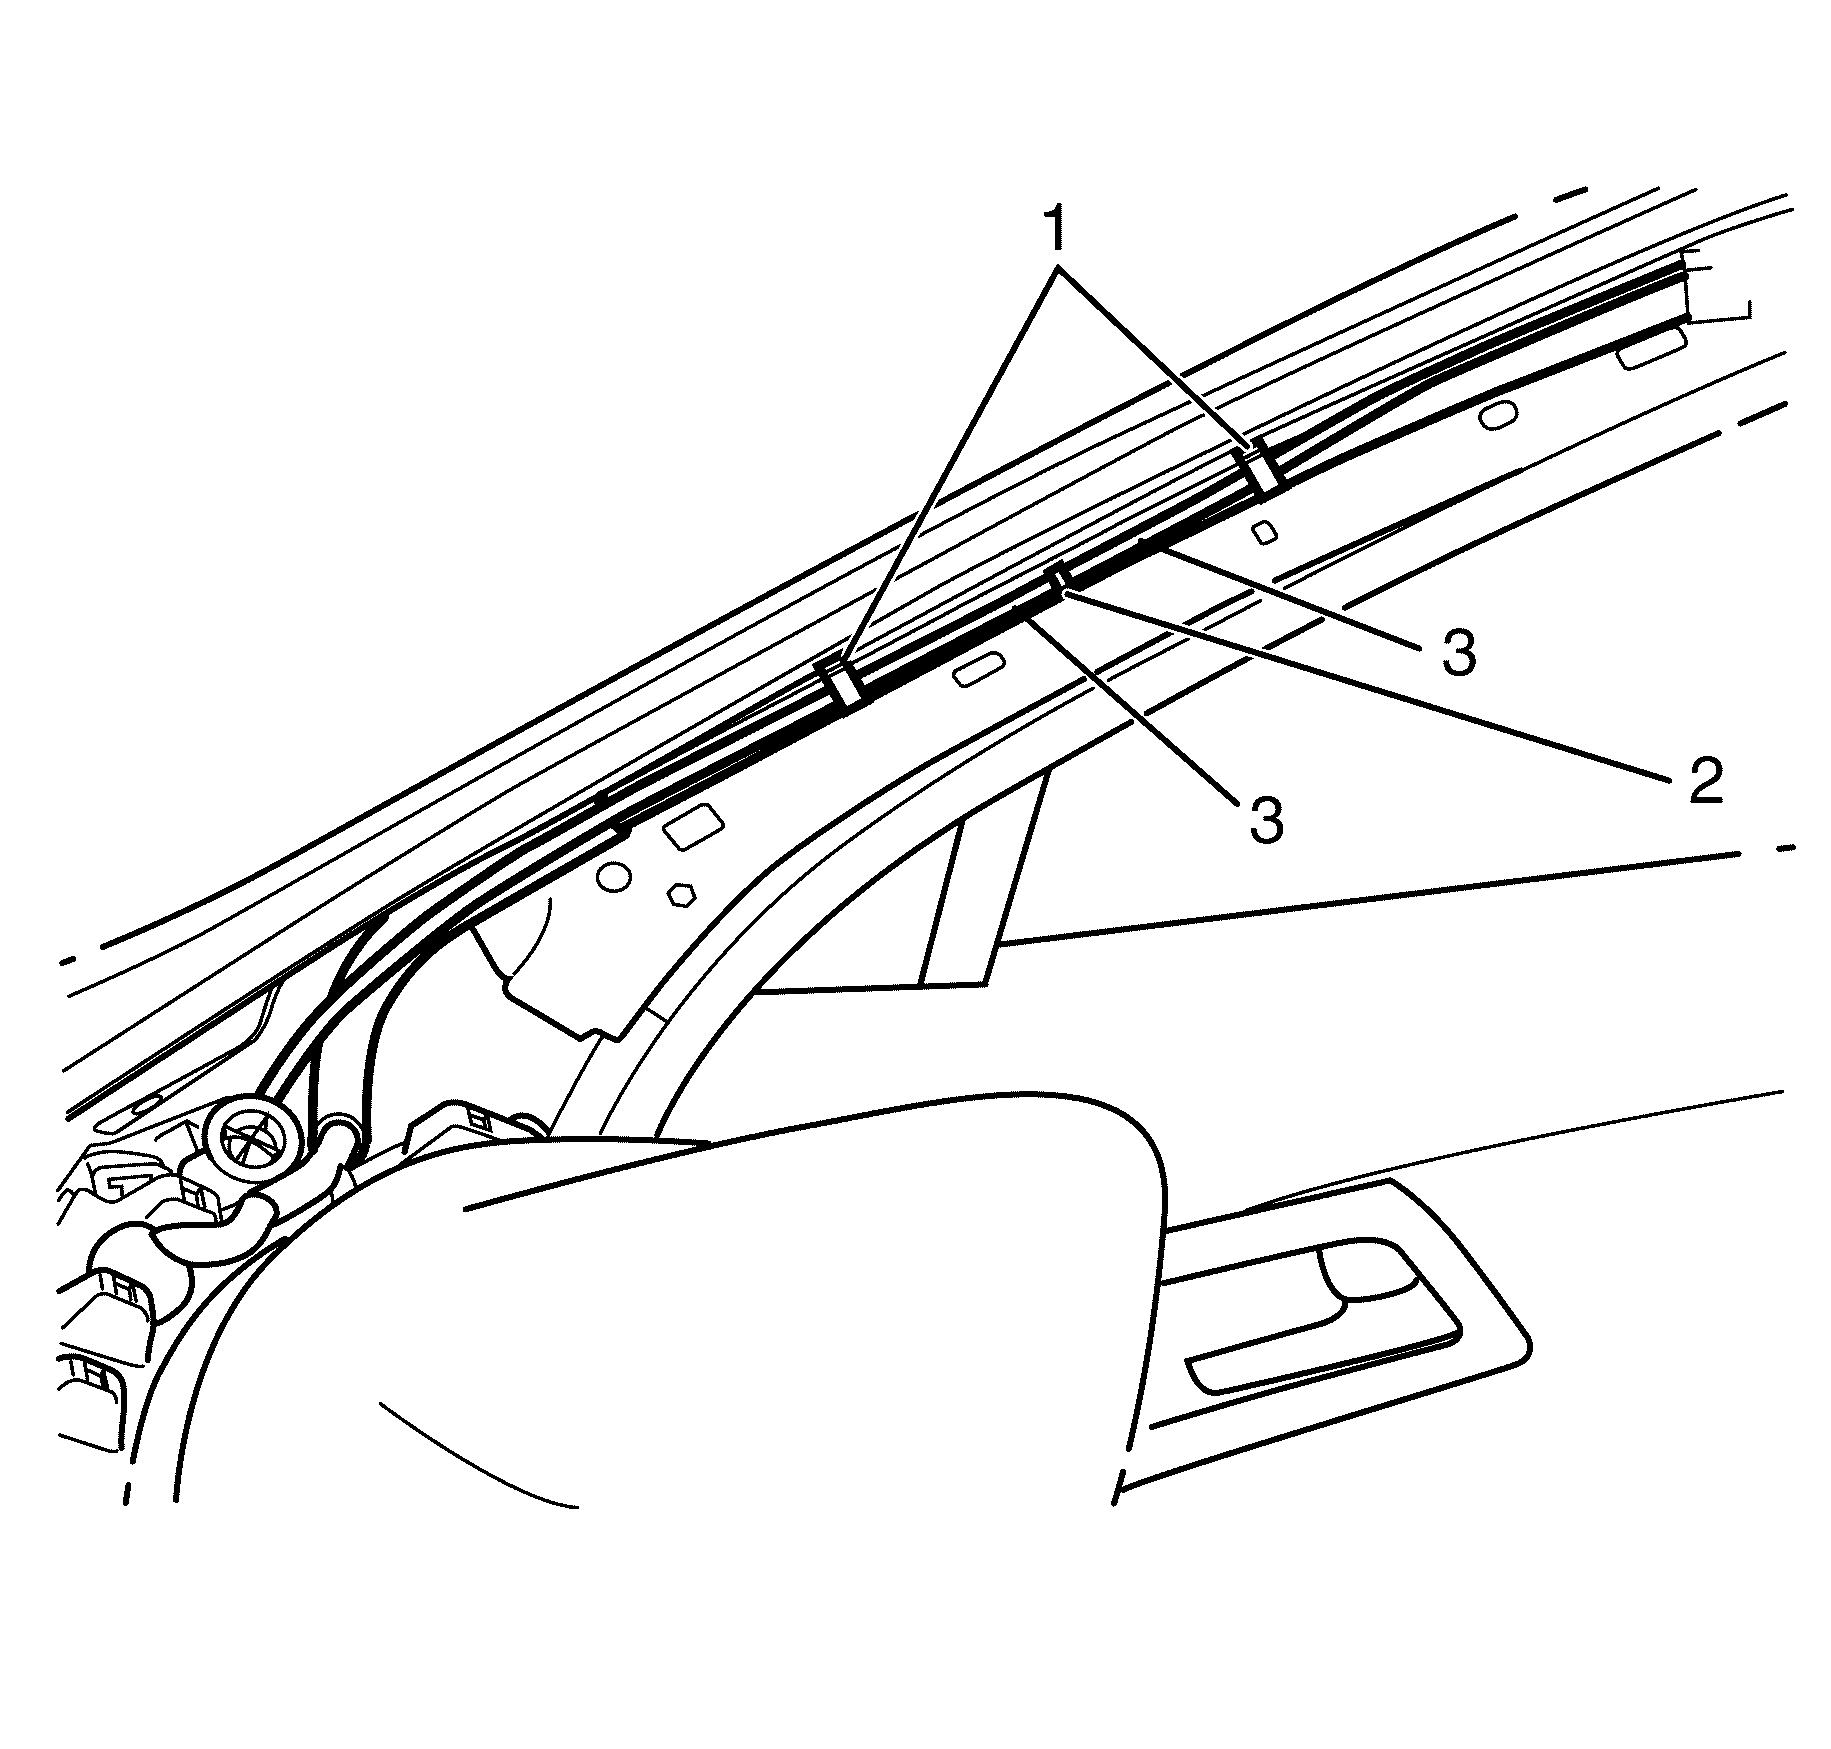
Important: Make sure the rear window washer hose in line joiner (2) is securely installed into both ends of the rear window washer hose (3).

Removal Procedure - A Pillar to Liftgate Connector
Important: This procedure should only be carried out if the headliner has not been damaged due to solvent leakage.
- Remove the headlining. Refer to Headlining Trim Panel Replacement.
- Peel back the headlining acoustic pads (4) to access the rear window washer hose (1).
- Using a wax pencil, mark the route of the rear window washer hose (1) onto the headlining (2).
- Using a wax pencil, mark the position of the rear headlining clip assembly washer hose guide (3) onto the washer hose (2).
- Remove the rear window washer hose (1) from the headlining (2).
- Measure and cut a hose of equal diameter and length to the rear window washer hose (1) which has been removed.
- Using the original washer hose reference marks as a guide, mark the position of the rear headlining clip assembly washer hose guide (3) to the NEW washer hose.
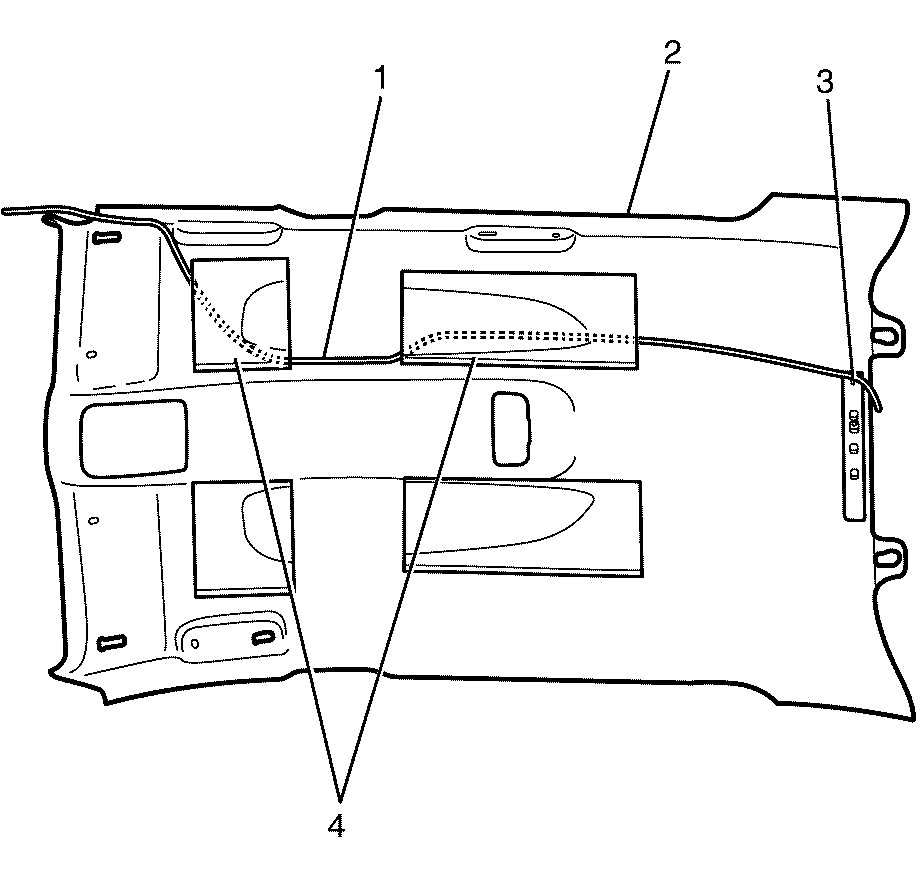
Important: Care must be taken not to damage the headlining (2) when removing the headlining acoustic pads (4) and the rear window washer hose (1).
Installation Procedure - A Pillar to Liftgate Connector
- Align the reference mark on the new washer hose with the rear headlining clip assembly hose guide (3).
- Install the NEW rear window washer hose to the marked location on the headlining (2).
- Apply the GM specification GM3628M adhesive or equivalent to attach the NEW rear window washer hose (1) to the headlining (2).
- Install the headlining. Refer to Headlining Trim Panel Replacement.
- Check the operation of the rear window washer and make sure there are no solvent leaks.

Removal Procedure - Liftgate Connector to Washer Nozzle Hose Connector
- Open and suitably support the liftgate.
- Remove the quarter inner trim finish panel on both sides. Refer to Quarter Inner Trim Finish Panel Replacement.
- Remove the headlining rear trim panel retainer. Refer to Headlining Rear Trim Panel Retainer Replacement.
- Remove the body side window rear garnish moulds on both sides. Refer to Body Side Window Rear Garnish Molding Replacement.
- Detach and lower the headlining (5).
- Remove the rear window washer hose (3) from the headlining clip assembly washer hose guide (1).
- Disconnect the rear window washer hose (3) from rear window washer connector (2).
- Remove the liftgate window side garnish moulding on both sides. Refer to Liftgate Window Side Garnish Molding Replacement.
- Remove the liftgate window upper garnish moulding. Refer to Liftgate Window Side Garnish Molding Replacement.
- Disconnect the rear window washer hose (3) from the rear washer nozzle connector (1).
- Detach the liftgate rear window washer hose grommet (4) from the rear header (5) and the liftgate (2).
- Remove the rear window washer hose (3) from the rear header (5) and the liftgate (2).
Important: When a suitable hold open device is being removed or installed, provide alternate support to avoid the possibility of damage to the vehicle or personal injury.
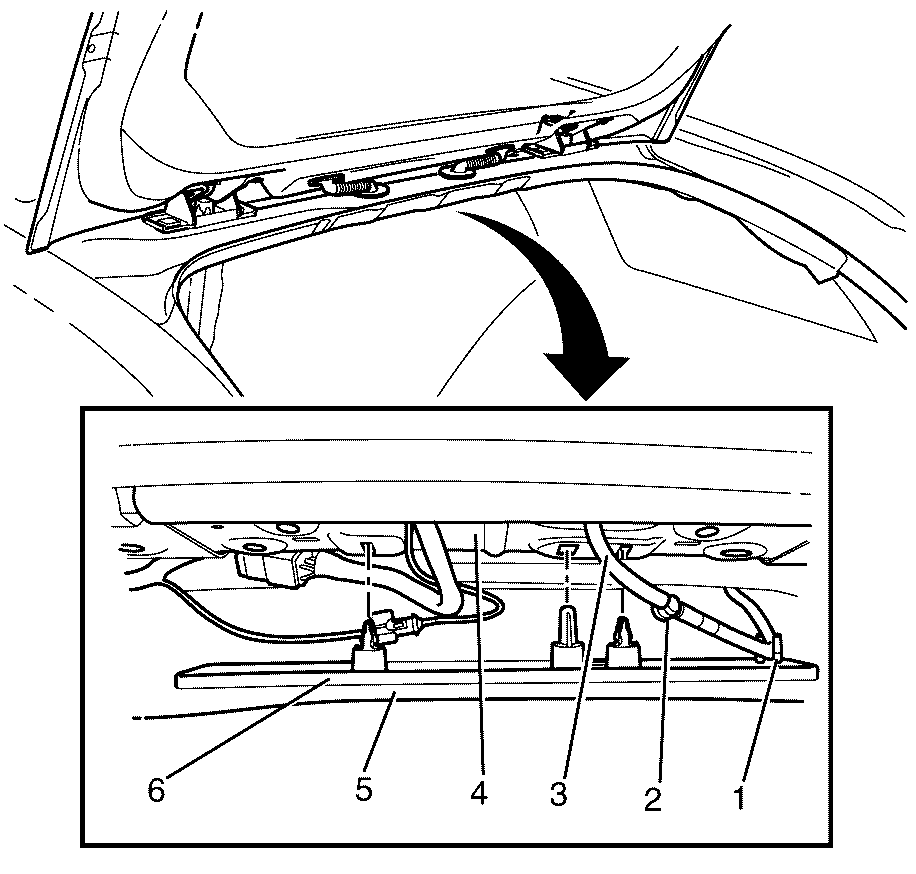
Important: To avoid damage to the headlining carefully pull down on the headlining rear clip assembly (6) to detach from the roof panel (4).
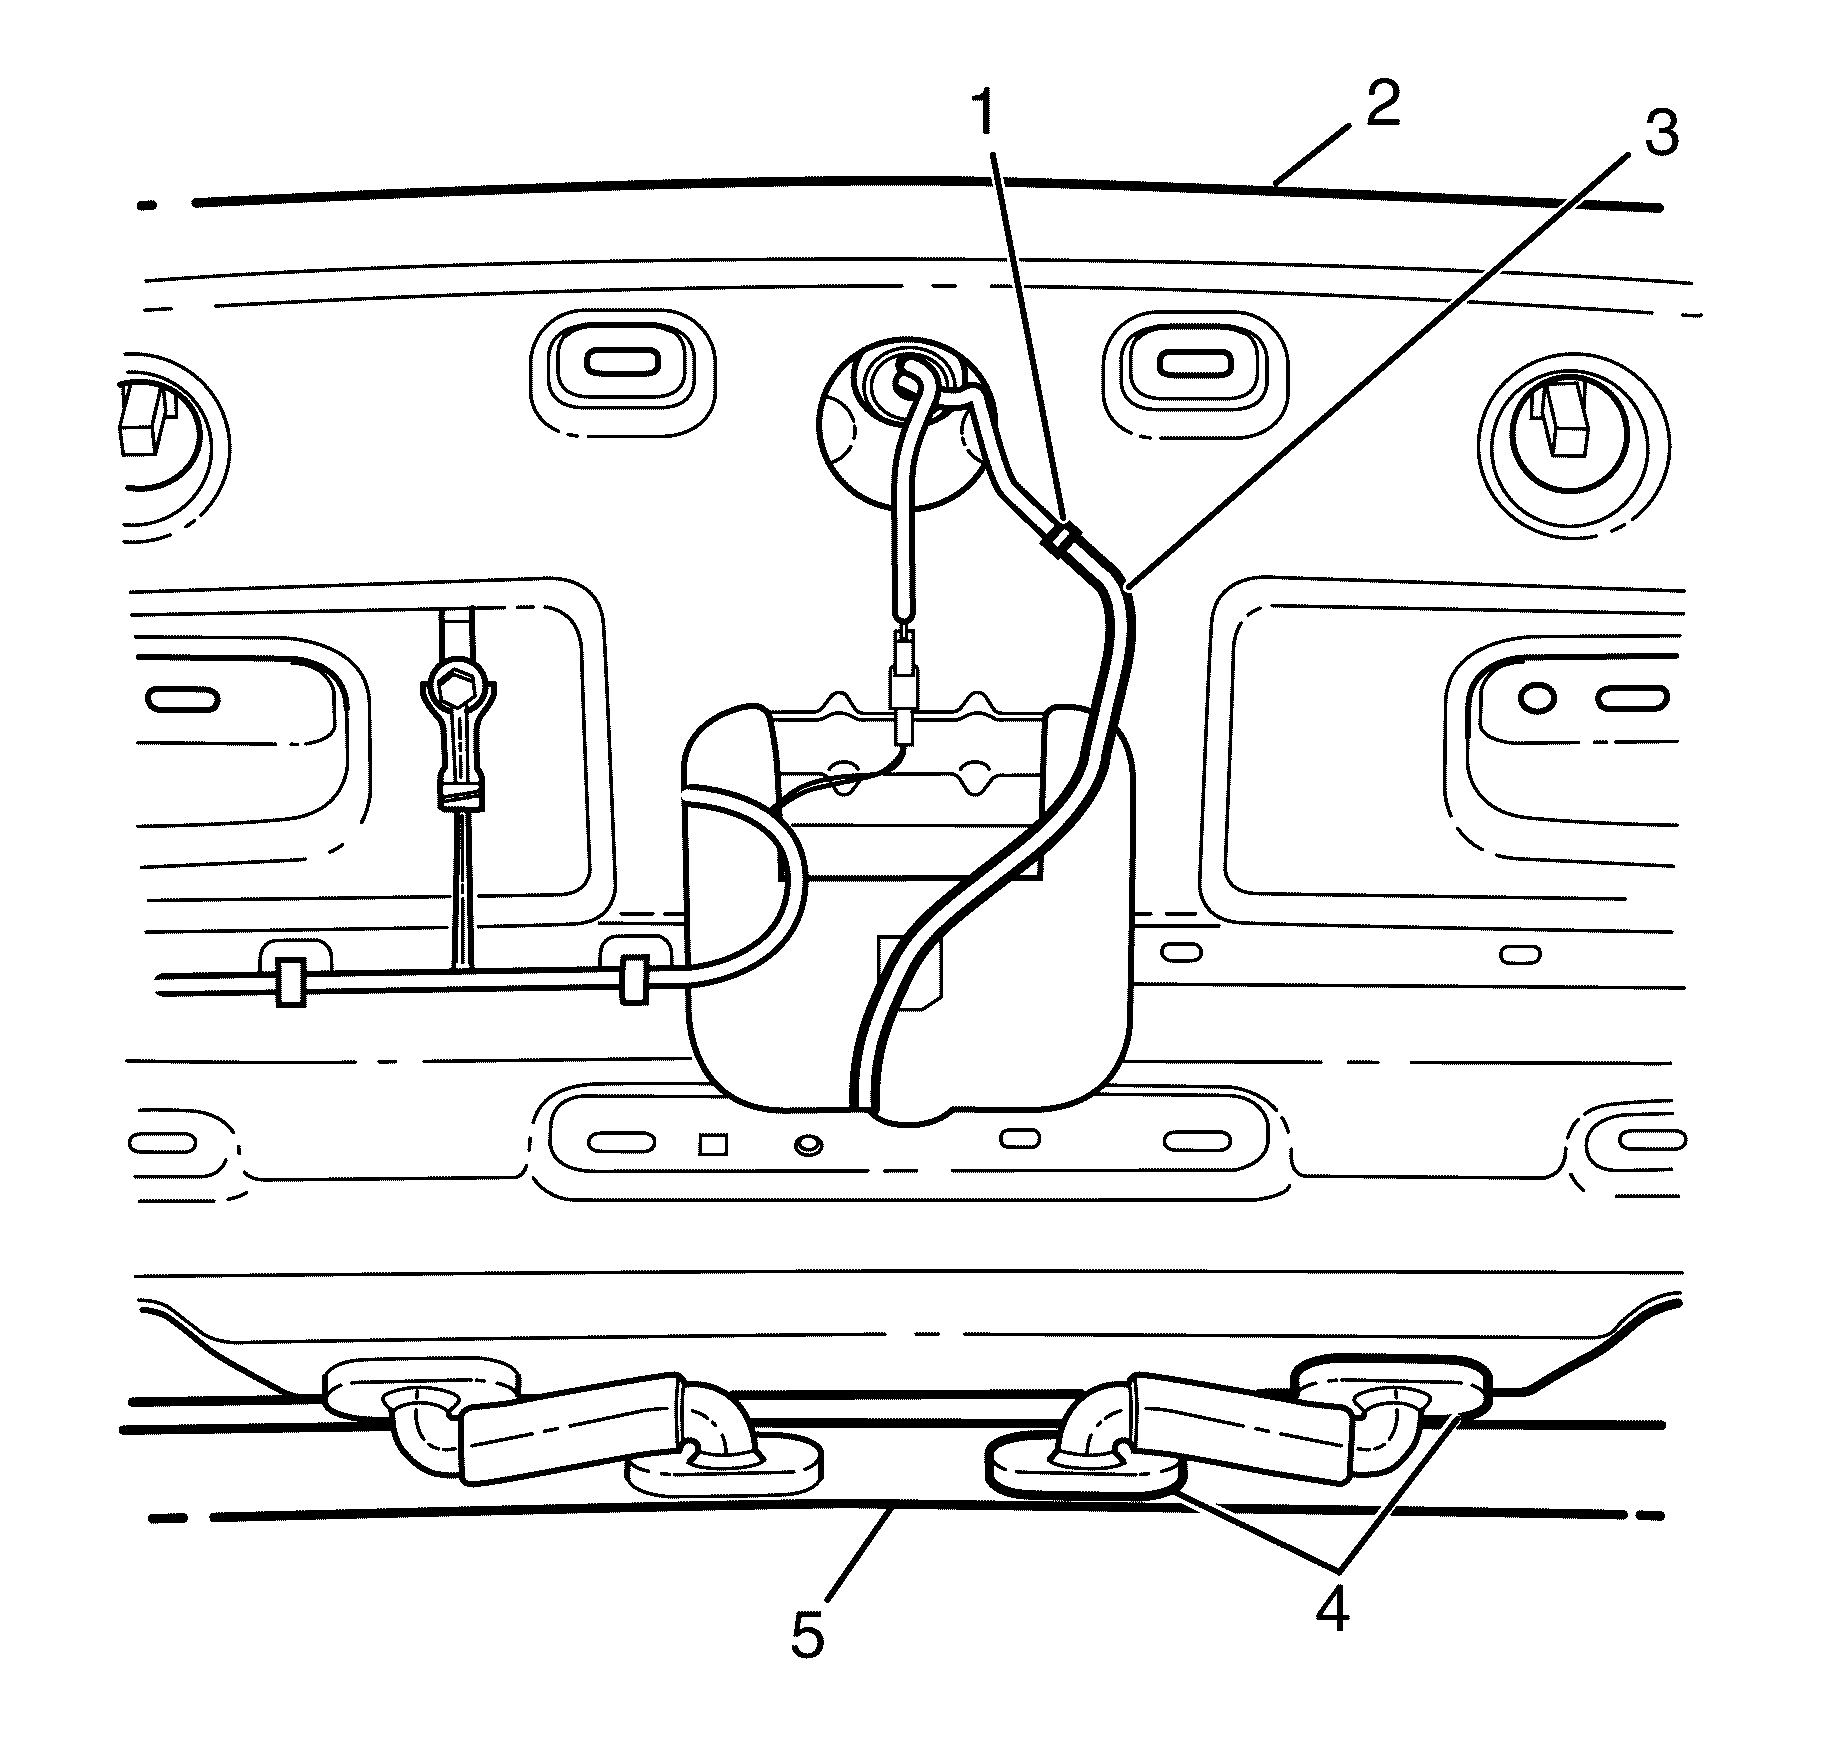
Installation Procedure - Liftgate Connector to Washer Nozzle Hose Connector
- Install the rear window washer hose (3) into the rear header (5) and the liftgate (2).
- Install the liftgate rear window washer grommet (4) into the rear header (5) and the liftgate (2).
- Connect the rear window washer hose (3) to the rear washer nozzle connector (1).
- Install the liftgate window upper garnish moulding. Refer to Liftgate Window Side Garnish Molding Replacement.
- Install the liftgate window side garnish moulding on both sides. Refer to Liftgate Window Side Garnish Molding Replacement.
- Connect the rear window washer hose (3) to the rear window washer connector (2).
- Install the headlining clip assembly (6) into the roof panel (4).
- Install the body side window rear garnish moulds on both sides. Refer to Body Side Window Rear Garnish Molding Replacement.
- Install the headlining rear trim panel retainer. Refer to Headlining Rear Trim Panel Retainer Replacement.
- Install the quarter inner trim finish panel on both sides. Refer to Quarter Inner Trim Finish Panel Replacement.
- Check the operation of the rear window washer and make sure there are no solvent leaks.


Important: To avoid crimping or puncturing the rear window washer hose (3) make sure it locates correctly into the headlining clip assembly washer hose guide (1).
