GM Service Manual Online
For 1990-2009 cars only

Cooling Fan and Shroud Replacement LAT
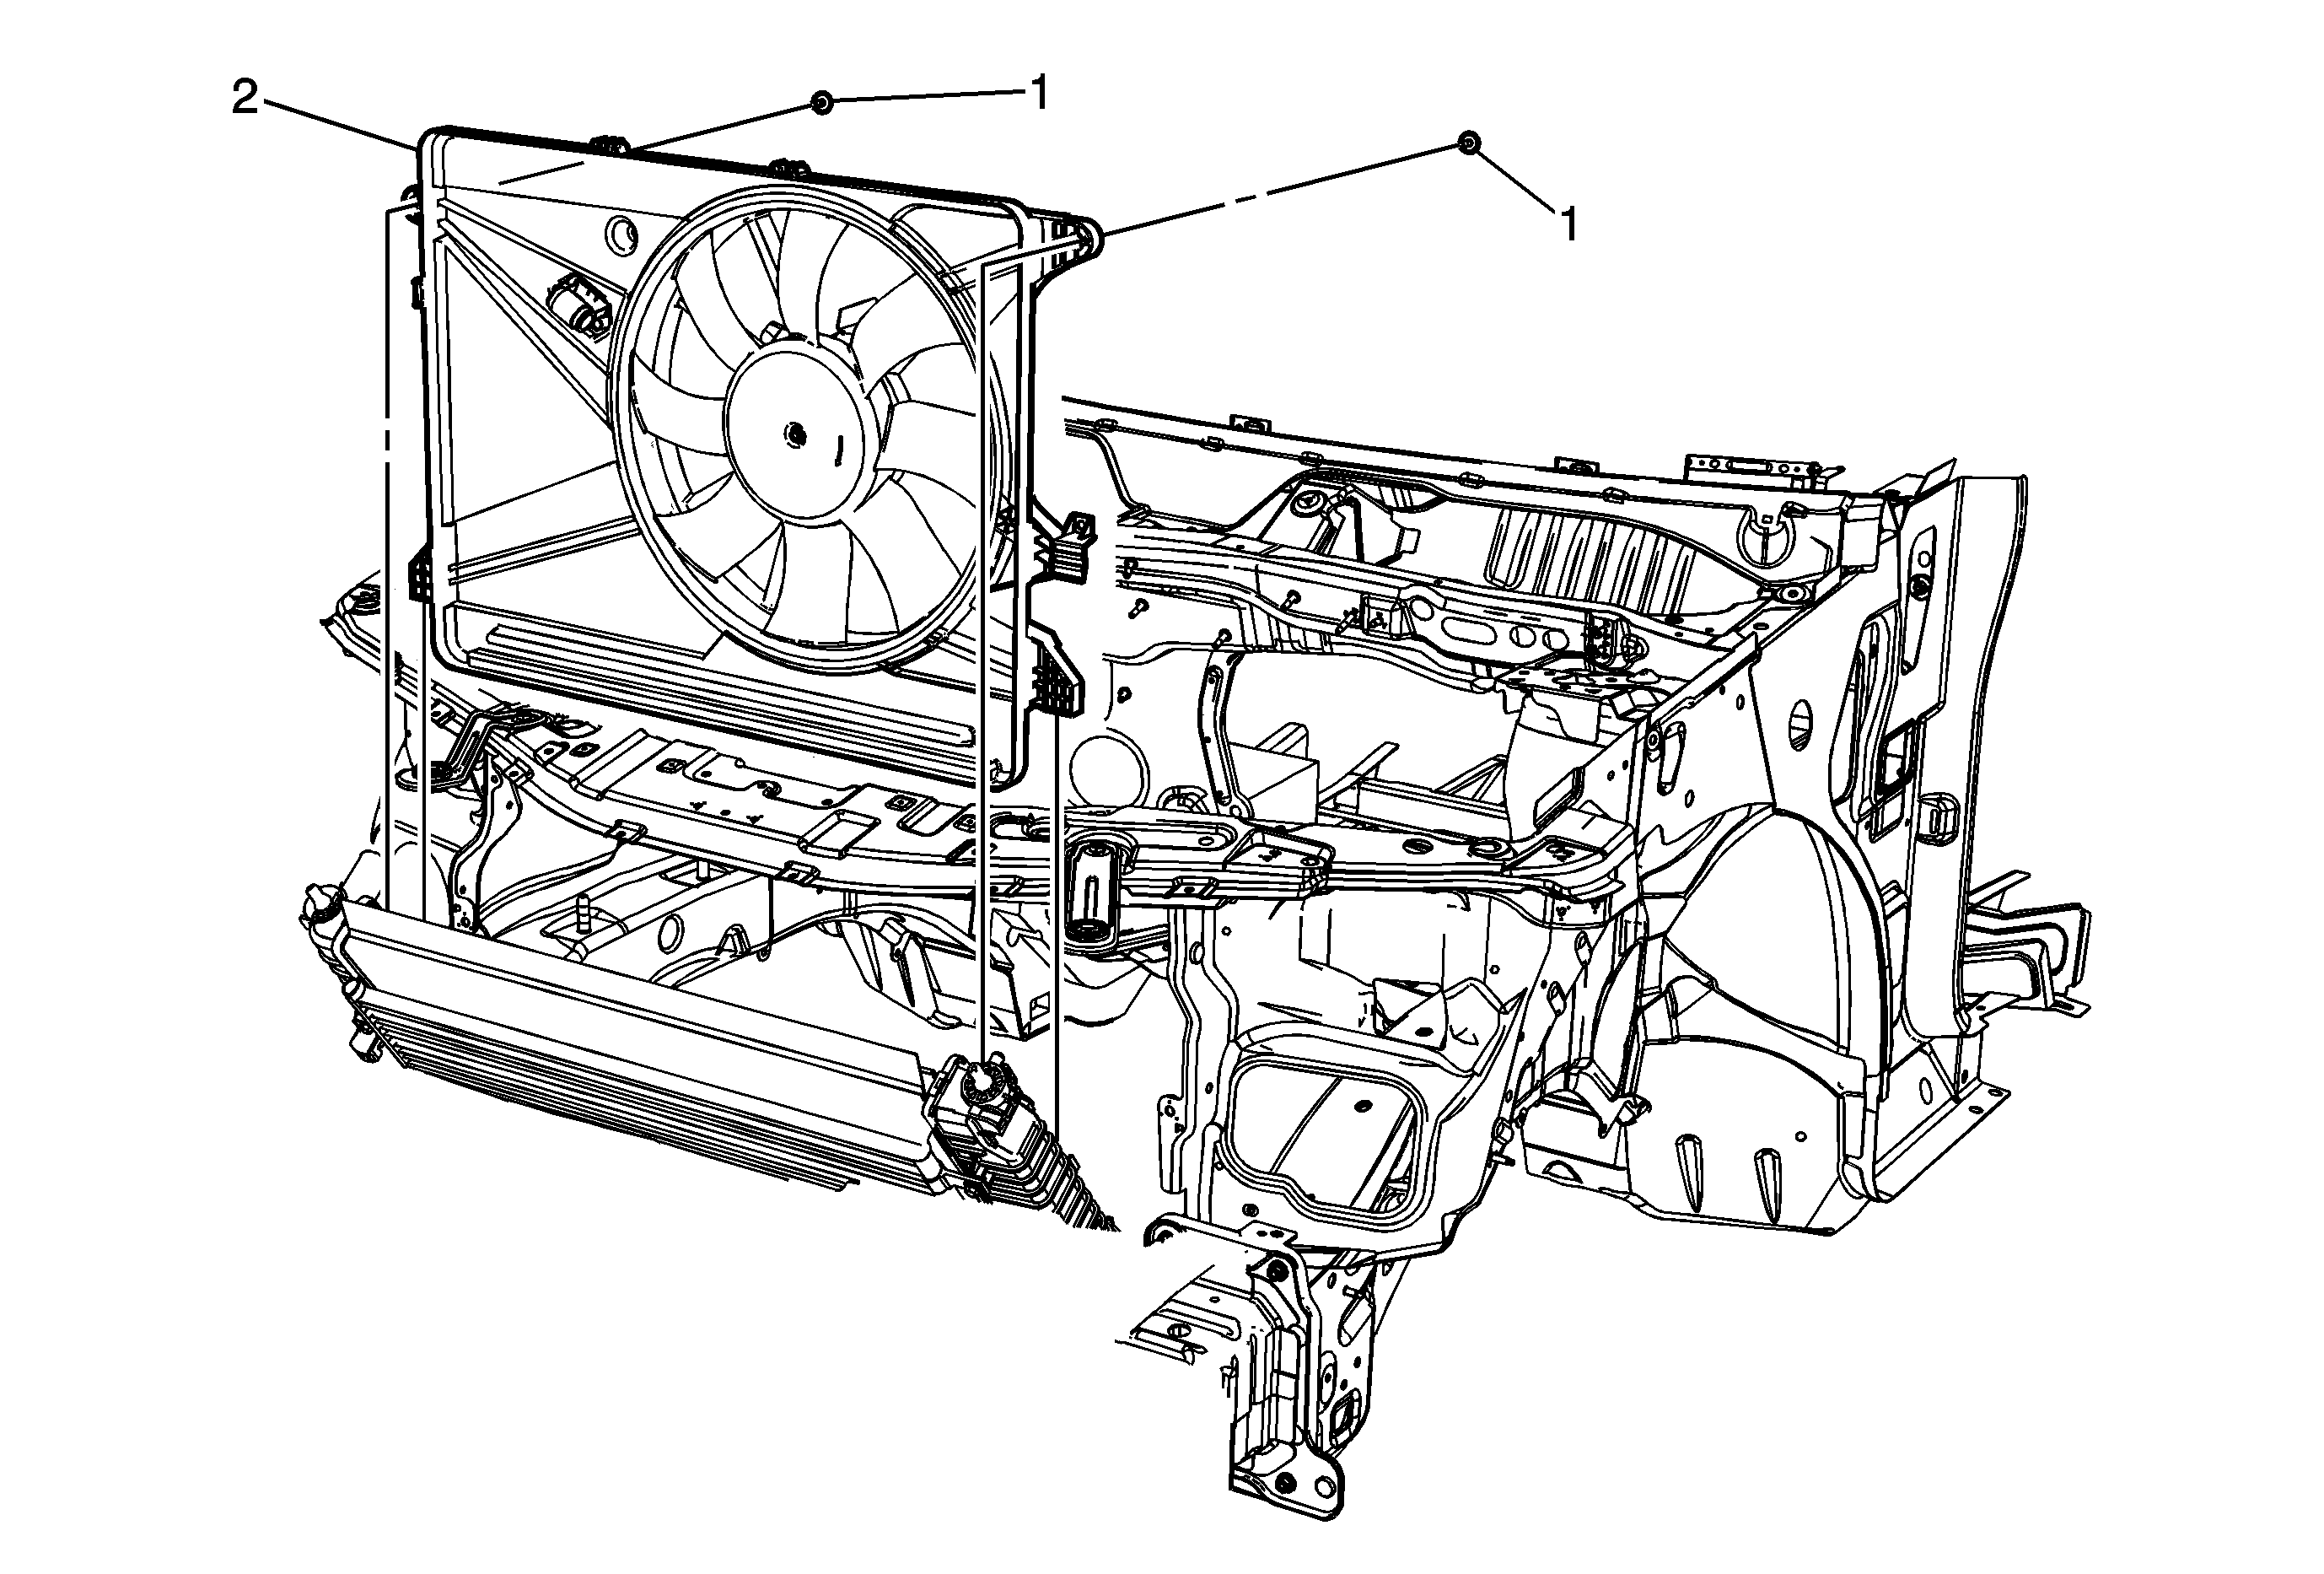

Object Number: 1887017  Size: MF

Callout

Component Name

Preliminary Procedure

  1. Drain the cooling system. Refer to Cooling System Draining and Filling .
  2. Disconnect the hybrid system. Refer to Hybrid Battery Service Disconnect/Connect .
  3. Raise and suitably support the vehicle. Refer to Lifting and Jacking the Vehicle .
  4. Remove the radiator opening upper cover. Refer to Radiator Opening Upper Cover Replacement .
  5. Disconnect the electrical connector from the fan motor.
  6. Remove the front fascia. Refer to Front Bumper Fascia Replacement .
  7. Remove the front bumper impact bar. Refer to Front Bumper Impact Bar Replacement .
  8. Disconnect the transmission oil cooler lines from the radiator.
  9. Remove the radiator inlet and outlet hoses. Refer to Radiator Inlet Hose Replacement , and Radiator Outlet Hose Replacement .
  10. Disconnect the compressor hose from the condenser. Refer to Compressor Hose Assembly Replacement
  11. Disconnect the liquid line from the condenser. Refer to Liquid Line Replacement
  12. Remove the condenser radiator fan module (CRFM) mounting bracket bolts from the radiator support.
  13. Remove the CRFM mounting brackets from the radiator support.
  14. Lift the CRFM assembly from the lower mounts and carefully move the bottom of the assembly rearward while tilting the top forward.

1

Fan Assembly Bolt (Qty: 2)

Notice: Refer to Fastener Notice in the Preface section.

Tighten
8 N·m (71 lb in)

2

Fan and Shroud Assembly

Procedure

Transfer cooling fan resistor.

Cooling Fan and Shroud Replacement LE5, LZ4, LY7
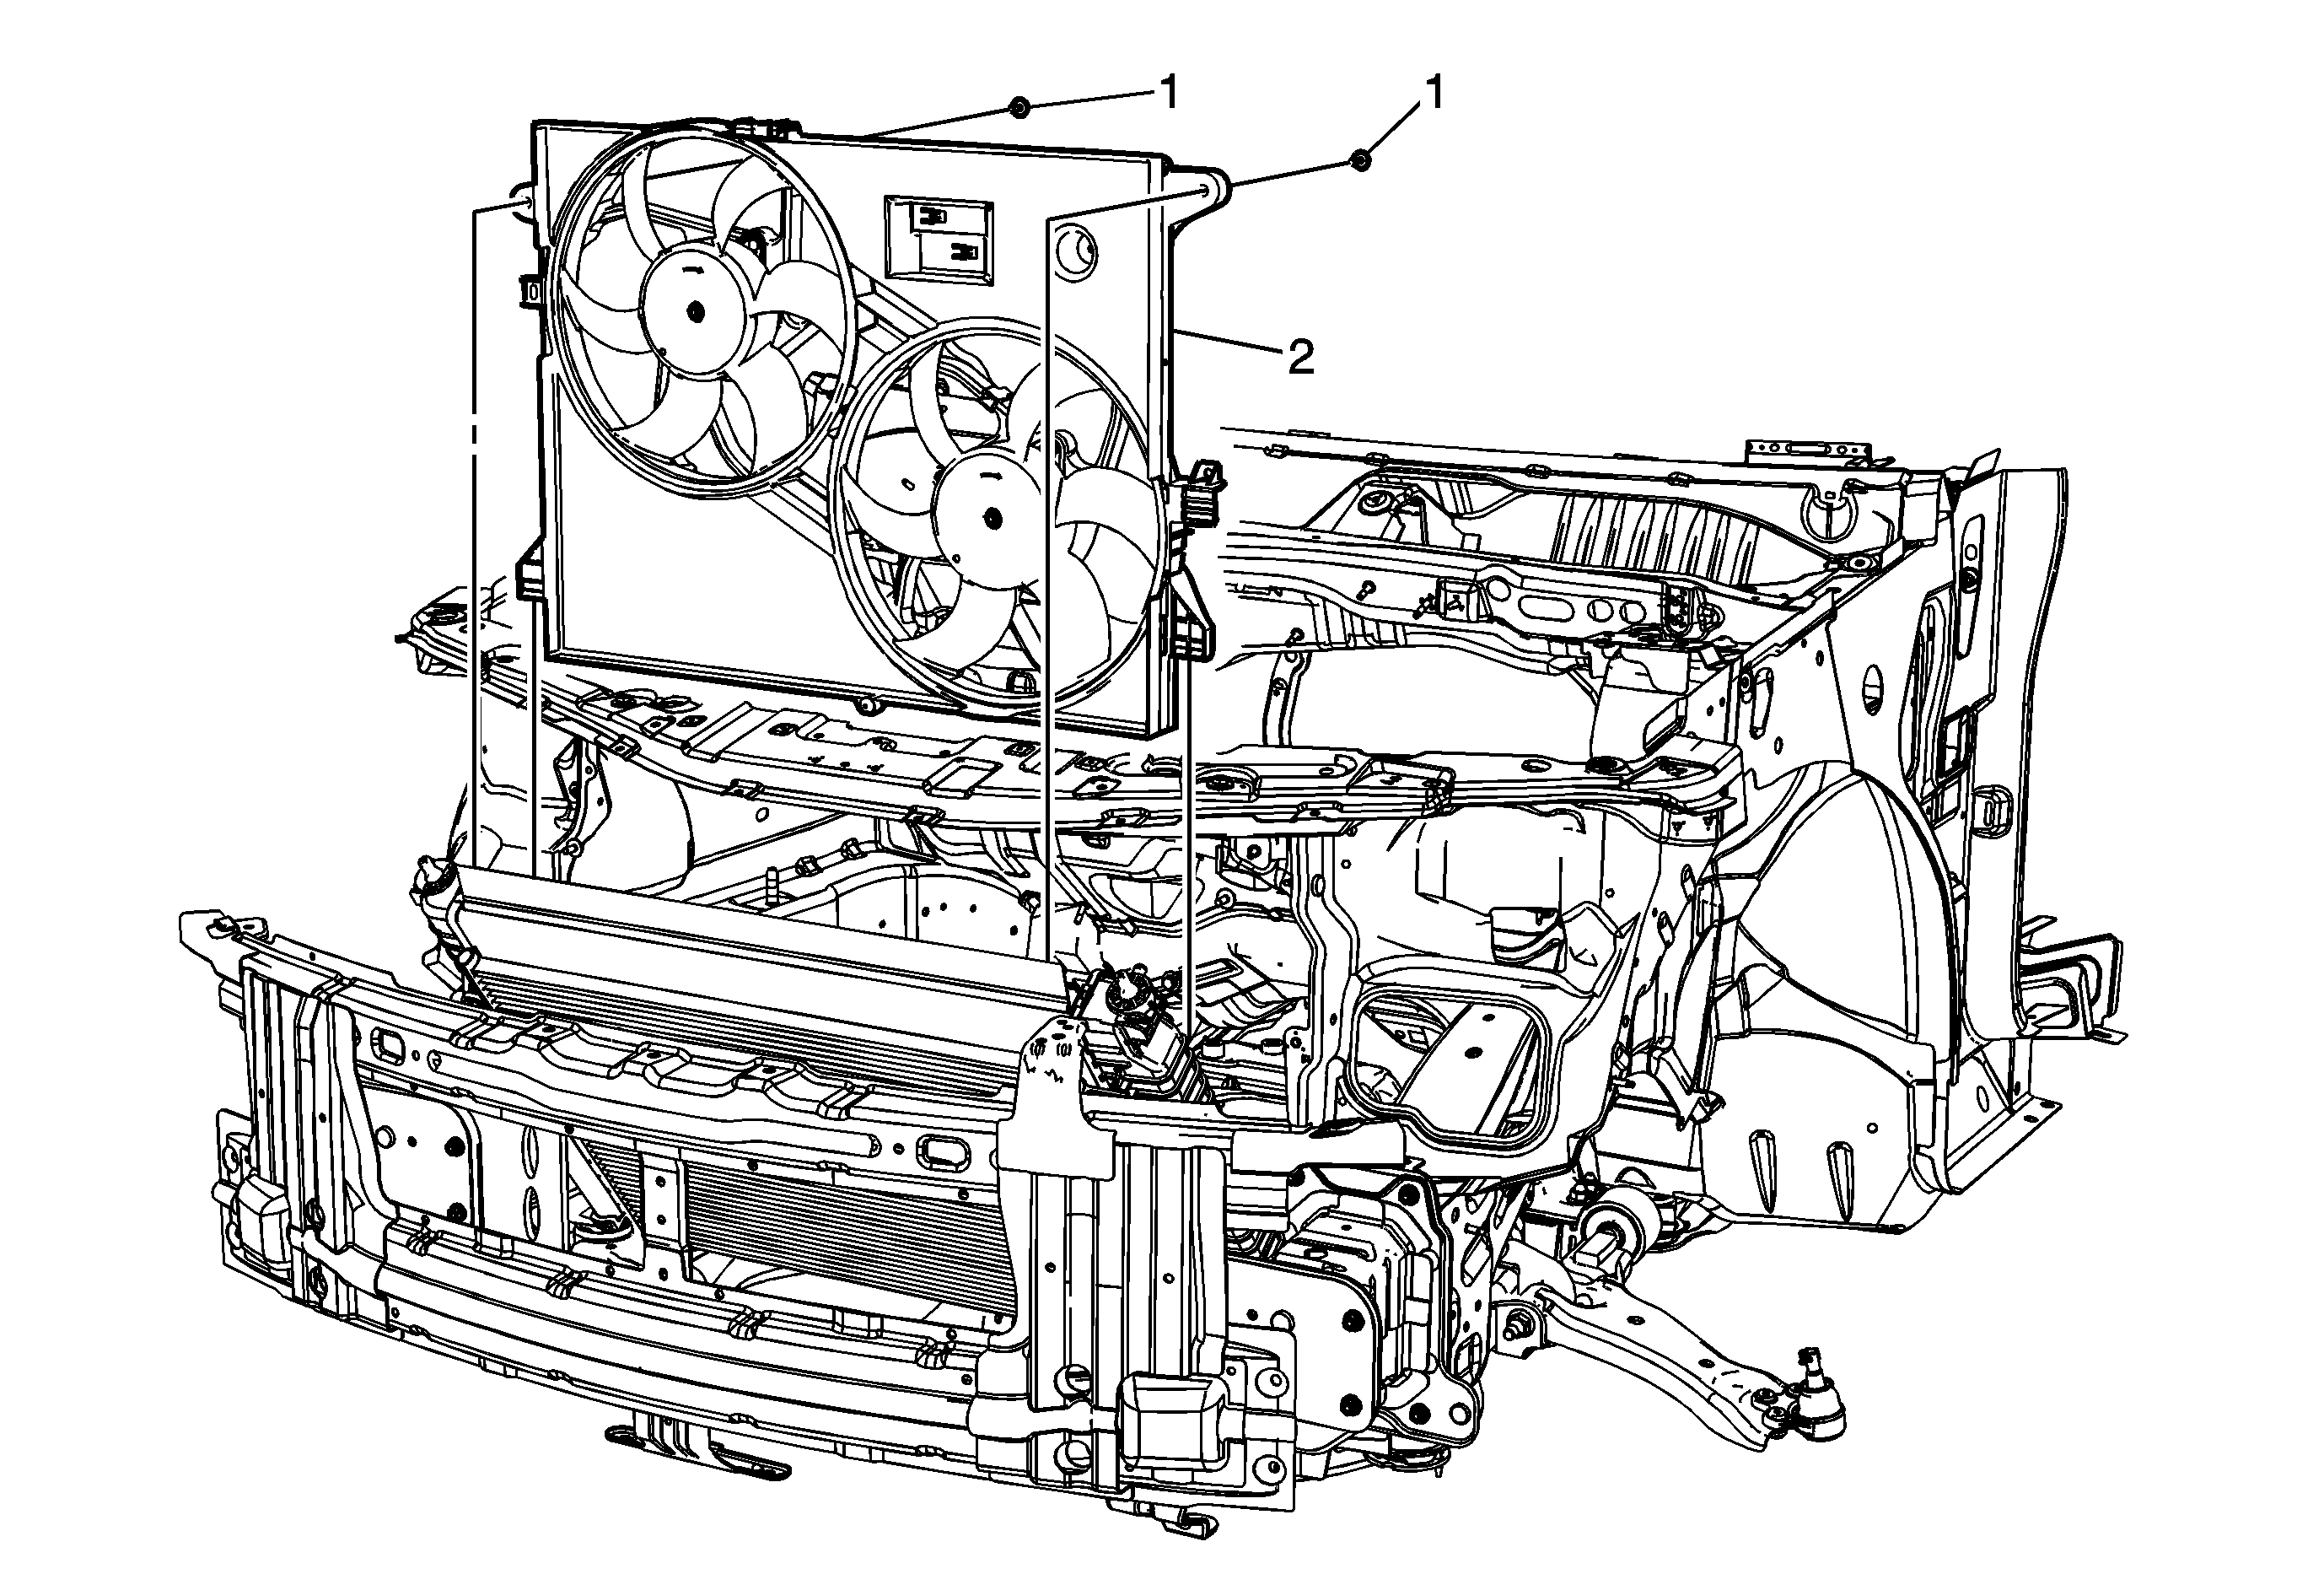

Object Number: 1887026  Size: MF

Callout

Component Name

Preliminary Procedure

  1. Drain the cooling system. Refer to Cooling System Draining and Filling.
  2. Raise and suitably support the vehicle as necessary. Refer to Lifting and Jacking the Vehicle.
  3. Remove the radiator opening upper cover. Refer to Radiator Opening Upper Cover Replacement.
  4. Disconnect the electrical connector from the fan motor.
  5. Remove the front fascia. Refer to Front Bumper Fascia Replacement.
  6. Remove the front bumper impact bar. Refer to Front Bumper Impact Bar Replacement.
  7. Disconnect the transmission oil cooler lines from the radiator.
  8. Remove the radiator inlet and outlet hose. Refer to Radiator Inlet Hose Replacement , and Radiator Outlet Hose Replacement.
  9. Remove the condenser radiator fan module (CRFM) mounting bracket bolts from the radiator support.
  10. Remove the CRFM mounting brackets from the radiator support.
  11. Lift the CRFM assembly from the lower mounts and carefully move the bottom of the assembly rearward while tilting the top forward.

1

Fan Assembly Bolt (Qty: 2)

Notice: Refer to Fastener Notice in the Preface section.

Procedure

Remove the fan assembly bolts from the radiator.

Tighten
8 N·m (71 lb in)

2

Fan and Shroud Assembly

Procedure

Remove the fan and shroud assembly.

Cooling Fan and Shroud Replacement LAT


Object Number: 1887017  Size: MF

Callout

Component Name

Preliminary Procedure

  1. Drain the cooling system. Refer to Cooling System Draining and Filling.
  2. Disconnect the hybrid system. Refer to Hybrid Battery Service Disconnect/Connect.
  3. Raise and suitably support the vehicle. Refer to Lifting and Jacking the Vehicle.
  4. Remove the radiator opening upper cover. Refer to Radiator Opening Upper Cover Replacement.
  5. Disconnect the electrical connector from the fan motor.
  6. Remove the front fascia. Refer to Front Bumper Fascia Replacement.
  7. Remove the front bumper impact bar. Refer to Front Bumper Impact Bar Replacement.
  8. Disconnect the transmission oil cooler lines from the radiator.
  9. Remove the radiator inlet and outlet hoses. Refer to Radiator Inlet Hose Replacement , and Radiator Outlet Hose Replacement.
  10. Disconnect the compressor hose from the condenser. Refer to Compressor Hose Assembly Replacement
  11. Disconnect the liquid line from the condenser. Refer to Liquid Line Replacement
  12. Remove the condenser radiator fan module (CRFM) mounting bracket bolts from the radiator support.
  13. Remove the CRFM mounting brackets from the radiator support.
  14. Lift the CRFM assembly from the lower mounts and carefully move the bottom of the assembly rearward while tilting the top forward.

1

Fan Assembly Bolt (Qty: 2)

Caution: Refer to Fastener Caution in the Preface section.

Tighten
8 N·m (71 lb in)

2

Fan and Shroud Assembly

Procedure

Transfer cooling fan resistor.

Cooling Fan and Shroud Replacement HP5
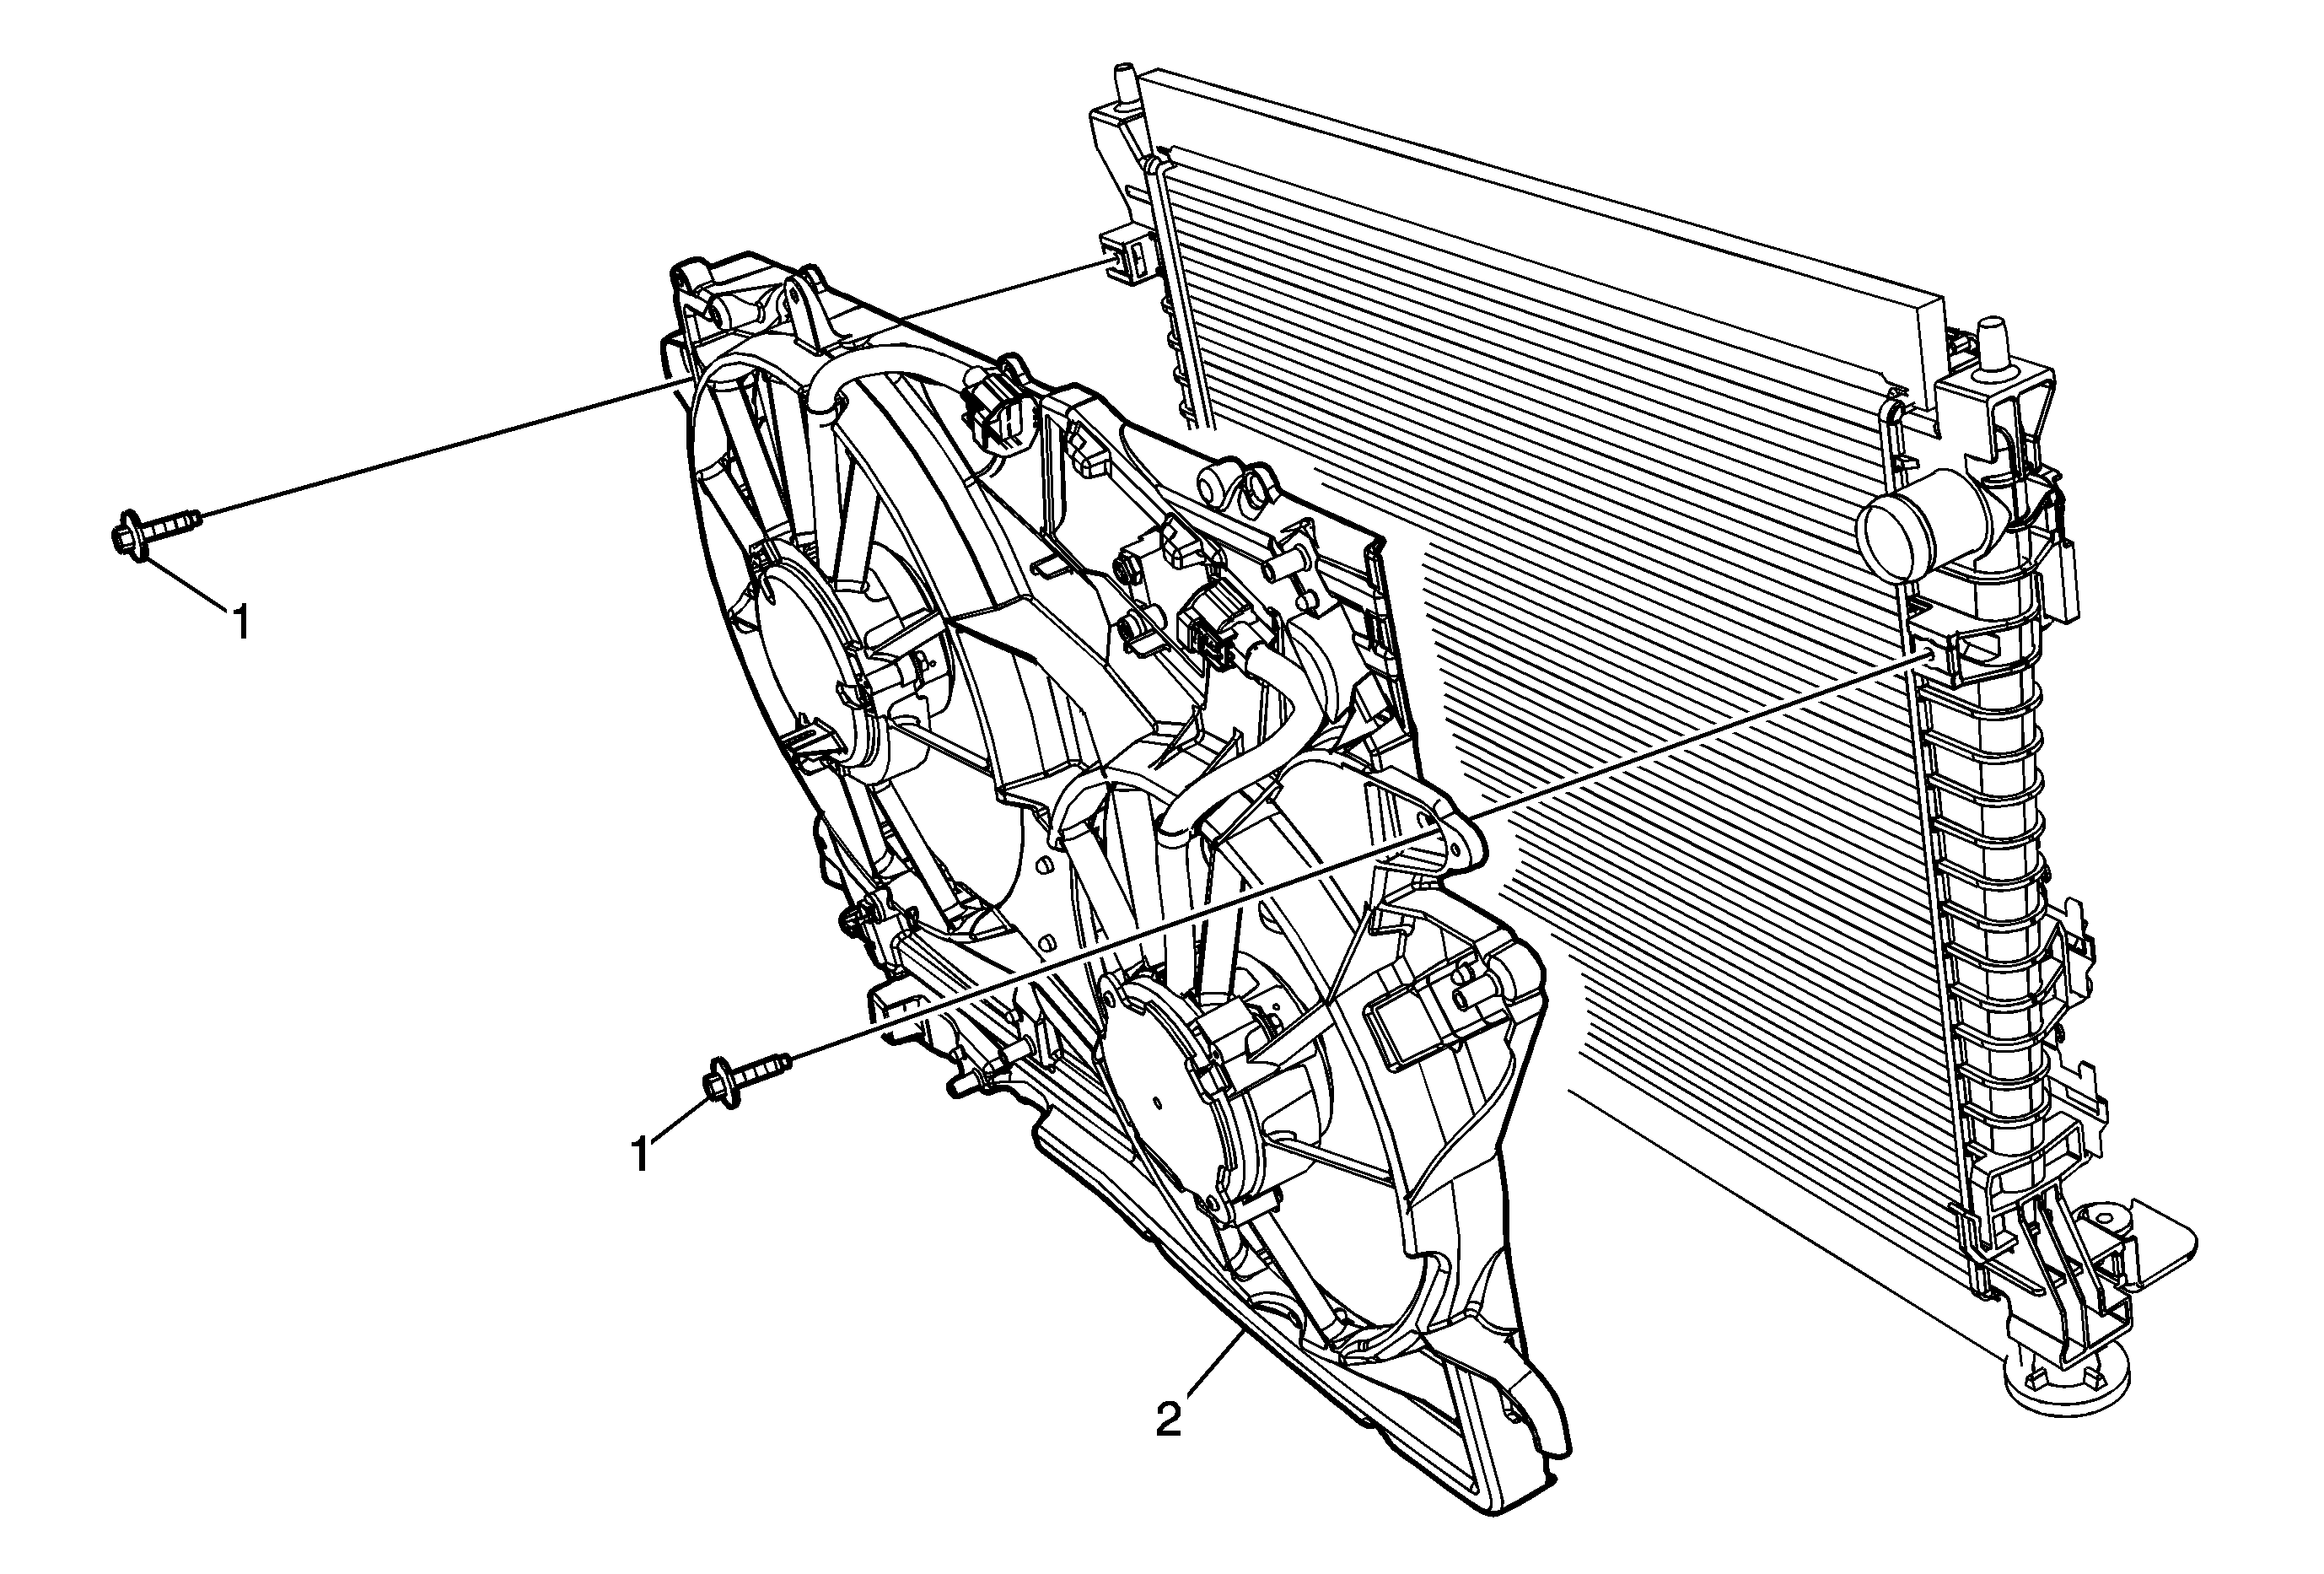

Object Number: 2150500  Size: MF

Callout

Component Name

Preliminary Procedures

  1. Drain the cooling system. Refer to Fuel Injector Sight Shield Replacement
  2. Remove underhood electrical block. Refer to Underhood Electrical Center or Junction Block Replacement
  3. Disconnect electrical connectors from cooling fan control module.
  4. Reposition radiator. Refer to Radiator Replacement

1

Cooling Fan and Shroud Bolt (Qty: 2)

Caution: Refer to Fastener Caution in the Preface section.

Tighten
8 N·m (71 lb in)

2

Cooling Fan and Shroud

Cooling Fan and Shroud Replacement LE5, LZ4, LY7


Object Number: 1887026  Size: MF

Callout

Component Name

Preliminary Procedure

  1. Drain the cooling system. Refer to Cooling System Draining and Filling.
  2. Raise and suitably support the vehicle as necessary. Refer to Lifting and Jacking the Vehicle.
  3. Remove the radiator opening upper cover. Refer to Radiator Opening Upper Cover Replacement.
  4. Disconnect the electrical connector from the fan motor.
  5. Remove the front fascia. Refer to Front Bumper Fascia Replacement.
  6. Remove the front bumper impact bar. Refer to Front Bumper Impact Bar Replacement.
  7. Disconnect the transmission oil cooler lines from the radiator.
  8. Remove the radiator inlet and outlet hose. Refer to Radiator Inlet Hose Replacement , and Radiator Outlet Hose Replacement.
  9. Remove the condenser radiator fan module (CRFM) mounting bracket bolts from the radiator support.
  10. Remove the CRFM mounting brackets from the radiator support.
  11. Lift the CRFM assembly from the lower mounts and carefully move the bottom of the assembly rearward while tilting the top forward.

1

Fan Assembly Bolt (Qty: 2)

Caution: Refer to Fastener Caution in the Preface section.

Procedure

Remove the fan assembly bolts from the radiator.

Tighten
8 N·m (71 lb in)

2

Fan and Shroud Assembly

Procedure

Remove the fan and shroud assembly.