For 1990-2009 cars only
Removal Procedure
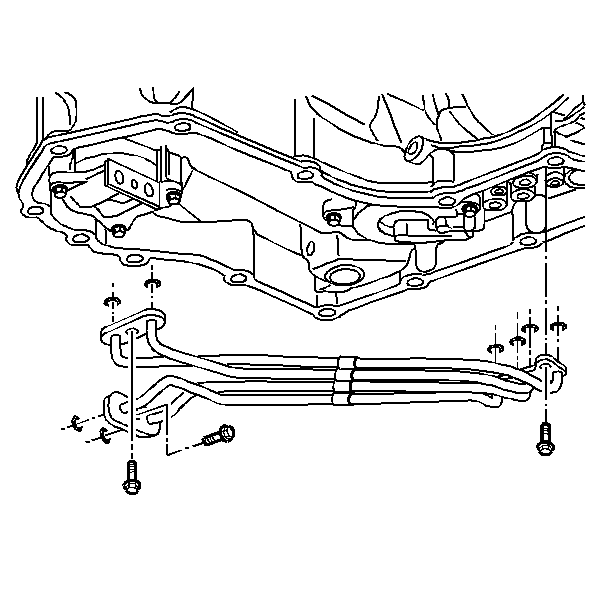
- Remove the transmission oil filter assembly. Refer to Automatic Transmission Fluid Filter and Seal Replacement .
- Remove the oil feed pipe bolts.
- Inspect the eight oil feed pipe seal rings.
- Replace the seal rings only if the seal rings are cut, swollen or damaged.
- Remove the lo and the reverse band oil pipe assembly.
- Remove the eight lo and the reverse band oil pipe assembly seals.
- Inspect the oil feed pipes for plugged passages, bent pipes, or cracks.
- Inspect the oil feed pipe seal rings. Verify the proper location of the seal rings. Replace the seal rings if these are cut, swelled or damaged.


Installation Procedure
- Install the eight lo and the reverse band oil pipe assembly seals.
- Install the lo and the reverse band oil feed pipe assembly onto the transmission.
- Hand start the bolts that attach the oil feed pipe assembly to the transmission.
- Install the transmission oil filter assembly. Refer to Automatic Transmission Fluid Filter and Seal Replacement .
- Reset the TAP values. Refer to Transmission Adaptive Functions .

Notice: Refer to Fastener Notice in the Preface section.

Tighten
Tighten the bolts to 12 N·m (106 lb in).
Important: It is recommended that transmission adaptive pressure (TAP) information be reset.
Resetting the TAP values using a scan tool will erase all learned values in all cells. As a result, the engine control module (ECM), powertrain control module (PCM) or transmission control module (TCM) will need to relearn TAP values. Transmission performance may be affected as new TAP values are learned.Removal Procedure
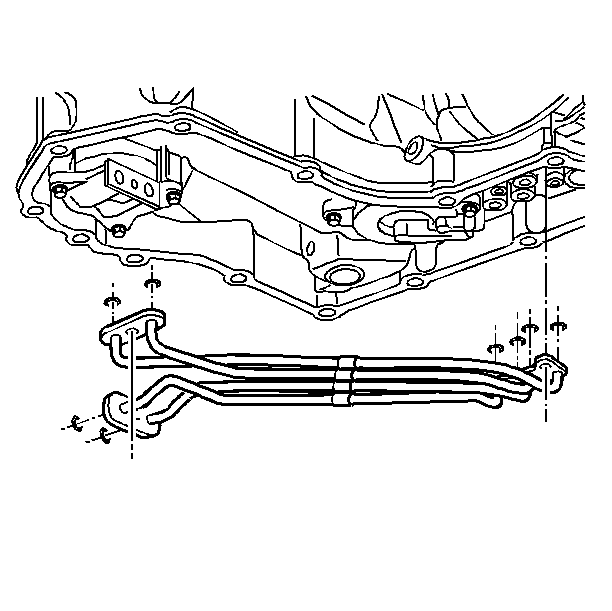
- Remove the transmission oil filter assembly. Refer to Automatic Transmission Fluid Filter and Seal Replacement.
- Remove the oil feed pipe bolts.
- Inspect the eight oil feed pipe seal rings.
- Replace the seal rings only if the seal rings are cut, swollen or damaged.
- Remove the lo and the reverse band oil pipe assembly.
- Remove the eight lo and the reverse band oil pipe assembly seals.
- Inspect the oil feed pipes for plugged passages, bent pipes, or cracks.
- Inspect the oil feed pipe seal rings. Verify the proper location of the seal rings. Replace the seal rings if these are cut, swelled or damaged.


Installation Procedure
- Install the eight lo and the reverse band oil pipe assembly seals.
- Install the lo and the reverse band oil feed pipe assembly onto the transmission.
- Hand start the bolts that attach the oil feed pipe assembly to the transmission.
- Install the transmission oil filter assembly. Refer to Automatic Transmission Fluid Filter and Seal Replacement.
- Reset the TAP values. Refer to Transmission Adaptive Functions.

Caution: Refer to Fastener Caution in the Preface section.

Tighten the bolts to 12 N·m (106 lb in).
Note: It is recommended that transmission adaptive pressure (TAP) information be reset.
Resetting the TAP values using a scan tool will erase all learned values in all cells. As a result, the engine control module (ECM), powertrain control module (PCM) or transmission control module (TCM) will need to relearn TAP values. Transmission performance may be affected as new TAP values are learned.