WATER LEAKS AT THE COWL AREA DIAGNOSIS/CAUSE AND CORRECTION

The intent of this bulletin is to provide water leaks diagnosis and correction information on 1982 Cavalier series vehicles.
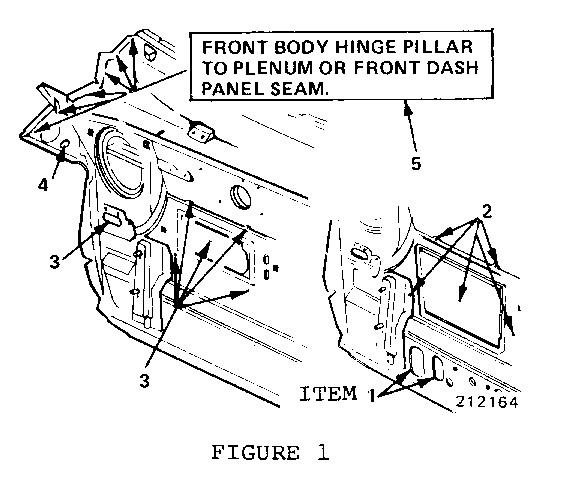
CONDITION: Water entry through evaporator core pipe front of dash holes (Figure 1, Item 1).
IDENTIFICATION: Carpet will be wet from underside and soaked through directly in under pipe entry into passenger compartment.
CORRECTION: Seal from engine compartment side-pipe to edge of metal with a moderately thick sealer over the gasket.
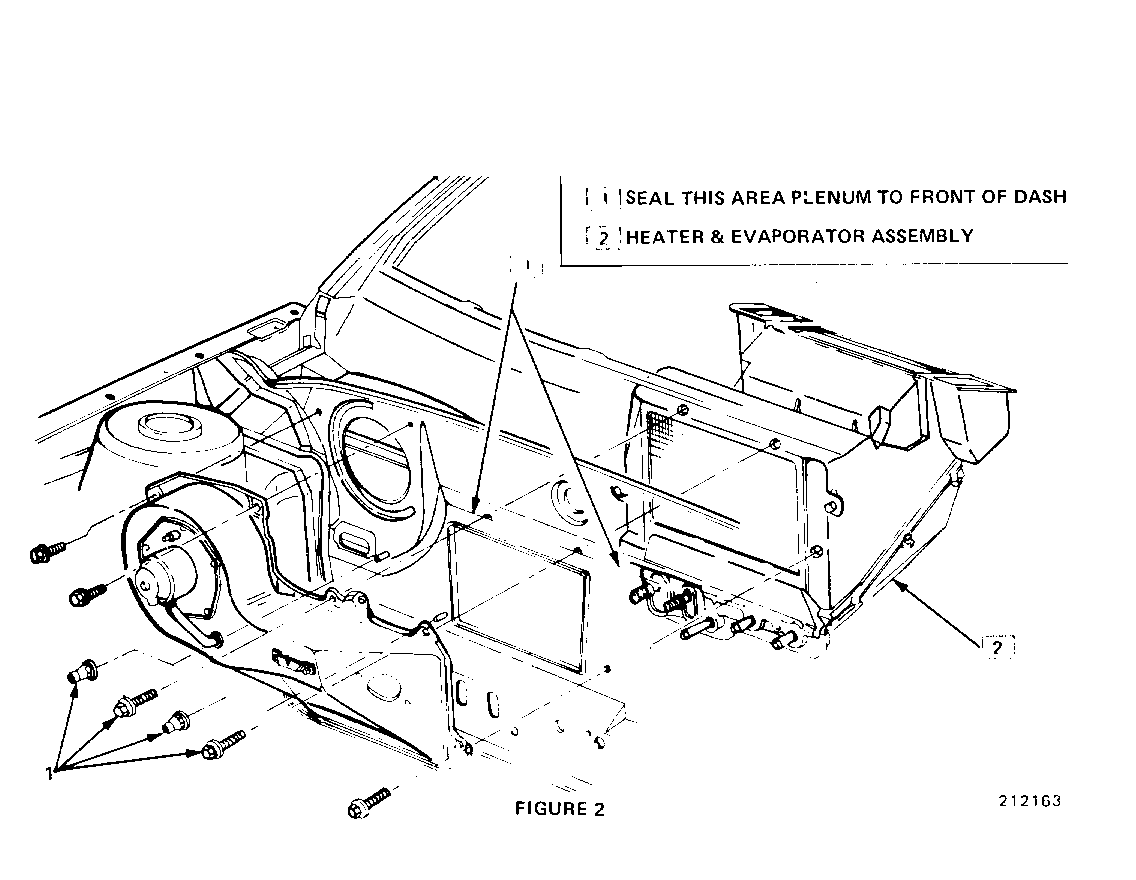
CONDITION: Water entry through heater or air conditioning blower and air inlet assembly mounting holes (Figure 1, Item 2 - screw holes; and, Figure 2, Item 1).
IDENTIFICATION: Wet carpet directly below the heater case ---- may be wet on top or underside of carpet.
CORRECTION: Seal upper left-hand horizontal two (2) and left-hand vertical one (1) blower and inlet assembly mounting bosses from the mounting gasket around the bosses back to the mounting gasket with 3M P/N 08648 or equivalent sealer.
CONDITION: Water entry from plenum chamber through the two (2) upper left-hand heater or air conditioning blower and air inlet assembly mounting holes (Figure 2).
IDENTIFICATION: Wet carpet directly below the heater case --- may be wet on top or underside carpet.
CORRECTION: Check for sealer skips inside the plenum between the front of dash panel and the plenum front panel and reseal as shown with 3M P/N 08648 or equivalent sealer (Figure 2).
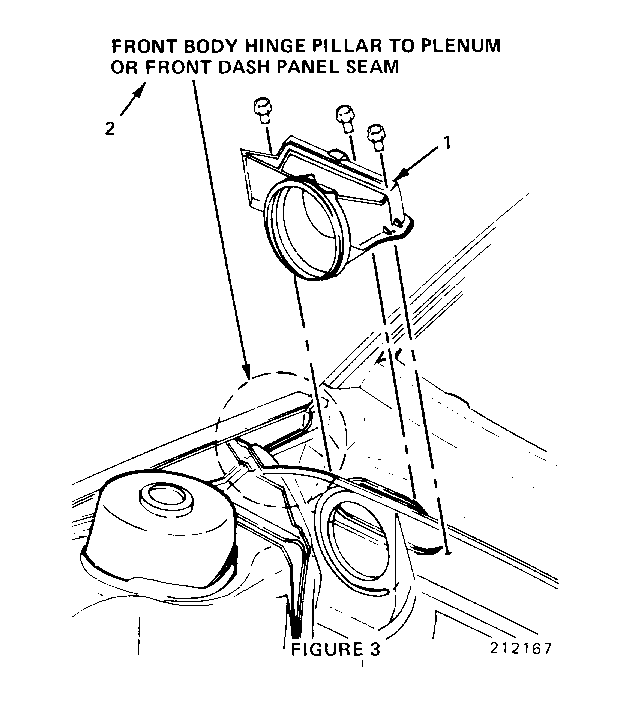
CONDITION: Water entry from around the plenum air conditioning recirculation valve assembly (Figure 3, Item 1).
IDENTIFICATION: Water will leak on right side of dash onto the hush panel, IP wiring, glove box, and/or carpet.
CORRECTION: Remove air inlet valve assembly from plenum and seal gasket to plenum surface with 3M P/N 08648 or equivalent sealer and reinstall valve assembly.
CONDITION: Water entry around heater fresh air vent valves (Figure 1, Item 3) right-hand or left-hand.
IDENTIFICATION: Water will leak on carpet, onto hush panel(s), etc.
CORRECTION: Remove valve(s) and overseal gasket and screw holes with 3M P/N 08648 or equivalent sealer.
CONDITION: Water entry through cruise control knock-out plug on units built without cruise control (Figure 1, Item 4).
IDENTIFICATION: Water will leak from hole down to carpet usually in under the carpet.
CORRECTION: Seal hole opening around edge with 3M P/N 08648 or equivalent sealer.
CONDITION: Water entry at front body hinge pillar (left-hand or right-hand) to plenum and front dash seam (Figure 3, Item 2, added note; and Figure 1, Item 5, added note).
IDENTIFICATION: Water will leak down from seam and wet the carpet from the underside at the forward outboard corner of the carpet.
CORRECTION: Remove fender and seal seam as required with 3M P/N 08648 or equivalent sealer.
CONDITION: Water entry at the rear edge of the front door(s) on 69 styles.
IDENTIFICATION: Water will seep down the forward edge of the door center post onto the carpet. The water may seep in under the carpet or on top of it.
CORRECTION: Remove door center post trim and remove from the door center post flange the door weatherstrip seal 6" below to 6" above the door lock stricker. Rework the flange by bending the flange outboard 5mm at the lock striker bolt and tapering off to zero bend 6" above and below the striker bolt. Reinstall the weatherstrip and post trim. This repair places more pressure on the door weatherstrip by the door at the point of water entry.
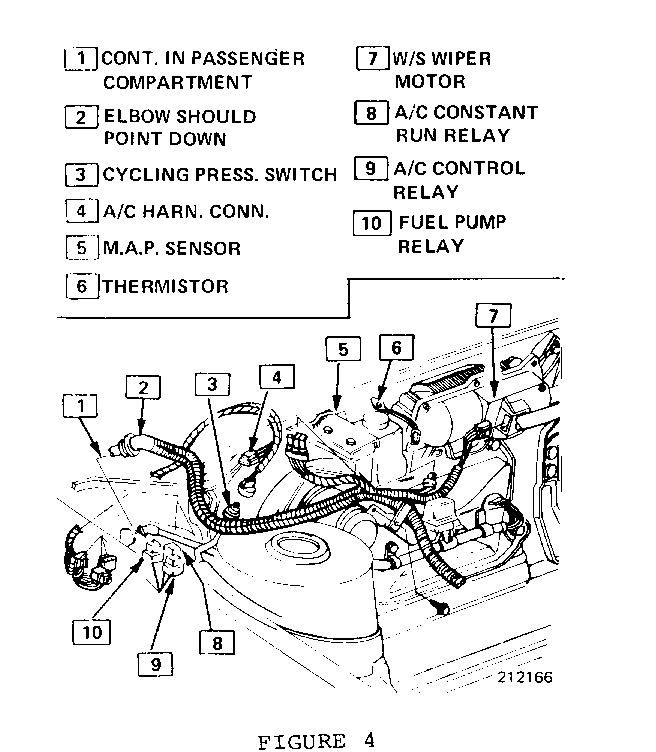
CONDITION: Water entry at the EFI wiring harness and right-hand side of car (Figure 4).
IDENTIFICATION: Water leaking onto right-hand dash panel or down firewall and onto carpet.
CORRECTION: Seal around EFI wiring grommet to front of dash opening. Seal split in grommet elbow. Seal wires inside conduit or tape around O.D. of conduit with waterproof tape providing that the split in the conduit is up (water will enter the split in the conduit and follow the wires back through the I.D. of the grommet and into the passenger compartment). The conduit and elbow should be routed in a downward direction from the grommet forward.
CONDITION: Rear compartment leaks on seventy-seven (77) styles at drip rail joints or hatch hing e holes in roof.
IDENTIFICATION: Water will leak into the rear compartment from hatch opening trim joints or from in under the trip onto the floor.
CORRECTION: Remove left-hand or right-hand drip rail and seal roof to 1/4 joint and/or remove hatch hinge bolts from roof joint and seal hole using 3M P/N 08648 or equivalent sealer.


General Motors bulletins are intended for use by professional technicians, not a "do-it-yourselfer". They are written to inform those technicians of conditions that may occur on some vehicles, or to provide information that could assist in the proper service of a vehicle. Properly trained technicians have the equipment, tools, safety instructions and know-how to do a job properly and safely. If a condition is described, do not assume that the bulletin applies to your vehicle, or that your vehicle will have that condition. See a General Motors dealer servicing your brand of General Motors vehicle for information on whether your vehicle may benefit from the information.
