NEWLY DESIGNED REAR WINDOW FOR FOLDING TOP (NEW PART/PROC.)

SUBJECT: NEWLY DESIGNED REAR WINDOW FOR FOLDING TOP (NEW PART AND SERVICE PROCEDURE)
VEHICLES AFFECTED: 1992 1/2 "J" CAR CONVERTIBLE SERIES
A newly designed glass rear window will replace the plastic backlite on the folding top beginning with the 1992 1/2 J car convertible models. If it becomes necessary to service the new rear window, use the following procedure:
1. Remove rear seat cushion and seatback. Refer to Service Manual for correct service procedure.
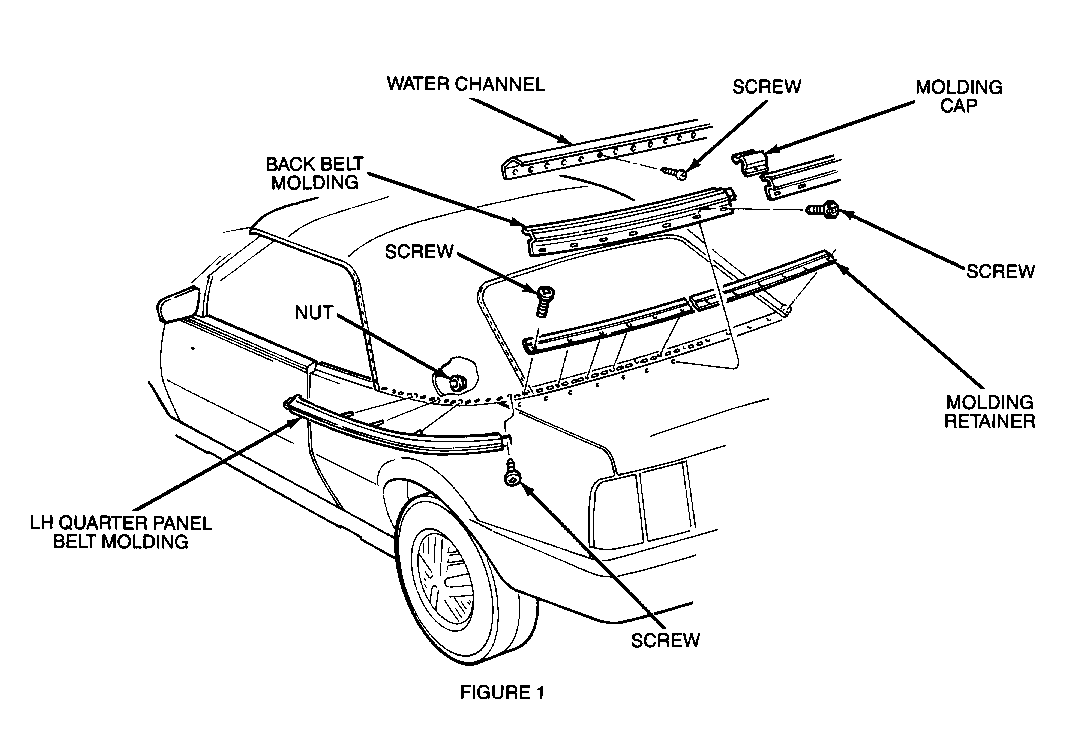
2. Remove LH quarter trim panel. Refer to Service Manual for correct procedure.
3. Peel LH portion of well cover off of quarter inner panel enough to gain access to LH quarter panel belt moulding retaining nuts.
4. Remove LH quarter panel belt moulding retaining nuts.
5. Remove water channel retaining screws and channel.
6. Remove back belt moulding retaining screws and pull mouldings away from folding top and rear window assembly while sliding mouldings off of quarter panel belt mouldings.
7. Remove retaining screws and back belt moulding retainers.
8. Remove LH quarter panel belt moulding retaining screw and pull moulding away from quarter panel to release studs of moulding from holes in sheet metal.
9. Using a grease pencil, mark location of each folding top sail panel on tack strip. Markings will aid in locating sail panels over tack strip during installation procedure.
10. Release latch hooks from windshield header to relieve tension in folding top cover.
11. Remove staples retaining LH top cover sail panel and rear window assembly to tack strip, noting location and spacing of staples. Remove only enough staples from RH sail panel as necessary to gain access to staples retaining RH portion of rear window assembly to tack strip. It is not necessary to remove the staples that retain the well cover to the tack strip.
12. Remove rear window assembly from vehicle as follows:
A. If vehicle is equipped with rear window defogger, disconnect wire harness connectors from both sides of rear window assembly.
B. Separate bottom edges of top cover and rear window assembly from butyl tape used to seal the cover and window assembly to the tack strip.
C. Pull LH sail panel over top cover to expose screw retaining rear window assembly to centre of #4 bow.
D. Remove screw and slide rear window assembly out of #4 bow by pulling pulling on window assembly from LH side of vehicle.
13. Add butyl tape as necessary to edge of well cover along tack strip to ensure complete sealing of rear window assembly and top cover sail panels to well cover.
14. Position rear window assembly at LH side of vehicle and feed bulb extrusion at top of rear window into slot on #4 bow.
15. Align slot at top centre of rear window with hole in #4 bow and install retaining screw. Tighten screw to 8 N.m (71 ft. lbs.).
16. Position material at bottom of rear window assembly over butyl tape on well cover (at tack strip) and press into place. Have assistant hold rear window from inside vehicle to prevent window from sagging and pulling bottom edge off of tack strip.
17. Secure rear window assembly to tack strip using 7mm (5/16 in.) (width) 12mm by (1/2 in.) (length) stainless steel staples. Apply downward pressure to material at each point of staple installation while working from centre to each end of rear window.
18. If vehicle is equipped with rear window defogger, connect wire harness connectors to both sides of rear window assembly.
19. Add butyl tape to edges of rear window assembly along tack strip where top cover sail panels overlap rear window. This will ensure complete sealing of boil sail panels to rear window.
20. Pull folding top sail panels down over butyl tape and into position with reference marks made during removal. Press each sail panel into place, keeping material flat without stretching.
21. Secure each sail panel to tack strip using 7mm (5/16 in.) (width) by 12mm (1/2 in.) (length) stainless steel staples. Apply downward pressure to sail panel at each point of staple installation while working from front to rear of sail panel.
22. Insert studs of LH quarter panel belt moulding into holes in sheet metal. Install retaining screw and tighten securely.
23. Position back belt moulding retainers over tack strip and align screw holes. Install retaining screws and tighten securely.
24. Slide outer ends of back belt mouldings over ends of quarter panel belt mouldings while engaging opposite ends together. Align screw holes in moulding with holes in body and install retaining screws. Tighten screws securely, then push moulding cap over seam in moulding until cap snaps into place.
25. Position water channel over back belt mouldings and align screw holes. Install retaining screws and tighten securely.
26. Install LH quarter panel belt moulding retaining nuts and tighten securely.
27. Reattach LH portion of well cover to quarter inner panel using vinyl trim adhesive.
28. Install LH quarter trim panel. Refer to Service Manual for correct service procedure.
29. Install rear seat cushion and seatback. Refer to Service Manual for correct service procedure.
30. Lock folding top to windshield header, then check appearance of folding top cover and rear window assembly. Top cover should be free from wrinkles and draws.
Please note this new service procedure in your copies of the appropriate Service Manual.
Labour Operation Number: B3550 Labour Time: 2.7 Hours Add Time: 0.2 Hour If vehicle is equipped with Rear Window Defogger

General Motors bulletins are intended for use by professional technicians, not a "do-it-yourselfer". They are written to inform those technicians of conditions that may occur on some vehicles, or to provide information that could assist in the proper service of a vehicle. Properly trained technicians have the equipment, tools, safety instructions and know-how to do a job properly and safely. If a condition is described, do not assume that the bulletin applies to your vehicle, or that your vehicle will have that condition. See a General Motors dealer servicing your brand of General Motors vehicle for information on whether your vehicle may benefit from the information.
