Driver or Passenger Seat Recliner Replacement Sedan
Removal Procedure
- Remove the front bucket seat. Refer to Seat Replacement .
- Remove the recliner finish cover screws.
- Remove the recliner finish cover from the seat.
- At the bottom of the seat back disengage the J-hook retainer for the seat back cover.
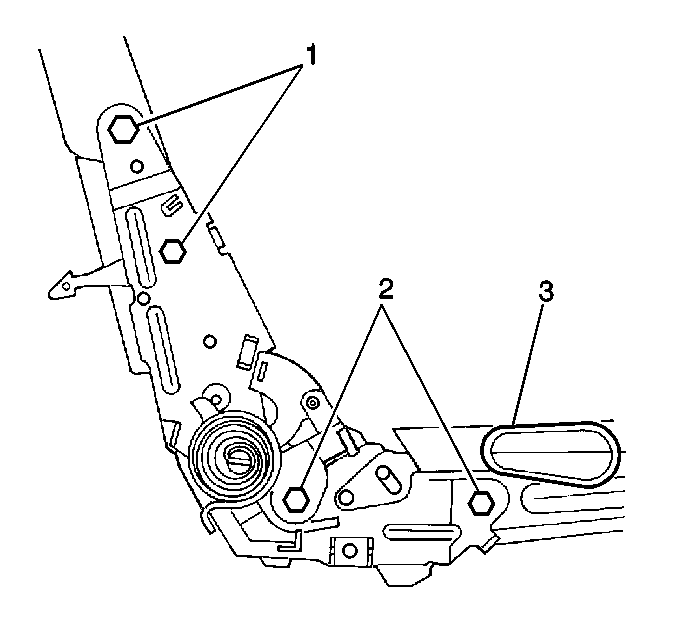
- Remove enough of the seat back cover and pad to gain access to the recliner bolts (1).
- Remove the recliner bolts (1, 2).
- Remove the recliner from the seat.

Installation Procedure
- Install the recliner to the seat.
- Install the recliner bolts (1, 2).
- Install the seat back pad and cover to a desired appearance.
- At the bottom of the seat back engage the J-hook retainer for the seat back cover.
- Install the bucket seat. Refer to Seat Replacement .
- Reposition the seat back to the original position.
- Check the seat back for proper operation.

Notice: Use the correct fastener in the correct location. Replacement fasteners must be the correct part number for that application. Fasteners requiring replacement or fasteners requiring the use of thread locking compound or sealant are identified in the service procedure. Do not use paints, lubricants, or corrosion inhibitors on fasteners or fastener joint surfaces unless specified. These coatings affect fastener torque and joint clamping force and may damage the fastener. Use the correct tightening sequence and specifications when installing fasteners in order to avoid damage to parts and systems.
Tighten
Tighten the recliner bolts to 24 N·m (18 lb ft).
Driver or Passenger Seat Recliner Replacement AF5
Removal Procedure
- Remove the front bucket seat. Refer to Passenger Front EZ Entry Seat Replacement .
- Remove the recliner finish cover screws.
- Remove the recliner finish cover from the seat.
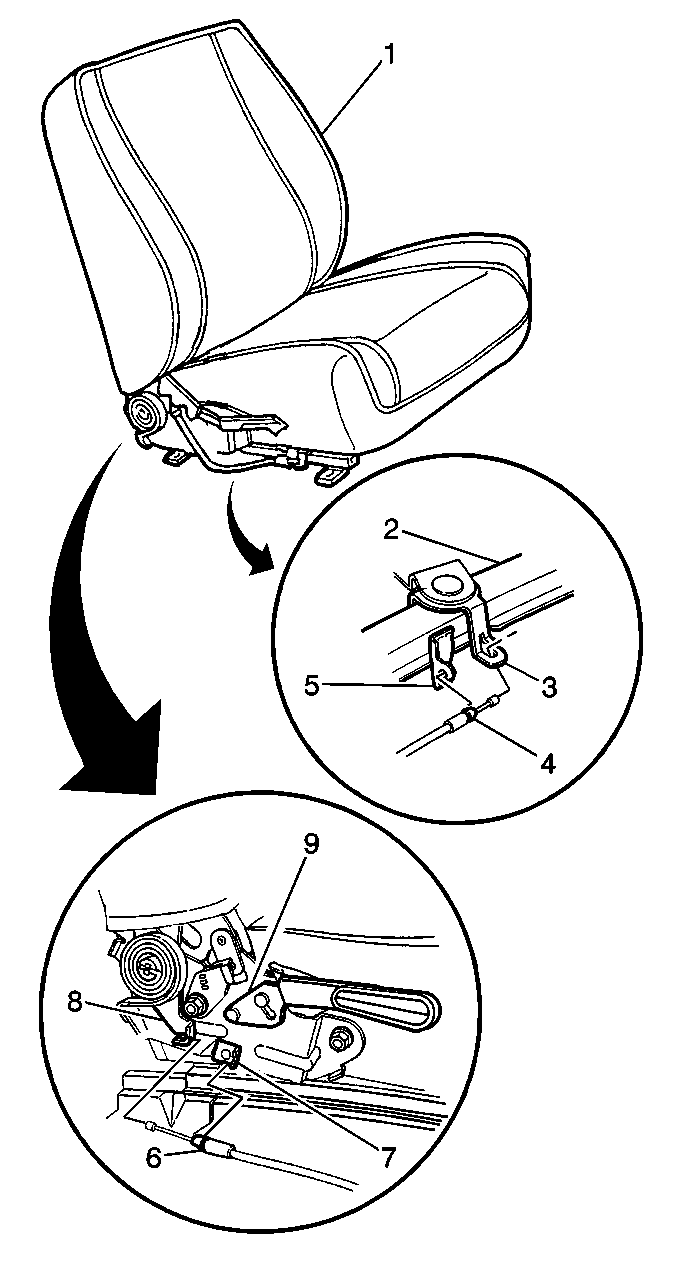
- At the bottom of the seat back (1) disengage the J-hook retainer for the seat back cover.
- At the bottom of the seat back (1) remove the seat cushion lateral release knob from the recliner.
- Remove the E-Z entry adjuster cable (4) from the seat adjuster (3).
- Remove the E-Z entry adjuster cable (4) from the adjuster cable bracket (5).
- Remove enough of the seat back pad and cover to access the recliner bolts (1).
- Remove the seat recliner bolts (1, 2).
- Remove the recliner from the seat.


Installation Procedure
- Install the recliner to the seat.
- Install the recliner bolts (1, 2)).
- Install the seat back pad and cover to a desired appearance .
- Install the E-Z entry adjuster cable (4) to the seat adjuster (3).
- Install the E-Z entry adjuster cable (4) to the adjuster cable bracket (5).
- At the bottom of the seat back (1) engage the J-hook retainer for the seat back cover.
- At the bottom of the seat back (1) install the lateral release knob to the recliner.
- Install the recliner finish cover to the seat.
- Install the recliner finish cover screws.
- Install the front bucket seat. Refer to Passenger Front EZ Entry Seat Replacement .
- Reposition the seat back (1) to the original position.
- Check seat back recliner for proper operation.

Notice: Use the correct fastener in the correct location. Replacement fasteners must be the correct part number for that application. Fasteners requiring replacement or fasteners requiring the use of thread locking compound or sealant are identified in the service procedure. Do not use paints, lubricants, or corrosion inhibitors on fasteners or fastener joint surfaces unless specified. These coatings affect fastener torque and joint clamping force and may damage the fastener. Use the correct tightening sequence and specifications when installing fasteners in order to avoid damage to parts and systems.
Tighten
Tighten the bolts to 24 N·m (18 lb ft).

Press the lateral release knob till fully seated on the recliner.
Tighten
Tighten the screws to 3 N·m (27 lb in).
