For 1990-2009 cars only
Front Side Door Trim Panel Replacement Pontiac
Tools Required
J 38778 Door Trim Pad Clip Remover
Removal Procedure
- Remove the manual window regulator handle from the front door, if equipped. Refer to Door Window Regulator Handle Replacement .
- Remove the power door lock switch, if equipped. Refer to Door Lock Switch Replacement .
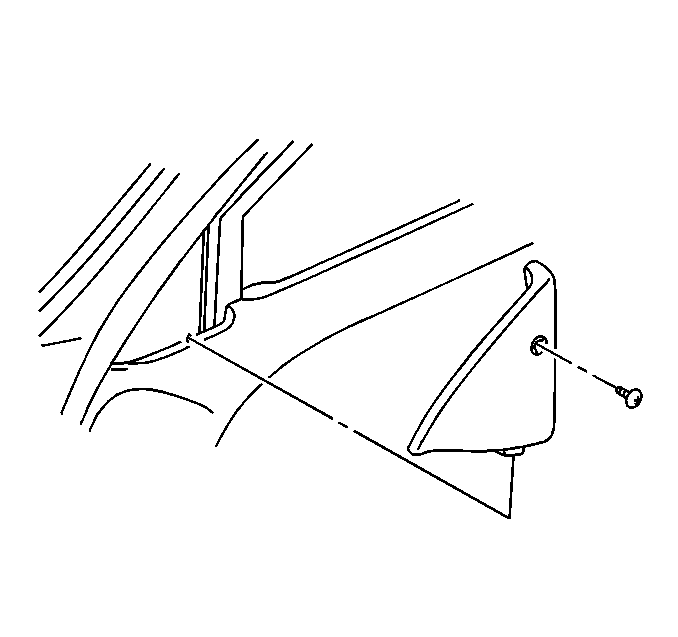
- Remove the upper extension trim panel screw.
- Remove the upper extension trim panel.
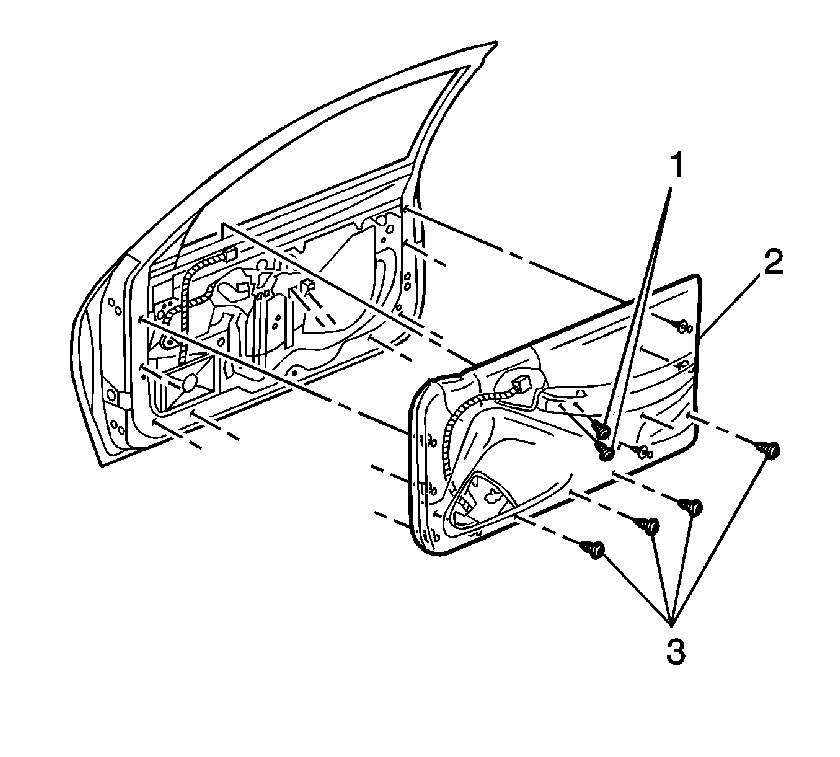
- Remove the front door trim panel screws (3).
- Remove the armrest screws (1).
- Starting at the bottom of the door disengage the trim panel retainers using the J 38778 .
- Lift up on the trim panel (2) to disengage the inner belt molding from the door flange.
- Remove the door trim panel (2) from the inner door panel.
- Disconnect the door speaker electrical connector.


Installation Procedure
- Position the trim panel (2) to the inner door panel.
- Connect the door speaker electrical connector.
- Engage the inner belt molding over the door flange and press down.
- Align the trim panel retainers to the inner door panel.
- Install the door trim panel screws (3).
- Install the door armrest screws (1).
- Install the upper extension trim panel.
- Install the upper extension trim panel screw.
- Install the power door lock switch, if equipped. Refer to Front Side Door Window Switch Replacement .
- Install the window regulator handle to the door, if equipped. Refer to Door Window Regulator Handle Replacement .

Press the trim panel (2) until the retainers are fully engaged.
Notice: Refer to Fastener Notice in the Preface section.
Tighten
Tighten the screws to 1.5 N·m (13 lb in).
Tighten
Tighten the screws to 5.7 N·m (51 lb in).

Tighten
Tighten the screw to 1.3 N·m (12 lb in).
Front Side Door Trim Panel Replacement Chevrolet
Tools Required
J 38778 Door Trim Pad Clip Remover
Removal Procedure
- Remove the manual window regulator handle from the front door, if equipped. Refer to Door Window Regulator Handle Replacement .
- Remove the power door lock switch, if equipped. Refer to Door Lock Switch Replacement .
- Remove the upper extension trim panel screw.
- Remove the upper extension trim panel.
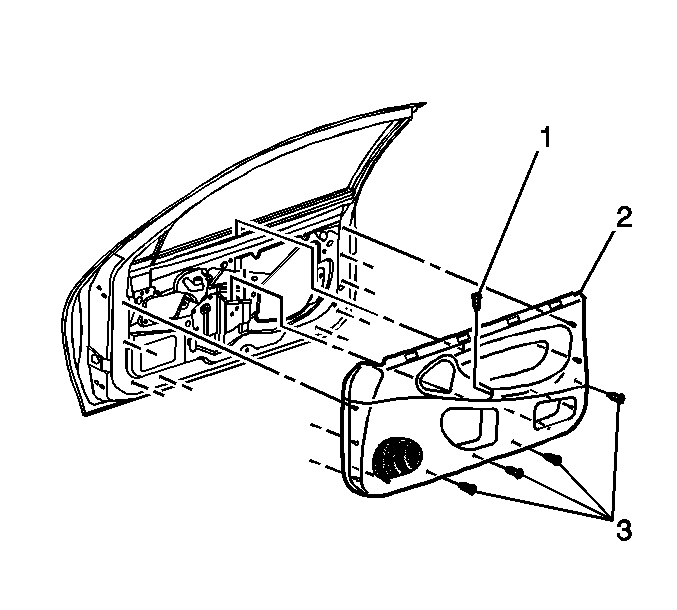
- Remove the door trim panel screws (3).
- Remove the armrest screw (1).
- Starting at the bottom of the door disengage the trim panel retainers using the J 38778 .
- Lift up on the door trim panel (2) to disengage the inner belt molding from the door flange.
- Remove the door trim panel (2) from the inner door panel.


Installation Procedure
- Position the trim panel (2) to the inner door panel.
- Engage the inner belt molding over the door flange and press down.
- Align the door trim panel retainers to the inner door panel.
- Install the door trim panel screws (3).
- Install the door armrest screw (1).
- Install the upper extension trim panel.
- Install the upper extension trim panel screw.
- Install the power door lock switch, if equipped. Refer to Front Side Door Window Switch Replacement .
- Install the window regulator handle to the door, if equipped. Refer to Door Window Regulator Handle Replacement .

Press the trim panel (2) until the retainers are fully engaged.
Notice: Refer to Fastener Notice in the Preface section.
Tighten
Tighten the screws to 1.5 N·m (13 lb in).
Tighten
Tighten the screw to 5.7 N·m (51 lb in).

Tighten
Tighten the screw to 1.3 N·m (12 lb in).
