PROM REPLACEMENT PROCEDURE INFORMATION

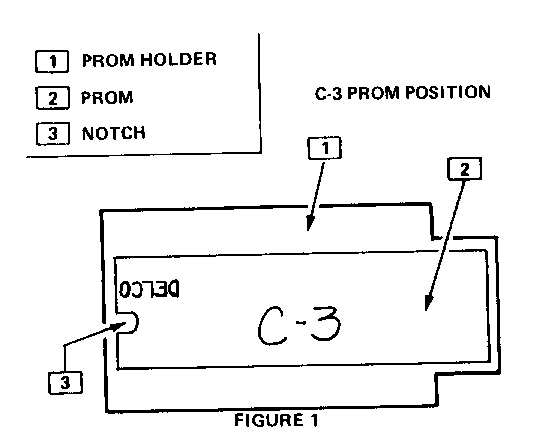
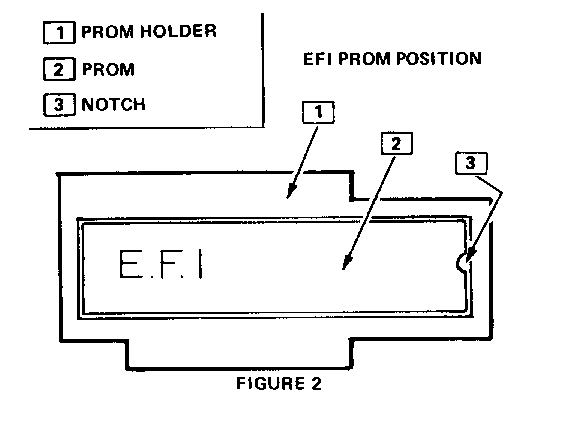
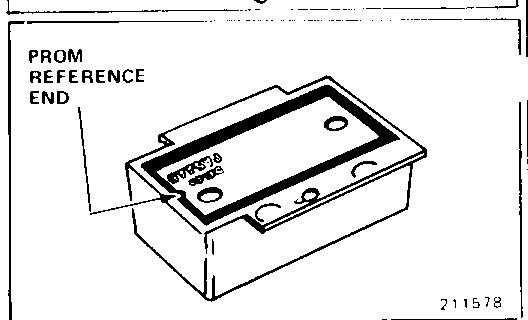
Due to the random orientation of the PROM socket to ECM circuit board, the alignment notch in the socket should be disregarded. To prevent incorrect installation of the PROM, the PROM should be installed into the holder with the notch in the PROM toward the square end of the PROM holder in C3 vehicles (Figure 1). Note that in EFI, the notch in the PROM is located in the opposite end of the PROM holder from computer command control ECM (Figure 2). If the PROM is installed incorrectly, damage will occur to both PROM and ECM. EFI PROM replacement procedures are provided with this bulletin.
NOTE: ECM mounting hardware not shown. Hardware will vary with car.
A. 1. Disconnect the two electrical connectors from the ECM.
2. Remove the ECM from the passenger compartment.
3. Remove the 1/4" screw from the access cover, then remove cover.
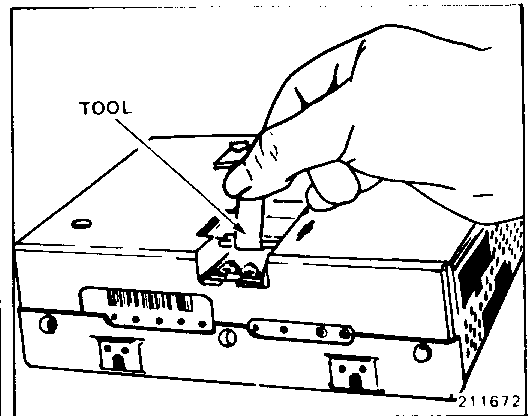
B. 1. Grasp the PROM carrier with the PROM removal tool.
2. Gently rock the carrier from side to side while applying a firm upward force.
3. Remove PROM and carrier.
C. 1. Take the new PROM from the package and check the part number to make sure it is the same as the defective PROM.
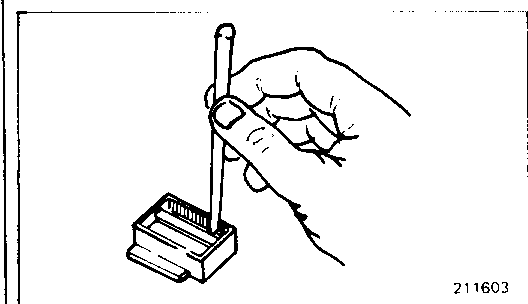
D. 1. Take the PROM mounted in the carrier and turn it upside down on a flat surface so pins are sticking up.
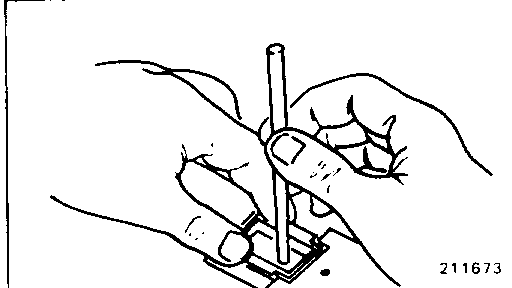
2. Using a narrow blunt tool, press down on the body of the PROM on both sides of the retainer bar so the top of the PROM is flush with the top of the carrier.
E. 1. Make certain the PROM is oriented in its carrier as shown:
F. 1. Position the PROM carrier squarely over the PROM socket as shown.
2. Press down firmly on the top of the carrier.
3. While firmly holding the carrier down, take a narrow blunt tool and press down on the body of the PROM. Alternately pressing on either end will help seat the PROM securely.
G. 1. Replace access cover and secure with 1/4" screw.
2. Install new ECM in passenger rompartment.
3. Connect the two electrical connectors to the ECM.
4. Turn ignition on.
5. Enter diagnostics and check for code 51. If code 51 is not present, the PROM is installed correctly.
If code 51 has been set, the PROM is not fully seated, installed backwards, has bent pins or is defective.
If not fully seated, remove access cover and press firmly on the PROM.
If it is necessary to remove the PROM, follow instructions "A" and "B".
If pins are bent, remove PROM, straighten pins and reinstall. If bent pins break or crack during straightening, replace PROM.
If the PROM is installed backwards, replace PROM.
General Motors bulletins are intended for use by professional technicians, not a "do-it-yourselfer". They are written to inform those technicians of conditions that may occur on some vehicles, or to provide information that could assist in the proper service of a vehicle. Properly trained technicians have the equipment, tools, safety instructions and know-how to do a job properly and safely. If a condition is described, do not assume that the bulletin applies to your vehicle, or that your vehicle will have that condition. See a General Motors dealer servicing your brand of General Motors vehicle for information on whether your vehicle may benefit from the information.
