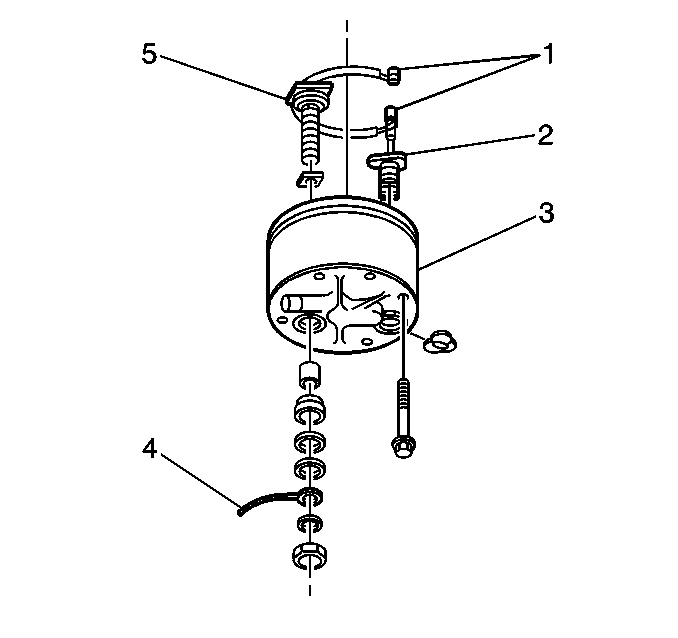
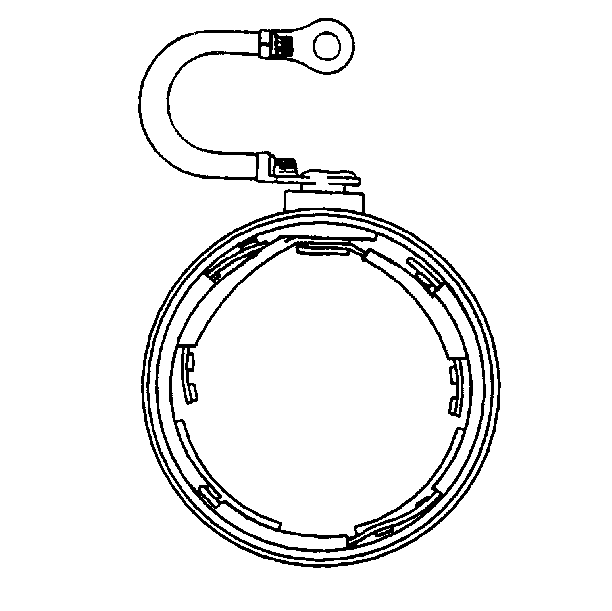
Starter Inspection 37-MT
Cleaning and Inspection Procedure
Tools Required
J 21008-A Self Powered
Test Light
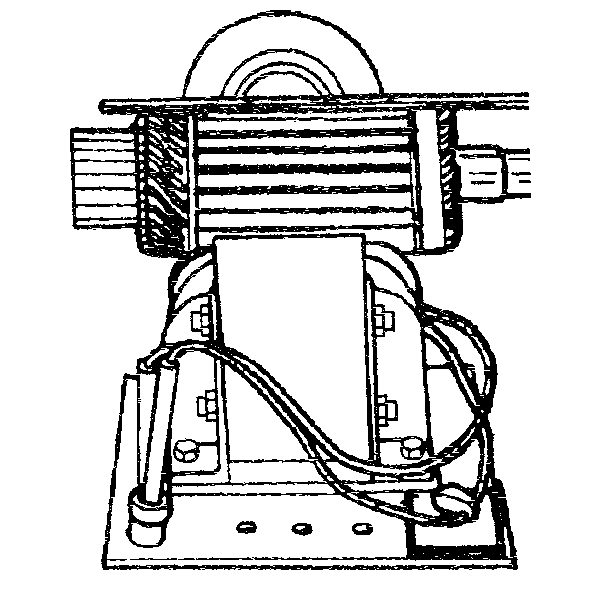
- Wipe all of the components
clean with a dry cloth.
- Do not clean the components in a degreasing tank or with grease
dissolving solvents.
- Inspect the armature bushing fit in the following components:
- Perform the following procedure if the bushings are worn:
If the bushings are not worn proceed to armature shaft inspection.
| 4.1. | Replace the bushings. |
| 4.2. | Puncture a small hole in the oil cup. |
| 4.3. | Pry out the oil cup and remove the old wick. |
| 4.4. | Install a new wick and a new oil cup. |
| 4.5. | Lubricate the new oil wicks and the new bushings before assembling
the starter motor. |
- Inspect the armature shaft for runout or scoring.
Replace the armature assembly if the armature assembly is not in proper
condition.
- Inspect the commutator for runout.
- If the commutator exhibits any of the following conditions, cut
the commutator on a lathe until the commutator is true:
| • | Do not undercut the commutators on these starter motors. |
- Deburr the commutator by lightly sanding the commutator with 400 grit
sandpaper. Never use emery cloth in order to clean the commutator.
- Perform the following procedure in order to inspect the armature
for short circuits:
| 9.1. | Use a steel strip, such as a hacksaw blade, held on the armature
parallel to the shaft in order to rotate the armature in a growler. |
| 9.2. | Inspect steel strip for vibration. |
The steel strip will vibrate on the area of the short circuit.
- Clean the commutator if a short exists between the commutator
bars.
Brush dust or copper dust may cause a short.
- Inspect the armature for loose connections where the conductors
join the commutator bars.
Poor connections cause arcing and burning of the commutator.
- If the bars are not extensively burned, use resin core solder
in order to reattach the leads.
- Remove burned material by turning the commutator down in a lathe.
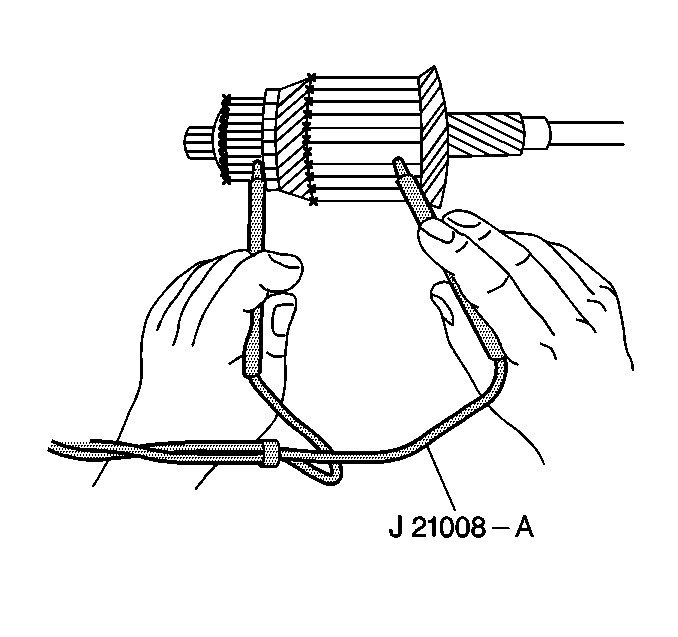
- Use a self-powered test
lamp in order to inspect the armature for grounds.
The armature is grounded if the test lamp lights when one test probe
is placed on the commutator and the other on the armature core or shaft. Brush
dust between the commutator bars and the steel commutator ring may cause
grounding.
- Inspect the motor housing and the solenoid housing for oil and
water.
The presence of oil or water indicates one of the following conditions:
| • | A torn solenoid rubber boot. |
- Replace all seals and gaskets as necessary.
- Inspect the brushes for wear.
New brushes measure about 25 mm (0.9 in) in length.
- Replace the brushes if the brushes are worn to half the size of
a new brush.
- Inspect the brush holders for cleanliness or damage.
Verify that the brushes are not binding the holders.
- Inspect the brush springs for the following conditions:
| • | Replace the brush springs if any of the above conditions exist. |
- Inspect the field coils for the following conditions:
| • | Burned or damaged insulation |
| • | Replace the field coils if any of the above conditions exist. |
- Perform the following procedure in order to inspect the field
frame assembly for grounds:
| 22.1. | Inspect the field coil brush lead connectors. |
Verify that the field coil brush lead connectors are not touching any
ground source.
| 22.2. | Connect a self-powered test lamp between the field frame and the
field connector. |
If the test lamp lights, the field coil is grounded.
| 22.3. | Replace the field coil if the field coil is grounded. |
- Connect a self-powered test lamp from the field connector to each
of the field coil brush leads in order to inspect the field coils for opens
The lamp should light at each lead. If the lamp does not light at each
lead, the field coil is open.
- Inspect the field coils for shorts.
Poor motor performance after all other possibilities have been evaluated
indicates a short.
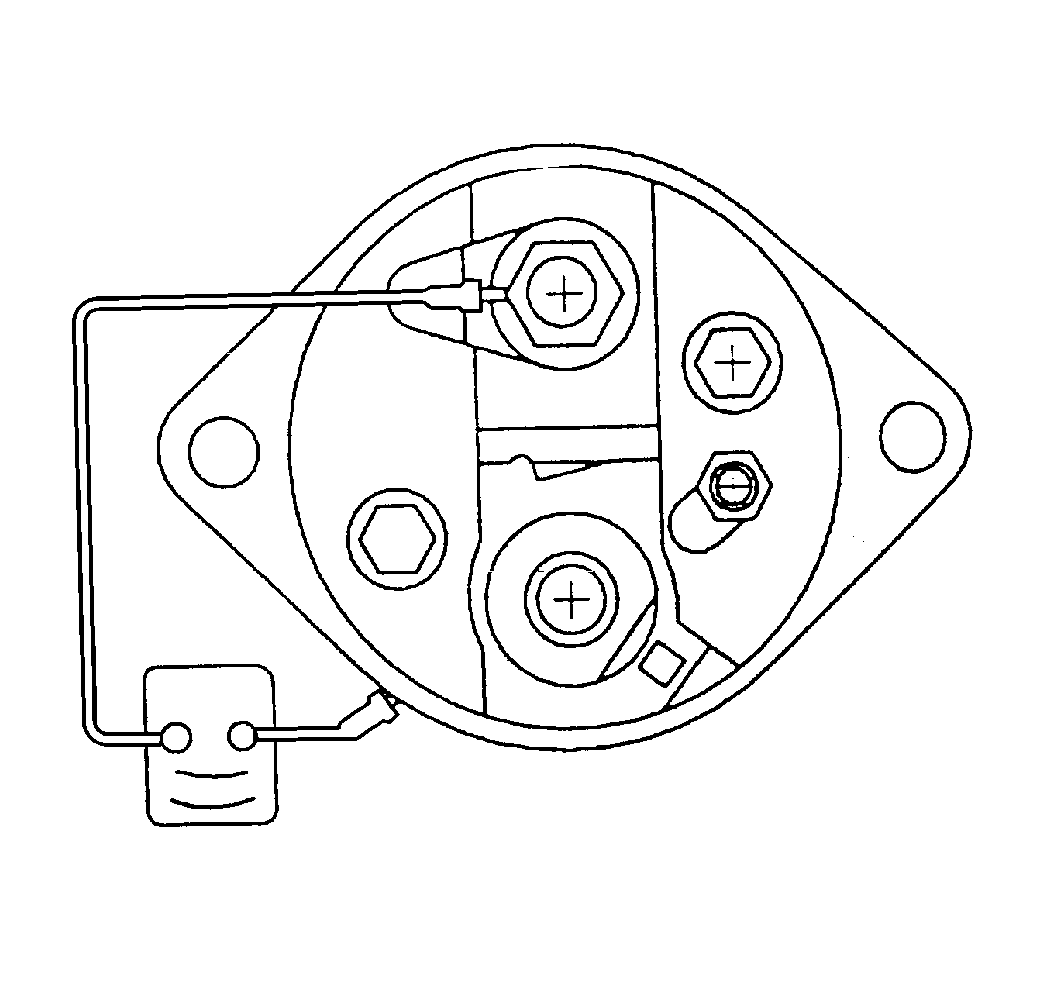
Important: Tighten the inner nuts (next to the cap) on each of the solenoid terminals
before making any electrical tests. Electrical tests may appear erratic or
give incorrect indications of open circuits if the following conditions
occur:
| • | The inner nuts are loosened as the leads are removed. |
| • | The terminals are loose in the cap. |
- Disconnect all of the leads from the solenoid
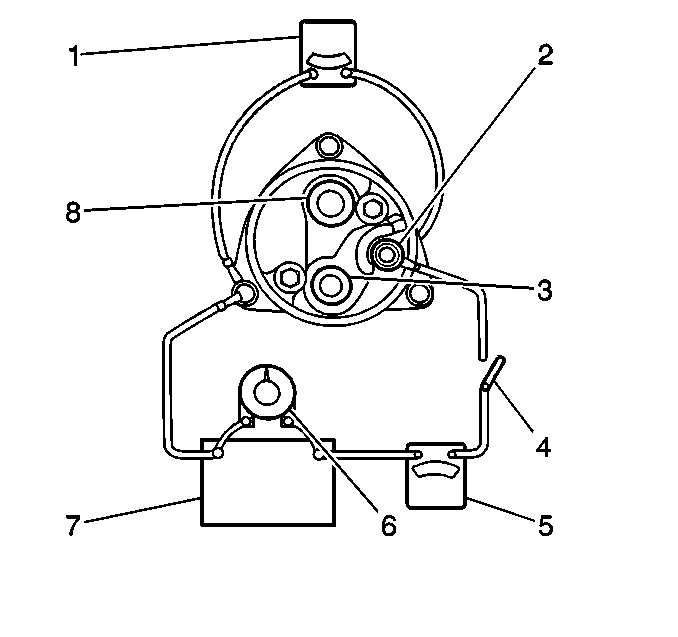
- Make the test connections shown in the above figure in order to test
the solenoid (8) hold-in winding on a type 300 solenoid.

- Make the test connections shown in the above figure in order to test
the solenoid hold-in winding on a type 350 solenoid.
- Turn the solenoid switch to the ON position.
- Adjust the carbon pile in order to lower the battery voltage to
the specified value. Refer to
Starter Motor Usage
.
- Measure the ampere reading. Compare the ampere reading with the
specified hold-in winding value.
A high ampere reading indicates a shorted or grounded winding. A low
ampere reading indicates excessive resistance. Use a digital ohmmeter that
can measure tenths of an ohm in order to measure the winding resistance.
Refer to
Starter Motor Usage
.
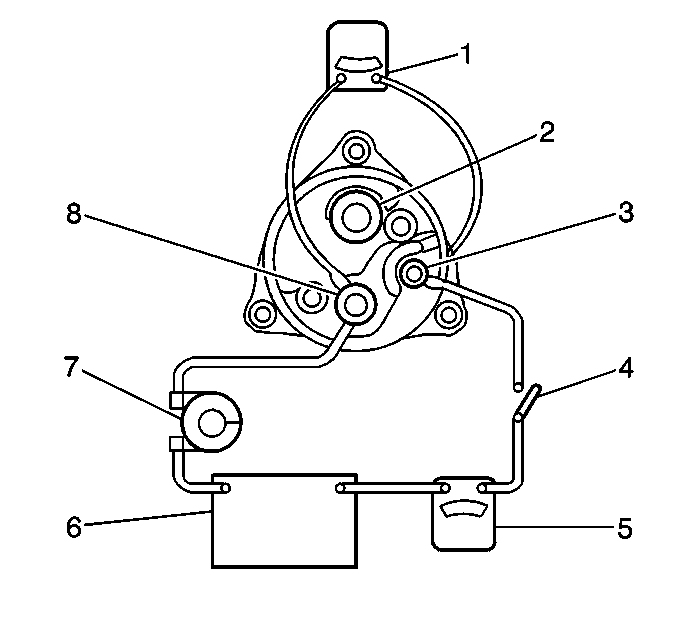
Notice: To prevent overheating of the solenoid pull-in winding, do not leave
the winding energized for more than 15 seconds. The current draw will decrease
as the winding temperature increases.
- Make the test connections shown in the above figure in order to test
the solenoid (2) pull-in winding on type 300 and type 350
solenoids.
- Compare the reading to the specified pull-in winding value. A
high reading indicates a shorted pull-in winding. A low reading indicates
excessive resistance. Refer to
Starter Motor Usage
.
Important: Use this test on four-terminal solenoids only. These solenoids are grounded
through the fourth terminal and the windings are insulated from the case.
The three-terminal solenoid is normally grounded to the case. The three-terminal
solenoid cannot be tested in this manner.
- Disconnect all of the other solenoid leads in order to test the four-terminal
solenoid for grounds.
- Connect a self-powered test lamp between the solenoid S terminal
and a clean metal ground on the solenoid case.
The lamp should not light on a four-terminal solenoid.
- Inspect the drive assembly by turning the drive pinion in the
cranking direction.
Replace the clutch assembly if the drive pinion turns roughly or slips
in the cranking direction.
Lubrication Procedure
Periodic lubrication of the 37-MT starter motor is not required.
The supply of oil provided by the tangential oil wicks is sufficient to last
through the engine overhaul interval. The tangential oil wicks are located
in the housings at each of the three armature shaft bushings. Install
new wicks with a fresh oil supply any time one of the following conditions
occurs:
Lubricate new bushings and wicks as described before installing the
bushings and wicks into the starter. Also lubricate the spacer between the
armature and lever housing any time the starter motor is disassembled to
the point of removing the armature.
- Lubricate the armature/lever housing spacer (24) lightly
with Delco Remy Lubricant No. DC 33 or the equivalent.
- Lubricate the three bushings prior to installation by dipping
the bushings in SAE 20 non-detergent oil.
The sintered bronze bushings used in the 37-MT starter motor
are porous. The oil from the oil wicks will soak through the bushings in order
to lubricate
the armature shaft. Do not perform any of the following actions
to the bushings:
- Lubricate the three oil wicks prior to installation by soaking
the new wicks for at least one hour in SAE 20 non-detergent oil. SAE 20
non-detergent
oil may also be added to previously installed wicks at other times
if desired.
Use the following procedure in order to remove the wicks from the oil
wells:
| 3.1. | Drill small holes in the cups. |
| 3.2. | Use a screw or a hook in order to pull the wicks out of the cups. |
| 3.3. | Pull the wick from the oil well in the housing. |
| 3.4. | Discard the old wicks and the cups. |
| 3.5. | Replace the wicks and the cups with new components. |
Thermostat Test (Overcrank Protection)
- Verify that the motor is cool.
The circuit should be closed.
- Connect an ohmmeter to the two thermostat terminals (4) on the
starter motor.
- The ohmmeter should read zero (continuity). If the ohmmeter does
not read zero then the thermostat has an open circuit.
Replace the thermostat (2) and the lead terminal assembly if
an open exists.
Starter Inspection 28-MT
Cleaning and Inspection Procedure
Notice: Do not clean the starter motor parts in a degreasing tank. Soaking parts
will dissolve the permanent lubrication and may damage the electrical
insulation. This will shorten starter motor life.
Perform the following cleaning and inspection procedure
in order to determine the serviceability of the starter motor components and
assemblies. Refer to Component Electrical Testing in order to test certain
assemblies:
- Clean all starter motor components with a clean soft cloth prior
to testing.
- Inspect all of the components for the following conditions:
| • | Replace any components or assemblies that exhibit any of the above conditions. |
- Inspect threaded components for the following conditions:
| • | Otherwise damaged threads |
| • | Replace the components exhibiting the above conditions if the above
condition cannot be cleaned up using a suitable tap or die. |
- Inspect the solenoid assembly for a cut or a torn boot. If the
boot is damaged, replace the solenoid assembly.
- Inspect the clutch drive assembly. Replace the assembly if the
following conditions exist:
| • | The pinion gear turns roughly or turns in both directions |
| • | The pinion gear teeth that are broken or show evidence of step
wear |
| • | The shift lever collar shows deep scoring or other damage |
- Inspect the brush holder assembly for loose riveted joints and
cracked or broken insulation. Replace if damaged.
- Inspect the brushes for excessive wear. The minimum allowable
brush length is 12 mm (0.472 in). Replace excessively worn
brushes in sets.
- Inspect the drive end housing bushing for scoring or other damage.
Replace the damaged bushing.
- Perform the following ball bearing inspection procedure:
| 9.1. | Hold the armature or driveshaft and slowly rotate the outer bearing
race by hand |
| 9.2. | Verify that the bearing turns freely without binding or the feel
of flat spots |
| 9.3. | Replace any damaged bearings |
- Inspect the armature assembly for the following conditions:
| • | Gear teeth that are broken, or that show evidence of step wear
or root interference. |
| • | A rough commutator surface. Polish the surface with 400 grit polishing
cloth if necessary. Thoroughly clean metal dusts from between the commutator
bars. If the commutator surface cannot be repaired in this manner, replace
the armature assembly. Do not turn the commutator in a lathe. |
| • | A worn commutator. Replace the armature assembly if the commutator
outer diameter is less than 36 mm (1.378 in) or if the undercut
depth at any point is less than 0.2 mm (0.008 in). Do
not undercut the insulation. |
- Inspect the driveshaft for the following conditions and replace
the driveshaft if necessary.
| • | Scored or damaged shaft where the driveshaft turns inside the
bushing |
| • | Internal gear with teeth broken or showing evidence of step wear |
| • | A damaged spline. The clutch drive assembly must slide smoothly
and easily over the full length the spline. |
Component Electrical Testing
Perform the following electrical tests in order to determine the serviceability
of the starter assemblies:
- Use an ohmmeter in order
to test the windings of the solenoid assembly for continuity:
| • | Test the resistance of the solenoid pull-in and hold-in windings
in a series by measuring the resistance between the motor terminal and the
solenoid case. |
| • | A resistance reading well above 1.95 ohms indicates a break
or fault in the winding continuity. |
| • | A resistance reading well below 1.95 ohms indicates a short
or ground in the winding circuit. |
| • | Replace the solenoid assembly if the resistance reading is extremely
high or very low. |
- Use the following procedure in order to test the armature assembly.
Replace a shorted or grounded armature, or an armature that shows evidence
of opens:
| 2.1. | Perform the following procedure in order to test the armature
for short circuits. |
| 2.1.1. | Rotate the armature in a growler. |
| 2.1.2. | Hold a steel strip such as a hacksaw against the armature. |
| 2.1.3. | If the steel strip vibrates in an area, a short is present. |
| 2.2. | Use a self-powered test lamp or ohmmeter in order to test for
continuity between the armature shaft and any point on the commutator. Continuity
indicates a ground. |
| 2.3. | Inspect the points where the armature conductors join the commutator
for signs of arcing or burning. These signs indicate opens. |
- Perform the following
procedure in order to inspect the frame and field assembly for grounds or
opens:
| 3.1. | Inspect the field coil connections for opens between the field
terminal and the connection points for insulated brushes on the filed coil
straps. |
| 3.2. | Use a self-powered test lamp or ohmmeter in order to test for
continuity or grounds between the frame and the field terminal. |
| 3.3. | Replace the frame and field assembly that has grounds or opens. |
