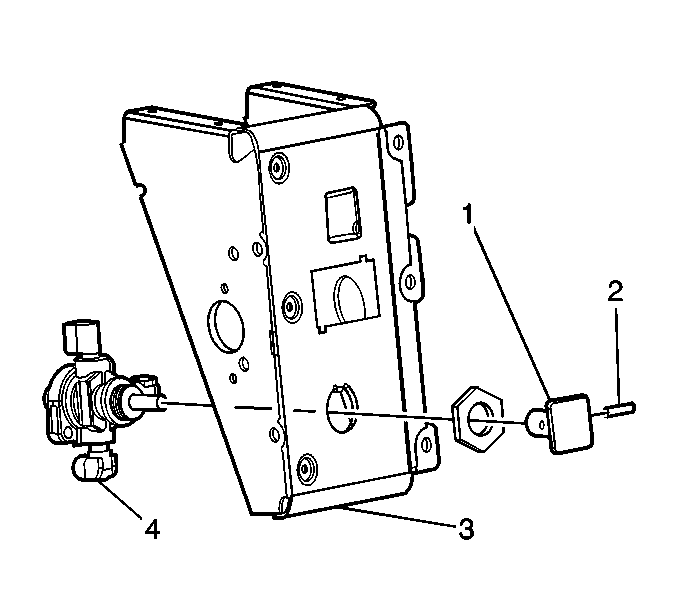
For 1990-2009 cars only
Removal Procedure
- Block the wheels.
- Drain all of the air reservoirs. Refer to Draining Reservoirs .
- Remove the air lines from the park control valve (4). Refer to Hose and Line Replacement - Nylon and Metal Compression .
- Tag and label the air lines for the installation procedure.
- Remove the pin (2).
- Remove the knob (3).
- Remove the park control valve cab mounted nut.
- Remove the park control valve cab mounted.
- Inspect the air lines for the following conditions:
- Replace any damaged, kinked or worn air lines.

| • | Damage |
| • | Kinks |
| • | Wear |
Installation Procedure
- Install the park control valve cab mounted.
- Install the park control valve cab mounted nut.
- Install the knob (1).
- Install the pin (2).
- Install the air lines to the park control valve cab mounted. Refer to Hose and Line Replacement - Nylon and Metal Compression .
- Perform the air leakage test. Refer to Air Brake System Leak Test .
- Perform the operational test. Refer to Air Brake Park Control Valve Operational Check .
- Remove the wheel blocks.

Notice: Use the correct fastener in the correct location. Replacement fasteners must be the correct part number for that application. Fasteners requiring replacement or fasteners requiring the use of thread locking compound or sealant are identified in the service procedure. Do not use paints, lubricants, or corrosion inhibitors on fasteners or fastener joint surfaces unless specified. These coatings affect fastener torque and joint clamping force and may damage the fastener. Use the correct tightening sequence and specifications when installing fasteners in order to avoid damage to parts and systems.
Tighten
Tighten the park control valve cab mounted nut to 6 N·m
(53 lb in).
