Uneven Brake Pad Wear (Replace Caliper Mounting Plate and Install New Rear Brake Dust Shield)

| Subject: | Uneven Brake Pad Wear (Replace Caliper Mounting Plate and Install New Rear Brake Shield) |
| Models: | 1995-2001 Chevrolet and GMC F6-7 T-Series Medium Duty Tilt Cab Models |
| 1995-2001 Chevrolet and GMC H6-7 C-Series Conventional Medium Duty Models |
| With Four-Piston Rear Disc Brakes (RPO JNC) |
| Built Prior to VIN Breakpoint 1J511161 or Build Date of May 9, 2001 |
This bulletin is being revised to remove the Isuzu models and change Warranty information. Please discard Corporate Bulletin Number 02-05-23-001 (Section 05 -- Brakes).
Condition
Some customers and dealers may comment on accelerated uneven brake pad wear on some of the above-listed vehicles equipped with four-piston fixed caliper rear disc brakes. This condition occurs mainly on the inboard brake pads.
Cause
Road dust and debris may be forced in between the brake pads and the brake rotor. This abrasive grit may cause accelerated wear on the inboard brake pad. The outboard brake pad is protected by the wheel rim and should not be affected by this condition.
Correction
A new brake caliper mounting plate and dust shield with fasteners have been developed to correct this condition.
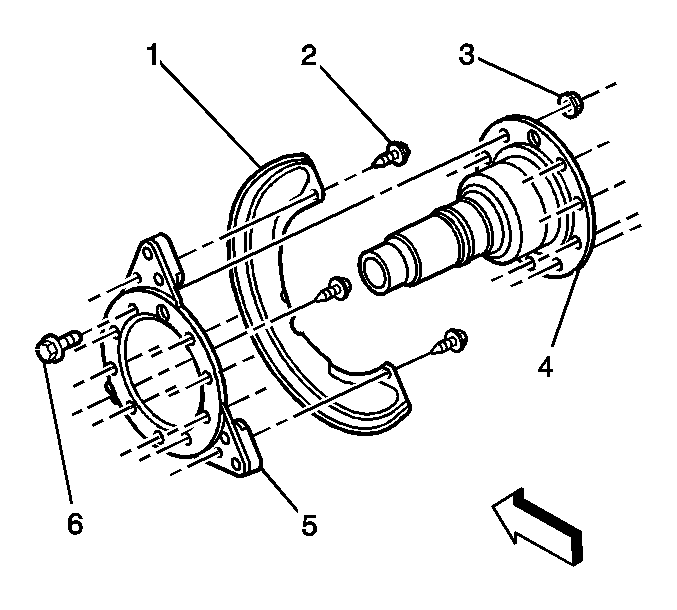
Important: The lower attachment bolt mounts through a semi-circular relief in the dust shield and the bolt pinches the shield at this location. The mounting hole near the relief on the shield is not used on this application.
This new dust shield secures to the inboard side of the caliper mounting plate with three fasteners. The new caliper mounting plate is drilled and tapped at these mounting locations.
Before beginning this procedure, inspect the inboard rear brake pads to verify this condition. If the pads show uneven or excessive wear, replace the disc brake pads and install a new caliper mounting plate and dust shield on affected vehicles. Refer to the Disc Brakes sub-section of the applicable Service Manual for further information. Follow the procedure listed below to install the new caliper mounting plate and the dust shield. This correction must be completed on BOTH the LH and RH sides. Use the part numbers listed below.
- Apply the parking brake.
- Block the wheels.
- Remove the brake caliper. Refer to the Brake Caliper Replacement - Rear procedure in the Disc Brakes sub-section of the applicable Service Manual. Do not remove the brake line from the caliper.
- Remove the hub and brake rotor assembly. Refer to Brake Rotor Replacement - Rear in the Disc Brakes sub-section of the applicable Service Manual.
- Remove the bolts and washers.
- Remove the brake caliper mounting plate.
- Install the new dust shield (1) with new bolts (2) to the new brake caliper mounting plate (5).
- Install the new brake caliper mounting plate with the shield to the axle.
- Apply 272 Threadlocker, P/N 12345493 (in Canada, use P/N 10953488), or equivalent to the threads of each brake caliper mounting plate bolt.
- Install the brake caliper mounting plate bolts and washers.
- Inspect the brake rotors for wear. Resurface the rotors if required.
- Install the hub and brake rotor assembly. Refer to Brake Rotor Replacement - Rear in the Disc Brakes sub-section of the applicable Service Manual.
- Install the brake caliper. Refer to the Brake Caliper Replacement - Rear procedure in the Disc Brakes sub-section of the applicable Service Manual.
- Remove the wheel blocks.
Notice: Support the brake caliper with heavy mechanic's wire, or equivalent, whenever it is separated from its mount and the hydraulic flexible brake hose is still connected. Failure to support the caliper in this manner will cause the flexible brake hose to bear the weight of the caliper, which may cause damage to the brake hose and in turn may cause a brake fluid leak.

Tighten
Tighten the dust shield bolts to 32 N·m (24 lb ft).
Important: Ensure that the threads are clean and greaseless before applying threadlocker.
Tighten
Tighten the mounting plate bolts to 280 N·m (206 lb ft).
Parts Information
Part Number | Description | Qty |
|---|---|---|
15066153 | Shield - Rr Brk (RPO JNC) | 2 |
15066152 | Plate Asm - Rr Brk Clpr Mt (LH) | 1 |
15066155 | Plate Asm - Rr Brk Clpr Mt (RH) | 1 |
11515754 | Bolt - Hvy Hex Flg hd | 6 |
Parts are currently available from GMSPO.
Warranty Information
For vehicles repaired under warranty, use:
Labor Operation | Description | Labor Time |
|---|---|---|
H0067 | Plate, Disc Brake Anchor - Replace | 2.9 hrs |
