A/C Condenser Instability, A/C System Inoperative (Inspect A/C System, Install Washers and Front Bumper Brace or Replace Condenser)

| Subject: | A/C Condenser Instability, A/C System Inoperative (Inspect A/C System, Install Washers and Front Bumper Brace or Replace Condenser) |
| Models: | 1997-2002 Chevrolet T-Series (C Model) Medium Duty Tilt Cab Models |
| 1997-2002 GMC T-Series (C Model) Medium Duty Tilt Cab Models |
| 1997-2002 Isuzu FSR/FTR/FVR Commercial Models |
| with Air Conditioning (RPO C60) |
This bulletin is being revised to add model years, Isuzu models and additional information and to change/add part numbers. Please discard Corporate Bulletin Number 00-01-38-005 (Section 01 -- HVAC).
Condition
Some customers may comment about instability of the A/C condenser or that the A/C system is inoperative.
Correction
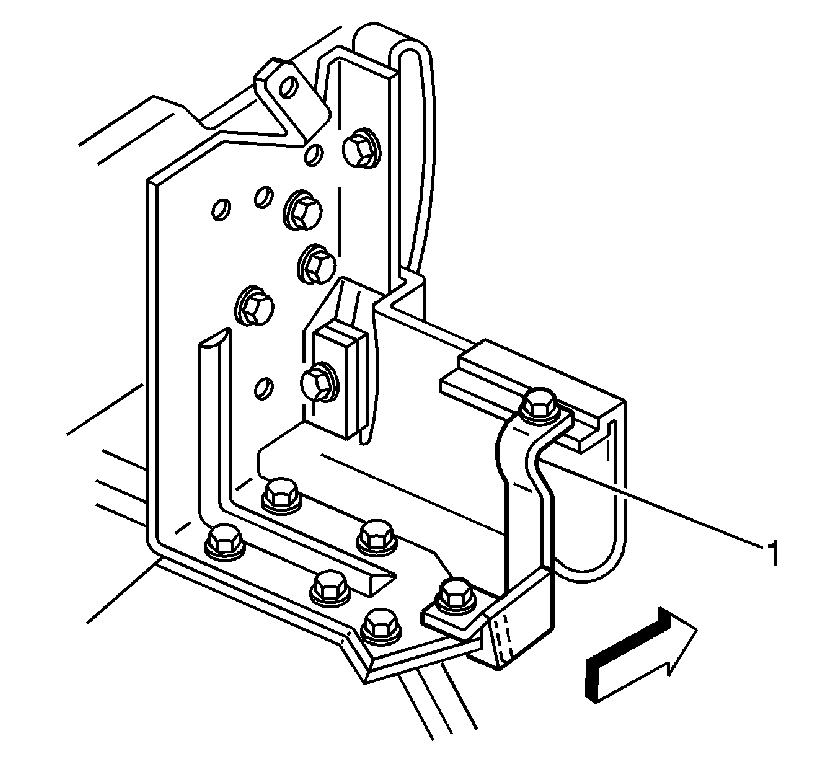
A new front bumper impact bar brace, P/N 15080248, has been released that incorporates an additional integral A/C condenser mount. This part replaces the existing brace that supports the bottom of the bumper. Install this brace on all repaired vehicles. This change was incorporated into vehicles built at Janesville Assembly effective on November 7, 2001.
A new condenser assembly, P/N 97317713, has been released with a more robust accumulator bottle mounting strap. If the accumulator bottle mounting strap is cracked or if the lines are damaged, install the new condenser assembly, P/N 97317713, as required. Repaired vehicles with an undamaged condenser, P/N 97500018, will not require replacement. This new condenser assembly became effective in production on February 25, 2002.
The repairs to be performed depend on the condition encountered. Evaluate the condition of the A/C system on the vehicle.
| • | For an A/C system that operates normally, follow Procedure #1. |
| • | For an inoperative A/C system due to a low refrigerant charge, follow Procedure #2. |

Procedure #1
The purpose of this procedure is to help stabilize the A/C condenser.
- Set the parking brake.
- Block the wheels.
- Insert refrigerant dye. Inspect for leaks. If no leaks are found, continue to step 4.
- Remove the nut from the "V" support brace.
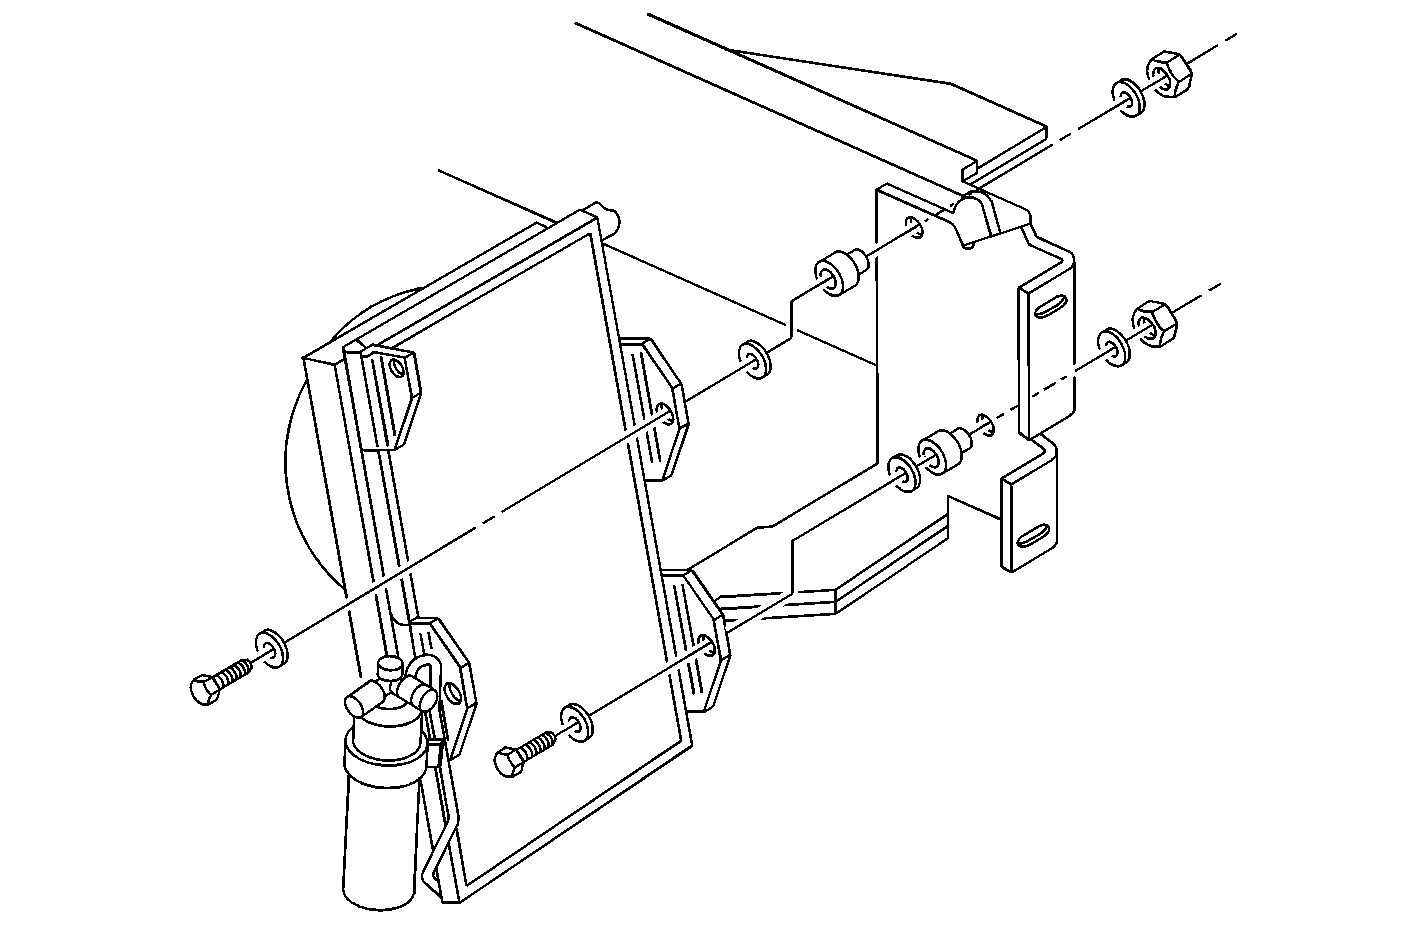
- Loosen both of the condenser-to-frame mounting bolts as much as possible. Leave the nuts on the bolts.
- Gently reposition the condenser in order to allow clearance between the truck frame and the condenser.
- Remove the nut and the washer from the top condenser-to-truck frame mounting bolt.
- Gently back out the bolt far enough to insert a washer, P/N 15650963, between the condenser and the truck frame, then reinstall the outer washer and nut. Repeat this on the lower mounting bolt.
- Install a new front bumper impact bar brace (1), P/N 15080248.

Tighten
| • | Tighten the condenser to frame bolts to 24 N·m (18 lb ft). |
| • | Tighten the "V" support brace to 35 N·m (26 lb ft). |
| • | Tighten the front impact bar brace nuts to 61 N·m (45 lb ft). |
Procedure #2
Use this procedure for an inoperative A/C system.
- Set the parking brake.
- Block the wheels.
- Inspect the A/C system for a leak. If the leak area cannot be located, insert one 7.39 ml (0.25 oz) bottle of R134a Leak Dye, GM P/N 12346303 (Canadian P/N 10953458), with GM tool #12344968 (Canadian P/N 10953530) or use Kent- Moore Leak Dye J 41447 and injector tool J 41459.
- Using the ACR4 machine, install 0.283 kg (10 oz) of R134a refrigerant into the system.
- Use the 12 V leak detection lamp to inspect the system for a leak. If the leak is at the condenser and/or the receiver dryer, continue with this procedure. Otherwise, repair the cause of the leak and perform Procedure #1.
- While you are recovering the R134a refrigerant from the system, use a small amount of weatherstrip cement and glue a washer, P/N 15650963, to each side of the condenser mounting tab.
- Disconnect the ACR4 from the vehicle.
- Tilt the cab forward following the procedure located near the cab release on the back of the cab.
- Disconnect the wiring harness and cut the tie strap for the condenser fan.
- Remove the A/C condenser fan assembly.
- Disconnect the A/C condenser hose from the top of the condenser and discard the O-ring.
- Loosen the A/C condenser tube nut and the refrigerant line from the receiver/dryer.
- Disconnect the electrical connector from the receiver/dryer pressure switch.
- Remove the two bolts that retain the receiver/dryer to the condenser. Disconnect the condenser tube and refrigerant line and discard the O-ring.
- Remove the 18 mm bolt from the top of the condenser and set the line and bracket aside.
- Remove the "V" brace-to-condenser attachment bolts.
- Remove the nut and washer from the "V" brace-to-frame mount.
- Remove both condenser-to-frame mounting bolts, starting with the bottom bolt. Remove the condenser from the vehicle.
- Inspect the new condenser, P/N 97317713, for the presence of the previously glued washers. Insert the condenser-to-frame mounting bolts to the condenser and the condenser to the frame. Install another washer before loosely installing the nuts.
- Loosely install the "V" braces to the condenser.
- Loosen and remove the clamp screw from the receiver/dryer. Remove the clamp from the receiver/dryer.
- Install the receiver/dryer clamp to the condenser mounting tab with 2 screws.
- Using three new O-ring seals, coat each seal with 525 viscosity refrigerant oil. Properly place one seal on each fitting interface.
- Place the receiver/dryer into the receiver/dryer bracket. Connect the condenser tube to the dryer.
- Attach the A/C evaporator hose to the receiver dryer.
- Attach the A/C condenser hose to the condenser.
- Reinstall the condenser fan assembly to the condenser. Connect the wiring to the fan and the pressure switch and reapply the tie strap to the wiring harness.
- Install a new front bumper impact bar brace (1), P/N 15080248.
- Reconnect the ACR4 to the vehicle.
- Evacuate and recharge the system. Install 0.9072 kg (2.0 lbs) of R134a refrigerant into the system. Inspect for leaks.
- Disconnect the ACR4 from the vehicle.
- Lower the cab.
Tighten
Tighten the mounting bolts to 35 N·m (26 lb ft).
Tighten
Tighten the "V" brace fasteners to 70 N·m (51 lb ft)
Tighten
Tighten the screws to 18 N·m (13 lb ft).
Tighten
| • | Tighten the condenser tube-to-receiver/dryer to 15 N·m (11 lb ft). |
| • | Tighten the receiver/dryer clamp bolt to 25 N·m (18 lb ft). |
Tighten
Tighten the condenser tube-to-receiver/dryer nut to 15 N·m
(11 lb ft).
Tighten
Tighten the condenser hose-to-condenser to 32 N·m (23 lb ft).

Tighten
Tighten the brace nuts to 61 N·m (45 lb ft).
Parts Information
Part Number | Description | Qty |
|---|---|---|
15650963 | Washer, Hardened Flat | 2 Per Vehicle |
97317713 |
Condenser Assembly A/C | 1 |
15080248 | Brace Asm. - Frt Bpr Imp Bar (RH) | 1 |
Parts are currently available from GMSPO.
Warranty Information
For vehicles repaired under warranty, use:
Labor Operation | Description | Labor Time |
|---|---|---|
D4704 | Inspect A/C System for Cracks or Leaks | 0.5 hr |
Add | To Replace A/C Condenser | 1.2 hrs |
Add | To Replace Bumper Impact Bar Brace | 0.2 hr |
