GM Service Manual Online
For 1990-2009 cars only

Information on Isuzu Diesel Engine Turbocharger Diagnostics

Subject:Information on Isuzu Diesel Engine Turbocharger Diagnostics

Models:1999-2007 Chevrolet W-Series Medium Duty Tilt Cab Models
1999-2007 GMC W-Series Medium Duty Tilt Cab Models
1999-2007 Isuzu N-Series Commercial Models
with Isuzu 4HE1-TC or 4HK1-TC Turbo Diesel Engine


This bulletin is being revised to add the 2006 and 2007 model years. Please discard Corporate Bulletin Number 04-06-93-001 (Section 06 -- Engine/Propulsion System).


Frequently, serviceable turbochargers are removed from engines before the cause of a condition has been determined.

In order to better service the customer and reduce the replacement of undamaged turbochargers, Isuzu has provided the following diagnostic information in order to aid the technician in properly diagnosing turbochargers.

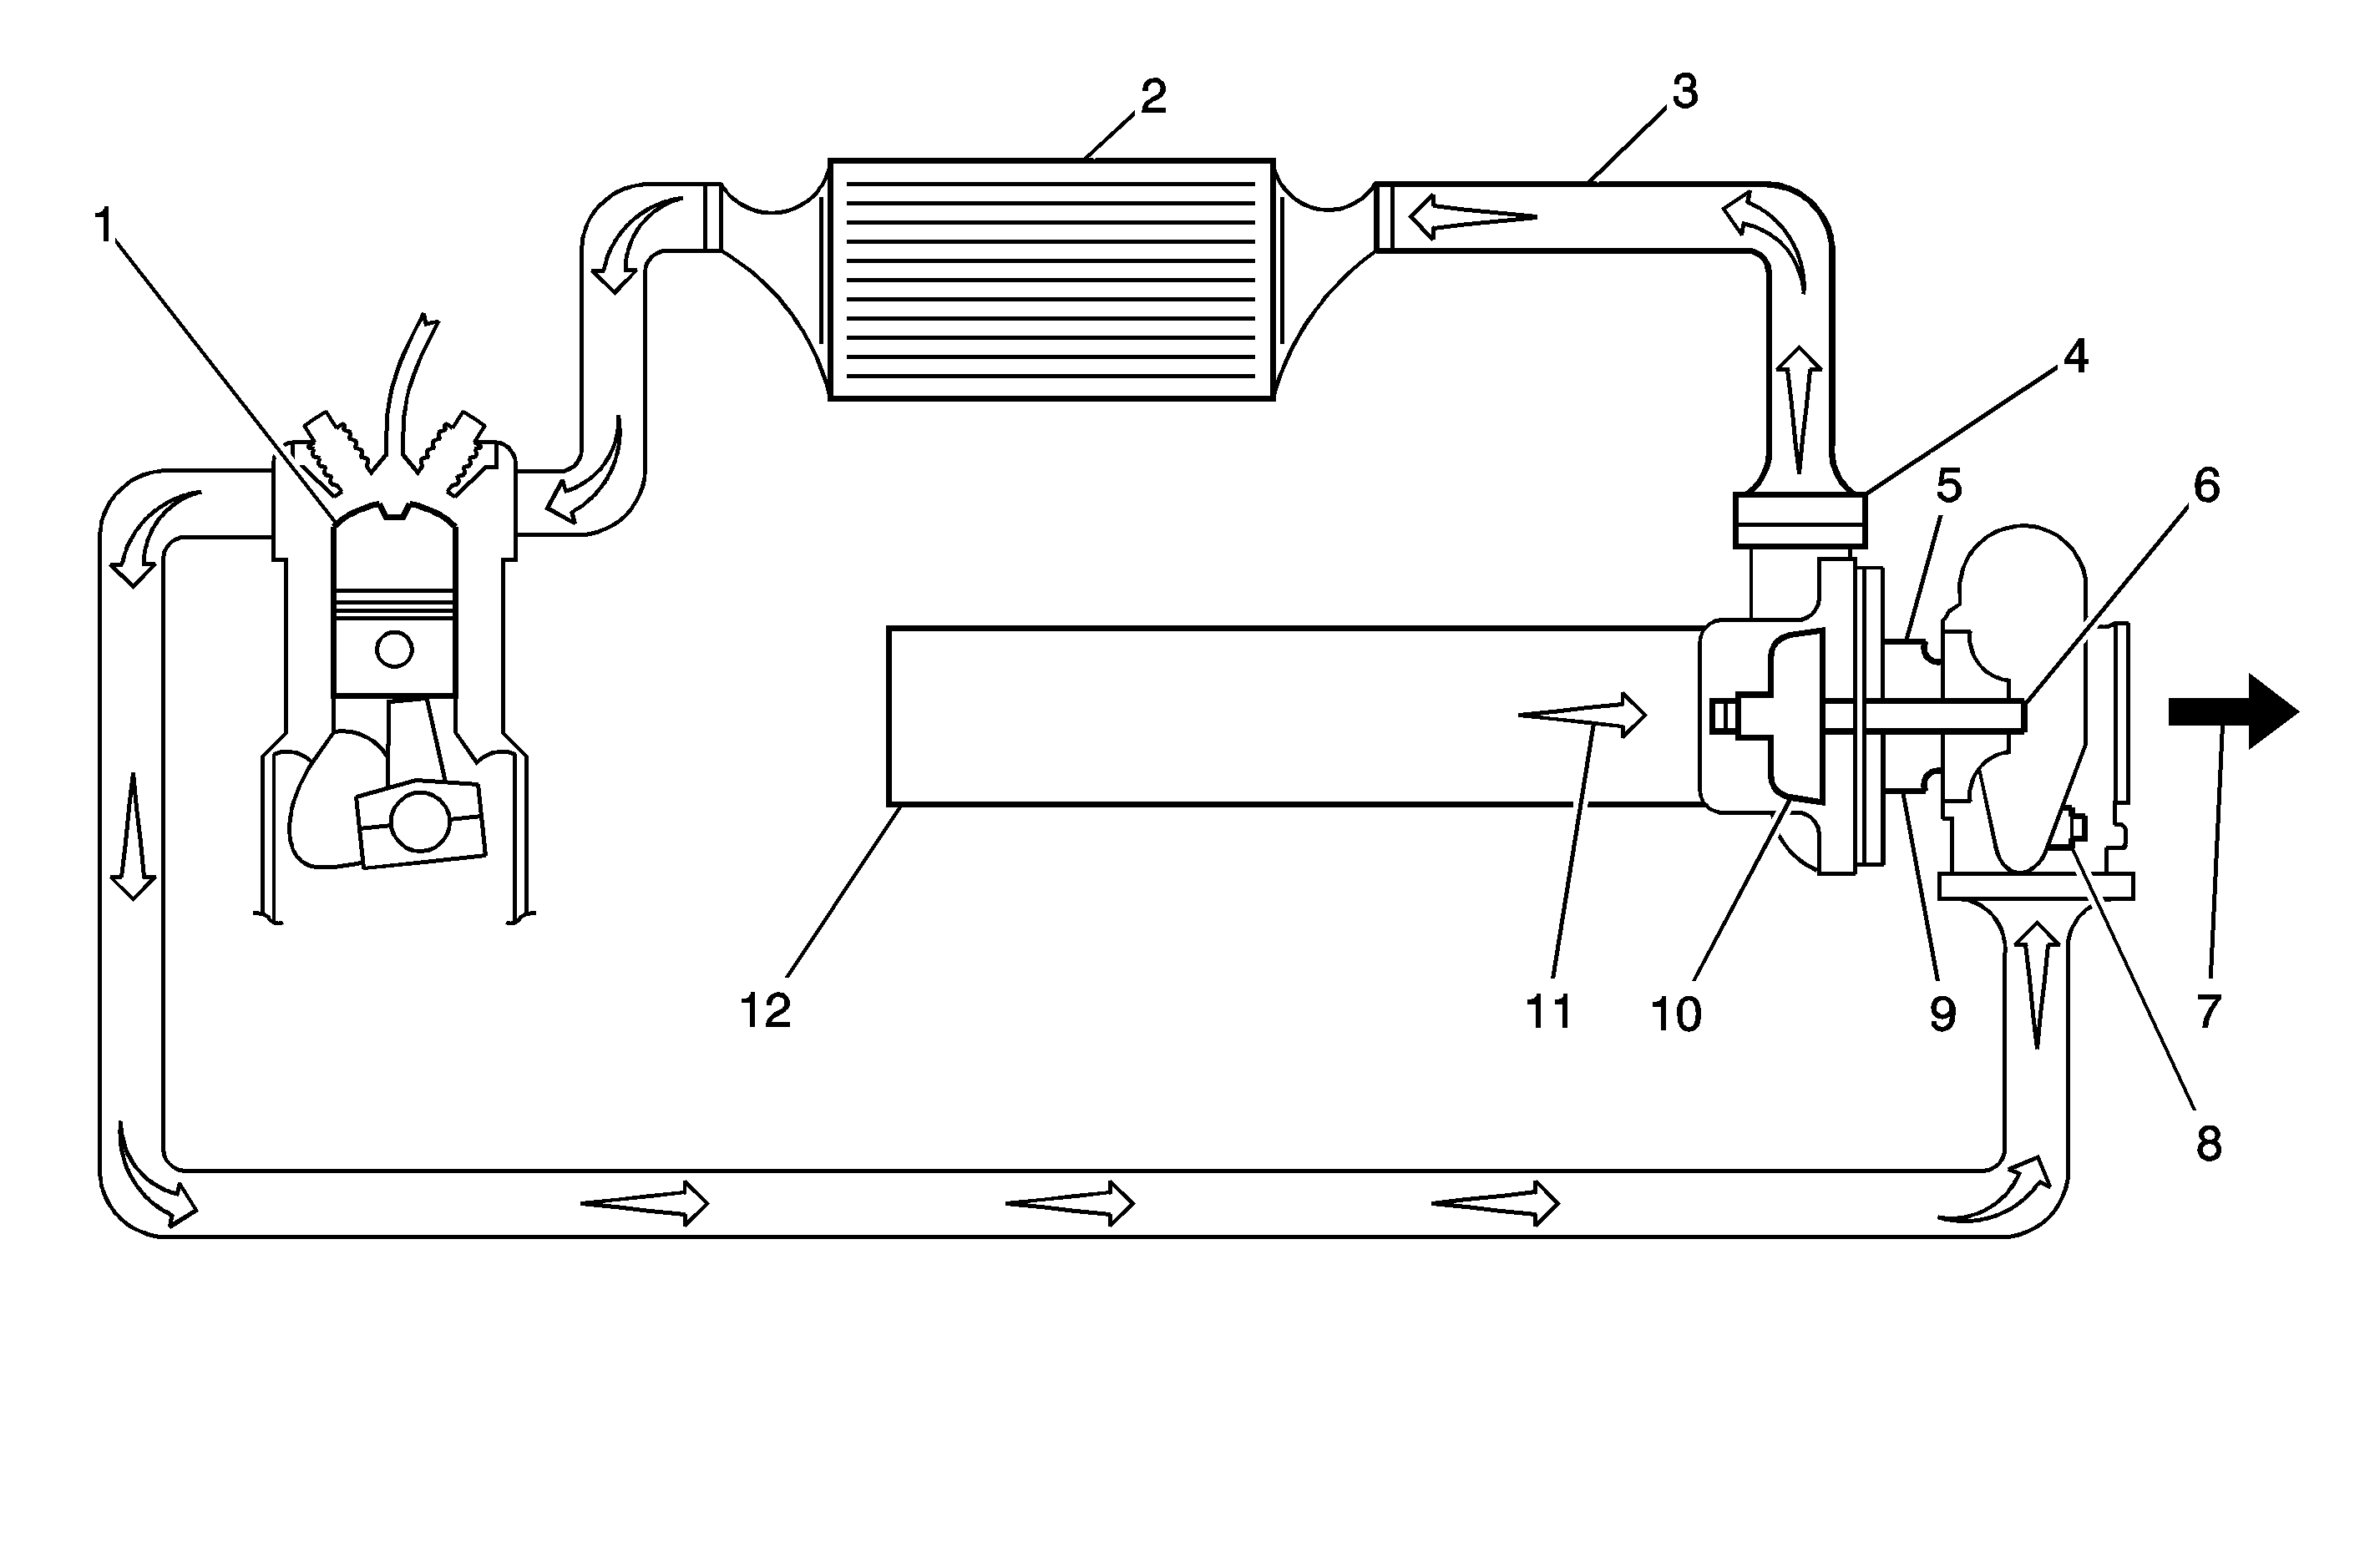
Common Mis-Diagnosis (Turbo Leaking Oil)


Object Number: 1488825  Size: MF
(1)Engine Cylinder
(2)Charge Air Cooler
(3)Compressed Air Flow
(4)Compressor
(5)Turbocharger Oil Inlet
(6)Turbine Wheel
(7)Exhaust Gas Discharge
(8)Wastegate
(9)Oil Outlet
(10)Compressor Wheel
(11)Ambient Air Inlet
(12)Air Filter

Investigation of returned turbochargers has identified a common occurrence of turbochargers being replaced for internal oil leaks. Results show that there is no fault with the turbocharger and that the oil leak actually is a result of an air restriction or a low boost condition. The oil seal inside the Isuzu turbocharger is a dynamic seal.

Air pressure (boost pressure) on the compressor side and exhaust pressure on the turbine side keep the lubricating oil inside the turbocharger center housing. A reduction in pressure on either side of the center housing will allow oil to pass into either the intake or the exhaust side on the turbocharger. In order to correct the oil bypassing the seal, the source of the pressure reduction must be located and corrected. The most common causes of this condition are a restricted air filter, incorrect engine oil and/or loose intake hose clamps.

Be sure that air filter maintenance and oil changes are performed per the Owner's Manual. Inspect these items before continuing into diagnosis. These inspections can save you and your customer time and money. A TURBOCHARGER FAILURE CAUSED BY ONE OF THESE ITEMS IS NOT A WARRANTABLE REPAIR.

Visual and Mechanical Inspections

Any failures found during these inspections should be repaired per the current published Service Manual.

    • Listen for unusual mechanical noise and watch for vibration.
    • Listen for high-pitched noise. This can indicate air or gas leaks.
    • Listen for noise level cycling. This can indicate a restriction in the air cleaner or duct.
    • Inspect for missing or loose nuts, bolts, clamps and washers.
    • Inspect for loose or damaged intake and exhaust manifolds and their duct clamps.
    • Inspect for damaged or restricted oil supply and drain lines.
    • Inspect for cracked or deteriorating turbocharger housings.
    • Inspect for external oil or coolant leakage.
    • Inspect for obvious heat distortion.
    • Inspect for an obviously restricted air filter.
    • Inspect the wastegate for free movement and damage. The hoses should be in good condition and tight. Verify the operation.

Turbocharger Visual, Radial and Axial Clearance and Wastegate Operation Inspection

Remove the duct from the compressor. Using an inspection light, inspect the compressor wheel for evidence of foreign object damage. If the wheel is damaged, the foreign object probably entered through the intake system. Identify the origin of the foreign object. Foreign objects usually come from human error or deteriorated engine/intake systems.

Turbo Service Limit Measurements


    • Bearing Radial Clearance -- 0.14 mm (0.0055 in)
    • Turbine Shaft Endplay -- 0.090 mm (0.0035 in)

Play in Radial Clearance

Moving the rotor in the radial clearance, measure the play using a dial gauge.


Object Number: 1488827  Size: SH
(1)Oil Outlet
(2)Oil Inlet
    • Measure the play at several points while letting the rotor revolve.
    • Use only the flat dial gauge attachment. Do not use the pointed one.
    • Attach the turbocharger and dial gauge firmly. The service limit is 0.140 mm (0.0055 in). If excessive, replace the turbocharger.

Play in Axial Clearance

Moving the rotor in the axial clearance, measure the play using a dial gauge.


Object Number: 1488832  Size: SH
    • Measure the play at several points while letting the rotor revolve.
    • Attach the turbocharger and dial gauge firmly. The service limit is 0.090 mm (0.0035 in). If excessive, replace the turbocharger.

Wastegate Operation


    Object Number: 1488839  Size: SH
  1. Disconnect the hose (3) from the wastegate actuator (1). Install a pressure gauge as shown above.
  2. With the engine stopped, operate the pressure gauge pump (2) in order to apply pressure to the wastegate to verify if the wastegate functions properly.

Symptom Diagnostics

Turbochargers and engines have common symptoms.

    • Engine Lacks Power
    • Engine Exhaust Smoke
    • Oil Consumption
    • Noisy Operation

Any of these symptoms may be the result of an internal engine condition that might not involve the turbocharger at all. Follow the On-engine troubleshooting diagnostic guide below to quickly determine the possible causes of a turbocharger condition and to prevent unnecessary removal or replacement.

Engine Lacks Power or Engine Exhaust Emits Black Smoke

Condition

Action

The air filter may be dirty.

Inspect the air filter. Replace the air filter as necessary.

The compressor to intake manifold duct connections may be loose.

Inspect the duct connections. Tighten the duct connections as required.

There may be leakage at the engine intake manifold.

Refer to the service manual.

There may be leakage at the engine exhaust manifold.

Refer to the service manual.

There may be leakage at the turbo mounting flange.

Inspect the condition of the gasket at the flange and tighten any loose bolts.

The turbocharger rotating assembly may be binding or dragging.

Do a radial and axial clearance inspection.

There may be a restricted air duct between the air cleaner and compressor.

Remove the restriction or replace the damaged parts as necessary.

There may be a restricted air duct between the air compressor and engine.

Remove the restriction or replace the damaged parts as necessary.

There may be a restricted engine exhaust system after the turbocharger.

Remove the restriction or replace the damaged parts as necessary.

There may be a restricted intake or exhaust manifold.

Refer to the service manual.

There may be an engine malfunction of some kind (such as a fuel system component, valve, valve timing, rings, pistons and the like).

Refer to the service manual.

Excessive Engine Oil Consumption

Condition

Action

The engine oil may be the wrong type or viscosity.

Service the engine lubrication system. Refer to the service manual.

There may be a seal leakage at the compressor end of the turbo.

Refer to Oil Seal Leak at Compressor section below.

There may be a seal leakage at turbine end of turbocharger.

Refer to Oil Seal Leak at Turbine End of Turbocharger section below.

There may be oil in the engine exhaust manifold.

Refer to the service manual.

Noisy Operation

Condition

Action

The air filter may be dirty.

Inspect the air filter. Replace the air filter as necessary.

There may be damage to the turbine wheel due to foreign object impact.

  1. Determine the source of the foreign object and repair.
  2. Replace the turbocharger.

The compressor or turbine wheel may be rubbing the housing.

  1. Inspect for wear (Radial and Axial).
  2. Replace the turbocharger.

There may be excessive dirty build-up in the compressor (housing or wheel).

  1. Clean and repair the intake system as necessary.
  2. Clean or replace the turbocharger as necessary.

There may be sludge or a coked center housing.

  1. Service the engine lubrication system.
  2. Replace the turbocharger.

Oil Seal Leak at Compressor

Inspect the following areas for possible causes and remedies for oil leak from the compressor end of the turbocharger.

    • Dirty air cleaner element
    • Restricted turbocharger oil drain line
    • Plugged engine crankcase breather
    • Overfull crankcase
    • Excessive blowby or high internal crankcase pressure
    • Damaged compressor wheel

Oil Seal Leak at Turbine End of Turbocharger

Inspect the following areas for possible causes and remedies for oil leak from the turbine end of the turbocharger.

    • Plugged engine crankcase breather
    • Restricted turbocharger oil drain line
    • Sludge or coked center housing
    • Overfull crankcase
    • Excessive piston blow-by or high internal crankcase pressure

Warranty Information

Turbocharger failures resulting from poor maintenance (oil sludge or coked, air filter restriction) are not warrantable repairs. Failures resulting from foreign material (intake debris, engine piston/valve failures) are not Emissions Warrantable repairs. Failures of this type (intake debris, engine piston/valve failures) would only be warrantable under the Engine Warranty period.