DIESEL - FUEL FILTER LEAK FAULTY SEAL

VEHICLES AFFECTED: 1984-85 C,G,K, - 1,2,3, MODELS WITH 6.2L DIESEL ENGINE
The possibility of fuel leakage and/or air past the drain and/or vent plug seal(s) may exists in the base of some Model 80 Fuel Filter. The two Model 80 assemblies involved are part numbers 14071933 (C,K models) and 14071064 (G,P Models).
The specific symptoms of this are:
1. External fuel leakage from the vent or drain plugs.
2. A hard starting condition where the engine starts normally, then stops, and is difficult to re-start.
A seal (P/N 15529641) has been released to repair fuel and/or air leakage.
Seal replacement can be accomplished with the filter assembly removed from the vehicle as outlined in the following steps:
1. Remove the air vent plug located at the top of the filter base.
2. Loosen the drain plug on C/K models and drain the fuel from the filter. On G and P models, open the remote drain valve to drain the filter.
Note: G & P model trucks do not have a filter base drain plug or seal. Only the air vent plug seal will be replaced on these models.
3. Disconnect fuel hoses and electrical connections from the filter assembly. Remove the assembly from the vehicle.
4. Unclamp and remove the filter/separator element from the base.
5. A paper clip or short length of mechanic's wire can be formed into a tool for seal removal (Figure 1). Using the tool, remove the air vent seal and drain plug seal (if equipped) from the filter base. The seal may be removed with special too No. 27751, available from *Stanadyne Diesel Systems.
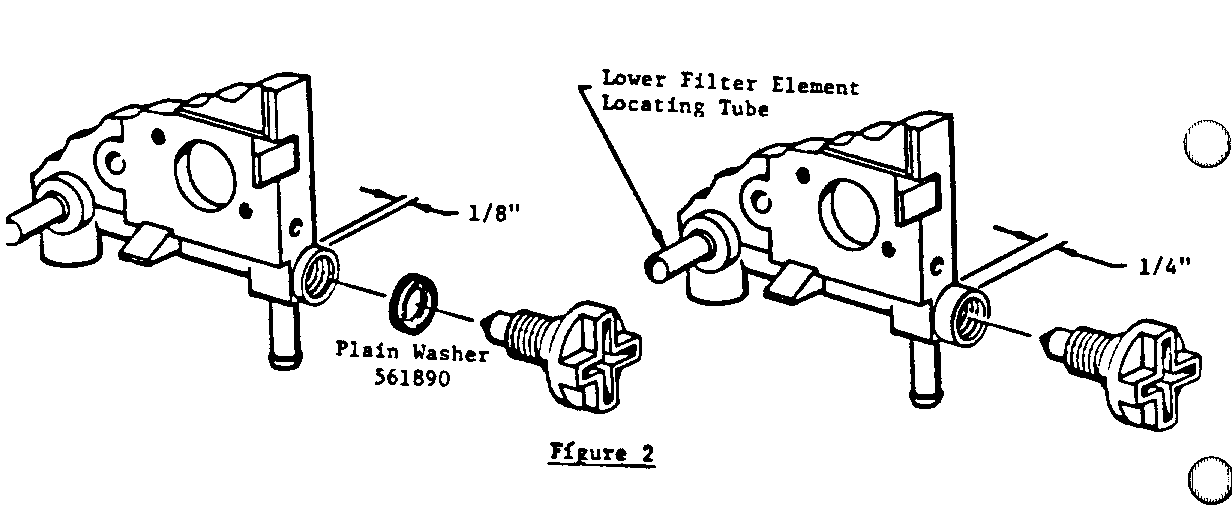
6. Visually inspect the bore(s) for evidence of seal particles. If particles are present, compressed air can be blown into the lower filter element locating tube to remove small particles in the bore(s) (Figure 2).
7. A short length of 1/4 inch diameter bar stock or equivalent with square ends can be used to install the new seals in the base. Apply a small amount of Synkut lubricant (or equivalent, such as STP) to the end of the rod. Attach a new seal (P/N 15529641) to the rod's end. Insert the seal into the air vent plug bore until it seats firmly in the botton of the bore. Visually inspect inside the bore to ensure that the seal in squarely bottomed. Install the air vent plug.
The seal can be installed with special tool NO. 27751, available from *Stanadyne Diesel Systems.
8. Repeat the above procedure to install a new seal in the drain plug bore, but do not install the drain plug.
9. Measure the length of the drain plug bore boss as shown in Figure 2. If the boas is 1/4 inch long, install the drain plug and tighten until it bottoms. If the boss is 1/8 inch long, install plain washer (P/N 561890) on the drain plug and then thread the plug in until it bottoms. The drain plug washer prevents threading the drain plug in too far and damaging the seal.
10. Attach the element to the base.
11. The filter assembly and plug seals can be pressure checked with air by plugging the fuel inlet, outlet, and drain outlet (if applicable). Using a maximum of 10 psi air pressure, open and close the air vent and drain plug (if equipped) several times to ensure that the plug(s) are sealing.
12. Reinstall filter assembly on vehicle and attach all fuel hoses and electrical connections.
13. Vent and prime the fuel system as outlined in the Service Manual or Owner's and Driver's Manual.
14. Check for leaks.


General Motors bulletins are intended for use by professional technicians, not a "do-it-yourselfer". They are written to inform those technicians of conditions that may occur on some vehicles, or to provide information that could assist in the proper service of a vehicle. Properly trained technicians have the equipment, tools, safety instructions and know-how to do a job properly and safely. If a condition is described, do not assume that the bulletin applies to your vehicle, or that your vehicle will have that condition. See a General Motors dealer servicing your brand of General Motors vehicle for information on whether your vehicle may benefit from the information.
