CAMPAIGN: TIE ROD FRACTURE THRU DAMPER STUD MOUNTING HOLE

Models: 1991 GMC & Chevrolet 'C' 3500 HD
TO: ALL GENERAL MOTORS DEALERS
General Motors of Canada Limited has determined that a defect which relates to motor vehicle safety exists in certain 1991 GMC and Chevrolet 'C' 3500 HD Chassis Cab Trucks with a GVW (Gross Vehicle Weight) of 15,000 lb. These vehicles may exhibit a fatigue fracture of the tie rod through the damper stud mounting hole. If a fracture occurs, the vehicle would pull to the left during braking or when driving on a rough road and could result in a vehicle crash without prior warning.
To prevent this condition from occurring, dealers are to replace the existing tie rod assembly, damper, and damper bracket with newly designed parts. The existing drag link Will be reused.
VEHICLES INVOLVED:
Involved are CERTAIN 1991 GMC and Chevrolet 'C' 3500 HD Chassis Cab vehicles with a GVW of 15,000 lbs. built within the following VIN breakpoints:
Year Model Plant Plant Code From Through --- ----- ----- ---------- ---- ------- 1991 GMC & Chevrolet 'C' 3500 HD Janesville "J" SOP EOP
All affected vehicles have been identified by the VIN listing provided to involved dealers with this bulletin. Any dealer not receiving a listing was not shipped any of the affected vehicles.
DEALER CAMPAIGN RESPONSIBILITY:
All unsold new vehicles in dealer's possession and subject to this campaign must be held and inspected/repaired per the Service Procedure of this Campaign Bulletin before owners take possession of these vehicles.
Dealers are to perform this campaign on all involved vehicles at no charge to owners, regardless of kilometres traveled, age of vehicle, or ownership, from this time forward.
Whenever a vehicle subject to this campaign is taken into your new or used vehicle inventory, or it is in your dealership for service, you are to ensure the campaign correction has been made before selling or releasing the vehicle.
Owners of vehicles recently sold from your new vehicle inventory are to be contacted by the dealer, and arrangements made to make the required correction according to instructions contained in this bulletin.
In summary, whenever a vehicle subject to this campaign is taken into your new or used vehicle inventory, or is in your dealership for service in the future, please take the steps necessary to be sure the campaign correction has been made before selling or releasing the vehicle.
CAMPAIGN PROCEDURE:
Refer to Section 4 of the Service Policies and Procedures Manual for the detailed procedure on handling Product Campaigns. Dealers are requested to complete the campaign on all transfers as soon as possible.
OWNER NOTIFICATION:
All owners of record at the time of campaign release are shown on the attached computer listing and have been notified by first class mail from General Motors. The listings provided are for campaign activity only and should not be used for any other purpose.
PARTS INFORMATION:
Parts required to complete this campaign should be ordered through regular channels, as follows:
Part Number Description Quantity/Vehicle ----------- ----------- ---------------- 15696702 Front Axle Mounting Bracket 1 15659623 Bolt - M10 - 1.5 x 30.0 1 11509775 Bolt - M14 - 2.0 x 50.0 1 15531206 Washer - M14 1 11500748 Lock Nut - M14 - 2.0 1 26035161 Tie Rod Assembly 1 (Includes 3 Castle Nuts - 5/8-18 and 3 Cotter Pins - 1/8" x 1 1/2") 22064604 Steering Linkage Absorber 1 11509142 Bolt - M10 - 1.5 x 65.0 2 11501033 Lock Nut - M10 - 1.5 2 15614758 Hardened Washer - M10 1
SPECIAL TOOL
Special Tool J-39605 (Special 15mm Drill Bit) must be obtained from Kent-Moore Tools by calling 1-800-345-2233. The Special Tool will be provided to dealers at no charge. When used properly, each drill bit should chill 3-5 axles.
PARTS AND LABOUR CLAIM INFORMATION:
Credit for the campaign work performed will be paid upon receipt of a properly completed campaign claim card or DCS transmission in accordance with the following:
Repair Code Description Time Allowance ----------- ----------- -------------- 2A Tie Rod Assembly - Replace 1.7
Time allowance includes 0.1 hour for dealer administrative detail associated with this campaign. Parts credit will be based on dealer net plus 30% to cover parts handling.
SERVICE PROCEDURE:
Tools Required: 15mm Drill Bit (Special Tool) J-39605 Tie Rod Puller J-6627A Universal Steering Linkage Puller J-29107
1. Block rear wheels.
2. Lift front axle and support with jack stands.
3. Remove the front tire and wheel assemblies (retain lug nuts).
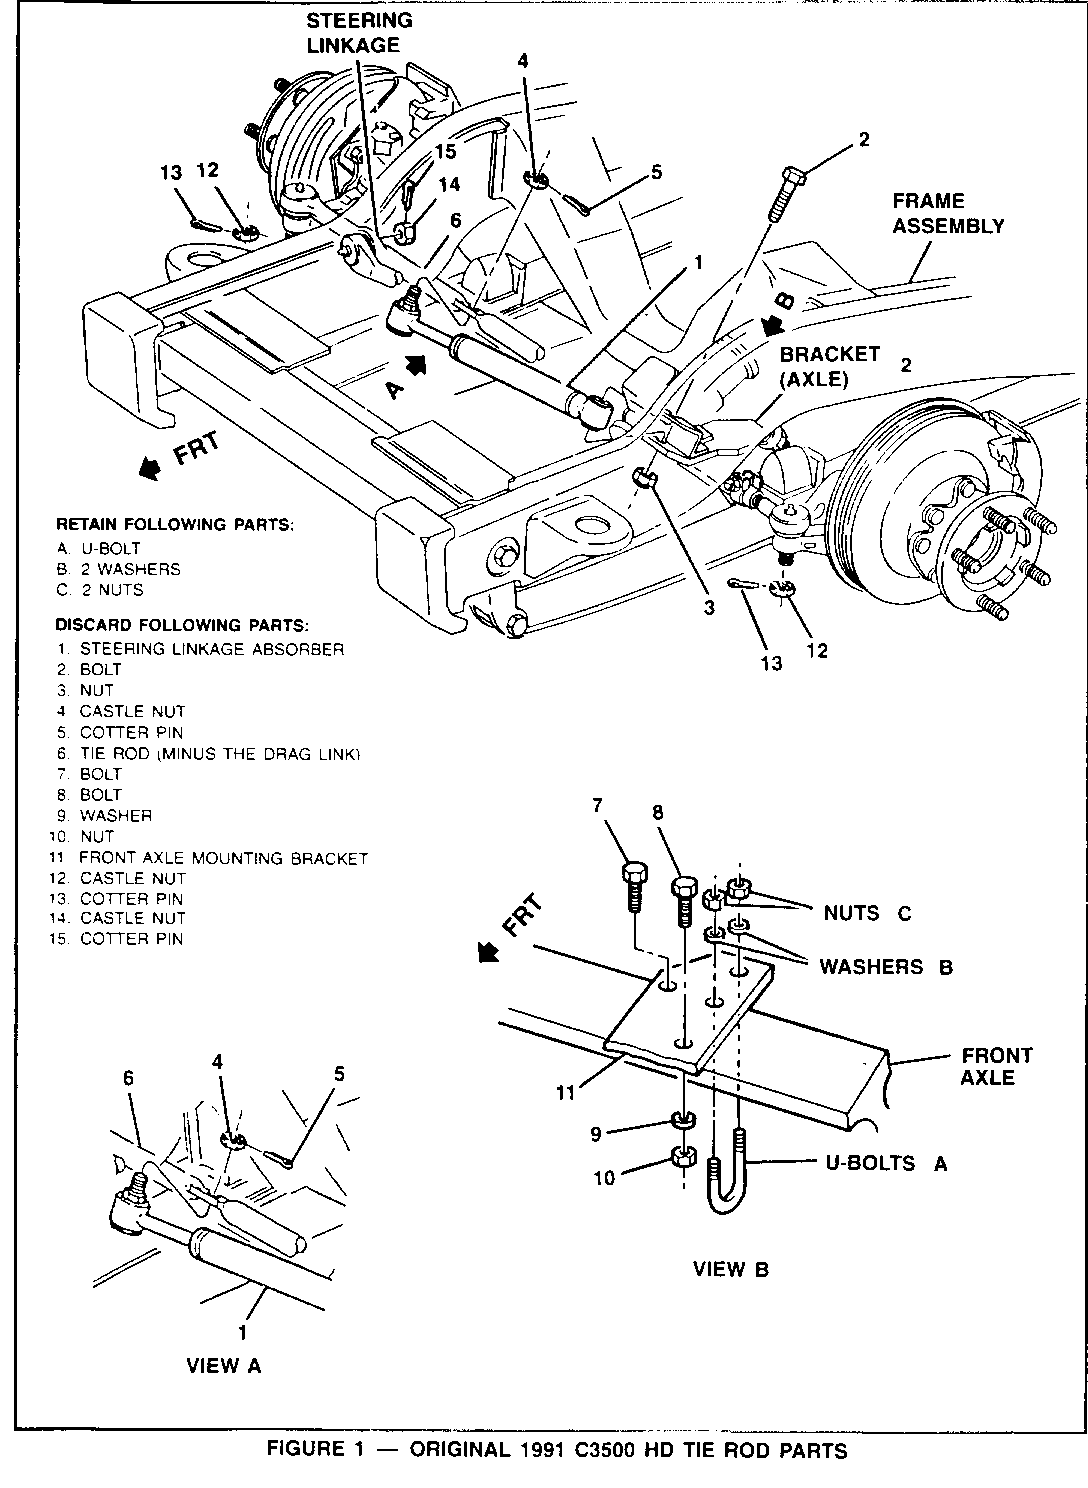
4. Remove bolt (Figure 1, "2"), two (2) nuts (Figure 1, "3" and "4"), cotter pin (Figure 1, "5"), and the steering linkage absorber (Figure 1, "1") which is attached to the front axle mounting bracket.
5. ON DRIVER'S SIDE ONLY: remove and retain the U-bolt (Figure 1, View B "A"), nuts (Figure 1, View B "C"), and washers (Figure 1, View B "B") which secure the front stabilizer bar to the front axle mounting bracket.
6. Remove remaining nut (Figure 1, View B "10"), washer (Figure 1, View B "9"), and bolts (Figure 1, View B "7" and "8") which mount the front axle mounting bracket (Figure 1, View B "1") to the front axle, then remove the front axle bracket. These parts will not be reused.
7. Enlarge the forward hole in the axle beam (used for the front axle mounting bracket) using Special Tool J39605 15mm drill.
NOTICE: This is the through hole on the front axle which is closest to the front bumper and is the hole through which bolt "3" in Figure 2 passes. Care should be taken to keep the new hole aligned with the old hole.
THE HOLE MUST BE DRILLED FROM THE BOTTOM OF THE AXLE UP USING A SPECIAL TOOL DRILL BIT, J39605. THE DRILL MUST BE ORDERED FROM KENT-MOORE TOOLS. THIS DRILL BIT IS REQUIRED DUE TO AN INTERFERENCE WITH THE BOTTOM FLANGE OF THE FRONT AXLE. When used properly, each special drill bit should drill 3-5 axles.
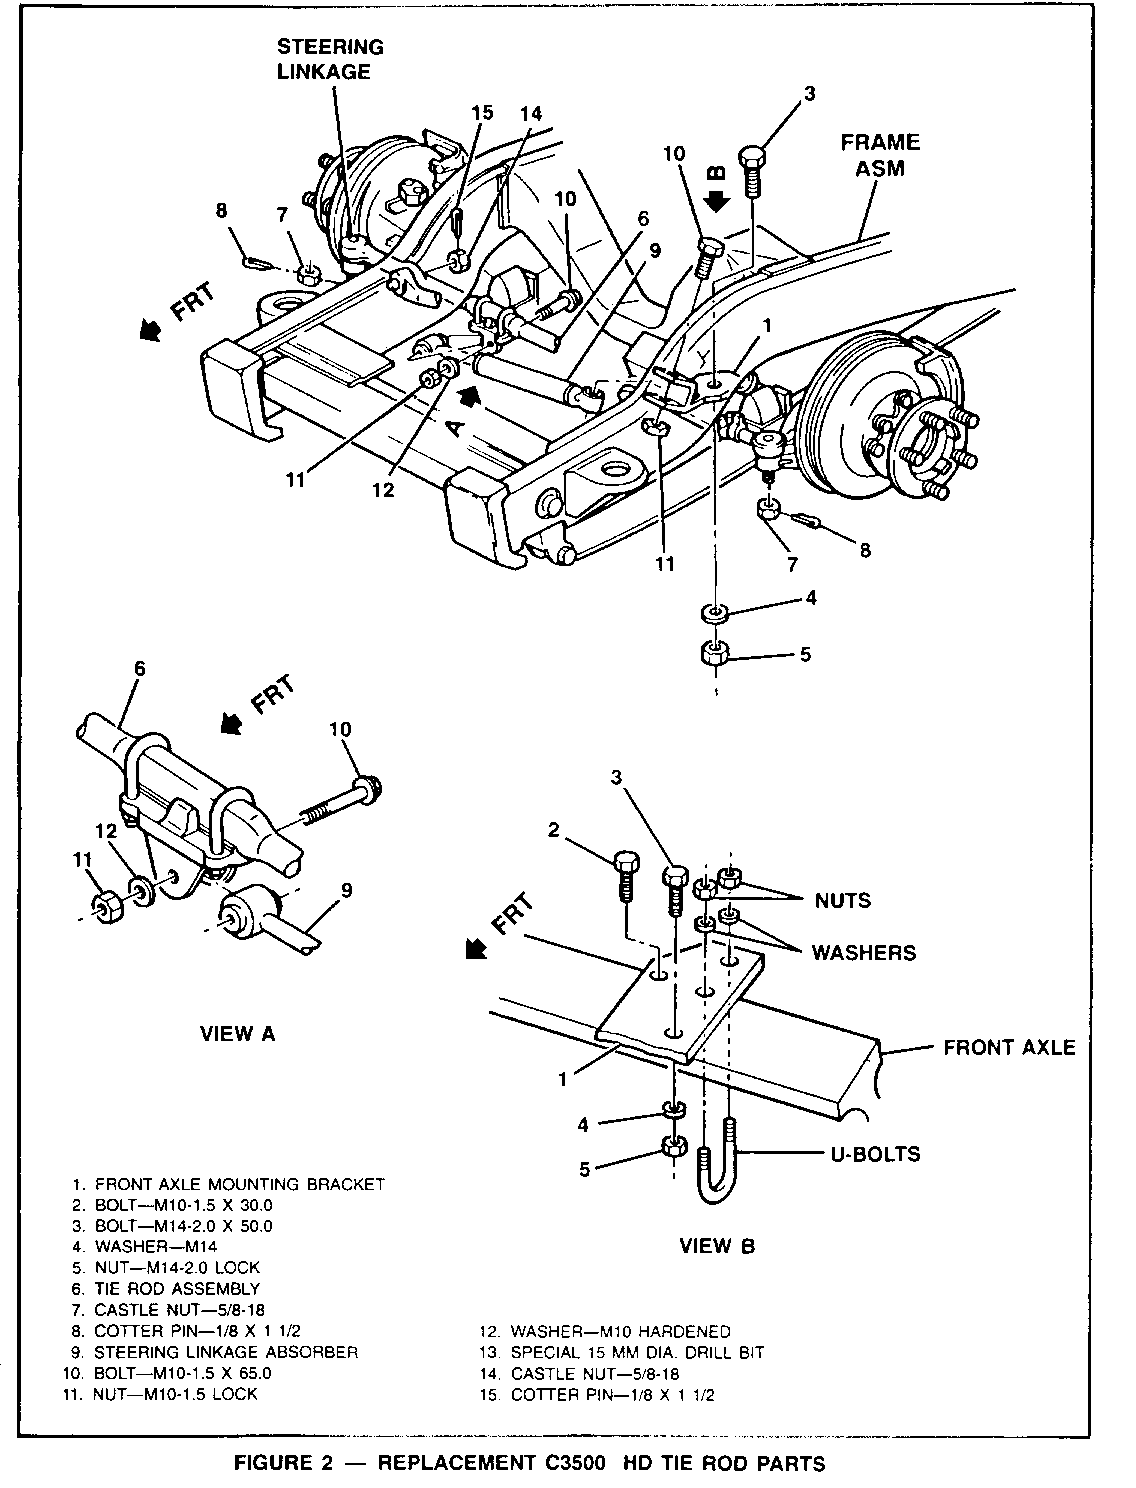
8. Install a replacement front axle mounting bracket (Figure 2, View B "1") using a new M10 bolt (Figure 2, View B "2"), torque to 60-75 N.m (44-55 lbs. ft). Also, install new M14 bolt (Figure 2, View B "3"), M14 washer (Figure 2, View B "4"), and M14 lock nut (Figure 2, View B "5"), torque to 120-130 N.m (89-96 lbs. ft.). The M14 bolt must be installed in the direction shown in Figure 2, View B.
9. Reinstall U-bolt, nuts and washers retained in Step 5, and torque to 24-32 N.m (18-24 lbs. ft.).
10. Remove cotter pin (Figure, 1, " 15") and castle nut (Figure 1, " 14") which retain the drag link to the tie rod assembly. Cotter pin and castle nut will not be reused.
11. Using a tie rod puller (J-6627A) or universal steering linkage puller (J-29107) disconnect the drag link from the tie rod assembly.
NOTICE: The joint seal will be damaged if the proper tool is not used.
12. Remove cotter pins (Figure 1, "13") and castle nuts (Figure 1, "12") retaining the tie rod assembly to the right and left spindles. Cotter pins and castle nuts will not be reused.
13. Using a tie rod puller (J-6627A) or universal steering linkage puller (J-29107) disconnect the tie rod assembly (Figure 1, "6") from the right and left spindles. The tie rod assembly will not be reused.
14. Install the new tie rod assembly (Figure 2, "6") to right and left spindles using new 5/8-18 castle nuts (Figure 2, "7") and torque to 75-100 N.m (55-74 lbs. ft.). Retain the castle nuts to the right and left spindle locations using two new 1/8" x 1 1/2" cotter pins (Figure 2, "8").
15. Connect the drag link to the new tie rod assembly (Figure 2, "6") using new 5/8-18 castle nuts (Figure 2, "14") and torque to 95-115 N.m (70-85 lbs. ft.). Retain the castle nut with new 1/8" x 1 1/2" cotter pin (Figure 2, "15").
16. Install a new steering linkage absorber (Figure 2, View A, "9") to the new tie rod assembly (Figure 2, View A, "6") using a new M10 bolt, M10 lock nut, and M10 washer (Figure 2, View A, "10", "11" and "12"), and torque to 40-50 N.m (30-37 lbs. ft.).
NOTICE: The bolt must be installed in the direction shown in Figure 2, View A.
17. Install the new steering linkage absorber to the new front axle mounting bracket (Figure 2, "1") using a new M10 bolt (Figure 2, " 10"), and M10 lock nut (Figure 2, "11"). Torque to 40-50 N.m (30-37 lbs. ft.).
18. Retrieve the retained lug nuts and reattach the front tire and wheel assemblies. Torque the lug nuts to 240 N.m (177 lbs. ft.).
19. Perform a complete toe-in adjustment. The steering wheel must be locked and centred. The toe-in should be set to the following specifications:
Service Checking Service Setting ---------------- --------------- Sum Toe-in 0.06 +/- 0.06 in. 0.06 +/- 0.06 in. 1.52 +/- 1.52 mm. 1.52 +/- 1.52 mm. 0.12 +/- 0.12 degrees 0.12 +/- 0.12 degrees
NOTICE: This is a new tie rod system.
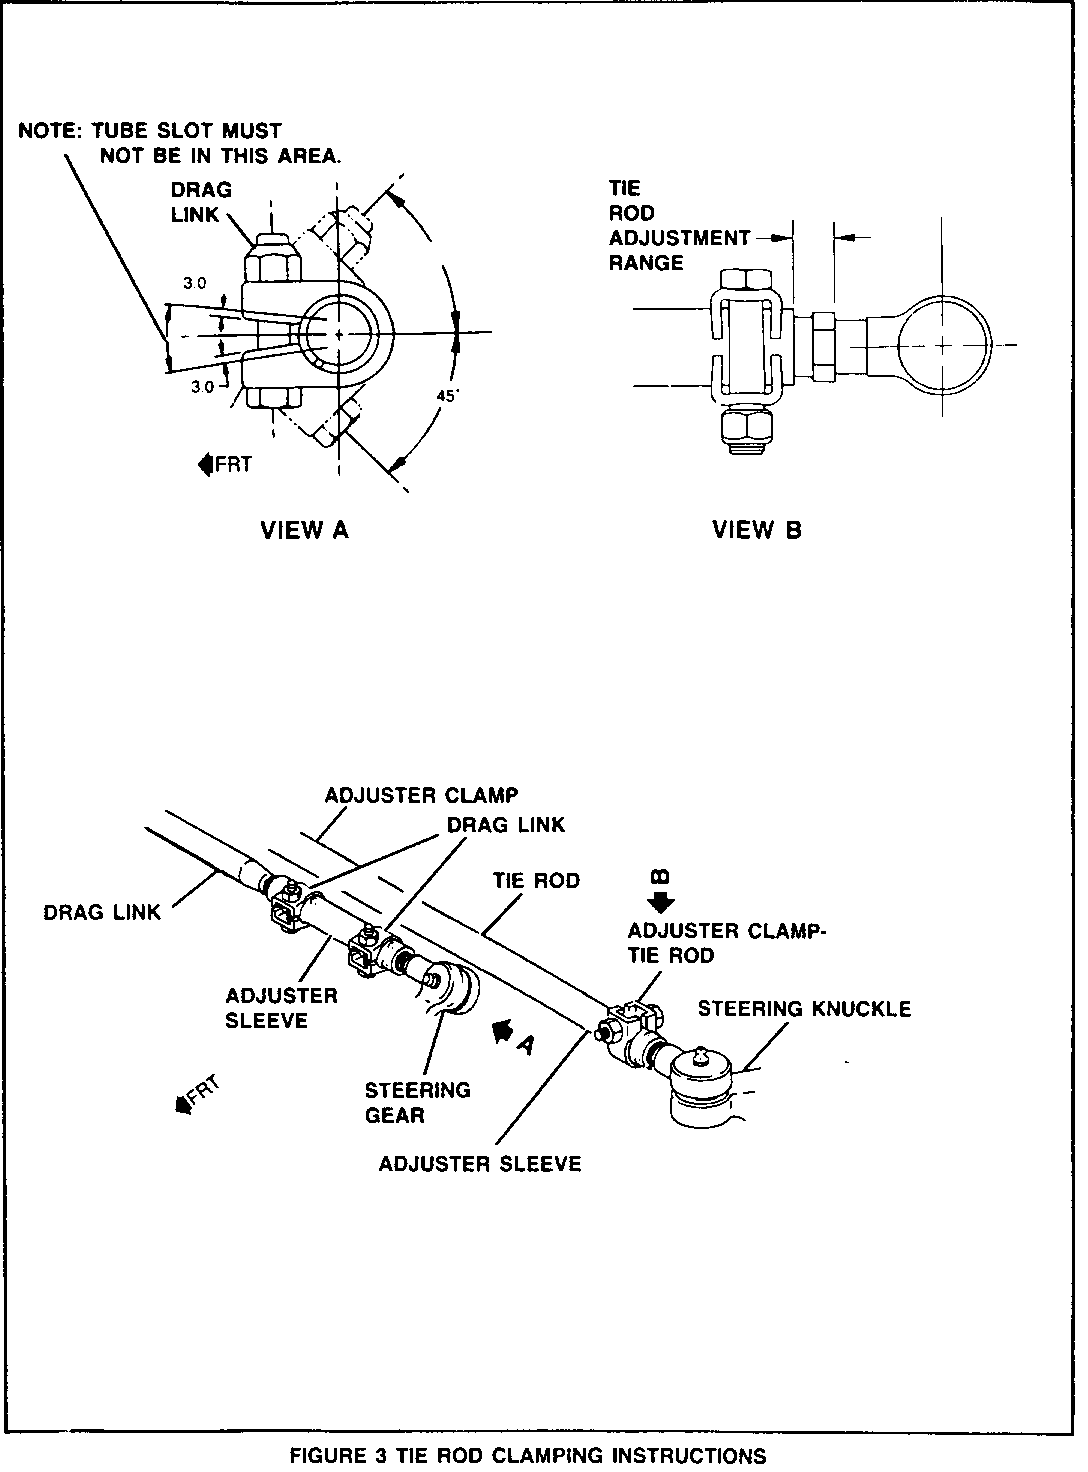
20. Align the right front wheel (Passenger Side) by using the drag link adjuster tube assembly and the following procedure:
a. Position the drag link adjuster clamps on the adjuster tube so the edge of the clamp ears do not fall on the adjuster tube slot (Figure 3, View A).
b. Adjuster clamps must be located BETWEEN (not ON) the stamped adjuster tube dimples.
c. The ears of the drag adjuster tube clamps must be rotationally positioned as specified on Figure 3, View A.
d. Tighten the drag link adjuster clamp nuts to 68 N.m (50 lbs. ft.).
e. The drag link assembly must be capable of rocking on the socket pivots through a minimum of eight (8) degrees total after the clamps are tightened.
NOTICE: If tools are used to rotate the adjuster tube, special attention must be given to prevent damage to the corrosion protection coating.
21. Align the left front wheel (Driver's Side) by using the tie rod adjuster tube assembly and the following procedure:
a. Position the tie rod adjuster clamps on the adjuster tube so that the edge of the clamp ears do not fall in the adjuster tube slot (Figure 3, View A).
b. Adjuster tube clamps must be located BETWEEN (not ON) the stamped adjuster tube dimples.
c. The ears of the tie rod adjuster tube clamps must be rotationally positioned as specified in Figure 3, View A.
d. Tighten the tie rod adjuster clamp nuts to 68 N.m (50 lbs. ft.).
NOTICE: If tools are used to rotate the adjuster tube, special attention must be given to prevent damage to the corrosion protection coating.
22. Remove the axle supports, lower front axle and remove rear wheel blocks.
23. Install a "Campaign Identification Label."
INSTALLATION OF CAMPAIGN IDENTIFICATION LABEL
Clean surface of radiator upper mounting panel and apply a Campaign Identification Label. Make sure the correct campaign number is inserted on the label. Ibis will indicate that the campaign has been completed.
Dear General Motors Customer:
General Motors of Canada Limited has determined that a defect which relates to motor vehicle safety exists in certain 1991 GMC and Chevrolet 'C' 3500 HD Chassis Cab Trucks with a GVW (Gross Vehicle Weight) of 15,000 lb. These vehicles may exhibit a fatigue fracture of the tie rod through the damper stud mounting hole. If a fracture occurs, the vehicle would pull to the left during braking or when driving on a rough road and could result in a vehicle crash without prior warning.
To prevent this condition from occurring, your dealer will replace the existing tie rod assembly, damper, and damper bracket with newly designed parts. The existing drag link will be reused. Ibis service will be performed for you at no charge.
Please contact your GM dealer as soon as possible to arrange a service date.
If parts are required, ask your dealer for details regarding their availability. If parts are not in stock, they can be ordered before scheduling your service date.
This letter identifies your vehicle. Presentation of this letter to your dealer will assist their Service personnel in completing the necessary conection to your vehicle in the shortest possible time.
Subsequent to contacting your dealer, further assistance, if required, may be obtained from our Customer Assistance Centre, toll free, by calling 1-800-263-3777 (English), or 1-800-263-7854 (French).
We are sorry to cause you this inconvenience; however, we have taken this action in the interest of your continued satisfaction with our products.
General Motors bulletins are intended for use by professional technicians, not a "do-it-yourselfer". They are written to inform those technicians of conditions that may occur on some vehicles, or to provide information that could assist in the proper service of a vehicle. Properly trained technicians have the equipment, tools, safety instructions and know-how to do a job properly and safely. If a condition is described, do not assume that the bulletin applies to your vehicle, or that your vehicle will have that condition. See a General Motors dealer servicing your brand of General Motors vehicle for information on whether your vehicle may benefit from the information.
