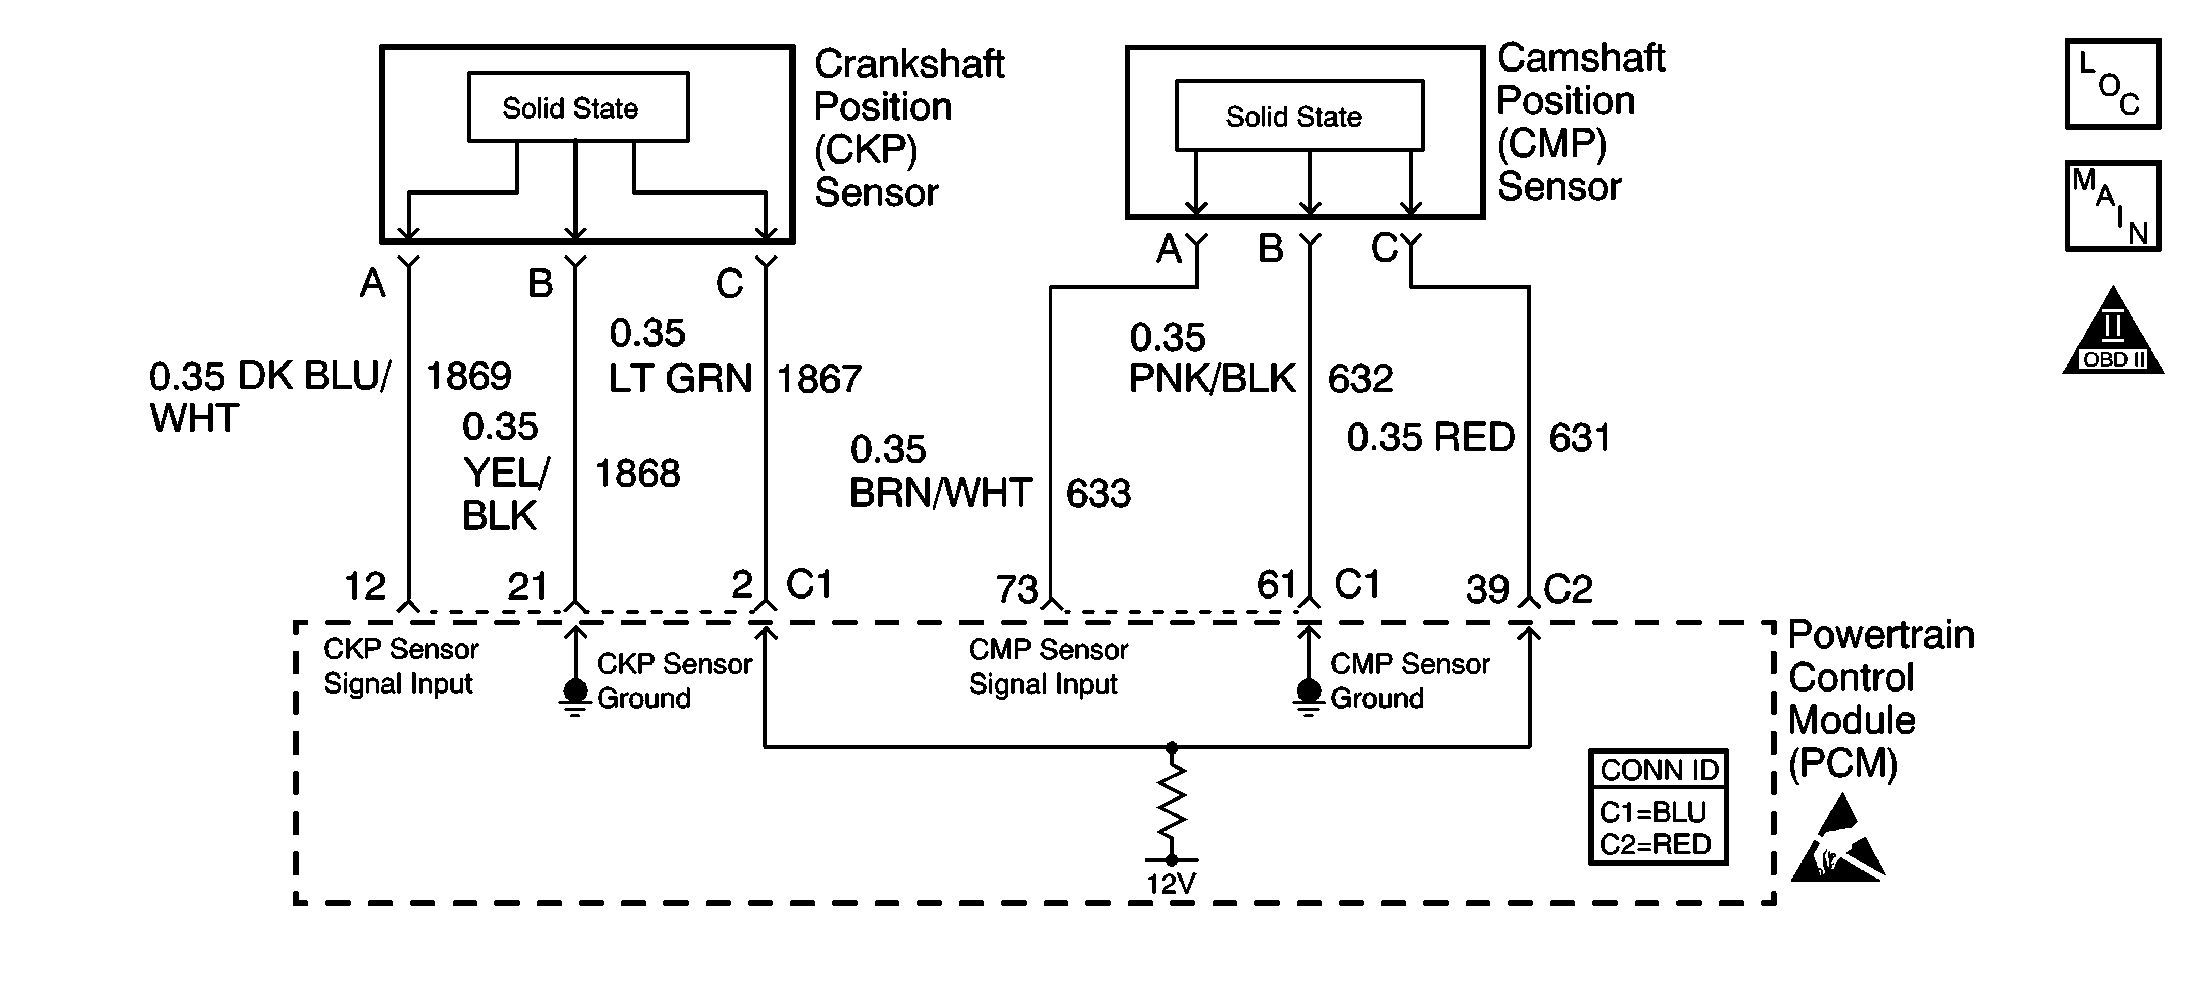
Circuit Description
The camshaft position (CMP) sensor is mounted through the top of the engine block at the rear of the valley cover. The CMP sensor works in conjunction with a 1X reluctor wheel on the camshaft. The reluctor wheel is inside the engine immediately in front of the rear cam bearing. The powertrain control module (PCM) provides a 12 volt power supply to the CMP sensor as well as a ground and a signal circuit.
The CMP sensor determines whether a cylinder is on a firing stroke or on an exhaust stroke. As the camshaft rotates, the reluctor wheel interrupts a magnetic field produced by a magnet within the sensor. The sensors internal circuitry detects this and produces a signal which the PCM reads. The PCM uses this 1X signal in combination with the crankshaft position (CKP) sensor 24X signal in order to determine crankshaft position and stroke. This diagnostic for the CMP sensor checks for a loss of CMP sensor signal.
Observe that as long as the PCM receives the CKP sensor 24X signal, the engine will start. The PCM can determine top dead center for all cylinders by using the CKP sensor 24X signal alone. The CMP sensor 1X signal is used by the PCM to determine if the cylinder at top dead center is on the firing stroke, or the exhaust stroke. The system attempts synchronization and looks for an increase in engine speed indicating the engine started. If the PCM does not detect an increase in engine speed, the PCM assumes it incorrectly synchronized to the exhaust stroke and re-syncs to the opposite cam position. A slightly longer cranking time may be a symptom of this condition.
Conditions for Running the DTC
The engine speed is less than 4,000 RPM.
Conditions for Setting the DTC
The PCM detects the cam signal is stuck high when the signal should be low for 1.5 seconds.
Action Taken When the DTC Sets
| • | The PCM illuminates the malfunction indicator lamp (MIL) on the second consecutive ignition cycle that the diagnostic runs and fails. |
| • | The PCM records the operating conditions at the time the diagnostic fails. The first time the diagnostic fails, the PCM stores this information in the Failure Records. If the diagnostic reports a failure on the second consecutive ignition cycle, the PCM records the operating conditions at the time of the failure. The PCM writes the conditions to the Freeze Frame and updates the Failure Records. |
Conditions for Clearing the MIL/DTC
| • | The PCM turns OFF the malfunction indicator lamp (MIL) after 3 consecutive ignition cycles that the diagnostic runs and does not fail. |
| • | A last test failed, or current DTC, clears when the diagnostic runs and does not fail. |
| • | A history DTC clears after 40 consecutive warm-up cycles, if no failures are reported by this or any other emission related diagnostic. |
| • | Use a scan tool in order to clear the MIL and the DTC. |
Diagnostic Aids
Important: Remove any debris from the PCM connector surfaces before servicing the PCM. Inspect the PCM connector gaskets when diagnosing or replacing the PCM. Ensure that the gaskets are installed correctly. The gaskets prevent water intrusion into the PCM.
The following conditions may cause this DTC to set:
| • | Poor connections/terminal tension at the sensor |
| • | Camshaft reluctor wheel damage |
| • | The sensor coming in contact with the reluctor wheel |
Using Freeze Frame and Failure Records data may aid in locating an intermittent condition. If you cannot duplicate the DTC, the information included in the Freeze Frame and Failure Records data can aid in determining how many miles since the DTC set. The Fail Counter and Pass Counter can also aid determining how many ignition cycles the diagnostic reported a pass or a fail. Operate the vehicle within the same Freeze Frame conditions such as RPM, load, vehicle speed, temperature, etc. that you observed. This will isolate when the DTC failed.
The CMP sensor output can be tested. The sensor must be supplied with a power and a ground. The engine must be cranking to perform this test. You can measure the duty cycle at the signal circuit of the sensor. The duty cycle should be between 45-55 percent for a good sensor.
Test Description
The numbers below refer to the step numbers on the diagnostic table.
-
This step verifies that the fault is present. A hard start is observed when a malfunction is present.
-
This step tests the CMP sensor ignition positive voltage circuit from the PCM to the CMP.
-
This step tests the CMP sensor ground circuit from the PCM to the CMP.
-
This step tests the CMP sensor signal circuit. Applying a voltage causes the CAM signal input - high to low and low to high parameter to increase if the circuit and the PCM are operating properly.
-
This step tests the CMP sensor ignition positive voltage circuit from the PCM to the CMP sensor.
-
This step tests the CMP sensor ground circuit from the PCM to the CMP sensor.
Step | Action | Value(s) | Yes | No | ||||
|---|---|---|---|---|---|---|---|---|
1 | Did you perform the Powertrain On-Board Diagnostic (OBD) System Check? | -- | ||||||
Does the scan tool parameter increment? | -- | |||||||
3 |
Does the scan tool indicate that this diagnostic failed this ignition? | -- | Go to Diagnostic Aids | |||||
Does the DMM display near the specified value? | B+ | |||||||
Measure the voltage from the CMP sensor ignition positive voltage circuit to the CMP sensor ground circuit using the DMM. Does the DMM display near the specified voltage? | B+ | |||||||
Does the CAM signal input - High to Low and Low to High transition counters increment when the test lamp contacts the signal circuit? | -- | |||||||
Is there continuity and is the resistance within the specified range? | 0-5 ohms | |||||||
8 | Inspect the CMP ignition positive voltage circuit for the following:
Did you find and correct the condition? | -- | ||||||
Is there continuity and is the resistance within the specified range? | 0-5 ohms | |||||||
10 |
Is there continuity and is the resistance within the specified range? | 0-5 ohms | ||||||
11 |
Did you find and correct the condition? | -- | ||||||
12 |
Did you find and correct the condition? | -- | ||||||
13 | Repair the CMP ground circuit for an open. Refer to Wiring Repairs in Wiring Systems. Is the action complete? | -- | -- | |||||
14 | Repair the CMP signal circuit for an open. Refer to Wiring Repairs in Wiring Systems. Is the action complete? | -- | -- | |||||
15 |
Did you find and correct the condition? | -- | ||||||
16 |
Did you find and correct the condition? | -- | ||||||
17 | Replace the CMP sensor. Refer to Camshaft Position Sensor Replacement . Is the action complete? | -- | -- | |||||
18 |
Important:: The replacement PCM must be programmed. Replace the PCM. Refer to Powertrain Control Module Replacement . Is the action complete? | -- | -- | |||||
19 |
Does the scan tool indicate that this test ran and passed? | -- | ||||||
20 | Select the Capture Info option and the Review Info option using the scan tool. Does the scan tool display any DTCs that you have not diagnosed? | -- | Go to applicable the DTC Table | System OK |
