Rear Exhaust System Replacement Light Duty-4.3L, 4.8L, 5.3L-Pickup
Removal Procedure
- Raise and support the vehicle. Refer to Lifting and Jacking the Vehicle in General Information.
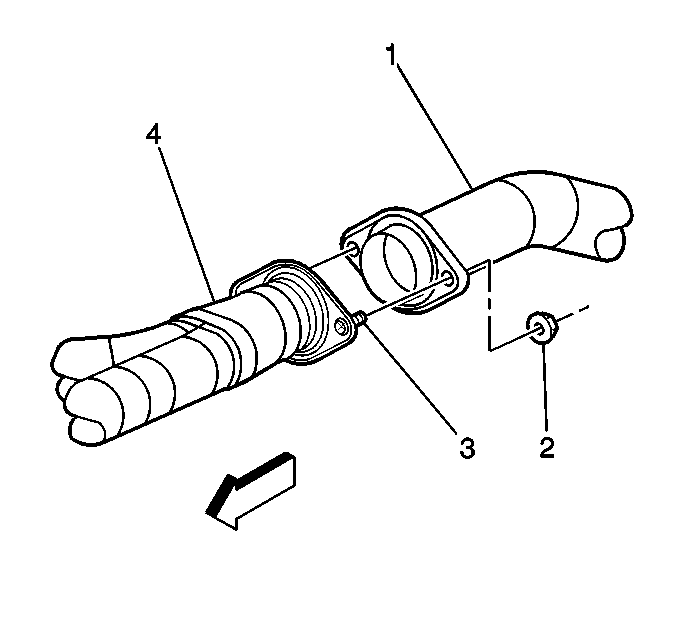
- Remove the flange stud nuts (2) at the junction of the rear exhaust system and the catalytic convertor.
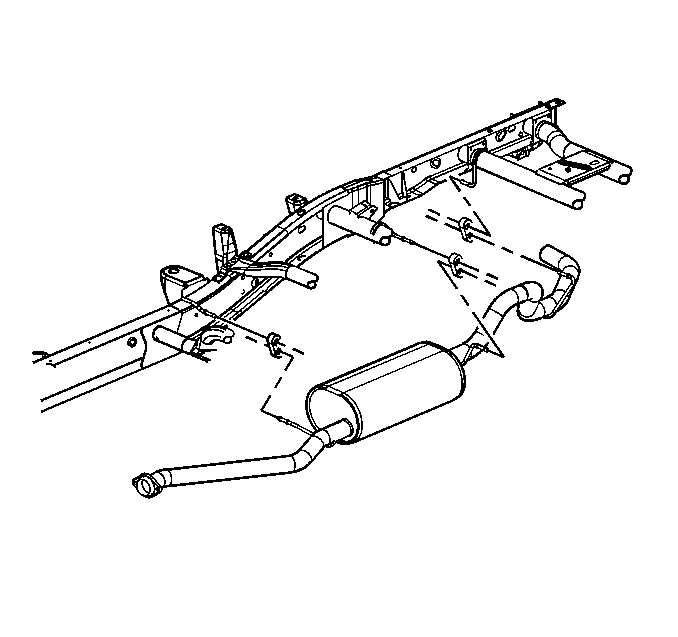
- Disconnect the exhaust hangers for the rear exhaust system.
- Remove the rear exhaust system.
Installation Procedure
- Install the rear exhaust system.
- Connect the exhaust hangers to the rear exhaust system.
- Install the flange stud nuts (2) at the junction of the rear exhaust system and the catalytic convertor.
- Remove the safety stands.
- Lower the vehicle.


Notice: Use the correct fastener in the correct location. Replacement fasteners must be the correct part number for that application. Fasteners requiring replacement or fasteners requiring the use of thread locking compound or sealant are identified in the service procedure. Do not use paints, lubricants, or corrosion inhibitors on fasteners or fastener joint surfaces unless specified. These coatings affect fastener torque and joint clamping force and may damage the fastener. Use the correct tightening sequence and specifications when installing fasteners in order to avoid damage to parts and systems.
Tighten
Tighten the nuts to 40 N·m (30 lb ft).
Rear Exhaust System Replacement Heavy Duty-6.0L-Pickup
Removal Procedure
Important: The slip joint clamp must be replaced whenever the slip joint is disconnected.
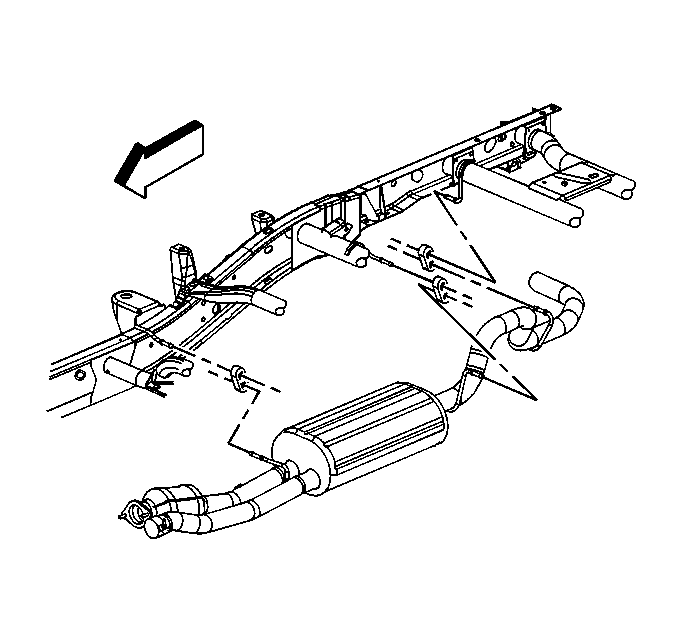
- Raise and support the vehicle. Refer to Lifting and Jacking the Vehicle in General Information.
- Remove the protective shields as necessary.
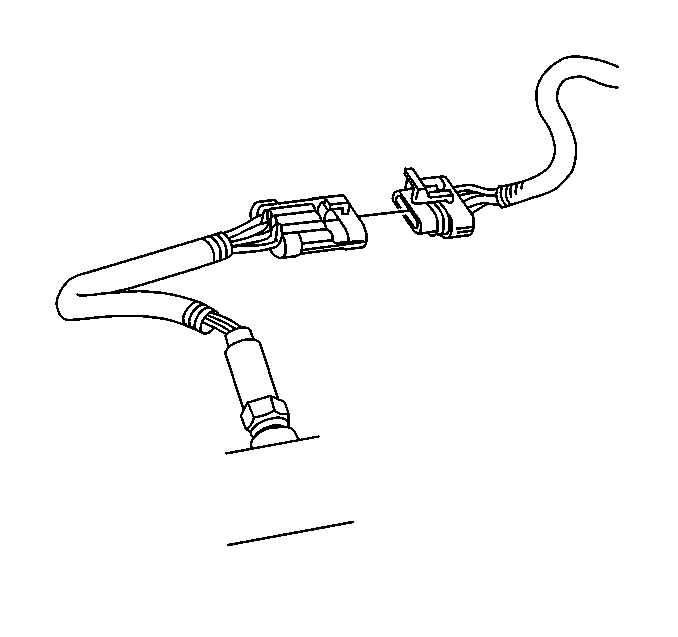
- Disconnect the electrical connection from the oxygen sensor.
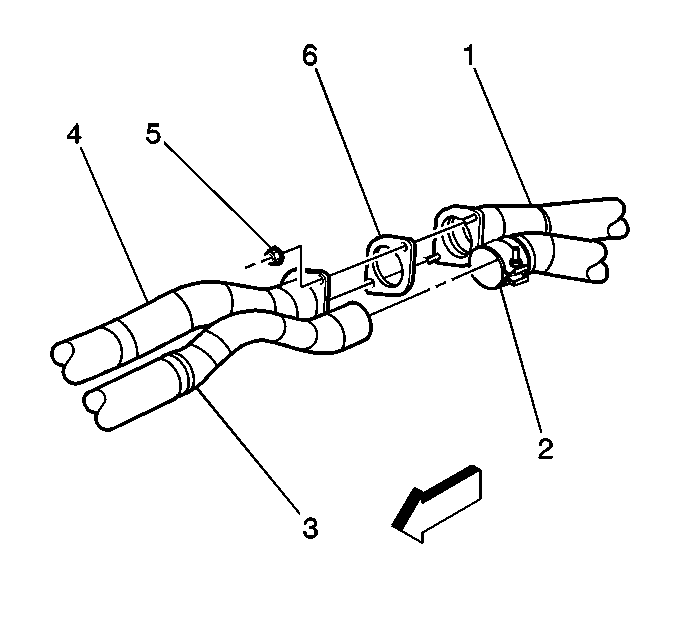
- Loosen the clamp at the slip joint (2).
- Remove the nuts (5) at the rear exhaust system flange.
- Disconnect the exhaust hangers from the rear exhaust system.
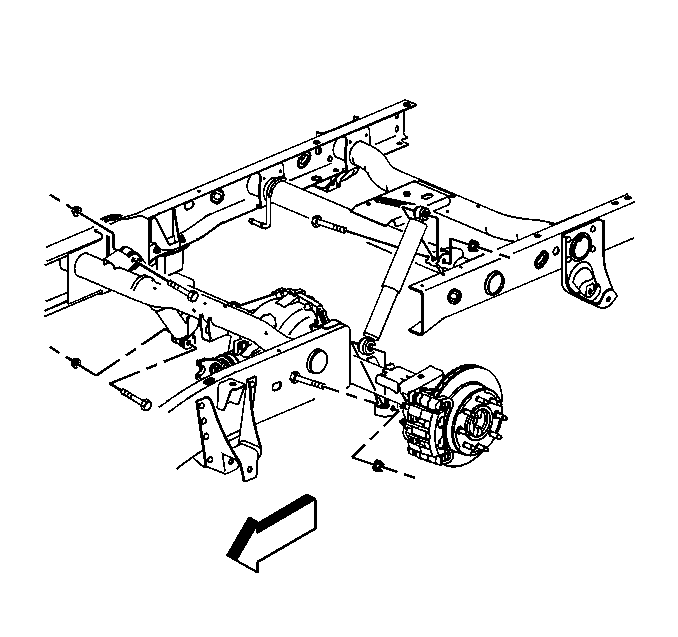
- Support the rear axle with jack stands.
- Remove the upper shock absorber bolts/nuts.
- Lower the rear axle.
- Slide the rear exhaust system rearward in order to disengage the flange and the slip joint.
- Remove the rear exhaust system.
- Remove and discard the slip joint clamp.
- Transfer the oxygen sensors if the catalytic converter is to be replaced. Refer to Heated Oxygen Sensor Replacement - Bank 2 in Engine Controls.
Installation Procedure
- Install a new slip joint clamp.
- Install the rear exhaust system.
- Slide the rear exhaust system forward in order to engage the flange and the slip joint.
- Raise the rear axle.
- Install the upper shock absorber bolts/nuts.
- Remove the rear axle support.
- Connect the exhaust hangers to the rear exhaust system.
- Install the nuts (5) to the rear exhaust system flange.
- Tighten the clamp (2) at the slip joint.
- Connect the electrical connector to the oxygen sensor.
- Remove the safety stands.
- Lower the vehicle.


Notice: Use the correct fastener in the correct location. Replacement fasteners must be the correct part number for that application. Fasteners requiring replacement or fasteners requiring the use of thread locking compound or sealant are identified in the service procedure. Do not use paints, lubricants, or corrosion inhibitors on fasteners or fastener joint surfaces unless specified. These coatings affect fastener torque and joint clamping force and may damage the fastener. Use the correct tightening sequence and specifications when installing fasteners in order to avoid damage to parts and systems.
Tighten
Tighten the nuts to 40 N·m (30 lb ft).
Tighten
Tighten the nut to 40 N·m (30 lb ft).

Rear Exhaust System Replacement Light Duty-4.8L, 5.3L-Utility
Removal Procedure
- Raise and support the vehicle. Refer to Lifting and Jacking the Vehicle in General Information.
- Remove the spare tire.
- Disconnect the Real Time Damping (RTD) sensor (if equipped). Refer to Electronic Suspension Rear Position Sensor Link Assembly Replacement in Real Time Damping.
- Remove the lower shock absorber mounting bolts. Refer to Shock Absorber Replacement in Rear Suspension.
- Lower the rear axle. Do not stretch the jounce hose.
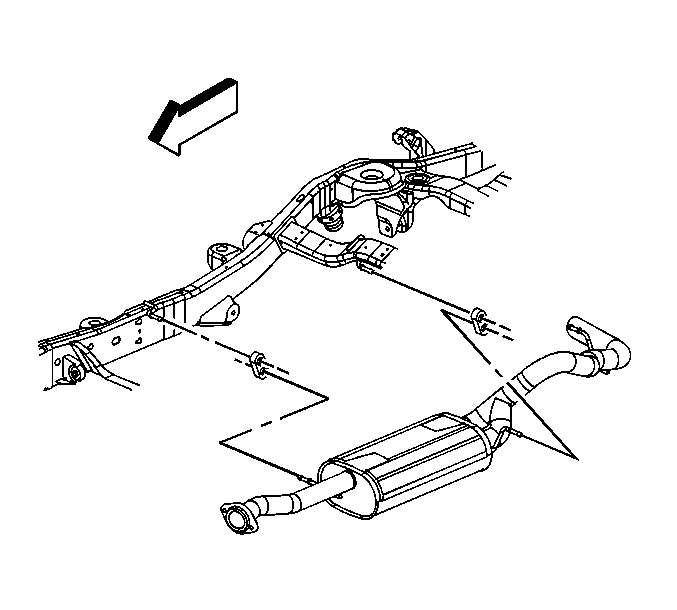
- Remove the flange stud nuts (2) at the junction of the rear exhaust system and the catalytic convertor.
- Disconnect the exhaust hangers for the rear exhaust system.
- Remove the rear exhaust system.

Installation Procedure
- Install the rear exhaust system.
- Connect the exhaust hangers to the rear exhaust system.
- Install the flange stud nuts (2) at the junction of the rear exhaust system and the catalytic convertor.
- Raise the rear axle.
- Install the lower shock absorber mounting bolts. Refer to Shock Absorber Replacement in Rear Suspension.
- Connect the RTD sensor (if equipped). Refer to Electronic Suspension Rear Position Sensor Link Assembly Replacement or Shock Absorber Replacement in Real Time Damping.
- Install the spare tire.
- Remove the safety stands.
- Lower the vehicle.


Notice: Use the correct fastener in the correct location. Replacement fasteners must be the correct part number for that application. Fasteners requiring replacement or fasteners requiring the use of thread locking compound or sealant are identified in the service procedure. Do not use paints, lubricants, or corrosion inhibitors on fasteners or fastener joint surfaces unless specified. These coatings affect fastener torque and joint clamping force and may damage the fastener. Use the correct tightening sequence and specifications when installing fasteners in order to avoid damage to parts and systems.
Tighten
Tighten the nuts to 40 N·m(30 lb ft).
Rear Exhaust System Replacement Heavy Duty-6.0L-Utility
Removal Procedure
Important: The slip joint clamp must be replaced whenever the slip joint is disconnected.
- Raise and support the vehicle. Refer to Lifting and Jacking the Vehicle in General Information.
- Disconnect the Real Time Damping (RTD) sensor (if equipped). Refer to Electronic Suspension Rear Position Sensor Link Assembly Replacement in Real Time Damping.
- Disconnect the electrical connection from the oxygen sensor.
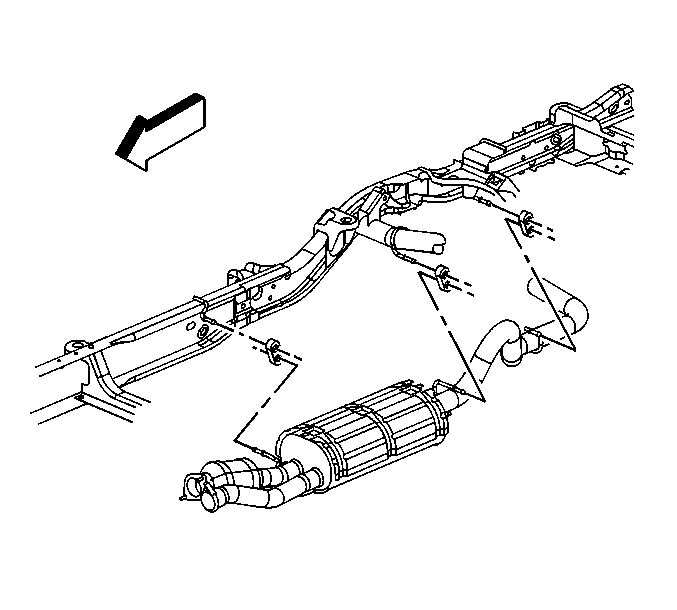
- Loosen the clamp at the slip joint (2).
- Remove the nuts (5) at the rear exhaust system flange.
- Disconnect the exhaust hangers from the rear exhaust system.
- Slide the rear exhaust system rearward in order to disengage the flange and the slip joint.
- Remove and discard the slip joint clamp.
- Remove the rear exhaust system.
- Transfer the oxygen sensors if the catalytic converter is to be replaced. Refer to Heated Oxygen Sensor Replacement - Bank 2 in Engine Controls


Installation Procedure
- Install a new slip joint clamp.
- Install the rear exhaust system.
- Slide the rear exhaust system forward in order to engage the flange and the slip joint.
- Connect the exhaust hangers to the rear exhaust system.
- Install the nuts (5) to the rear exhaust system flange.
- Tighten the clamp (2) at the slip joint.
- Connect the electrical connector to the oxygen sensor.
- Disconnect the Real Time Damping (RTD) sensor (if equipped). Refer to Electronic Suspension Rear Position Sensor Link Assembly Replacement in Real Time Damping.
- Remove the safety stands.
- Lower the vehicle.


Notice: Use the correct fastener in the correct location. Replacement fasteners must be the correct part number for that application. Fasteners requiring replacement or fasteners requiring the use of thread locking compound or sealant are identified in the service procedure. Do not use paints, lubricants, or corrosion inhibitors on fasteners or fastener joint surfaces unless specified. These coatings affect fastener torque and joint clamping force and may damage the fastener. Use the correct tightening sequence and specifications when installing fasteners in order to avoid damage to parts and systems.
Tighten
Tighten the nuts to 40 N·m (30 lb ft).
Tighten
Tighten the nut to 40 N·m (30 lb ft).

