Tools Required
J 42000 Digital Battery
Tester
| • | For best results, use an automatic, taper-rate battery charger
with a voltage capability of 16 volts. |
| • |

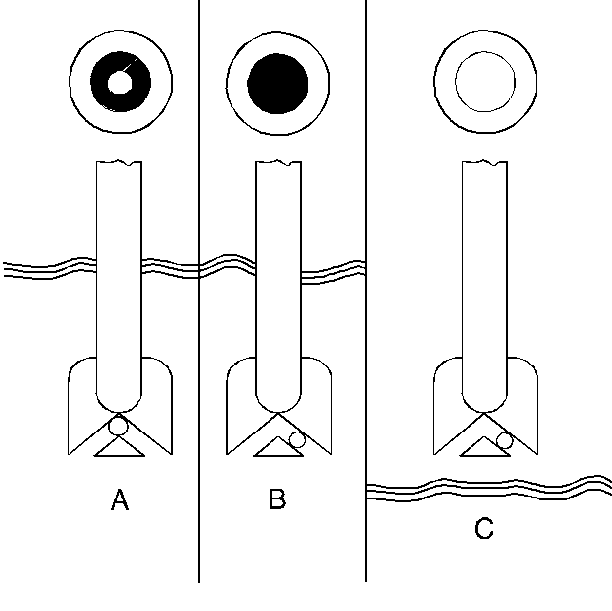
A battery showing a green
dot in the hydrometer (A), does not need to be charged unless the J 42000
battery tester has shown that the battery
needs to be charged. |
| • | A battery showing a dark dot in the hydrometer (B) should be charged
unless the J 42000
battery
tester has indicated no charge is needed. |
| • | Do not charge a battery when the built in hydrometer is clear
or yellow in the center (C). Tap the hydrometer lightly in order to dislodge
any air bubbles. The bubbles may cause a false indication. If the hydrometer
is still clear or yellow, replace the battery. |
| • | The charging area should be well ventilated. |
| • | Do not charge a battery that appears to be frozen; allow the battery
to warm to room temperature and test it before charging. |
Charging Time Required
The time required to charge a battery will vary depending upon the following
factors:
- The battery charger capacity. The higher the charger's amperage,
the less time it will take to charge the battery.
- The state-of-charge of the battery. A completely discharged battery
requires more than twice as much charging time as a half charged battery.
In a discharged battery with a voltage below 11 volts, the battery
has a very high internal resistance and may only accept a very low current
at first. Later, as the charging current causes the acid content to increase
in the electrolyte, the charging current will increase. Extremely discharged
batteries may not activate the reversed voltage protection in some chargers.
Refer to the manufacturers instructions for operating this circuitry.
- The temperature of the battery. The colder the battery is, the
more time it takes to recharge the battery. The charging current accepted
by a cold battery is very low at first, then, as the battery warms, the
charging current will increase.
Charging Procedure
Tools Required
GM P/N 12303040 Battery
Terminal Adapters
Notice: Turn OFF the ignition when connecting or disconnecting the battery cables,
the battery charger or the jumper cables. Failure to do so may
damage the PCM or other electronic components.
When charging side-terminal batteries with the battery
cables connected, connect the charger to the positive cable bolt and to a
ground located away from the battery. When charging side-terminal batteries
with the battery cables disconnected, install the battery side terminal
adapters and connect the charger to the adapters.
Notice: Use the correct fastener in the correct location. Replacement fasteners
must be the correct part number for that application. Fasteners requiring
replacement or fasteners requiring the use of thread locking compound or sealant
are identified in the service procedure. Do not use paints, lubricants, or
corrosion inhibitors on fasteners or fastener joint surfaces unless specified.
These coatings affect fastener torque and joint clamping force and may damage
the fastener. Use the correct tightening sequence and specifications when
installing fasteners in order to avoid damage to parts and systems.
Tighten
Tighten the battery side terminal adapters to 17 N·m (13 lb ft).
Use the following procedure to charge the battery:
- Turn OFF the charger.
- Ensure all battery terminal connections are clean and tight.
- Connect the charger positive lead to the battery positive terminal.
- Connect the negative charger lead to a solid engine ground or
to a ground stud in the engine compartment that is connected directly to the
battery negative terminal, but away from the battery. If the negative battery
cable is disconnected and a terminal adapter is being used, connect directly
to the adapter.
- Turn ON the charger and set to the highest setting for normal
charging.
- Inspect the battery every half hour after starting the battery
charger.
| • | Charge the battery until the hydrometer has a green dot or until
the taper-rate charger indicates the battery is fully charged, whichever occurs
first. |
| • | Tap the hydrometer lightly in order to dislodge any air bubbles.
The bubbles may cause a false indication. |
| • | Estimate the battery temperature by feeling the side of the battery.
If it feels hot to the touch or its temperature is over 45° C (125° F),
discontinue charging and allow the battery to cool before resuming charging. |
- After charging, test the battery. Refer to
Battery Inspection/Test
.

