- Install the J 39893
on the rear head of the compressor.
- Using the J 39500-B
, attach the center hose of the manifold gauge set on the charging
station to a refrigerant drum standing in an upright position.
- Connect the charging station high and low pressure lines to the
corresponding fittings on the J 39893
.
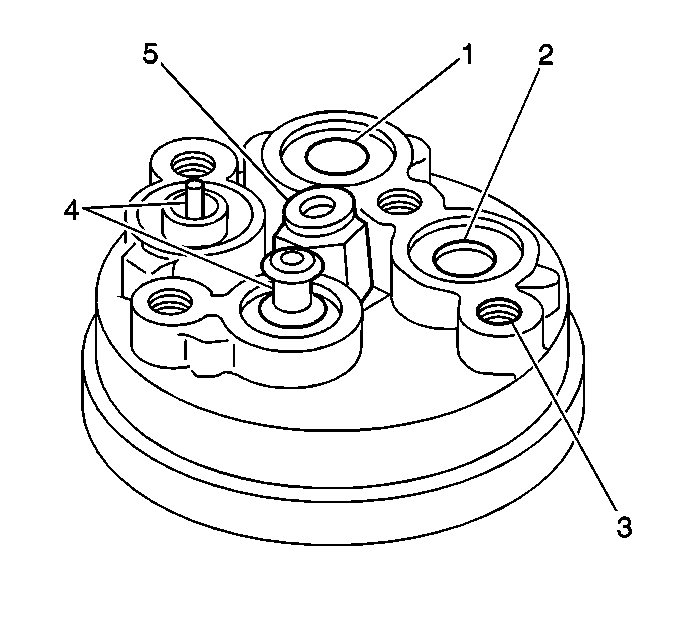
The suction port (1) (low-side) of the compressor has a large
internal opening. The discharge port (high-side) has a smaller internal opening
into the compressor. The discharge port (2) (high-side) also has
a deeper recess.
- Open the following controls on the charging station in order to
allow refrigerant vapor to flow into the compressor:
| • | The low pressure control |
| • | The high pressure control |
| • | The refrigerant control |
- Use the J 39400
in order to inspect for leaks at the following locations:
| • | The pressure relief valve (5) |
| • | The rear head switch location |
| • | The compressor front head seal |
| • | The compressor rear head seal |
| • | The center cylinder seal |
| • | The through bolt head gaskets |
| • | The compressor shaft seal |
- Turn OFF the low-pressure control and the high-pressure control
on the charging station.
- Perform the following steps if an external leak exists:
| 7.1. | Perform the necessary corrective measures. |
| 7.2. | Inspect the components for leaks again in order to verify that
the leak is corrected. |
- Recover the refrigerant.
- Disconnect both hoses from the J 39893
.
- Add 90 ml (3 fl oz) of new PAG lubricant
to the compressor assembly.
- Slowly rotate the complete compressor assembly (excluding the
crankshaft and the drive plate hub) several turns in order to distribute oil
to all of the cylinder and the piston areas.
- Install a M9 x 1.25 threaded nut on the compressor
crankshaft if the drive plate and clutch assembly are not installed.
- Use a box-end wrench or socket and handle in order to rotate the
compressor crankshaft or clutch drive plate on the crankshaft several turns.
Performing the above action will ensure piston assembly to cylinder
wall lubrication.
- Using the J 39500-B
, connect the J 39893
to the test plate high-side connector.
- Using the J 39500-B
, connect the charging station low-pressure line to the low-pressure
port of the J 39893
.
Oil will drain out of the compressor suction port (1) if the
compressor is positioned with the suction port downward.
- Attach the compressor to the J 34992
.
- Mount the compressor in a vise in order to place the compressor
in a horizontal position.
- Use a wrench in order to rotate the compressor crankshaft or the
drive plate hub ten complete revolutions at the speed of approximately one-revolution
per second.
Turning the compressor at less than one-revolution per second can result
in a lower pump-up pressure. Low pump-up pressure may disqualify a good pumping
compressor.
- Observe the reading on the high-pressure gauge at the completion
of the tenth revolution of the compressor.
The pressure reading for a good pumping compressor should measure 690 kPa
(100 psi) or above. A pressure reading less than 620 kPa (90 psi)
indicates one or more of the suction and/or discharge valves have an internal
leak or an inoperative valve.
Perform the following procedure if one of the valves are leaking or
inoperative:
| 19.1. | Recover the refrigerant. |
| 19.2. | Disassemble the compressor. |
| 19.3. | Inspect the compressor for the cause of the leak. |
| 19.4. | Repair the compressor as necessary. |
| 19.5. | Reassemble the compressor. |
| 19.6. | Repeat the pump-up test. |
| 19.7. | Test for external leaks |
- Recover the refrigerant from the high-side.
- Remove the J 39893
.
- Tilt the compressor with the compressor suction port (1)
and the discharge port (2) positioned downward.
- Drain the PAG lubricant from the compressor.
Allow the compressor to drain for 10 minutes.
- Refill the compressor with the proper amount of PAG lubricant.
Pour the PAG lubricant into the suction port (1).
- If further assembly or processing is necessary, install a shipping
plate or the J 39893
.
The shipping plate or the J 39893
prevents the following materials from entering the compressor
until the compressor is installed:
