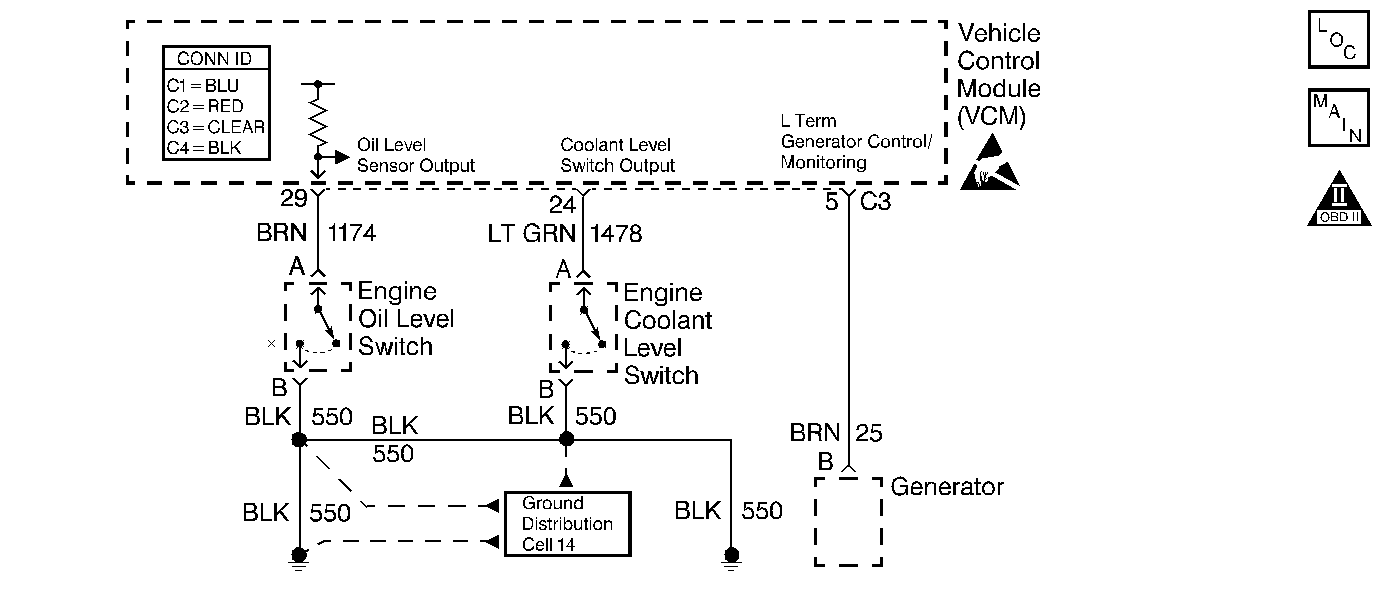
Circuit Description
The oil level switch is a normally open switch. When the oil level is within an acceptable range the oil level switch closes. The switch opens when the engine oil level drops below a predetermined amount. The vehicle control module (VCM) turns ON the oil level indicator when the engine oil level drops below a predetermined value.
Diagnostic Aids
The LOW OIL LEVEL message will only appear in the message center within a few seconds after the vehicle has been started. The ignition key must be removed from the ignition for 10 seconds, and then start the vehicle to check if the message has been cleared.
An intermittent may be caused by any of the following conditions:
| • | A poor connection |
| • | Rubbed through wire insulation |
| • | A broken wire inside the insulation |
Thoroughly inspect any circuitry that is suspected of causing the intermittent complaint. Refer to Testing for Intermittent Conditions and Poor Connections in Wiring Systems.
If a repair is necessary, refer to Wiring Repairs or Connector Repairs in Wiring Systems.
Test Description
The numbers below refer to the step numbers on the diagnostic table.
-
This steps checks the oil level sensor signal circuit between the VCM and the sensor.
-
This steps checks the oil level sensor ground circuit between the VCM and the sensor.
-
This steps checks for an open in the oil level sensor signal circuit between the VCM and the oil level sensor.
-
This steps checks the oil level signal circuit for a short to ground.
Step | Action | Value(s) | Yes | No |
|---|---|---|---|---|
1 | Did you perform the Powertrain On-Board Diagnostic (OBD) System Check? | -- | ||
Physically check engine oil level. Did you find a problem? | -- | |||
Does the message center display the LOW OIL LEVEL message? | -- | |||
Is the voltage above the specified value? | 11 V | |||
Probe the switch ground with a test lamp connected to B+. Did the test lamp turn ON? | -- | |||
6 |
Did the test lamp turn ON? | -- | ||
7 |
Did the test lamp turn ON? | -- | ||
8 | Check for an improper harness connector connection at the VCM and oil level sensor. Refer to Diagnostic Aids. Did you find a problem? | -- | ||
9 | Check for an improperly operating message center display. Refer to Diagnostic System Check - Instrument Cluster in Instrument Panel, Gauges, and Console. Did you find a problem? | -- | ||
10 | Fill the engine to the proper oil level. Refer to Engine Oil and Oil Filter Replacement in Engine Mechanical. Is the action complete? | -- | -- | |
11 |
Is the action complete? | -- | -- | |
12 |
Is the action complete? | -- | -- | |
13 | Replace the engine oil level switch. Refer to Engine Oil Level Indicator Switch Replacement . Is the action complete? | -- | -- | |
14 |
Important: Program the replacement VCM. Replace the VCM. Refer to VCM Replacement/Programming .Is the action complete? | -- | -- | |
15 | Operate the vehicle under the conditions that the original problem was encountered. Is the problem still present? | -- | System OK |
