Front Seat Adjuster Replacement Manual
Removal Procedure
- Remove the front seat from the vehicle. Refer to Front Seat Replacement - Bucket .
- Remove the seat trim panel. Refer to Front Seat Trim Panel Replacement .
- Remove the seat cushion frame. Refer to Front Seat Cushion Frame Replacement .
- Remove the seat back frame. Refer to Front Seat Back Frame Replacement .
- Remove the seat back hinge/recliner mechanism. Refer to Front Seat Back Hinge and Recliner Mechanism Replacement .
- Remove the seat adjuster track cover. Refer to Front Seat Adjuster Track Finish Cover Replacement .
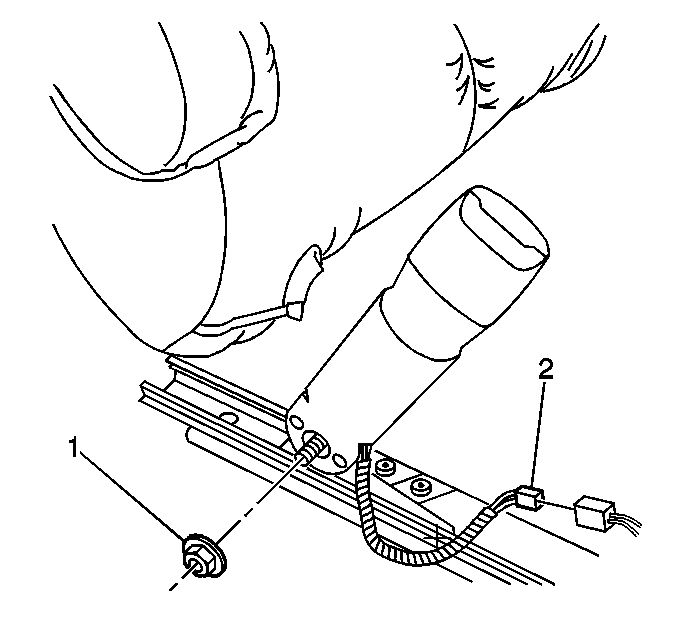
- Remove the inboard seat belt buckle and nut (1).
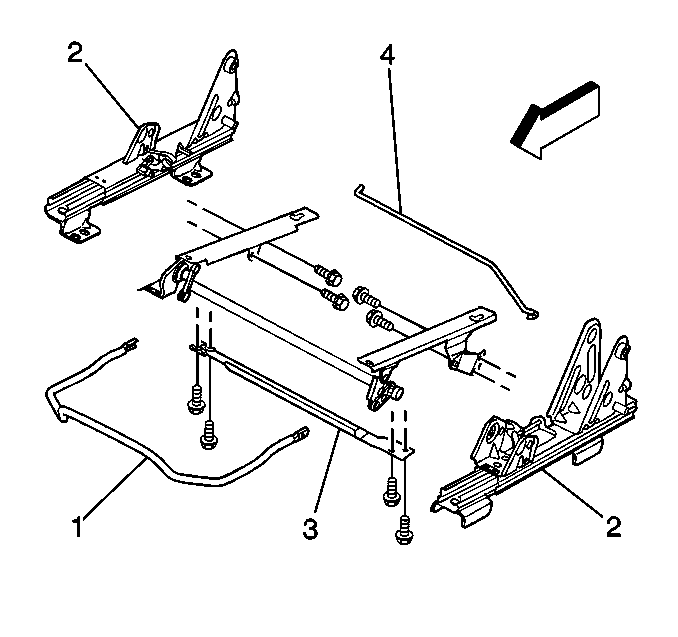
- Remove the bar (1) from the adjuster tracks (2). Straighten the tabs in order to remove the towel bar.
- Remove the cross brace (3).
- Remove the EZ entry rod (4), if equipped with the EZ entry feature.
- Remove the cushion tilt mechanism, if equipped.

Disconnect the electrical connection (2).

Installation Procedure
- Install the cushion tilt mechanism, if equipped.
- Install the EZ entry rod (4), if equipped with the EZ entry feature.
- Install the cross brace (3).
- Install the bar (1) onto the racks (2). Bend the tabs in order to secure the towel bar.
- Install the inboard seat belt buckle and nut (1).
- Connect the electrical connection (2).
- Install the seat adjuster track cover. Refer to Front Seat Adjuster Track Finish Cover Replacement .
- Install the seat back hinge/recliner mechanism. Refer to Front Seat Back Hinge and Recliner Mechanism Replacement .
- Install the seat back frame. Refer to Front Seat Back Frame Replacement .
- Install the seat cushion frame. Refer to Front Seat Cushion Frame Replacement .
- Install the seat trim panel. Refer to Front Seat Trim Panel Replacement .
- Install the front seat in the vehicle. Refer to Front Seat Replacement - Bucket .


Notice: Use the correct fastener in the correct location. Replacement fasteners must be the correct part number for that application. Fasteners requiring replacement or fasteners requiring the use of thread locking compound or sealant are identified in the service procedure. Do not use paints, lubricants, or corrosion inhibitors on fasteners or fastener joint surfaces unless specified. These coatings affect fastener torque and joint clamping force and may damage the fastener. Use the correct tightening sequence and specifications when installing fasteners in order to avoid damage to parts and systems.
Tighten
Tighten the seat belt buckle nut to 53 N·m (39 lb ft).
Front Seat Adjuster Replacement Power
Removal Procedure
- Remove the front seat from the vehicle. Refer to Front Seat Replacement - Bucket .
- Remove the seat trim panel. Refer to Front Seat Trim Panel Replacement .
- Remove the seat cushion frame from the seat adjuster. Refer to Front Seat Cushion Frame Replacement .
- Remove the inboard seat belt buckle and nut (1).
- Remove the seat back frame from the seat adjuster. Refer to Front Seat Back Frame Replacement .
- Remove the seat back hinge/recliner mechanism. Refer to Front Seat Back Hinge and Recliner Mechanism Replacement .
- Remove the seat adjuster track cover. Refer to Front Seat Adjuster Track Finish Cover Replacement .
- Remove the memory module, if equipped. Refer to Memory Seat Control Module Replacement .
- Remove the seat adjuster from the vehicle.
- Disconnect and replace the motors, if needed.

Disconnect the electrical connection (2).
Installation Procedure
- Install the memory module, if equipped. Refer to Memory Seat Control Module Replacement .
- Install the inboard seat belt buckle and nut (1).
- Connect the electrical connection (2).
- Install the seat adjuster track cover. Refer to Front Seat Adjuster Track Finish Cover Replacement .
- Install the seat back hinge/recliner mechanism. Refer to Front Seat Back Hinge and Recliner Mechanism Replacement .
- Install the seat back frame to the seat adjuster. Refer to Front Seat Back Frame Replacement .
- Install the seat cushion frame to the seat adjuster. Refer to Front Seat Cushion Frame Replacement .
- Install the seat trim panel. Refer to Front Seat Trim Panel Replacement .
- Install the seat in the vehicle. Refer to Front Seat Replacement - Bucket .
- If the vehicle is equipped with memory seats, calibrate the seat. Refer to Memory Seat Calibration .

Notice: Use the correct fastener in the correct location. Replacement fasteners must be the correct part number for that application. Fasteners requiring replacement or fasteners requiring the use of thread locking compound or sealant are identified in the service procedure. Do not use paints, lubricants, or corrosion inhibitors on fasteners or fastener joint surfaces unless specified. These coatings affect fastener torque and joint clamping force and may damage the fastener. Use the correct tightening sequence and specifications when installing fasteners in order to avoid damage to parts and systems.
Tighten
Tighten the seat belt buckle nut to 53 N·m (39 lb ft).
