FMVSS Noncompliance - Child Restraint Anchorage System

| Subject: | 04038 - Child Restraint Anchorage System |
| Models: | 2003 Chevrolet Express |
| 2003-2004 Chevrolet Silverado |
| 2003 GMC Savana |
| 2003-2005 GMC Sierra |
| Equipped with Compressed Natural Gas (CNG) Fuel System (RPO KL8/KL6) |
Condition
General Motors has decided that certain 2003 model year Chevrolet Express and GMC Savana vehicles, and 2003 and 2004 model year Chevrolet Silverado and GMC Sierra vehicles converted to compressed natural gas, fail to conform to Federal Motor Vehicle Safety Standard 225, Child Restraint Anchorage System. The Standard requires child seat lower anchorages in two seating positions for vehicles with three rear seating positions, and requires front passenger seat child seat lower anchorages in vehicles that are equipped with an air bag off switch. Some of these vehicles were built with three rear seating positions but with only one seat equipped with child restraint lower anchorages, or have an air bag off switch and no child restraint lower anchorages.
Correction
If the vehicle has three rear seating positions, dealers are to install child seat lower anchorages to the front passenger seat. This will allow two positions for a child restraint. If the vehicle has only front seats, the air bag off switch will be disabled, a new air bag warning label will be installed on the sun visor, and the Owner's Manual will be updated, if applicable.
Vehicles Involved
Involved are certain 2003 model year Chevrolet Express and GMC Savana vehicles, and 2003 and 2004 model year Chevrolet Silverado and GMC Sierra vehicles converted to compressed natural gas and built within these VIN breakpoints:
Year | Division | Model | From | Through |
|---|---|---|---|---|
2003 | Chevrolet | Express | 31100221 | 31230891 |
2003 | Chevrolet | Silverado | 3E100137 | 3E368354 |
3Z100040 | 3Z331609 | |||
2004 | Chevrolet | Silverado | 4E125396 | 4E310742 |
2003 | GMC | Savana | 31158001 | 31230776 |
2003 | GMC | Sierra | 3E196279 | 3E349716 |
3Z212861 | 3Z330610 | |||
2004 | GMC | Sierra | 4E128258 | 4E185087 |
Important: Dealers should confirm vehicle eligibility through GMVIS (GM Vehicle Inquiry System) before beginning recall repairs. [Not all vehicles within the above breakpoints may be involved.]
For dealers with involved vehicles, a Campaign Initiation Detail Report containing the complete Vehicle Identification Number, customer name and address data has been prepared and will be loaded to the GM DealerWorld, Recall Information website. Dealers that have no involved vehicles currently assigned will not have a report available in GM DealerWorld.
The Campaign Initiation Detail Report may contain customer names and addresses obtained from Motor Vehicle Registration Records. The use of such motor vehicle registration data for any other purpose is a violation of law in several states/provinces/countries. Accordingly, you are urged to limit the use of this report to the follow-up necessary to complete this program.
Parts Information
Parts required to complete this recall are to be obtained from General Motors Service Parts Operations (GMSPO). Please refer to your "involved vehicles listing" before ordering parts. Normal orders should be placed on a DRO = Daily Replenishment Order. In an emergency situation, parts should be ordered on a CSO = Customer Special Order.
Part Number | Description | Qty/ Vehicle |
|---|---|---|
88978375 | Frame, P/Seat Bk Cush (bucket) | 1 (if req'd) |
88978376 | Frame, P/Seat Bk Cush (60/40) | 1 (if req'd) |
15734687 | Cover, Acsry Sw Opg (truck) | 1 (if req'd) |
25730854 | Cover, I/P Sw Tr Plt Hole (van) | 1 (if req'd) |
15006352 | Label, Infl Rst Sys Info (reg cab and vans) | 1 (if req'd) |
12103620 | Insulator, Acsry Display Cvr | 1 (if req'd) |
12345632 | Instant Gel Adhesive | 1 (if req'd) |
Service Procedure
The following service procedure provides instructions for disabling the AIR BAG on/off switch located in the instrument panel on "REGULAR CAB" full size pickups and vans, installing new air bag warning labels on the sun visors, and updating the Owner's Manual on the vans. Additionally, there are instructions for installing a new right front passenger seatback frame that has child seat anchor provisions on 'EXTENDED CAB" full size pickups.
Regular Cab Pickup Trucks - Disable Air Bag Switch
- Remove the AIR BAG fuse.
- If equipped with an automatic transmission, place the shift lever in a low gear.
- Carefully release the clips retaining the instrument panel cluster bezel to the instrument panel.
- Place the shift lever in PARK and turn the ignition switch to the OFF position.
- Remove the AIR BAG on/off switch and bezel.
- Disconnect the electrical connector from the AIR BAG switch and remove the switch from the bezel.
- With the AIR BAG switch in the ON position, apply the adhesive into the key cylinder opening in the switch.
- Reconnect the electrical connector to the AIR BAG switch and apply foam tape around the switch to prevent rattles.
- Position the switch and wiring into the recessed opening in the instrument panel and secure the tape as necessary.
- Install the "blank" panel into the switch bezel in place of the AIR BAG switch.
- Install the switch bezel assembly into the instrument panel.
- Place the shift lever in low gear and install the instrument panel cluster bezel to the instrument panel.
- Place the shift lever in PARK.
- Install the AIR BAG fuse.
- Turn the ignition switch to the ON position and verify that the AIR BAG light flashes seven times and goes out.
- Install a new label over the existing label on both the driver and passenger sun visors.
Important: This procedure is NOT to be used on "EXTENDED CAB" models.
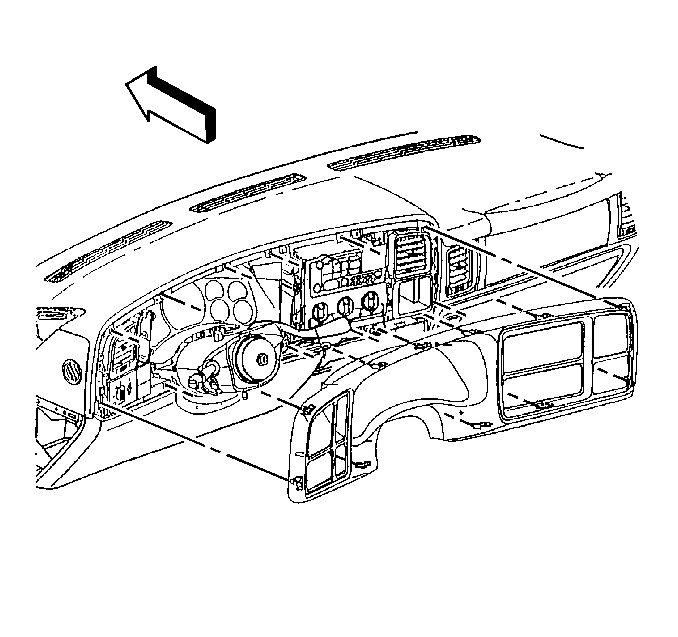
Important: The purpose of the adhesive in the next step is to disable the switch so that it can't be operated with a key. It is NOT necessary to wait for the adhesive to cure before reinstalling.
Vans - Disable Air Bag Switch
- Remove the AIR BAG fuse from the fuse block.
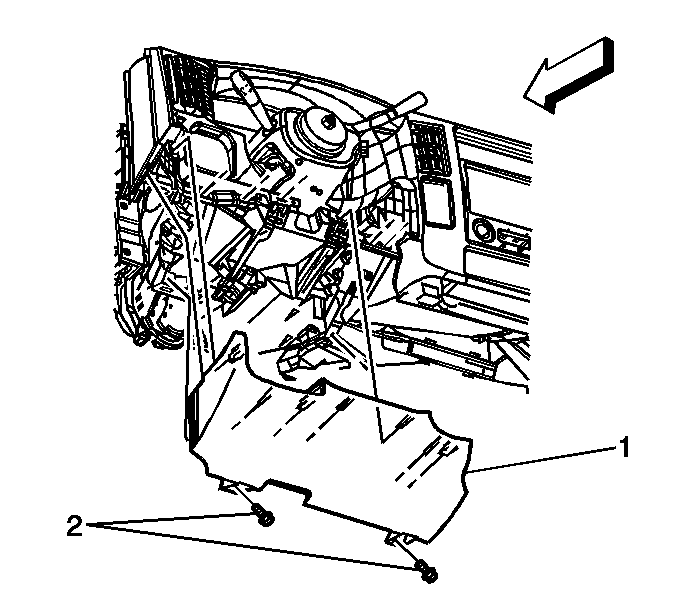
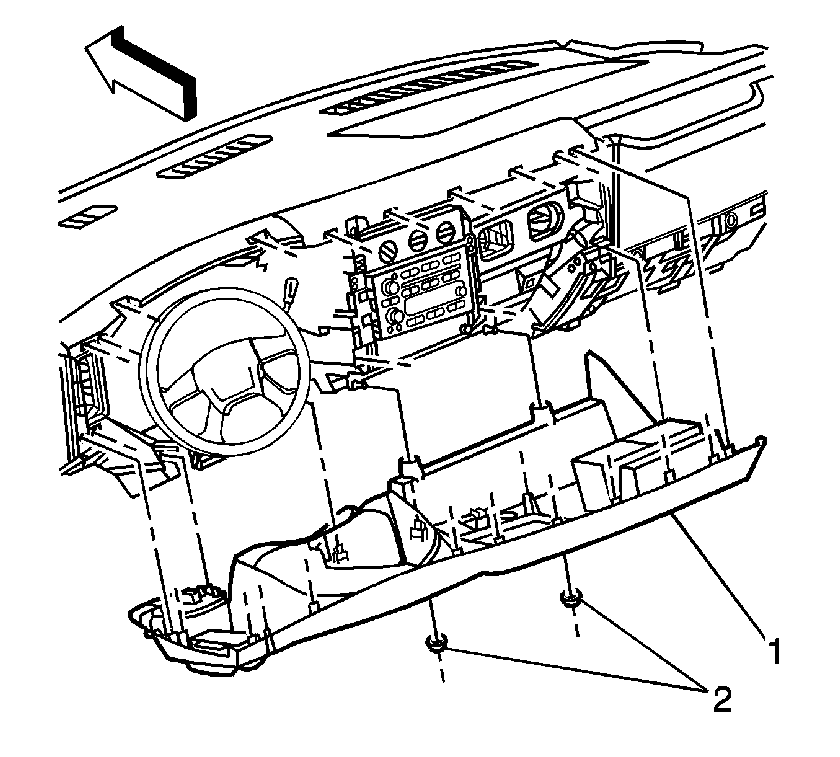
- Remove the two screws (2), release the six retaining clips, and remove the driver's side knee bolster trim panel (1).
- Remove the two instrument panel bezel nuts (2).
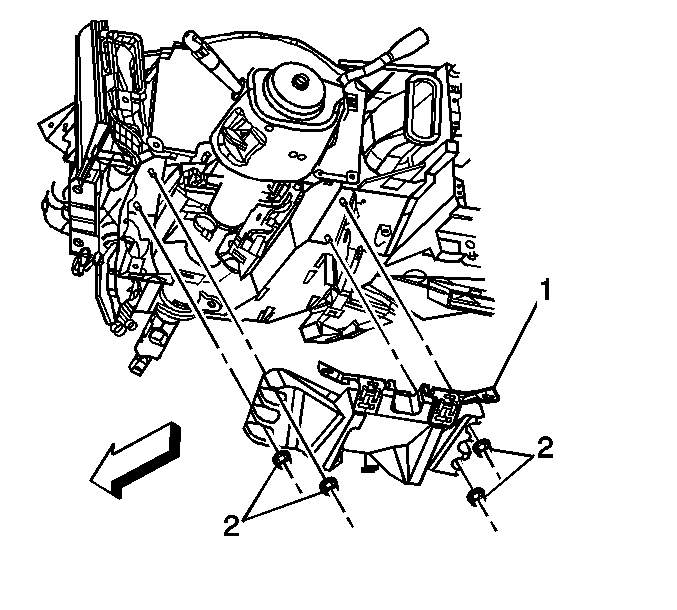
- Remove the four nuts (2) on the driver's knee bolster (1).
- If equipped, remove the OnStar® module screw and reposition the module.
- Remove the driver's knee bolster.
- Remove the two screws (2) for the passenger side knee bolster trim panel and remove the panel (1).
- Remove the two bolts supporting the steering column and carefully lower the column.
- Place the gearshift lever in a low gear.
- Carefully pull the instrument panel bezel in the sequence listed to release the retaining clips.
- Disconnect the necessary electrical connectors from the rear of the bezel and remove the bezel.
- Remove the AIR BAG switch from the bezel.
- Install the "blank" panel into the bezel in place of the AIR BAG switch.
- With the AIR BAG switch in the ON position, apply the adhesive into the key cylinder opening in the switch.
- Reconnect the electrical connector to the AIR BAG switch and apply foam tape around the switch to prevent rattles.
- Position the switch and wiring into the recessed opening in the instrument panel and secure with tape as necessary.
- Connect any necessary electrical connectors to the bezel.
- Install the instrument panel cluster bezel to the instrument panel.
- Place the gearshift lever in PARK.
- Carefully raise the steering column and install the two bolts.
- Position the passenger side knee bolster trim panel and install the two screws.
- Position the driver's knee bolster and install the four nuts.
- If equipped, reposition the OnStar® module and install the bracket screw.
- Install the two instrument panel bezel nuts (2).
- Install the driver's side knee bolster trim panel, engage the six retaining clips, and install the two screws.
- Install the AIR BAG fuse.
- Turn the ignition switch to the ON position and verify that the AIR BAG light flashes seven times and goes out.
- Install a new label over the existing label on both the driver and passenger sun visors.
- Copy the Owner's Manual Update on the next page and place it in the Owner's Manual.
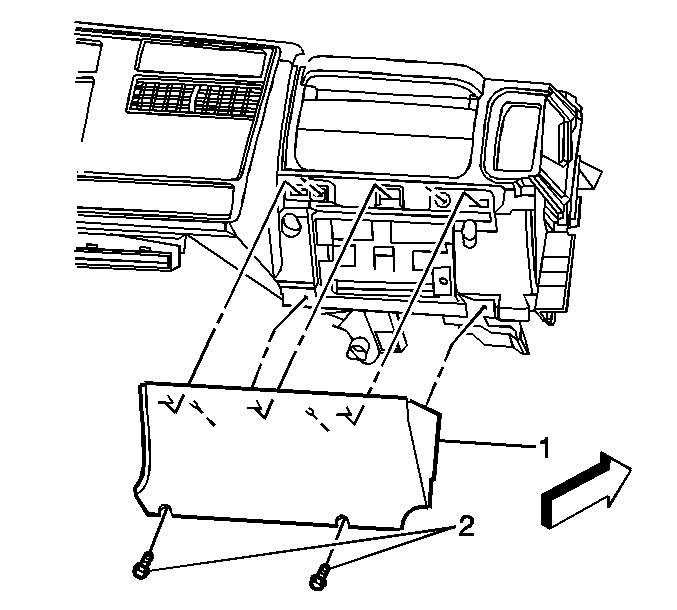
| 10.1. | Pull on the bottom. |
| 10.2. | Pull at the left corner. |
| 10.3. | Pull at the right corner. |
| 10.4. | Pull at the top. |
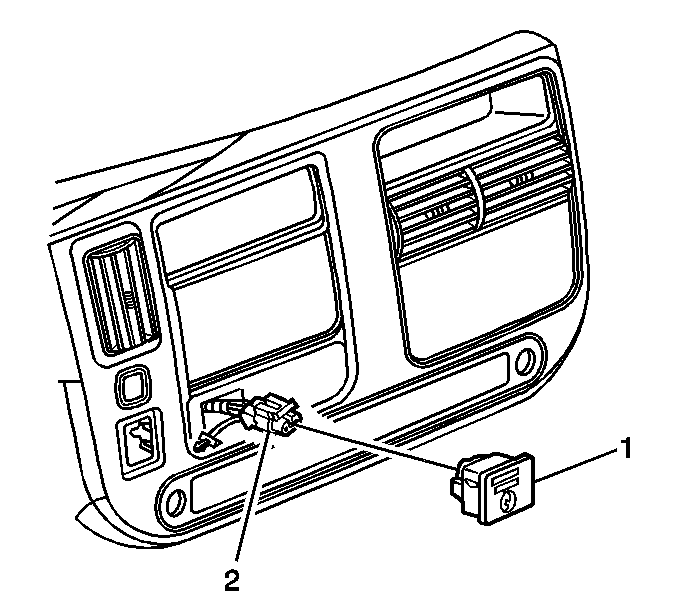
Important: The purpose of the adhesive in the next step is to disable the switch so that it can't be operated with a key. It is NOT necessary to wait for the adhesive to cure before reinstalling.
Tighten
Tighten the bolts to 30 N·m (22 lb ft).
Tighten
Tighten the screws to 3.5 N·m (31 lb in).
Tighten
Tighten the nuts to 10 N·m (88 lb in).
Tighten
Tighten the screw to 3 N·m (27 lb in).
Tighten
Tighten the nuts to 6 N·m (53 lb in).
Tighten
Tighten the two screws to 3.5 N·m (31 lb in).
Extended Cab Pickup Truck -- Seatback Frame Replacement
- Remove the head restraint from the seat assembly.
- Move the seat to the full forward position.
- Release the J-strip fastener on the bottom of the seatback cover.
- Remove the two push-pin retainers at the lower rear of the seatback.
- From the bottom of the seatback, place your hand up the front side of the seatback cover and release the hook and loop fasteners that attach the seatback cover to the foam pad.
- On bucket seats, remove the armrest by accessing and releasing the retaining spring clip from the bottom of the seatback cushion cover.
- Starting at the bottom of the seatback, pull the seatback cover upwards. The bottom of the cover should be turning inside out as the cover rolls upward. Continue pulling the cover upward. Continue pulling the cover upwards until it reaches the top of the seatback.
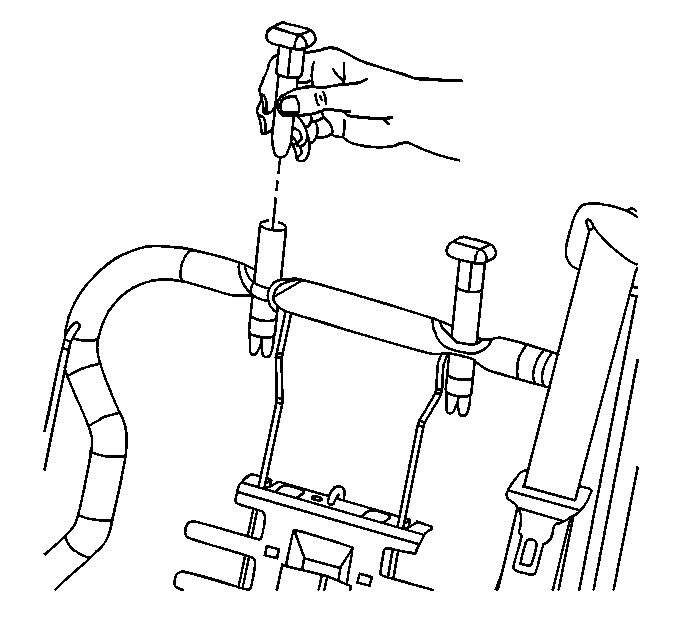
- Reach up inside the seat and squeeze the base of each head restraint retainer and push it up and out of the seatback frame.
- Unsnap the seat belt bezel from the retractor tower.
- Finish removing the seat cover.
- Release the adhesive between the foam pad and the cardboard on both the left and right sides of the seatback. Remove the cardboard.
- Remove the seat belt retractor from the seatback tower.
- Remove the bolt attaching the retractor to the lower seatback.
- Remove the bolt attaching the retractor to the upper seatback and remove the retractor.
- Release and remove the foam pad from the seat frame.
- On seats WITHOUT lumbar features, remove the seatback spring support from the seatback frame and transfer it to the NEW seatback frame.
- On seats WITH lumbar features, disconnect the electrical connectors.
- Remove the two outboard bolts attaching the seatback frame to the lower cushion frame.
- Remove the one inboard bolt attaching the seatback frame to the lower cushion frame.
- Slide the seatback frame upwards to separate it from the lower frame.
- One seats WITH lumbar features, drill out the necessary rivets and transfer the lumbar feature to the new seatback frame.
- Position the new seatback frame to the lower seat cushion frame and slide into position.
- Install the one inboard bolt attaching the seatback frame to the lower frame.
- Install the two outboard bolts attaching the seatback frame to the lower frame.
- On seats WITH lumbar features, connect the electrical connectors.
- Position the foam pad on the seatback frame.
- Position the sear belt retractor to the seat frame and install the upper bolt.
- Install the lower bolt attaching the seat belt retractor to the seat frame.
- Attach the seat belt retractor to the seatback tower.
- Install the cardboard and attach it to the foam pad. If necessary, apply additional spray adhesive.
- Install the seat cover over the top portion of the seatback frame.
- Install the head restraint retainers through the openings in the seat cover. The retainers will snap into place when fully seated.
- Install the seatback cover and attach the J-strip and two push-in retainers at the lower rear of the cover.
- Position the seat belt bezel to the retractor tower and snap into place.
- On bucket seats, install the armrest to the seat and press inwards until its retained by the spring clip.
- Install the head restraint.
- Return the seat assembly to the original position.
Important: This procedure is NOT to be used on "REGULAR CAB" pickups or vans.
Important: For additional information, refer to the Seats subsection in the Body section of the appropriate Service Manual.
Important: It is not necessary to remove the seat from the vehicle when performing this procedure.
Important: The retaining spring clip in the next step is similar to those used to attach manual window crank handles. Do not remove the clip completely to remove the armrest. To avoid the possibility of losing the clip, reinstall the clip immediately after removing the armrest.
Tighten
Tighten the bolt to 53 N·m (39 lb ft).
Tighten
Tighten the bolt to 53 N·m (39 lb ft).
Important: When reinstalling the seatback cover in the next step, verify that the pleats in the seat cover attach correctly to the foam cushion with the hook and loop fasteners.
Courtesy Transportation
The General Motors Courtesy Transportation program is intended to minimize customer inconvenience when a vehicle requires a repair that is covered by the New Vehicle Limited Warranty. The availability of courtesy transportation to customers whose vehicles are within the warranty coverage period and involved in a product recall is very important in maintaining customer satisfaction. Dealers are to ensure that these customers understand that shuttle service or some other form of courtesy transportation is available and will be provided at no charge. Dealers should refer to the General Motors Service Policies and Procedures Manual for Courtesy Transportation guidelines.
Claim Information
Submit a Product Recall Claim with the information indicated below:
Repair Performed | Part Count | Part No. | Parts Allow | CC-FC | Labor Op | Labor Hours | Net Item |
|---|---|---|---|---|---|---|---|
Disable Air Bag Switch | 3 | -- | * | MA-96 | V1172 |
| ** |
Regular Cab Pickups |
|
|
|
|
| 0.3 |
|
Van |
|
|
|
|
| 0.7 |
|
Replace Seatback Frame | 1 | -- | *** | MA-96 | V1173 | 0.7 | N/A |
Courtesy Transportation | N/A | N/A | N/A | MA-96 | **** | N/A | ***** |
* -- The "Parts Allowance" should be the sum total of the current GMSPO Dealer Net price plus applicable Mark-Up for the cover, insulator, bonder kit, and label needed to complete the repair. ** -- The amount identified in the "Net Item" column should represent the sum total of the Current GMSPO Net Price plus applicable Mark-Up for the bonding kit (1 kit services 12 vehicles) needed to perform the required repairs. *** -- The "Parts Allowance" should be the sum total of the current GMSPO Dealer net price plus applicable Mark-Up for the seatback frame needed to complete the repair. **** -- Submit courtesy transportation using normal labor operations for courtesy transportation as indicated in the GM Service Policies and Procedures Manual. ***** -- The amount identified in the "Net Item" column should represent the actual dollar amount for courtesy transportation. | |||||||
Note: Canadian dealers should refer to the Canadian distribution of the bulletin for detailed claim information.
Refer to the General Motors WINS Claim Processing Manual for details on Product Recall Claim Submission.
Customer Notification
General Motors will notify customers of this recall on their vehicle (see copy of customer letter included with this bulletin).
Dealer Recall Responsibility
The US National Traffic and Motor Vehicle Safety Act provides that each vehicle that is subject to a recall of this type must be adequately repaired within a reasonable time after the customer has tendered it for repair. A failure to repair within sixty days after tender of a vehicle is prima facie evidence of failure to repair within a reasonable time. If the condition is not adequately repaired within a reasonable time, the customer may be entitled to an identical or reasonably equivalent vehicle at no charge or to a refund of the purchase price less a reasonable allowance for depreciation. To avoid having these burdensome remedies, every effort must be made to promptly schedule an appointment with each customer and to repair their vehicle as soon as possible. In the recall notification letters, customers are told how to contact the US National Highway Traffic Safety Administration if the recall is not completed within a reasonable time.
This bulletin is notice to you that the new motor vehicles included in this recall may not comply with the standard identified above. Under Title 49, Section 30112 of the United States Code, it is illegal for a dealer to sell a new motor vehicle which the dealer knows does not comply with an applicable Federal Motor Vehicle Safety Standard. As a consequence, if you sell any of these motor vehicles without first performing the recall correction, your dealership may be subject to a civil penalty for each such sale.
All unsold new vehicles in dealers' possession and subject to this recall MUST be held and inspected/repaired per the service procedure of this recall bulletin BEFORE customers take possession of these vehicles.
Dealers are to service all vehicles subject to this recall at no charge to customers, regardless of mileage, age of vehicle, or ownership, from this time forward.
Customers who have recently purchased vehicles sold from your vehicle inventory, and for which there is no customer information indicated on the dealer listing, are to be contacted by the dealer. Arrangements are to be made to make the required correction according to the instructions contained in this bulletin. This could be done by mailing to such customers a copy of the customer letter accompanying this bulletin. Recall follow-up cards should not be used for this purpose, since the customer may not as yet have received the notification letter.
In summary, whenever a vehicle subject to this recall enters your vehicle inventory, or is in your dealership for service in the future, please take the steps necessary to be sure the recall correction has been made before selling or releasing the vehicle.
September 2004Dear <Division(s)> Customer:
This notice is sent to you in accordance with the requirements of the National Traffic and Motor Vehicle Safety Act.
Reason For This Recall
General Motors has decided that certain 2003 model year Chevrolet Express and GMC Savana vehicles, and 2003 and 2004 model year Chevrolet Silverado and GMC Sierra vehicles converted to compressed natural gas, fail to conform to Federal Motor Vehicle Safety Standard 225, Child Restraint Anchorage System. The Standard requires child seat lower anchorages in two seating positions for vehicles with three rear seating positions, and requires front passenger seat child seat lower anchorages in vehicles that are equipped with an air bag off switch. Some of these vehicles were built with three rear seating positions but with only one seat equipped with child restraint lower anchorages, or have an air bag off switch and no child restraint lower anchorages.
What Will Be Done
If your vehicle has three rear seating positions, your GM dealer will install child seat lower anchorages to the front passenger seat. This will allow two positions for a child restraint. If your vehicle has only front seats, the air bag off switch will be disabled, a new air bag warning label will be installed on the sun visor, and the Owner's Manual will be updated, if applicable. This service will be performed for you at no charge .
How Long Will The Repair Take?
This service correction will take approximately 20 to 50 minutes. However, due to service scheduling requirements, your dealer may need your vehicle for a longer period of time.
Contacting Your Dealer
To limit any possible inconvenience, we recommend that you contact your GM dealer as soon as possible to schedule an appointment for this repair. By scheduling an appointment, your dealer can ensure that the necessary parts will be available on your scheduled appointment date. Should your dealer be unable to schedule a service date within a reasonable time, you should contact the appropriate Customer Assistance Center at the number listed below. The Customer Assistance Center hours of operation are from 8:00 AM - 11:00 PM eastern standard time Monday through Friday
Division | Number | Text Telephones (TTY) |
|---|---|---|
Chevrolet | 1-800-630-2438 | 1-800-833-2438 |
GMC | 1-866-996-9463 | 1-800-462-8583 |
Puerto Rico - English | 1-800-496-9992 |
|
Puerto Rico - Español | 1-800-496-9993 |
|
Virgin Islands | 1-800-496-9994 |
|
If, after contacting the appropriate customer assistance center, you are still not satisfied that we have done our best to remedy this condition without charge and within a reasonable time, you may wish to write the Administrator, National Highway Traffic Safety Administration, 400 Seventh Street SW, Washington, DC 20590 or call 1-888-327-4236.
Customer Reply Form
The enclosed customer reply form identifies your vehicle. Presentation of this form d to your dealer will assist in making the necessary correction in the shortest possible time. If you no longer own this vehicle, please let us know by completing the form and mailing it back to us.
Courtesy Transportation
If your vehicle is within the New Vehicle Limited Warranty your dealer may provide you with shuttle service or some other form of courtesy transportation while your vehicle is at the dealership for this repair. Please refer to your Owner's Manual and your dealer for details on Courtesy Transportation.
Recall Information Online
More information about this recall (including answers to frequently asked questions) is available online at the Owner Center at My GMLink. This free online service offers vehicle and ownership related information and tools tailored to your specific vehicle. To join, visit www.mygmlink.com and enter your vehicle's 17-character vehicle identification number (VIN) shown on the enclosed form to get the most personalized information for your vehicle.
Federal regulation requires that any vehicle lessor receiving this recall notice must forward a copy of this notice to the lessee within ten days.
We are sorry to cause you this inconvenience; however, we have taken this action in the interest of your safety and continued satisfaction with our products.
General Motors Corporation
Enclosure
04038
