DEALER INSTALLED ANCHOR CHILD SEAT WITH TOP STRAP

VEHICLES AFFECTED: 1984 110 & 125 Inch Wheelbase 'G' Vans
NOTE: All hardware discussed in this bulletin should be supplied or available from the child seat manufacturer. Be sure the child seat position does not conflict with any additional requirements provided by its manufacturer, or with any recommendations in the Child Restraint section of the Owner's Manual.
The child seat may be used only in a forward facing seating location.
However, installation is not recommended in the front passenger seat of 'G' Vans. The second seat offset to allow passenger entry does not position a second seat lap belt within the recommended zone for attachment to the top strap hook. Moreover, floor anchorage is impractical since the top strap length is insufficient to directly connect the restraint to the floor with high back bucket seats.
LOCATIONS RECOMMENDED - For 'G' Vans
Second Seat When vehicle is equipped with a third seat - All seating positions.
Use the Child Seat as directed in the usage instructions furnished with the Child Seat, latching the Child Seat top strap hook to the third seat lap belt tongue located most directly behind the Child Seat.
Second Seat When vehicle does not have a third seat - ALL seating positions.
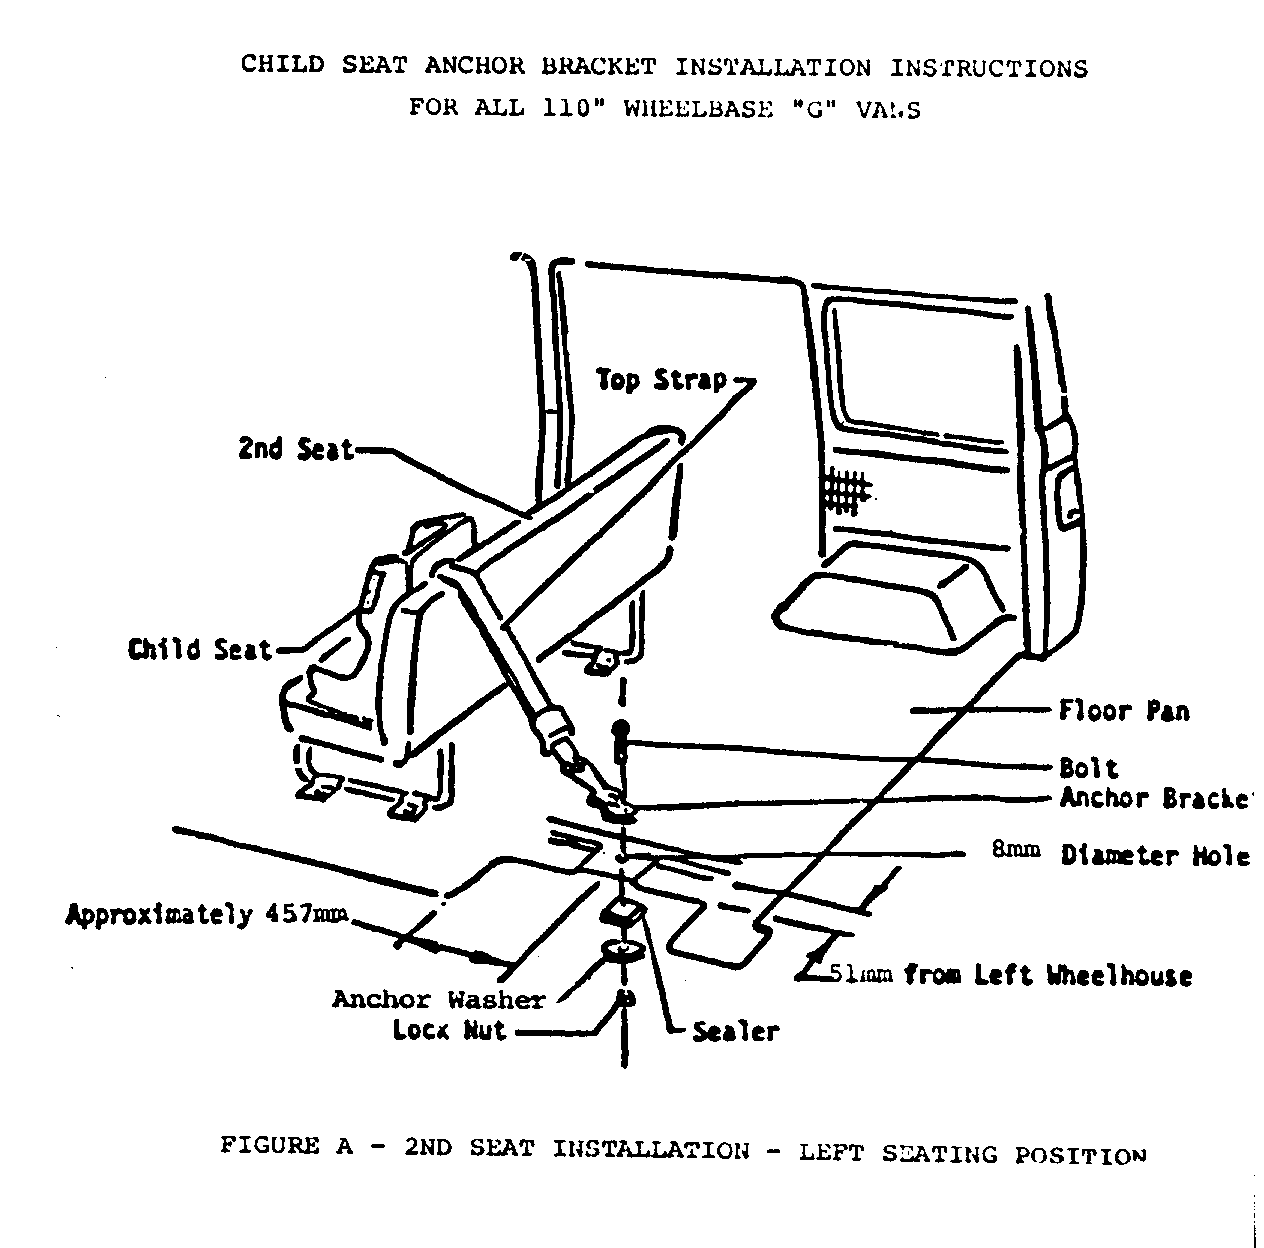
Left Seating Position - (Refer to Figure A on Page 4 - 110 inch wheelbase 'G' Van)
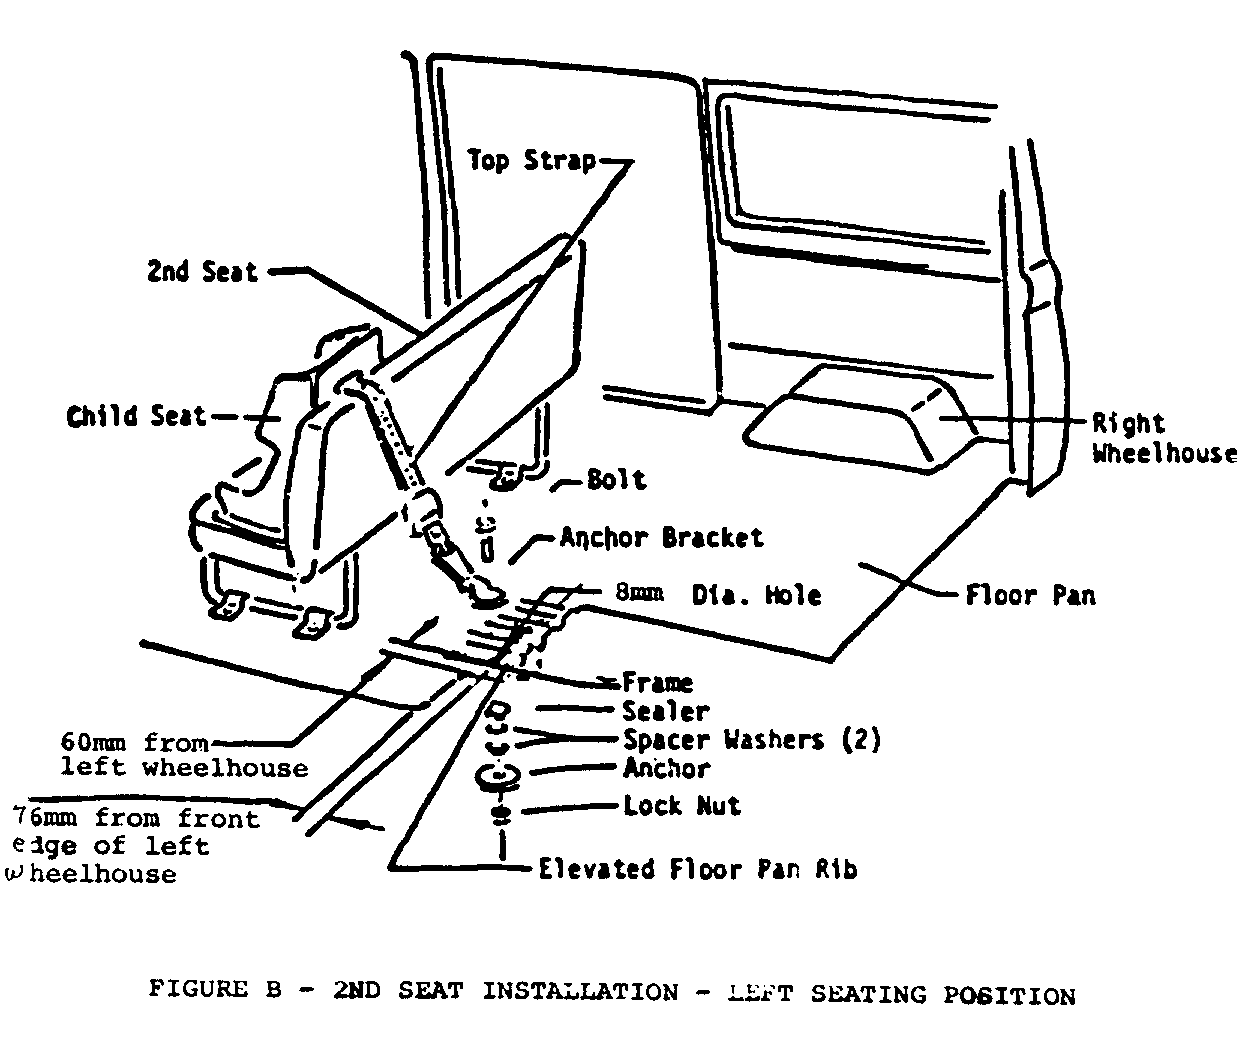
(Refer to Figure B on Page 5 - 125 inch wheelbase 'G' Van)
1. Drill a .313 mm (5/16 of an inch) diameter hole through the floor pan 76 mm (3 inches), for 125 W.B. (18 inches for 110 W.B.), rearward of the front edge of the left wheelhouse on the centre of the elevated floor pan rib located 51.18 mm (2 3/8 inches) for 125 W.B. (50.80 mm (2 inches) 110 inch W.B.) inboard of the left wheelhouse.
2. To ensure proper sealing of the hole, remove any dirt or foreign matter from around the hole on the underside of the floor pan where the sealer is to be applied.
3. Place sealer on the hole from the underside of the vehicle to prevent carbon monoxide from entering the vehicle. Suitable sealers include silicone, buytl, or acrylic type caulking. Then assemble the bolt anchor bracket, two (2) 25.78 mm (1 3/8 inches) spacer washers, anchor washer and lock nut to the floor pan. Tighten securely and make certain that the hole is completely sealed.
4. Use the Child Seat in the second seat - left seating position as directed in the usage instructions, latching the Child Seat top strap hook to the anchor bracket.
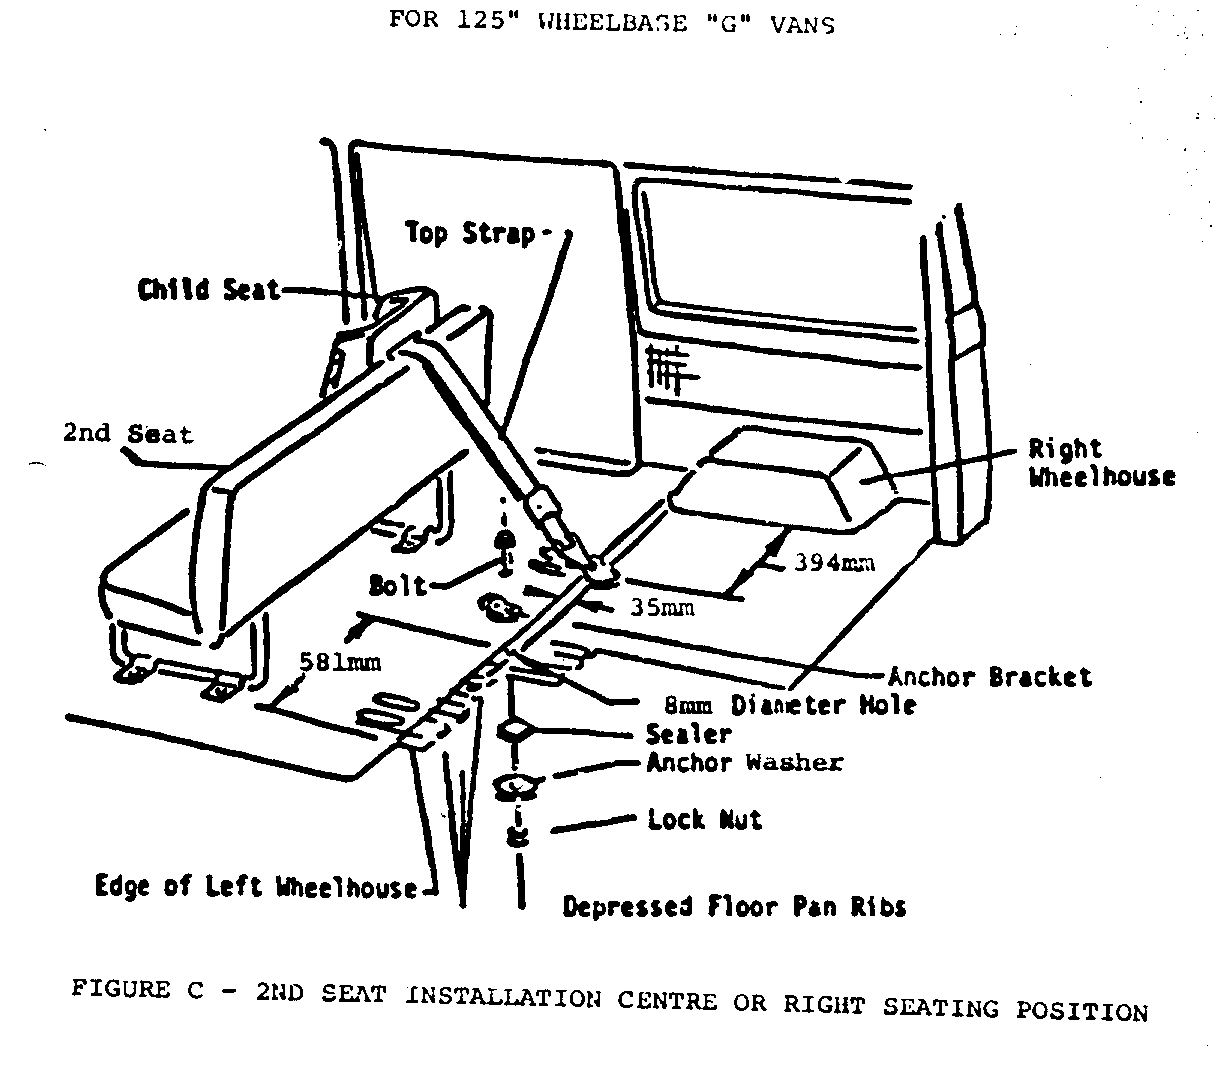
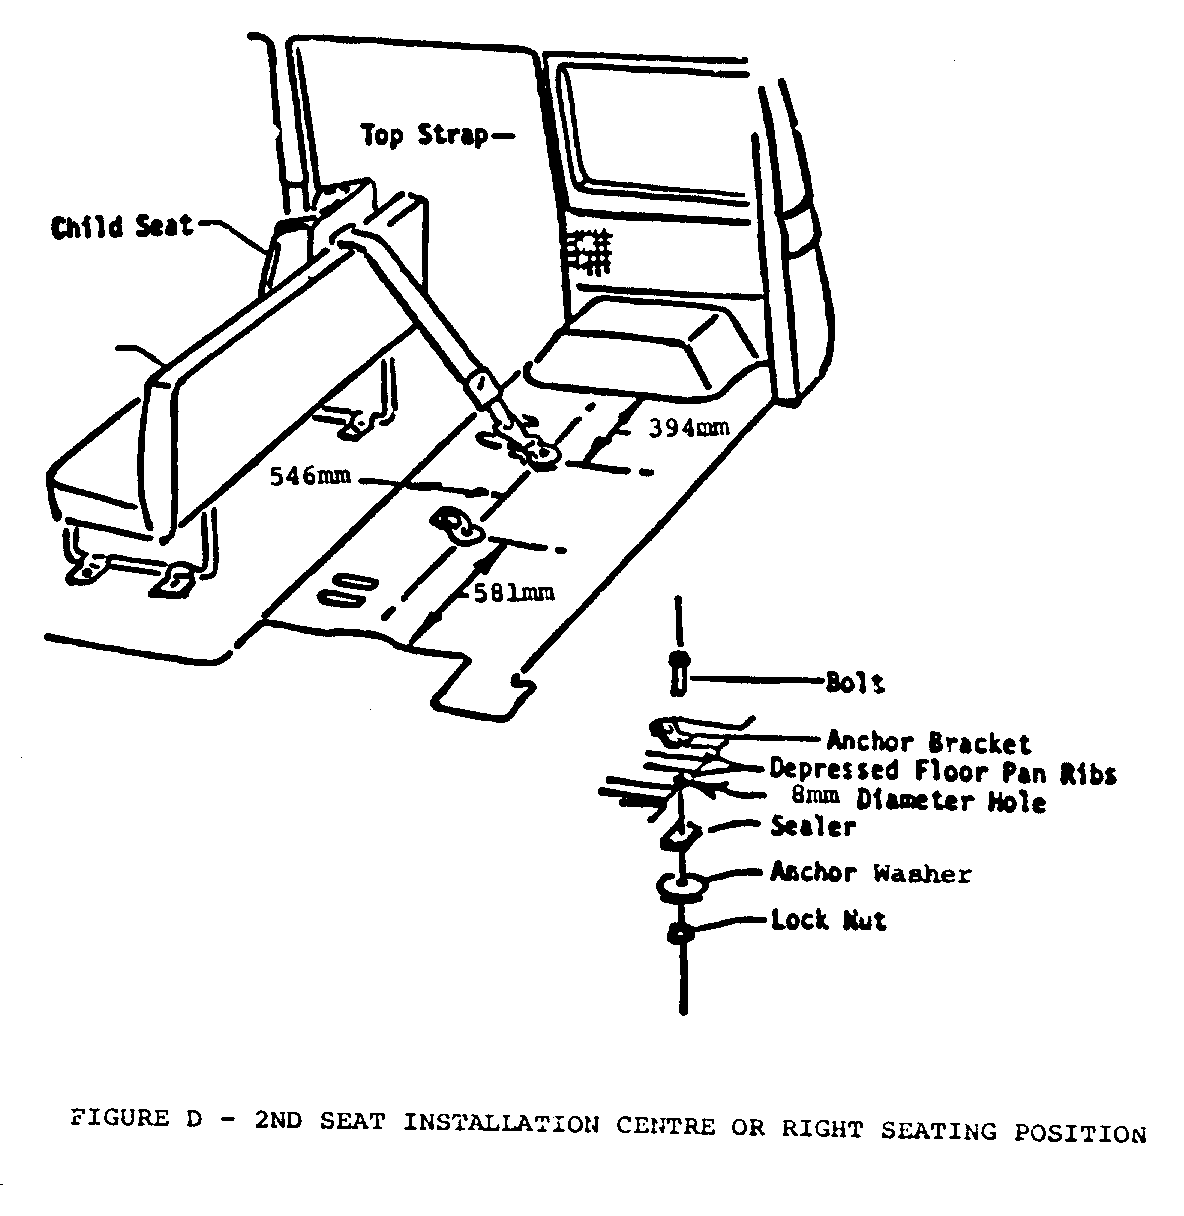
Centre or Light Seating Positions - (Refer to Figure D on Page 6 110 inch wheelbase 'G' Van) (Refer to Figure C on Page 6 125 inch wheelbase 'G' Van)
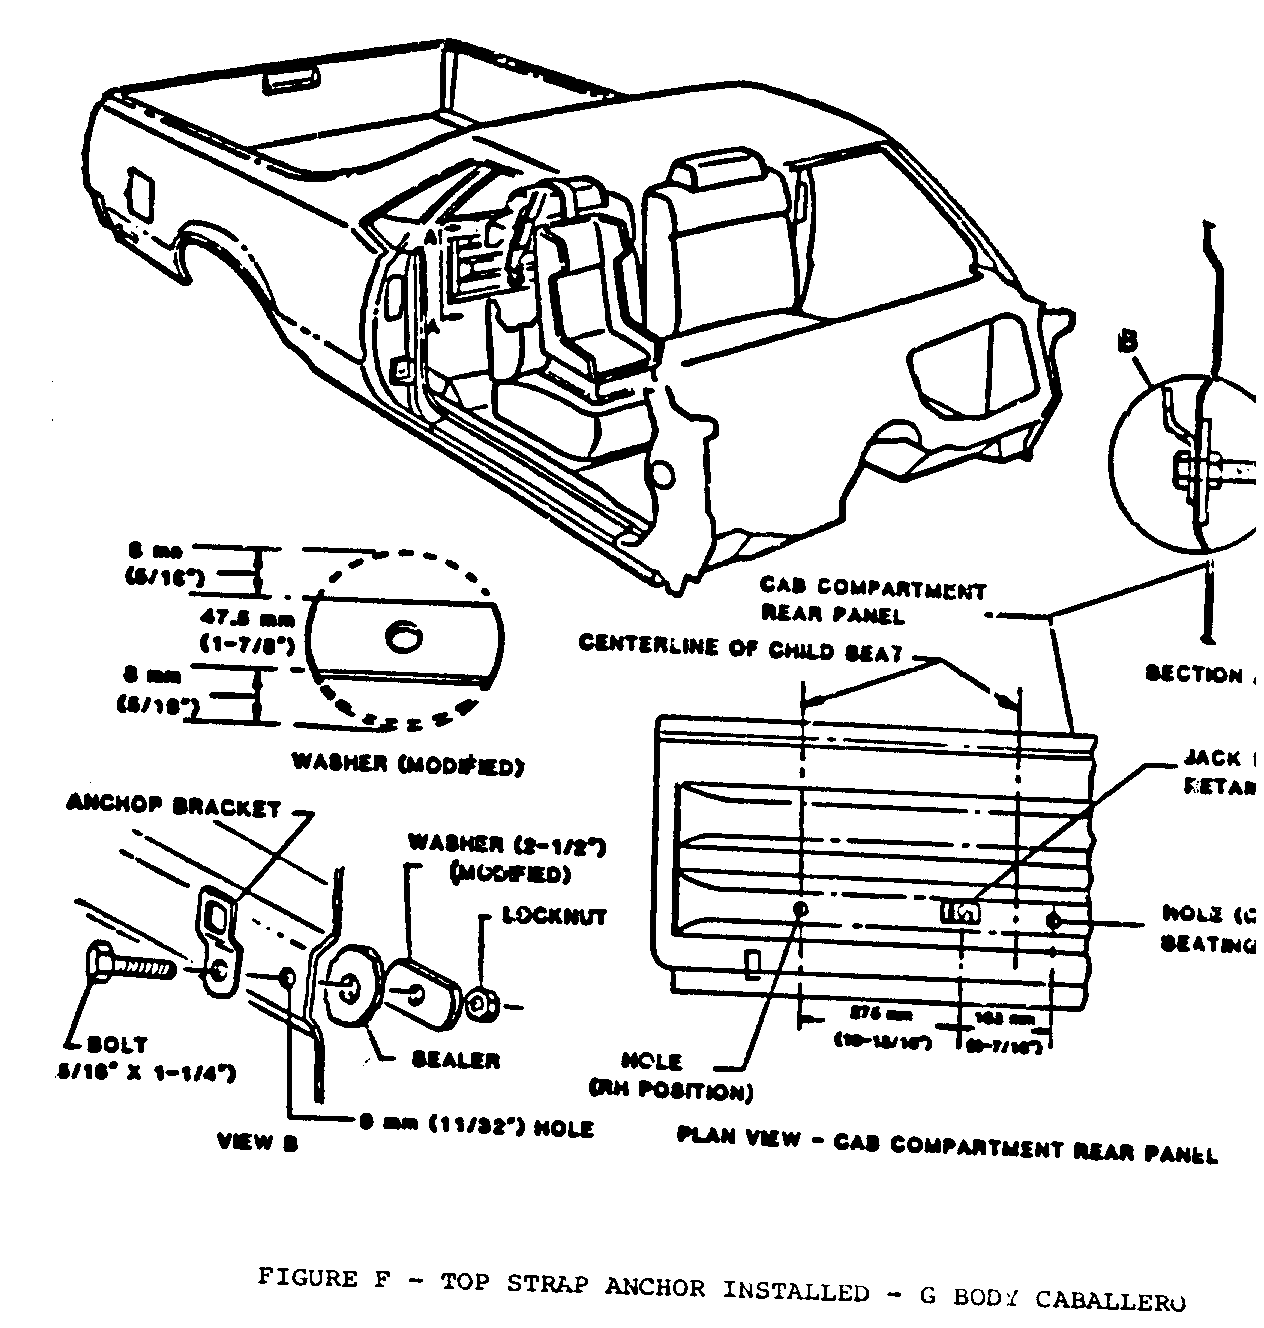
1. Centre Seating Position - Drill a .313 mm (5/16 of an inch) diameter hole through the floor pan 25.78 mm (1-3/8 inches) rearward of the front edge of the left wheelhouse and on the centre of the depressed floor pan rib located 559.68 mm (22-7/8 inches) inboard of the left wheelhouse.
or
Right Seating Position - Drill a .313 mm (5/16 of an inch) diameter hole through the floor pan 25.78 mm (1-3/8 inches) rearward of the front edge of the right wheelhouse and on the centre of the depressed floor pan rib located 393.1 mm (15-1/2 inches) inboard of the right wheelhouse.
2. To ensure proper sealing of the hole, remove any dirt or foreign matter from around the hole on the underside of the floor pan where the sealer is to be applied.
3. Place sealer on the hole from the underside of the vehicle and assemble the bolt, anchor bracket, anchor washer and lock nut to the floor pan as shown in Figure B. Tighten securely and make certain that the hole is completely sealed. Note: The two (2) 25.78 mm (1-3/8 inches) O.D. spacer washers are not needed for these installations.
4. Use the Child Seat in the seating position of the second seat for which the anchor bracket has been installed. Use the Child Seat as directed in the usage instructions, latching the Child Seat top strap hook to the anchor bracket.
Third Seat When vehicle is equipped with d foucth Sedt - ALL seating positions.
Use the Child Seat as directed in the usage instructions furnished with the Child Seat, latching the Child Seat top strap hook to the fourth seat lap belt tongue located most di-l-ectly behiiid the Child Seat.
Third Seat - When vehicle does not have a fourth seat - Only recommended for use in left seating position (Not recommended for centre or right positions).
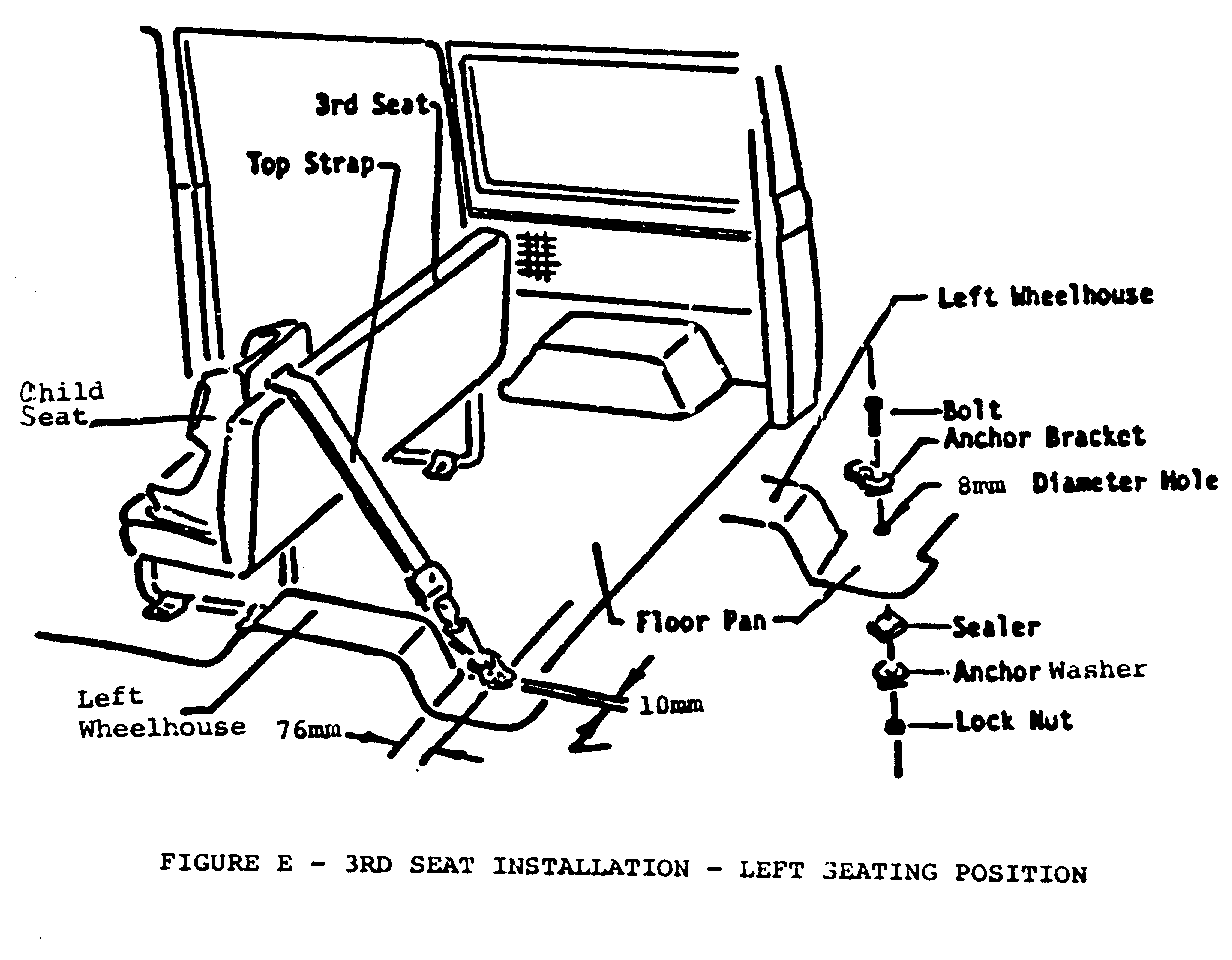
Install the anchor bracket in accord with the instructions on Page 7 (Refer to Figure E - 125 inch wheelbase 'G' Van).
Third Seat Installation Instructions - When vehicle does not have a fourth seat (Refer to Figure C on Page 5).
Only recommended in Left Seating Position.
Left Seating Position - (Refer to Figure E on Page 7)
1. Drill a .313 mm (5/16 of an inch) diameter hole through the floor pan 76.2 mm (3 inches) rearward and .375 mm (3/8 of an inch) inboard of the left wheelhouse.
2. To ensure proper sealing of the hole, remove any dirt or foreign matter from around the hole on the underside of the floor pan where the sealer is to be applied.
3. Place sealer on the hole from the underside of the vehicle and assemble the bolt, anchor bracket, anchor washer and lock nut to the floor pan as shown. Tighten securely and make certain that the hole is completely sealed. Note: The two (2) 25.78 mm (1-3/8 inches) O.D. spacer washers are not needed for this installation.
4. Use Child Seat in the third seat - left seating position as directed in the usage instructions, latching the Child Seat top strap hook to the anchor bracket.
Fourth Seat - Not Recommended for 125 inch wheelbase 'G' Vans.
General Motors bulletins are intended for use by professional technicians, not a "do-it-yourselfer". They are written to inform those technicians of conditions that may occur on some vehicles, or to provide information that could assist in the proper service of a vehicle. Properly trained technicians have the equipment, tools, safety instructions and know-how to do a job properly and safely. If a condition is described, do not assume that the bulletin applies to your vehicle, or that your vehicle will have that condition. See a General Motors dealer servicing your brand of General Motors vehicle for information on whether your vehicle may benefit from the information.
