98040(A) - Special Policy - Rear Side Cargo Door Does Not Stay Open

| Subject: | 98040(A) -- SPECIAL POLICY - REAR SIDE CARGO DOOR DOES NOT STAY OPEN |
| Models: | 1996-97 CHEVROLET AND GMC G VANS WITH SIDE CARGO DOORS (RPO E24) |
| Attention: | THIS SPECIAL POLICY IS IN EFFECT UNTIL SEPTEMBER 30, 1999 |
THIS BULLETIN CANCELS AND REPLACES BULLETIN 98040 ISSUED SEPTEMBER, 1998. THE PARTS, SERVICE PROCEDURE, AND CLAIMS SECTIONS HAVE BEEN REVISED. ALL COPIES OF BULLETIN 98040 SHOULD BE DESTROYED.
Condition
Some customers of 1996-97 G vans equipped with side cargo doors (RPO E24) may comment about the rear side cargo door not staying open and/or the door contacting the rear quarter panel.
Cause
The original design did not have a feature to control an open door.
Special Policy Product Enhancement
This special policy covers the condition described above until September 30, 1999. Dealers are to install a rear side cargo door check link using the part number listed below. Use the following Service Procedure. This will be performed at no charge to the customer during this time.
Vehicles Involved
Involved are certain 1996-97 Chevrolet and GMC G vans equipped with side cargo doors (RPO E24) and built within the following VIN breakpoints:
Year | Division | Model | Plant | Plant Code | From | Through |
|---|---|---|---|---|---|---|
1996 | Chevrolet | G | Wentzville | "1" | T1000008 | T1044630 |
1997 | Chevrolet | G | Wentzville | "1" | V1000003 | V1097892 |
1996 | GMC | G | Wentzville | "1" | T1000010 | T1044627 |
1997 | GMC | G | Wentzville | "1" | V1000001 | V1097901 |
Parts Information
Part Number | Description | Qty/ Vehicle |
|---|---|---|
15011044 | Link Kit | 1 |
12475419 | Rivet (For Cargo Vans Only) | 8 |
Customer Notification
Customers will be notified of this special policy on their vehicles by General Motors (see copy of typical customer letter included with this bulletin - actual divisional letter may vary slightly).
Service Procedure
- Remove the rear side door trim panel from the vehicle, if equipped. Refer to Section 10A1 of the Service Manual.
- Remove the passenger body side trim panel from the vehicle, if equipped. Refer to Section 10A4 of the Service Manual.
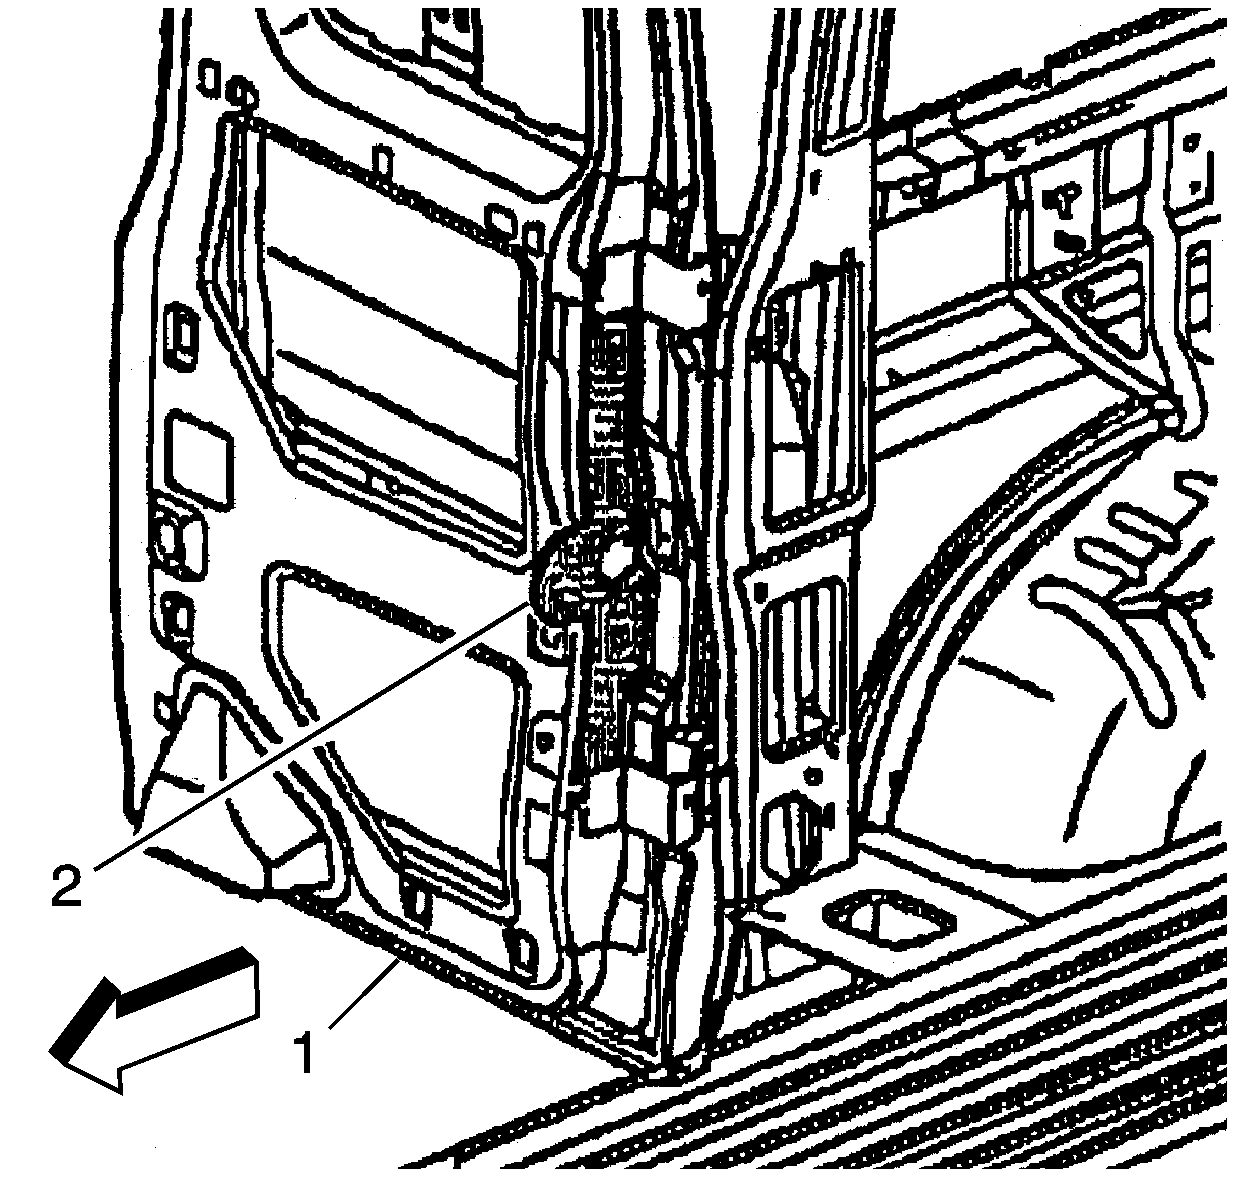
- Align the check link bracket mounting hole template (2) between the upper and lower side door hinges of the rear side door assembly (1).
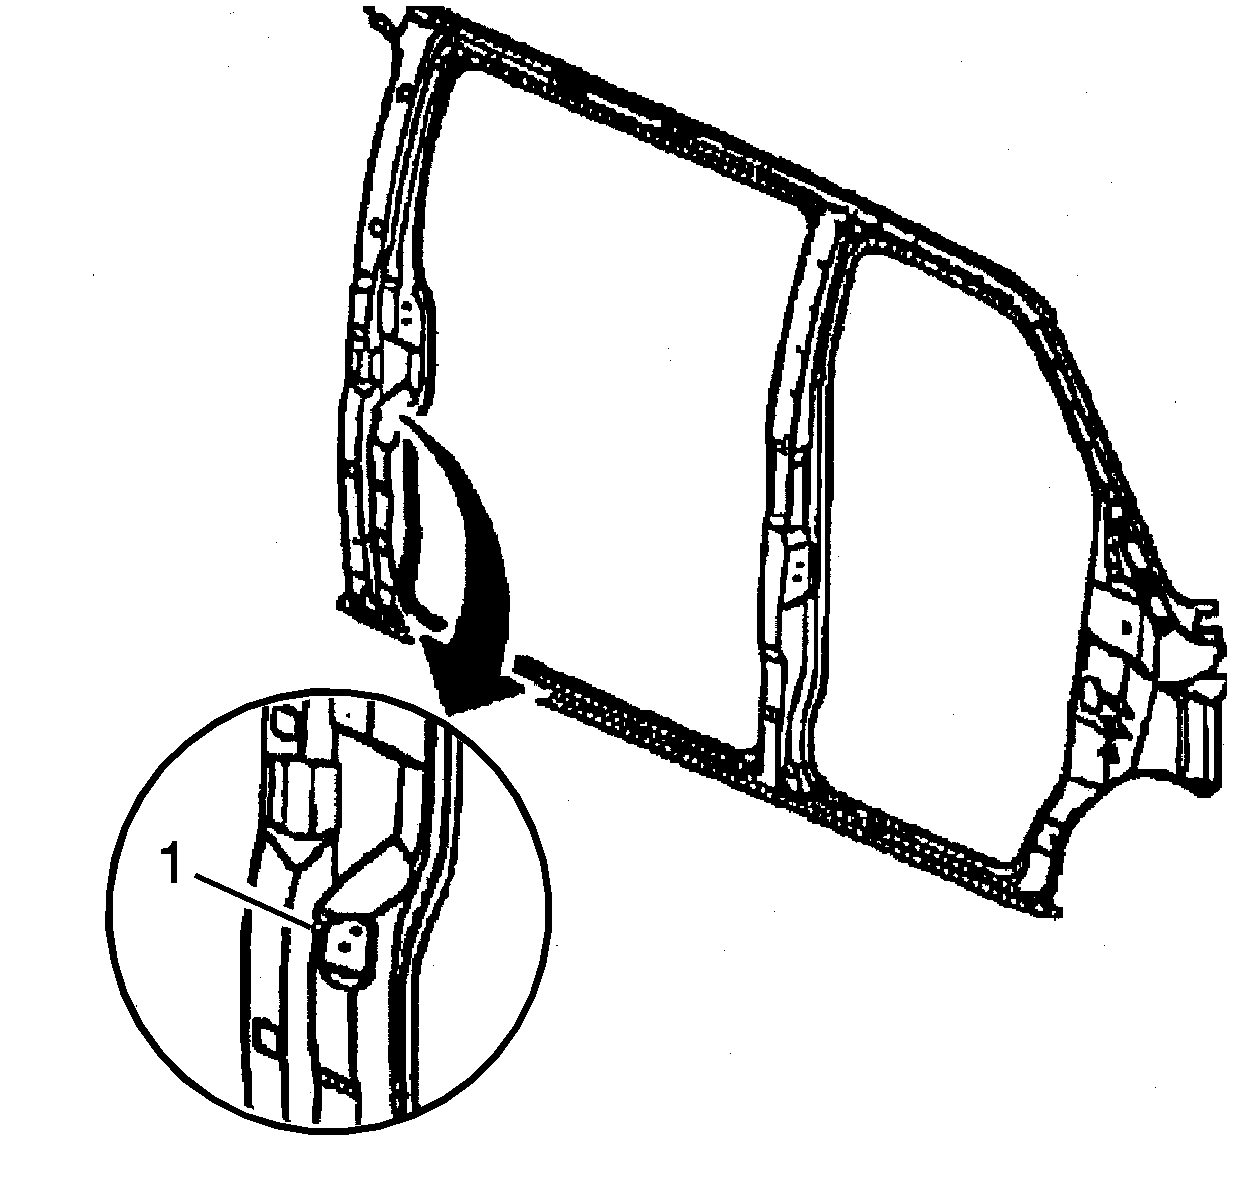
- Align the check link stud plate template (1) to the flat area at the rear of the side door opening across from the hole indicated on the side door template.
- Drill four 1/8 inch pilot holes for the check link bracket mounting studs at the points indicated on the rear side door template.
- Drill four 5/16 inch holes for the check link bracket mounting studs through the pilot holes drilled in Step 5.
- Drill four 1/8 inch pilot holes at the corners of the rear side door template for the check link access opening.
- Drill four 1/4 inch holes through the pilot holes drilled for the check link access opening in Step 7.
- Using a die grinder with a cut-off wheel, or the equivalent, cut along the lines on the rear side door template for the check link access opening in order to connect the 4 holes drilled in Step 8.
- Using a file or deburring tool, remove any burrs or sharp edges from the check link access hole in the rear side door.
- Remove the metal cutout and any other debris from the rear side door.
- Drill two 1/8 inch pilot holes at the point indicated on the template on the side door opening.
- From inside the vehicle, drill two 3/8 inch holes through the pilot holes. Partially close the rear side door in order to avoid damage to the rear side door when drilling these holes.
- Apply touch-up paint to all exposed metal edges.
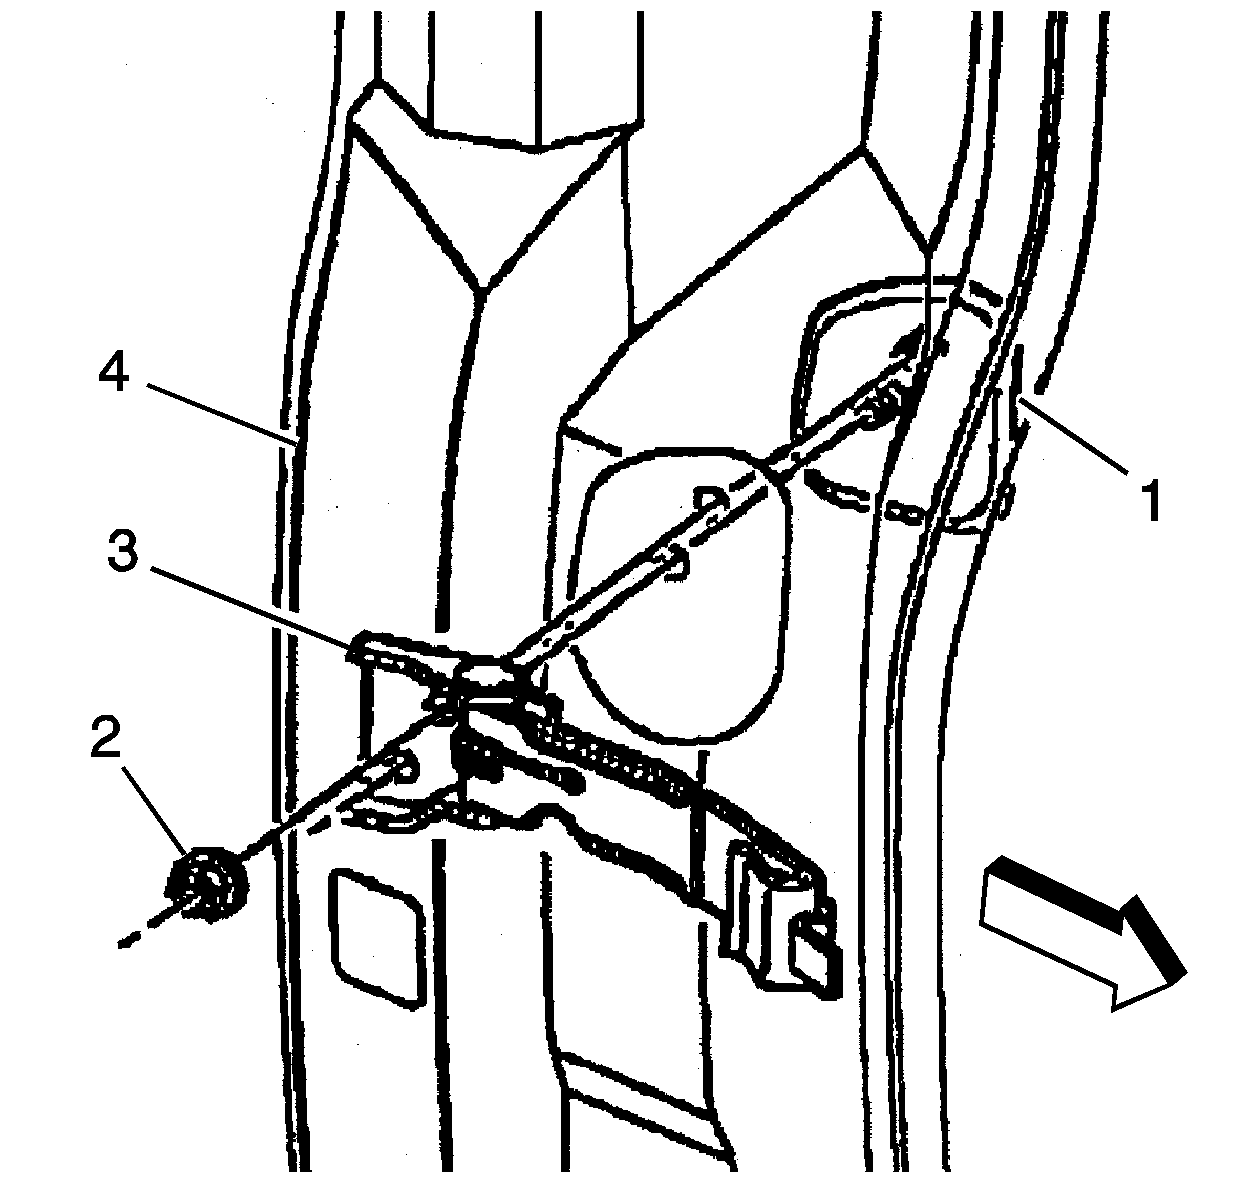
- Install the rear side door check link through the access hole in the rear side door.
- Install the check link stud plate (1) to the side door opening (4).
- Install the check link (3) to the studs.
- Install the check link retaining nuts (2) to the studs on the rear side door opening (4).
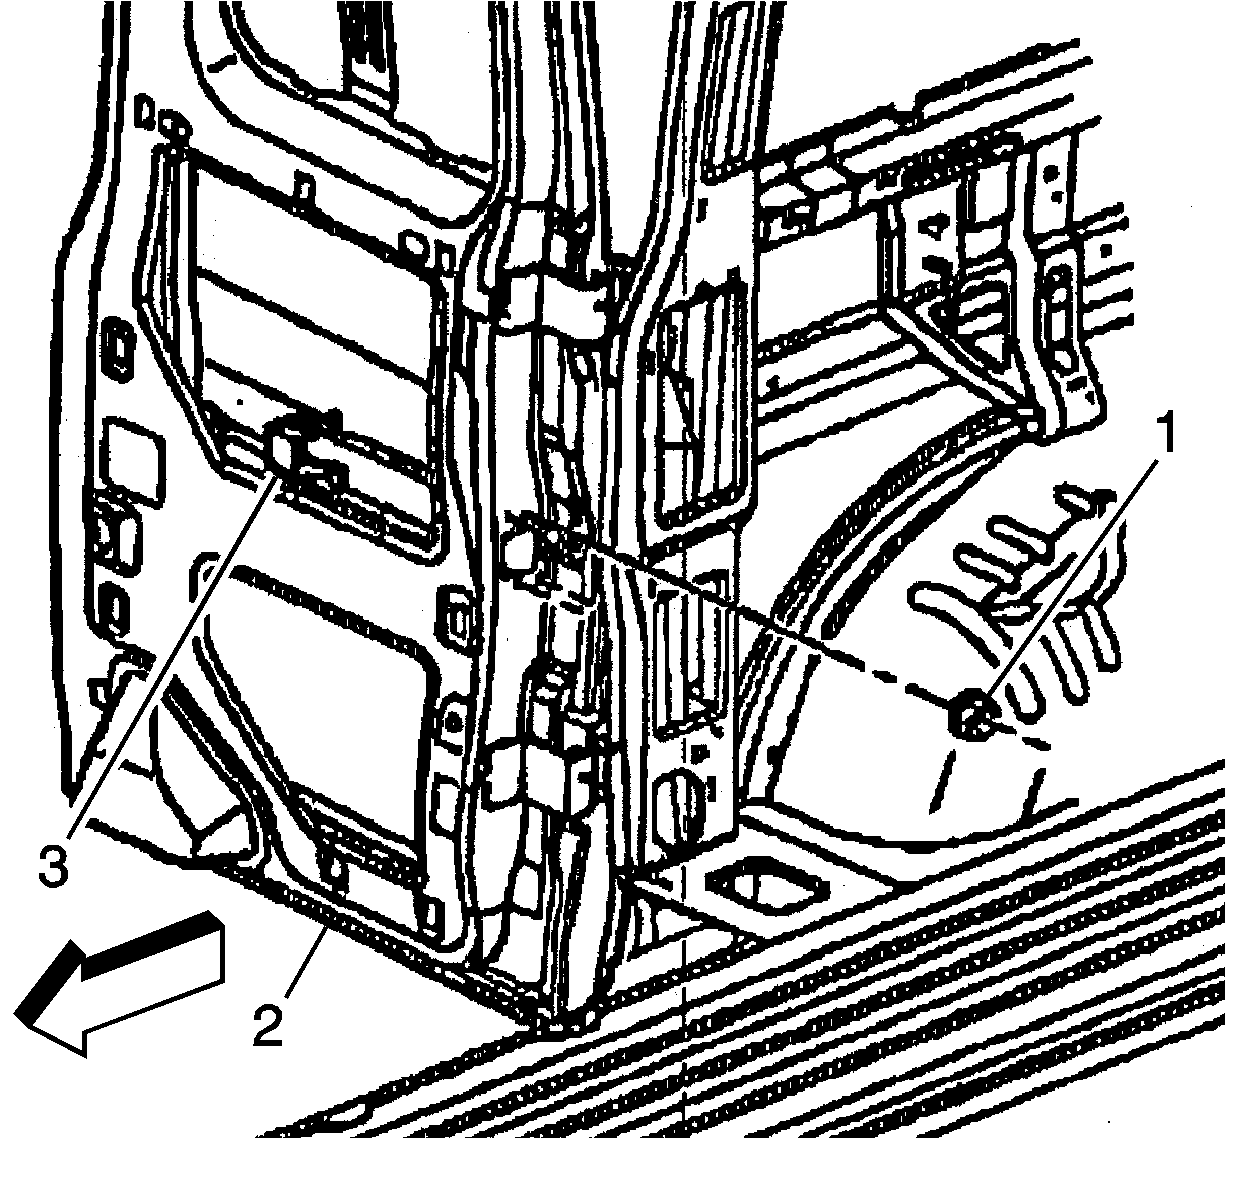
- Install the check link bracket (3) to the rear side door (2).
- Install the check link bracket retaining nuts (1) to the rear side door (2).
- Close the rear side door (2) in order to engage the check link to the check link bracket.
- Carefully open and close the door to ensure that the rear side door check link is operating correctly.
- Install the passenger body side trim panel to the vehicle, if equipped. Refer to Section 10A4 of the Service Manual.
- Install the rear side door trim panel to the vehicle, if equipped. Refer to Section 10A1 of the Service Manual.
| • | For 05 Model with YF7 (Upfitted Vans) and 06 Model (Passenger Vans) |
| • | Remove the rear side door trim panel from the vehicle by gently pulling on the top of the panel to release the retaining clips around the window opening. Lift the rear side door trim panel up and remove it from the door. |
| • | For 05 Models (Cargo Vans) with a black plastic close out panel |
| • | Drill out the rivet heads from the rear side door close out panel retainers. Remove the rear side door close out panel from the door close out panel retainers. |
Figure 1 - Check Link Bracket Mounting Hole Template

Figure 2 - Check Link Stud Plate Template

Caution: Standard shop practices, particularly eye protection, should be followed during these operations to avoid personal injury.
Important: Paint the check link to match the body color.
Figure 3 - Installing Check Link Assembly

Tighten
Tighten the check link retaining nuts to 30 N·m (22 lb ft).
Figure 4 - Check Link Bracket Installation

Tighten
Tighten the check link bracket retaining nuts to 12 N·m
(108 lb in).
| • | For 05 Model with YF7 (Upfitted Vans) and 06 Model (Passenger Vans) |
| • | Install the rear side door trim panel by aligning the tabs on the panel with the slots in the door. Lower the rear side door trim panel into place. Press on the top of the rear side door trim panel to engage the retaining clips. |
| • | For 05 Model (Cargo Vans) with a black plastic close out panel |
| • | Position rear side door close out panel to the door close out panel retainers. Install the rear side door close out panel to the door close out panel retainers with rivets. |
Claim Information
Important: This special policy is in effect until September 30, 1999. During the time that this special policy is in effect, the following labor codes and times should be used for claim submission.
Repair Performed | Model | Part Count | Part No. | Parts Allow | CC-FC | Labor Op | Labor Hours | **Net Item |
|---|---|---|---|---|---|---|---|---|
Install Link Kit | 05 Model (Cargo) | 9 | -- | * | MK-95 | T5511 | 1.1 | $4.28 |
Install Link Kit | 05 Model With YF7 (Upfitted) | 1 | -- | * | MK-95 | T5511 | 1.3 | $4.28 |
Install Link Kit | 06 Model (Passenger) | 1 | -- | * | MK-95 | T5511 | 1.3 | $4.28 |
* -- The "Parts Allowance" should be the sum total of the current GMSPO Dealer Net price plus 40% for link kit needed to complete the repair. **--The amount identified in the "Net Item" column represents the total of amount of material allowance. | ||||||||
Dear Chevrolet Express/GMC Savana Customer:
This letter is to inform you of a service update available at your Chevrolet/GMC dealer in the event you are dissatisfied with the operation of the rear side cargo door. This is the result of comments received about the rear side cargo door closing during loading and unloading of the vehicle when parked on an incline.
A service kit has been developed for the installation of a door check strap which will assist in keeping the door open while loading and unloading the vehicle. Your Chevrolet/GMC dealer has the necessary instructions, and the required parts kit is currently available. If you desire this improvement be made to your vehicle, please contact your Chevrolet/GMC dealer to schedule an appointment. This improvement will be available to you at no charge until September 30, 1999.
Your satisfaction with your Chevrolet Express/GMC Savana van is of the utmost importance to us and we have taken this action to ensure that your ownership experience is a pleasurable one.
Chevrolet/Pontiac-GMC Division
General Motors Corporation
